Archive for February, 2012

Install Mac OS X Snow Leopard on a PC using VMware

February 29th, 2012 by Admin

The following step by step guide will help you in installing Mac OS X 10.6 Snow Leopard as a guest virtual machine in Windows 7. You’ll need to have a system with an Intel processor which supports hardware virtualization, original OS X Snow Leopard retail disk, VMware Workstation 7 and Windows 7, Vista or XP installed as host operating system. If you meet all these requirements, you can then install OS X Snow Leopard in VMware under Windows and can enjoy the best of both worlds.
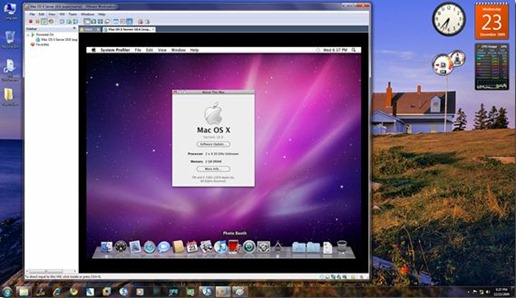

Note: We don’t in anyway encourage downloading Apple software via file-sharing / torrent sites and run it in an virtualized environment under Windows. This guide is for informational purposes only. If you like OS X Snow Leopard, Get a Mac.

Step 1: Download and install VMware Workstation 7.

Step 2: Click here to download pre-made modified version of Snow Leopard.vmdk and darwin_snow.iso files required to get this thing to work.

Step 3: Start VMware Workstation and open up “Mac OS X Server 10.6 (experimental).vmx” file which you downloaded in Step 2.
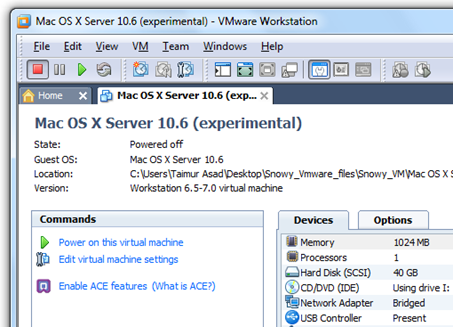
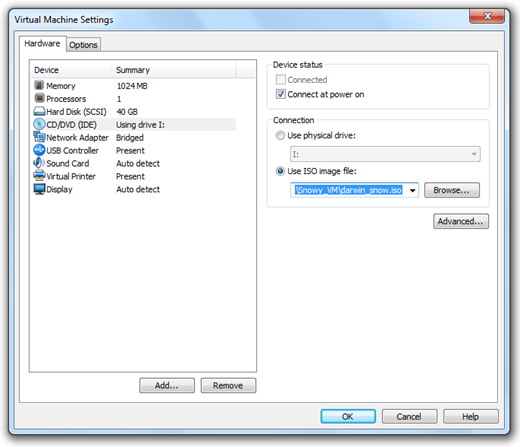
Step 4: Click on “Edit virtual machine settings”, select CD/DVD (IDE) option from left hand side and then and select “Use ISO image file” option. Point it to “darwin_snow.iso” which you downloaded in Step 2.
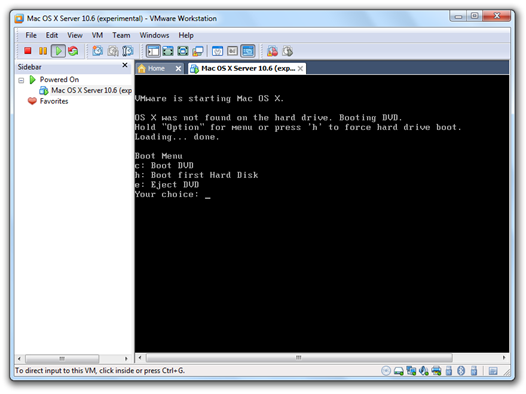
Step 5: Now power on the virtual machine and hit “F8” key. You should now have a screen similar to the one shown below.
Step 6: Now you’ll have to point your virtual machine to OS X Snow Leopard retail DVD instead of “darwin_snow.iso”. To do this, right click on CD/DVD option found in lower right most corner of your VMware window and select settings.
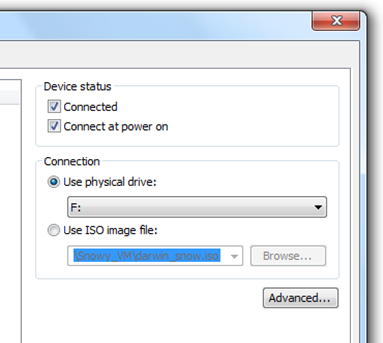
Insert OS X Snow Leopard retail DVD in your DVD drive and select the “Use physical drive” option.

Step 7: Now go back and select “c” option (Boot DVD) from the prompt which you got in Step 5 to boot from the OS X retail DVD. OS X boot screen with Apple logo should now appear. If the boot screen doesn’t appear for you, try booting it in verbose mode by pressing “F8” key after selecting “c” option, and then enter “-v” (without quotes). This will enable the system to boot OS X DVD using verbose mode.
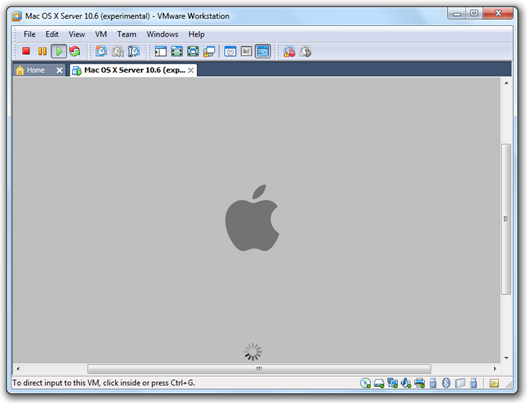
Step 8: Wait for a couple of minutes for the Installation Setup screen to show up. From here on, simply follow the onscreen setup instructions to install OS X Snow Leopard. Make sure you format your virtual hard drive in “Mac OS Extended (Journaled)” format using Disk Utility. Customize your installation with minimum set of printer drivers and language options for a lightweight trouble free installation experience.

Step 9: Once the installation is completed. System will automatically reboot. At this point, close your guest virtual machine and change your CD/DVD option again like you did in Step 2 to point it to “darwin_snow.iso”.

Step 10: Start the virtual machine again. Press “F8” key and select “h” option to “Boot first hard disk”. Voila! Snow Leopard should now be running live under Windows 7!
How to Reset Forgotten Root Password for Linux?

February 21st, 2012 by Admin

It happens sometime that you can’t remember root password. On Linux, resetting root password can be done by booting Linux under a specific mode: single user mode. This tutorial will show how to boot Linux in single user mode when using GRUB or LILO and finally how to change forgotten root password.

If your boot loader is GRUB, follow the procedure below to reset your lost root password:

  1. Select the kernel.
  2. Press the e key to edit the entry.
  3. Select second line (the line starting with the word kernel).
  4. Press the e key to edit kernel entry so that you can append single user mode.
  5. Append the letter S (or word Single) to the end of the (kernel) line.
  6. Press ENTER key.
  7. Now press the b key to boot the Linux kernel into single user mode.
  8. At prompt type passwd command to reset password.

You need to mount at least / and other partitions:
# mount -t proc proc /proc
# mount -o remount,rw /

Change the root password, enter:
# passwd

Finally reboot system:
# sync
# reboot

If your boot loader is LILO:
At LILO boot loader type linux single and press [ENTER] key:
Boot: linux single

When you get the # prompt you will need to type passwd root to reset password:
# passwd

Reboot system:
# sync
# reboot

If you need to reset forgotten Windows admin/user password, please refer to this software: Reset Windows Password.

Forgot Mac Password? 2 Methods to Reset Your Mac Password Easily

February 21st, 2012 by Admin

So you forgot your Mac password… uh oh. Don’t worry, it happens and you aren’t out of luck. You’ll need to reset the forgotten password and there’s several ways to do this, we’ll focus on the two best methods; one does not require a Mac OS X installer CD and is a great hack, and the other is much more simple if you happen to have a Mac OS X DVD laying around.

Method 1: Reset Mac Password without a CD

Using a pretty nifty trick you can reset a forgotten Mac password without a Mac OS X installer CD/DVD. The steps may seem a little intimidating at first but I assure you it’s easy if you follow them exactly, here is exactly how to do this in three stages:

Step 1) Boot into Single User Mode and remove a setup file

  1. Restart the Mac holding down the Command+S keys, this will take you into Single User Mode and it’s Terminal interface
    You’ll need to check the filesystem first:
    fsck -fy
  2. Next, you must mount the root drive as writeable so that changes will save:
    mount -uw /
  3. Now, type the following command exactly, followed by the enter key:
    rm /var/db/.applesetupdone
  4. After removing the applesetupdone file, you need to reboot, type ‘reboot’ and hit enter.

Step 2) Create a New User Account upon System Boot
You aren’t finished, but the hard part is now over – no more command lines, you’ll now be in the familiar Mac OS X GUI to finish the password reset process. In this step we just create a new user account as if you just got a new Mac:

  1. Upon reboot, you will be presented with the traditional “Welcome Wizard” startup screen just like when you first get a Mac.
  2. Follow the welcome wizard and create a new user account – making the account name different from the account whose password you want to recover.
  3. Continue on and boot into Mac OS X with this newly created user account, this new user account is an Administrator and has administrative access.

Step 3) Reset the Forgot Password via System Preferences
You are almost done, now you just need to reset the forgotten user account password using the Accounts control panel:

  1. Once you are booted into Mac OS X, click on the Apple logo and then navigate down to “System Preferences”.
  2. Click on the “Accounts” icon in System Preferences.
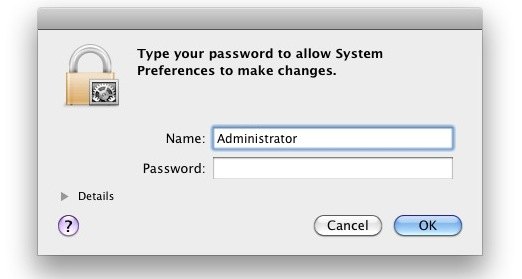
  3. Click on the Lock icon in the lower left corner of the “Accounts” preference window and enter the newly created user credentials, this enables you to change other user accounts and reset other users passwords.
  4. On the left side user panel, select the user account containing the forgotten password.
    With the user of the forgotten password account selected, click on the “Reset Password” button.
  5. Enter a new password for that user, be sure to include a meaningful hint so you don’t forget it again!
  6. Close System Preferences and reboot the Mac.
  7. You can now login to the previously inaccessible user account using the newly reset password! All user files and settings are maintained as before the password was forgotten.

Optional: If you’d like, you can delete the temporary account you created to reset the users password. This is wise for security purposes.

Here’s how this works: by deleting the .applesetupdone file, you are telling Mac OS X to re-run the setup wizard, which by default creates a new user account with Administrative abilities, which can then reset the forgotten password of any other user on the Mac. This is a great trick and excellent troubleshooting technique if you don’t have a Mac OS X installer CD/DVD laying around, which is pretty much the norm as many people tend to lose or misplace the installer disks that come with their computers. I have used this exact method multiple times to restore various Macs with forgotten/lost passwords.

Method 2: Reset Mac Password with the installer CD/DVD

Resetting a forgotten Mac password is easier if you have an installer disk handy, we have covered this tip before on it’s own:

  1. Boot from the Mac OS X installer disk by inserting it into the Mac and holding down the “C” key on boot.
  2. Select your language preferences and then under the “Utilities” menu select “Password Reset” (it may say “Reset Password” instead, depends on the version of Mac OS X).
  3. Select the hard disk that the forgotten password is on, then select the username of the forgotten password, you’ll then be asked to select a new password.
  4. Reboot as usual from the hard drive, using your newly reset password as the login!

This is obviously an easier method but it’s of no help if you own a MacBook Air with no DVD drive, or if you just don’t have the installer Mac OS CD laying around. If you’re in that situation, the best alternative is to use the above method that does not require a CD to reset the password.

If you have forgotten Windows admin/user password, you can take advantage of the Reset Windows Password utility to remove your lost password easily and quickly! Learn more at http://www.top-password.com/reset-windows-password.html

How to Set up PIN Logon in Windows 8?

February 10th, 2012 by Admin

Windows 8 introduces two new ways of authenticating yourself other than just using a text password. Now you can use a Picture Password, which uses gestures, as well as PIN code. In previous post I covered the details of picture password. Now I’ll show you how to set up PIN logon in Windows 8.

A PIN (Personal Identification Number) is almost the same as a password except you can only use numbers, and it must be 4 digits long—which doesn’t seem that secure, but there’s a chance they will allow longer PIN codes in future versions of Windows 8.

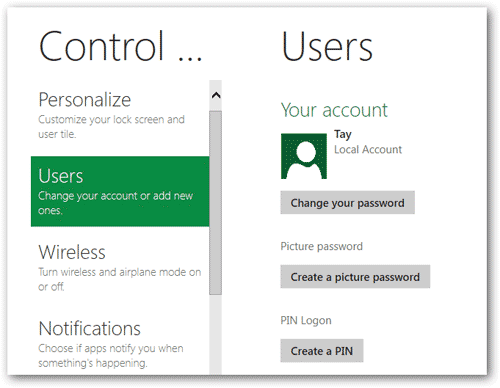
To setup a PIN, go to the Control Panel, click on Users, and then click on Create a PIN.

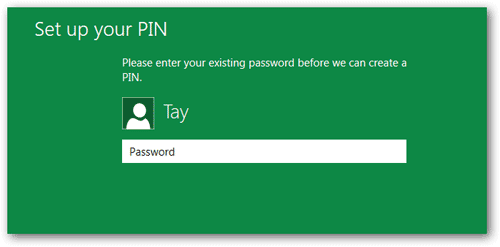
Now you will have input your password.

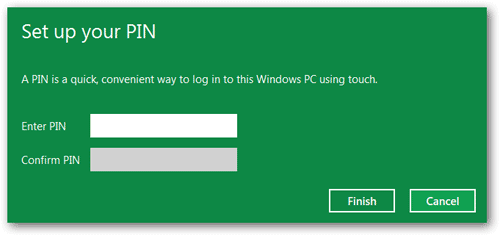
Now you will be asked what PIN you want to use, remember 4 DIGITS.

Now when you go to log in, all you have to do is input the 4 Digit number.

Keep in mind that you can continue using a text password to logon if you prefer. Even if you have forgotten the picture password, PIN digits or traditional text password, you can still take advantage of the Reset Windows Password utility to reset/remove the traditional text password. After log on your computer using the blank text password, you are allowed to setup a new picture password or PIN logon again.

How to Automatically Logon to Windows 8?

February 7th, 2012 by Admin

Personally, I find the feature of Windows 8 allowing users to disable the logon screen, as it was in prior versions. When you enter the password on the logon screen, it takes some time to load windows explorer and all startup programs. This can also be quite annoying and time consuming. So what is the solution?

There should be a way to automatically logon to Windows 8, so that when you hit the Power button and return a few minutes later, you won’t need to enter your password and then wait for all those startup programs to load. let us see how.

Automatically logging into Windows 8:

1. Press Win + R to open the Run command, type netplwiz and press Enter.

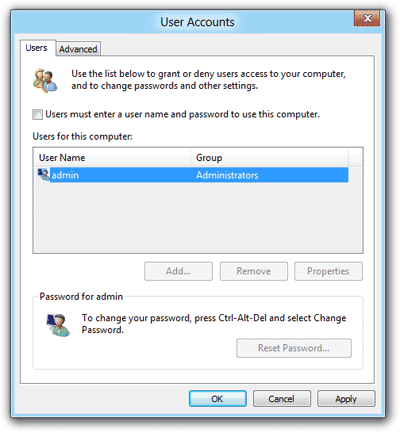
2. Under the Users tab, uncheck the Users must enter a user name and password to use this computer option, click Ok.

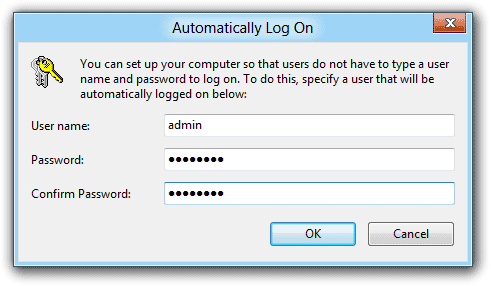
3. Now enter the password in Automatically Log On dialog window, click Ok, restart your Computer.

You won’t be prompted to enter your password again during login and no lock screen appears either.