Archive for June, 2012

How to Change Directory Service Restore Mode (DSRM) Password

June 7th, 2012 by Admin

Directory Service Restore Mode (DSRM) password is set during the installation of Active Directory on a server. This password will be required when you boot up your domain controller in Directory Service Restore Mode by pressing F8. DSRM is required to restore the Active Directory database. Since, DSRM is used very rarely, there are chances that administrators might forget the password. This post explains an easy method to reset your DSRM password without knowing the old one.

Resetting DSRM password is possible on Windows Server 2003 or Windows Server 2008 domain controller using NTDSUTIL command.

Follow below simple steps to reset DSRM passoword:

  1. Open the command prompt in administrative mode.
  2. Type NTDSUTIL and hit enter
  3. Type SET DSRM PASSWORD and hit enter
  4. Type RESET PASSWORD ON SERVER NULL and hit enter
  5. Now you type the password that you wish to configure and hit enter
  6. Retype the password and again hit enter
  7. Type QUIT and exit NTDSUTIL

Here NULL denotes the server that you are logged in. If you want reset DSRM password on a remote computer, type the computer name instead of NULL.

If you forgot DSRM password or domain administrator password, you can always reset the password using Reset Windows Password – A professional password recovery software which enables you to create a Windows password reset disk and reset lost local administrator, domain administrator and DSRM passwords easily.
 

How to Add a Computer to Windows Server 2008 Active Directory Domain?

June 7th, 2012 by Admin

This post is for newbies, for the people who are learning Windows Server and Active Directory administration. Follow below steps for adding a computer or a member server to Windows Server 2008 Active Directory based domain.

  1. Go to Run and type ‘NCPA.CPL’ and launch Network settings.
  2. Configure IP address, Subnet Mask, Gateway IP (if any) and DNS IP address.
  3. Ensure connectivity by pining to DNS server / Domain Controller.
  4. Right click on ‘Computer’ and click on properties. Click on ‘Change Settings’.
  5. Click on ‘Change’ button at System Properties.
  6. Select ‘Domain’ and provide domain name. In this example its ‘training’.
  7. Click OK and provide user name and password of Domain Admin  or any other authorized user name.
  8. Reboot the computer to enable the changes.

If your are getting any errors while adding the computer to domain, there seems to be connection issues with Domain Controller. Go to the AD server and check if it is functioning properly. Also check the DNS IP configuration at the client computer. It should be pointing to the correct AD / DNS server.

If you forgot domain administrator password for your Windows Server 2008 Active Directory, you can easily reset the password using Password Recovery Bundle 2012.

How to Run a Program with Administrator Rights on Windows 7/Vista/XP

June 6th, 2012 by Admin

How to run a program with administrator rights on Windows 7/Vista/XP: Typically when you launch a program that requires administrative rights in Windows 7 or Vista, you are prompted for administrator credentials to continue. Sometimes, programs that were designed for older systems such as Windows XP may not even run or could be limited in functionality if they are not launched with administrator rights. In the following tutorial, I’ll cover the process of launching a program with administrator credentials. In addition I’ll show you how to make it so that programs are automatically launched with administrator rights and how to ensure that they run compatible with Vista if the program was produced for an older version of Windows.

How to run a program with Administrator Rights on Windows 7/Vista/XP:

  1. Browse to the program you would like to launch as an administrator.
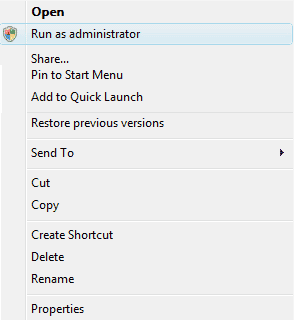
  2. Right click the program icon and select the option to “Run as administrator“.

If all works well when the program is running as administrator, you can opt to always run the program as administrator. In addition, you might want to run the program in compatibility mode for an older version of Windows.

How to set a program to always run as administrator:

  1. Locate the program you want to launch with admin rights.
  2. Right click the program icon and choose the properties option.
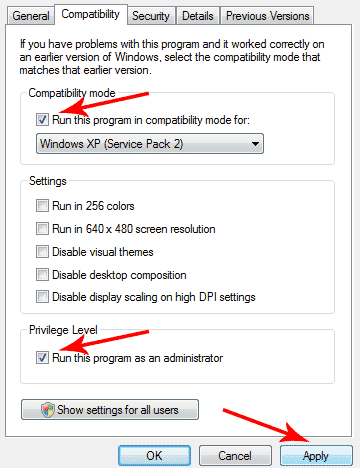
  3. Select the compatibility tab from the window that appears.
  4. At the bottom of the window, under privilege level, check the box to run this program as administratorNote: you may also want to run this run this program in compatibility mode if it was originally created for another version of Windows such as Windows XP. To do this simply check the box to run this program in compatibility mode for: and then select the compatible Windows environment from the drop down menu.
  5. Once finished setting your options, click Apply to accept the changes.

Enjoy!

How to Create a Password Reset Disk in Windows 7

June 6th, 2012 by Admin

In Windows 7 there is a feature under User Account in Control Panel that allows you to create a password reset disk, what it does is simply create an encrypted key and store that key on a removable media. It can be used when you literary forgot your password of this account that you login to Windows 7 and all you need to do is have this piece of removable media available insert it into your Windows 7. It will then let you reset the password if you have the right encrypted key. It’s a good idea to create one for yourself or for your elderly parents who tend to have bad memories on their password.

Here is How to Create a Password Reset Disk:

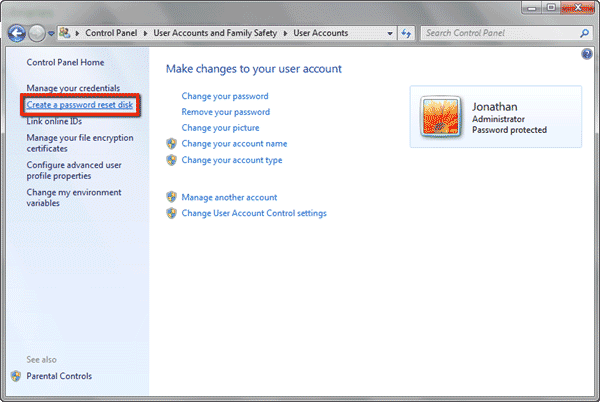
First go to Control Panel > User Accounts and Family Safety > User Accounts

On the left menu bar, click on “Create a password reset disk

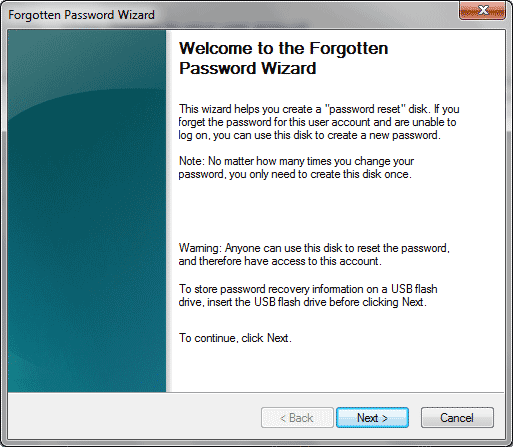
This will launch the Forgotten Password Wizard, now at this step you need to make sure to have a USB flash drive or Floppy available. (A blank CD or DVD will not work apparently)

Otherwise you will get an error like this. Once you have the USB stick ready, insert it to your machine and proceed to the next step of the wizard.

Since it’s already 2011 I wonder what kind machine will even have floppy disk. So I used a USB disk as an example here.

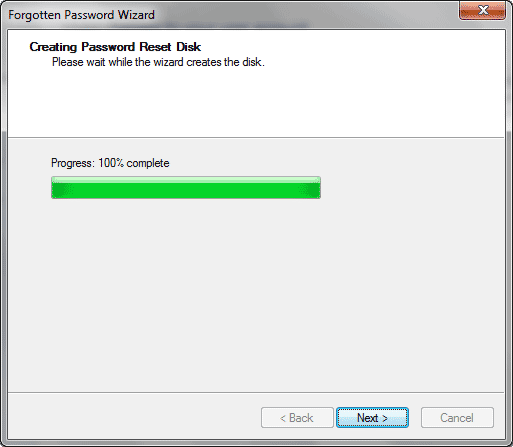
It will ask you to type the current password for the account that you are logged in to check and generate a encrypted key and store the key on the USB stick.

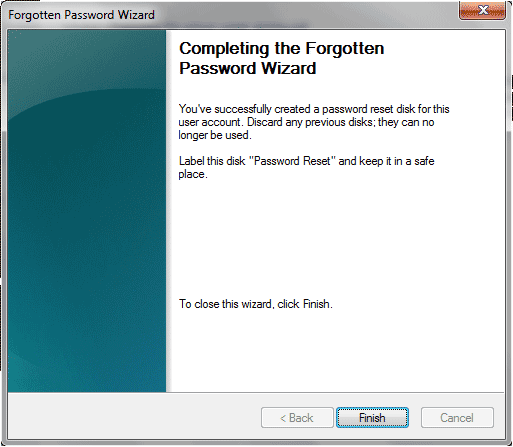
Once it’s finished you are safe to remove the USB stick. The only thing you need to make sure is don’t lose this USB stick !

Now you can click on “Reset password” in the login screen of Windows 7 if you’ve typed your password wrong or forgot your password.

Note:  Forgot Windows 7 password and don’t have a password reset disk? You can still reset Windows 7 password by using a professional Windows password recovery utility – Reset Windows Password, which allows you to create a universal password reset disk for removing forgotten Windows login password on any computer.

How to Recover Windows 7 Password Using Ophcrack

June 4th, 2012 by Admin

Forgot Windows 7 password and can’t log on to your local account on the laptop or desktop? I believe that you’ve faced this issue several times. There are tons of free tools which can be used to recover Windows 7 password. One of the most popular software is Ophcrack, which can run from a CD or USB drive and enable you to recover Windows 7 password without reinstalling.

Note:  Ophcrack is only intended for computer geek, not ordinary, nontechnical folk. For average computer users, the most efficient and easiest way is to use Reset Windows Password utility.

Ophcrack is a free (open source) Windows password cracker/recovery tool based on rainbow tables. It is a very efficient implementation of rainbow tables done by the inventors of the method. It comes with a Graphical User Interface and could be used to recover Windows 7/Vista/XP password.

How to Recover Windows 7 Password Using Ophcrack?

  1. Download the Ophcrack from the official website. When you go to Ophcrack download page you will notice there are LiveCD ISO’s for Windows 7 and Windows XP. Based on the operating system of your locked computer download the ISO for that operating system (Windows 7 or XP). It won’t hurt to download both because you never know when you might need them.
  2. Burn the ISO image on to a CD. It will create a bootable CD for you. I use BurnCDCC for this. You can use anything you like.
  3. Now put the CD into the CD-ROM and make sure you set CD/DVD as the first boot device inside the computer BIOS.
  4. When it boots from the CD, you will see the list of the accounts on the computer.
  5. The machine will do its thing and just leave it. After a while, you will see password has been recovered and displayed on the screen beside the accounts those are not password-protected.
  6. After you see it – remember it just reboot the machine and you should be able to log on to Windows 7 system.

How to Recover Windows 7/Vista/XP Product Key with Ease

June 3rd, 2012 by Admin

There could be number of occasions when you need to recover product key from installed Windows OS. If you are geek enough you may dig into Windows registry to find product key but for normal users it may not be possible to recover easily.  So how to recover lost Windows product key without having to buy a new copy of Windows?

In this tutorial I’ll show you how to recover Windows 7/Vista/XP product key with ease.  To get started,  we need to use a popular key finder program – Product Key Finder. It enables you to recover lost Windows product keys and backup them to prevent from losing your valuable licenses.

How to Recover Windows Product Key

  1. First you need to download Product Key Finder onto your computer and then install it.
  2. Launch Product Key Finder program and then click Start Recovery button. Choose the From current system option.
  3. The program will decrypt and recover your lost Windows product key immediately.
  4. Last you can click the Save To File button to save the recovered product key to a file for safe keeping.

Product Key Finder can also help you recover product keys for other software such as Microsoft Office, SQL Server, Exchange Server, Visual Studio, VMWare, Adobe Reader, etc.

Windows 8 Release Preview Is Released and Available to Download

June 3rd, 2012 by Admin

Windows 8 Release Preview, also known as Release Candidate, is officially released the last day in May with ISO images in 13 languages available to download to the public. Since it’s the last version before the next version of Windows is heading over to RTM, what you will see in this version will be pretty much what you will get in the final release. All surprises will be revealed by now so if you have been waiting you should give it a try now.

According to Microsoft, the final phrase of the RTM process will kick start in about 2 months.

System Requirements

  • 1G or faster Processor
  • 1G (32-bit) or 2G (64-bit) of RAM
  • 16GB (32-bit) or 20GB (64-bit) of free hard drive space
  • Microsoft DirectX 9 graphic device with WDDM driver

To experience the most out of Windows 8, a touch equipped device that supports multi-touch like Tablet is recommended.

Additionally, to access Windows Store and to download and run apps, you will need a screen that has the resolution at least 1024 x 768.

To snap apps, you need a screen resolution of at least 1366 x 768.

Download link

The direct download link for English version of ISO images:

Windows 8 Release Preview 64-bit (English) – 3.3GB

SHA1 hash – 0xD76AD96773615E8C504F63564AF749469CFCCD57

Windows 8 Release Preview 32-bit (English) – 2.5GB

SHA1 hash – 0x8BED436F0959E7120A44BF7C29FF0AA962BDEFC9

More downloads for different languages can be found here.

The product key for this Release Preview is also made available to the public:

TK8TP-9JN6P-7X7WW-RFFTV-B7QPF