Archive for July, 2012

Windows 8 Release Date Confirmed as October

July 11th, 2012 by Admin

Microsoft has revealed that it will be releasing Windows 8 to the public this October, as previously planned.

Speaking at Microsoft’s Worldwide Partner Conference this week, Tami Reller, VP of Microsoft, explained that the Windows 8 release date was set for late October and the RTM (release to manufacturer) date was penned in for the first week of August.

Microsoft had hinted that it would look to release Windows 8 in October, but this is the first time the company has given any sort of confirmation.

Tablet Time

Reller also revealed that Microsoft has sold 630 million Windows 7 licenses to date, which is a 30 million uplift in sales from the company’s previous announcement in June.

There was also some talk of Microsoft Surface, but nothing concrete on the tablet’s release date.

Interestingly, Steve Ballmer did say that Surface was only a small part of Microsoft’s tablet strategy – and that the company will be relying on partners to release tablets with Windows 8 inside. The biggest rumour so far is that Samsung will be one of the first to release a Windows 8 RT tablet.

Price-wise, it is thought Microsoft Surface will be comparable to other ARM-based tablets.

2 Ways to Reset Lost iPhone Password

July 10th, 2012 by Admin

Setting a password on your iPhone is an effective method for protecting your personal data. However, if your password is lost it can be a real problem. The conventional method of bypass iPhone password is to restore your phone to factory default using iTunes. This will reset the lost password but will also delete all of your data. Is there a way to reset iPhone password without losing your data?

In this article I’ll show you 2 easy ways to reset lost iPhone password. Each of them has its own advantages and disadvantages.

Method 1: Reset iPhone Password by Restoring to Factory State

  1. Plug your iPhone into your computer using the bundled USB cable. iTunes will launch automatically.
  2. Select your iPhone from the “Devices” menu in iTunes. Select the “Summary” tab and click “Restore”.
  3. Click “Don’t Back Up” when prompted to back up your data, as this will not work without your password. Click “Restore”.
  4. Wait while your iPhone is reset. It will display “iPhone is activated” when complete.
  5. Click “Restore from the backup of” and select “iPhone” from the drop-down list. This will only work if you’ve previously backed up your data. Click “Continue”. Your data will be restored.
  6. Set up password protection on your iPhone once again if desired.

Method 2: Reset iPhone Password without Losing Data

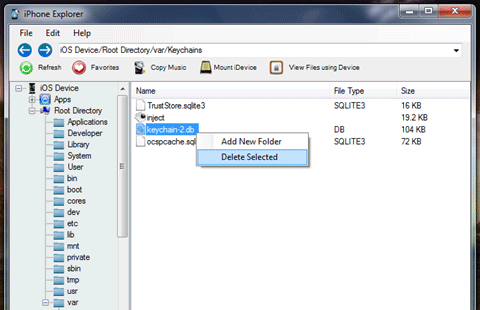
For jailbroken devices, the root access that comes along with a jailbreak can also be very useful in the case the user forgot the iPhone password. The process involves gaining access to the var/KeyChains root directory and deleting the keychain that holds the password information.

To achieve this, you’ll need a method of gaining root access into your device, either via wireless SSH or a free program like iExplorer. Please note that this method will require your device to be already jailbroken and OpenSSH installed if you plan on using wireless SSH. This method may also fail if your device was jailbroken using limera1n and you haven’t reinstalled the afc2add service.

The following steps utilize iExplorer (download here) to remove the password on your iPhone or iPod Touch without losing data, for both Windows and Mac.

  1. Connect your powered-on device to the PC/Mac using USB cable.
  2. Launch iExplorer and select Root Directory from the left hand pane.
  3. Navigate to var > Keychains.
  4. Within Keychains, locate the one titled keychain-2.db. Right-click on it and Delete Selected.
  5. Disconnect your iPhone from the computer, power it off and power back on. The password would be removed without affecting your personal data or settings.

How to Recover Email Password from Outlook 2010/2007/2003

July 10th, 2012 by Admin

I have Outlook 2010 configured on my home PC and I want to configure it on my laptop, however, I cannot remember the password. How to recover email password from Outlook?

MS Outlook is a really good email, contact and calendar management tool which allows you to add and access an unlimited amount of POP3/IMAP/HTTP accounts. But what if you forgot the passwords of email accounts you have setup in Outlook? How to recover and backup email password from Outlook 2010/2007/2003 in case you have to reinstall Windows or Outlook application?

Forgot Outlook password? You can still see your Outlook email account settings except the password. For security reason, Outlook application intelligently hides the password using stars (asterisks or dots). In this article I’ll show you how to recover email password from MS Outlook 2010/2007/2003 if you forgot Outlook password.

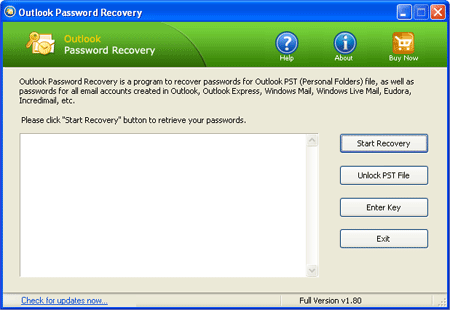
What you should do first is to download and install Outlook password recovery program on your computer, then follow the steps below to recover your forgotten Outlook email password.

How to Recover Email Password from Outlook:

  1. Launch Outlook Password Recovery program.

  2. Click the Start Recovery button.
  3. The program will instantly recover all types of MS Outlook passwords: SMTP, POP3, IMAP, HTTPMAIL, LDAP.

The recovery steps are so easy that even kids can do it. Just one click and Outlook Password Recovery program will automatically search your Outlook profiles and recover Outlook password instantly.

How to Crack Windows XP Password

July 8th, 2012 by Admin

Forgot your Windows XP password? The computer won’t recognize your password which you set up some weeks ago and you’re locked out of Windows XP? Try to repair Windows on your laptop but it is asking for administrator password? How to recover or crack the password?

You can find a variety of ways to crack Windows XP password, but most of them are complicated and time consuming. However, I highly recommend that you create a Windows XP password cracking disk which is not only easy to create, but also simple to crack your password.

How to Crack Windows XP Password:

  1. Download the self-extracting package of Reset Windows Password utility. Unzip the download file, then burn the ISO image file: ResetWindowsPwd.iso to a CD or USB flash drive.
  2. Insert the password cracking disk into your locked Windows XP computer. Let the computer to boot from it. To do this you may have to enter into BIOS and set CD or USB as the first boot device.
  3. It may take a minute for the bootdisk to load some required system files and launch the Reset Windows Password utility.

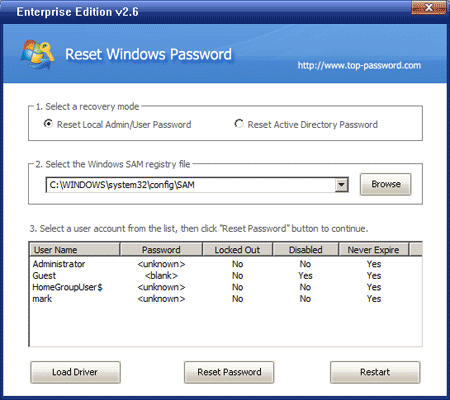
  4. On the main screen of Reset Windows Password utility, you can choose the Windows SAM registry hive. The program will display all user accounts inside the SAM database.
  5. Choose a user account whose password you want to crack, then click Reset Password button to remove your forgotten password.

Reboot your computer and remove the password cracking disk, you’ll be able to login Windows XP user account without being asked for a password. The password cracking procedure is so simple that even a complete computer novice can crack Windows XP password in minutes. What’s more, the password cracking disk can also be used to crack Windows 8/7/Vista/2008/2003/2000 password.

How to Change SATA Hard Disk Mode from AHCI / RAID to IDE in BIOS

July 7th, 2012 by Admin

When you install Windows XP on a SSD or SATA hard disk, Windows installer may give you a blue screen on boot. There is also a problem when we’re going to boot a crashed computer from Windows PE bootdisk to repair your computer, the Windows PE bootdisk may can’t recognize your SATA hard drive. What’s the root cause of these problems? Let me uncover the real truth and offer an easy way to get around this issue.

Windows XP is incompatible with SATA?

SATA is a new type of interface that connects hard drives to computers’ mainboard (motherboard) and replaces the older IDE standard. As of 2009, SATA has replaced IDE in most desktop and laptop computers. The difference between a SATA hard drive and the old IDE drives, among other things, is that SATA can provide for a faster data rate and speed.

This should not affect you unless you just bought a new computer with SATA hard drive and then decided that you want to install your old version of Windows XP on that instead of the new Microsoft Windows 7 operating system that it comes with.

Well the problem is that your good old Windows XP installation CD, when it was made, never knew about SATA drives so obviously, it doesn’t include the driver. When you try to install your operating system, you will notice that the installation procedure fails and usually a blue screen is displayed declaring a missing driver for the hard drive.

Solution to fix the compatibility issue:

No reason to worry. There is a very easy solution that will make the SATA hard drive act as if it were an IDE one. By following the simple steps below, you can put your computer into SATA Compatibility mode and once again be able to use your Windows XP operating system.

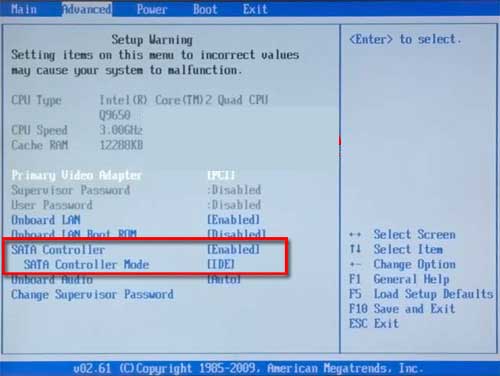
  1. Turn on your computer. While the computer starts keep pressing and releasing the F2 button to enter the BIOS setup utility.  (Some computers may use a different key to load BIOS such as Del, F1, F12, Esc, etc. )
  2. When you enter BIOS, navigate to the Advance menu and under that section choose SATA Controller Mode.
  3. Change SATA controller Mode to [Compatibility].
  4. Save the new settings and exit BIOS. Let your computer start up.

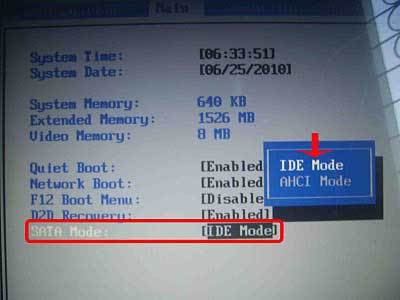
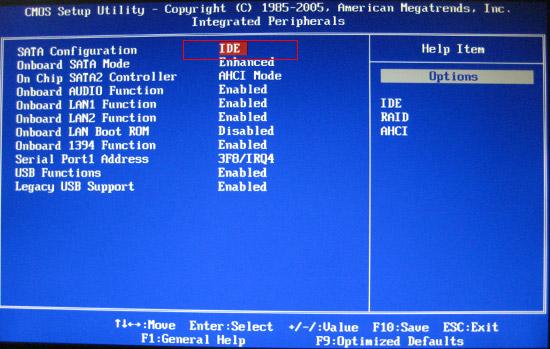
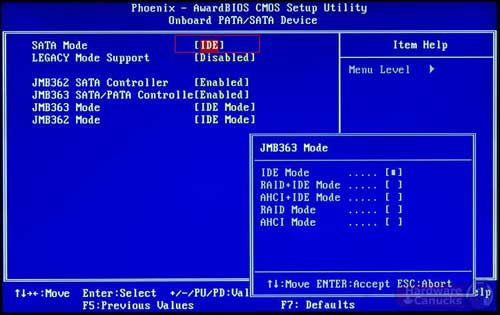
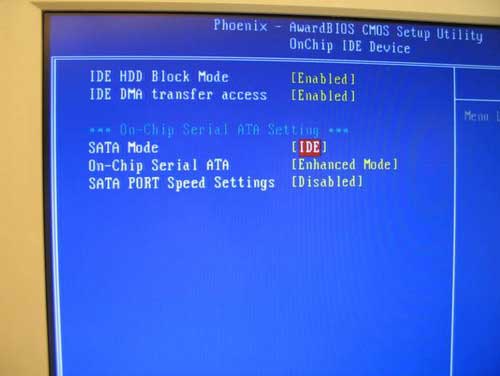
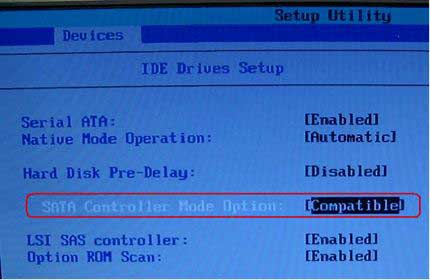
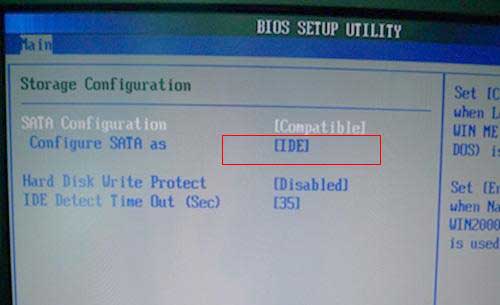
The exact menu option in your motherboard’s BIOS may differ but look for phrases like “SATA Configuration”, “SATA Mode”, “SATA Controller Mode”, “SATA Operation”, “Configure SATA as”, etc. Change SATA mode from AHCI / RAID to IDE compatible mode.

Restart your computer. The SATA drive will be emulated as an IDE drive. Everything should be working again.

PS: Take a look at the following pictures, you should be able to find out how to change SATA mode in different BIOS:

Ultimate Guide to Make Windows 7 Run Faster

July 6th, 2012 by Admin

After the debacle of Windows Vista on different performance issues, Microsoft was under a deep pressure and stress to get into the league of repeating the success that it made with Windows XP.

Windows 7 was engineered to answer all shots of questions that Windows Vista raised during its time period. The factor on which Windows 7 in cashes the market as compared to its predecessors is Speed. Special attention was paid by Microsoft team for making Windows 7 run faster than the previous operating systems (Windows XP, Windows Vista).

Although Windows 7 is much faster than Vista but still a lot of users tend to find the OS not convincing enough to accept that fact, there are different reasons that come into play if you are experiencing a slow windows 7 performance. A lot of users have upgraded Windows 7 on their Old PC’s. Installing Windows 7 on a old PC can not give you that soothing and satisfactory experience as compare to having Windows XP on them in past. The possible reasons for that is the enhanced hardware requirements that Windows 7 demands.

If you are having a slow Windows 7, there are some tweaks with the help of which we can optimize Windows 7 to the maximum possible extent. So, for all those who are looking forward to tweak their Windows 7 here is a top 5 steps that we are going to discuss.

So lets start the ultimate guide to make Windows 7 run faster.

Step 1 : Disable the Search Indexing feature of Windows 7

The Search Indexing service in Windows 7 index’s to keeps track of the files so that they can be found quickly when asked at some other time. This feature is useful only if you perform frequent searches on your system. Most of the Windows 7 users do less searches in there system.

For occasional file searchers the Search Indexing service in Windows 7 is a total resource hog. It unknowingly eats up your system resources. What you need from windows 7 is maximum performance from it then I would certainly recommend you to disable this resource hogging Windows 7 Search Indexing Feature.

  • Right Click the “Computer” Icon in the desktop and select “Manage”.
  • Click “Services and Applications” in the “Computer Management” window.
  • Click on “Services”.
  • You can see a lot of services listed there. Look for “Windows Search” in that.
  • Right Click on “Windows Search” from the list and choose “Properties”.
  • The “Windows Search Properties Window” will open up. From “Startup type” click on the drop down menu and choose “Disabled”.
  •  Click “Apply” then “OK” and that’s it. The Windows 7 Search Indexing Feature is now disabled.

Step 2 : Disable the Aero Theme to make Windows 7 faster

The aero user interface certainly adds some “Eyecandy” to Windows 7 but certainly is a resource hog especially when, what you expect from windows 7 is more performance juice. Aero user interface squeezes your graphics or video card to its maximum. Disabling the aero theme alone in Windows 7 will really speed things up.

  • Right Click on your Desktop and select “Personalize” click the Window Color Tab.
  • Uncheck the Box saying “Enable Transparency” and then click on “Open classic appearance properties for more color options”.
  • Then a window will open up. Apply a Standard or Basic theme from it. The Standard Windows 7 theme is more preferred.

Step 3: Disable the unwanted Visual Effects to make Windows 7 run faster

There are many unwanted visual effects that can be safely disabled to speed up windows 7.

  • For this right click on “Computer” and select “Properties” from the right click menu.
  • Click on “Advanced System Settings” from the left pane to open up the “System Properties” window.
  • Select the “Advanced” tab from it. Then Under “Performance” click “Settings”. Choose “Custom” options from it.
  • Now untick all the options and select only the last four options (actually three only needed; you can untick the second option from the last four). See the screen shot if you have any doubt.
  • Now just logoff your system and turn logon.

Step 4: Disable the unwanted services to make Windows 7 run faster

There are many services in windows 7 that we don’t require for our daily use. There are some exceptional cases though. Services such as “print spooler” is only needed when we use a printer. If we use a printer only occasionally we can safely turn off that service in Windows 7 and turn it on only when we need to take a print.

Step 5 : Disable the User Account Control (UAC) feature in Windows 7

The User account control (UAC) feature in Windows 7 is very annoying though it says it can protect your computer from harmful virus activity etc. But if you are a daily user of your computer this windows 7 feature will be a total nuisance to you.

  • From the Control Panel open the “User Accounts and Family Safety” > User Account.
  • Click the User Account Control settings link.
  • Now just Drag the Slider towards “Never Notify”.
  • Click “OK” and Reboot your system.
How to Reset Mac OS X Password with a Installation CD

July 5th, 2012 by Admin

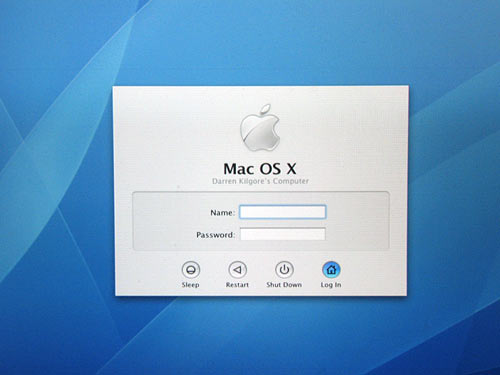
If you cannot remember your Mac administrator password, you may need to recover or reset your password to log onto your system. Although you can change passwords within Mac OS X, resetting a forgotten password requires that you use a Mac OS X installation disc. The installation disc allows you to create a new password for the administrator account so that you can gain access to your system again.

Let’s say you totally forgot the password to log on to your Mac. Or maybe you purchased a used Mac from someone else and they’ve got it locked down. Follow the steps below you can reset Mac OS X password easily with a installation CD.

Step 1

Insert your Mac OS X CD into your computer’s optical drive and reboot the computer. Hold down the “C” key as the computer starts to boot the computer using the CD.

Step 2

Click to select your language when prompted and click the right arrow icon. Click “Utilities” on the toolbar and select “Password Reset”. Select your system hard drive and choose the original administrator account name from the drop-down menu. Type a new password for the account and reenter the password to confirm. Type a password hint if you wish.

Step 3

Click “Save” to change the password and click the red icon on the top of the window to exit. Click “Mac OS X Installer” on the toolbar and select “Quit Mac OS X Installer”. Restart your computer when prompted.

Note:

If Mac OS X prompts you for the new password each time you log in, you can change this setting from the “Keychain Access” utility. Click “Edit” and select “Keychain List”. Select your previous administrator key chain and select “Delete”. You can add your new password in the key chain at the next login.

Reset Domain Controller Password on Windows Server 2008/2003/2000

July 4th, 2012 by Admin

My company has a remote location with a rogue domain controller in which no one has the password for. This was set up by my predecessor who was fired and never told anyone the password.  I want to migrate this location to our national domain, and it is currently in production at as a file server and print server also. My question is how can I safely reset the password on this server?

There are many password reset tools out there, that will allow you to reset Windows local passwords, but I haven’t come across one before, that will let you reset the password of a domain admin account on a domain controller. In this tutorial I will walk you through how to reset the domain administrator password on Windows Server 2008/2003/2000 domain controller.

Reset Windows Password is the software that can help you instantly regain access to your domain controller by resetting the forgotten domain administrator password. The software comes as an ISO image, which you have to burn to a CD or USB drive. As long as you have physical access to the domain controller, you can easily reset domain controller password on Windows Server 2008/2003/2000.

How to Reset Domain Controller Password:

  1. Download the zip archive of Reset Windows Password utility. Unzip it and burn the ISO image to a blank CD or USB stick.
  2. Insert the CD or USB stick into your locked computer and let your computer boot from it.
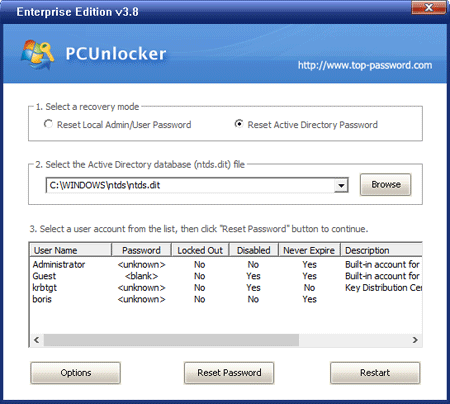
  3. After a while the bootdisk will launch the Reset Windows Password utility, which shows all user accounts available for your Windows installation. By default the Reset Local Admin/User Password option will be selected, the program will display a list of Windows local user accounts. The Reset Active Directory Password option is intended for resetting domain administrator password on domain controller. So we choose the Reset Active Directory Password option.
  4. The program will display a list of domain user accounts on your domain controller.
  5. Choose the user account whose password you forgot, then click Reset Password button. The domain user password will be changed to Password123 by default.

The last step is to remove the CD or USB stick, then restart the domain controller. You’ll be able to log into your domain user account with the new password. After logging into domain controller you can set a new password for the administrator account.

How to Remove Excel Workbook Password for Free

July 3rd, 2012 by Admin

How many times have you forgotten password of a Microsoft Excel workbook/sheet and then had a sinking face?


Microsoft Excel has a protection feature that allows users to lock a workbook or sheet with a password. When the Excel workbook/sheet is protected with a password, any user attempt to edit data shows an error message as follow.

Here comes an handy Excel plug-in called Excel Password Remover utility which can remove the password protection from Excel workbooks and spreadsheets. You can install the plug in by downloading it from here. Once installed, it adds options Unprotect workbook and Unprotect sheet to Excel’s Tools menu, and choosing these options does what they are meant to.

Download Excel Password Remover

Note:

To install the plugin you should set security level of Macros to medium by following the menu Tools->Macros->Security in Microsoft Excel.

Excel Password Remover can’t be used to remove password set to open a spreadsheet. If you are unable to open the file because it asks you for a password, this program won’t help you. Then you need to get this Excel Password Recovery program to crack the file open password.

How to Repair Windows 7 Installation

July 3rd, 2012 by Admin

Every operating system needs an occasional repair job, and Windows 7 is no exception. Whether the source of the problem is corrupt data, a particularly brutal piece of malware, or some other serious issue, you’ll occasionally have to reinstall your copy of Windows.

Wiping your hard drive and performing a fresh installation can be a huge headache; but fortunately there’s a way to repair a corrupt Windows 7 installation while keeping all your programs, personal data, and user accounts intact. This article will show you how to do a repair install to fix Windows 7 issues.

Step 1

Put the Windows 7 installation disc in the CD drive and Click on Setup.

Step 2:

Then Click on “Install Now“.

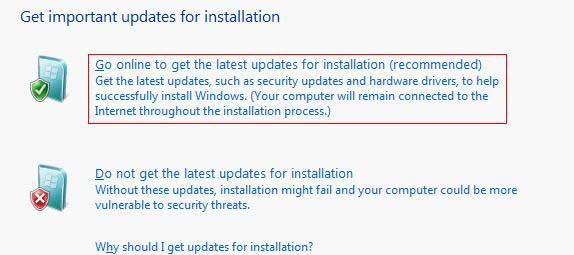
Step 3:

Now click on “Go Online and get the latest updates for Installation“, then it might take few minutes to download the critical updates and apply them depending upon your Internet speed.

Step 4:

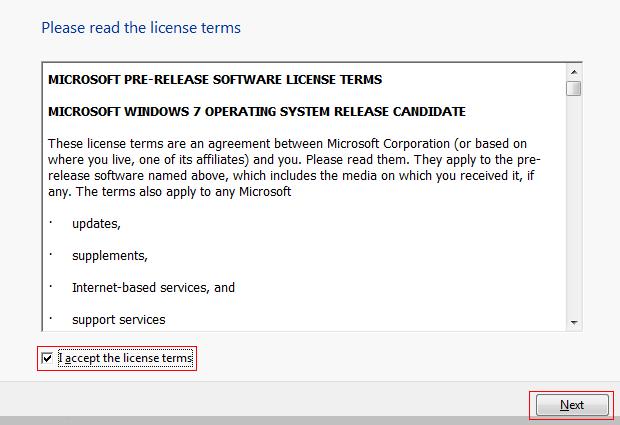
Then Accept the Terms and Conditions and Click Next.


Step 5

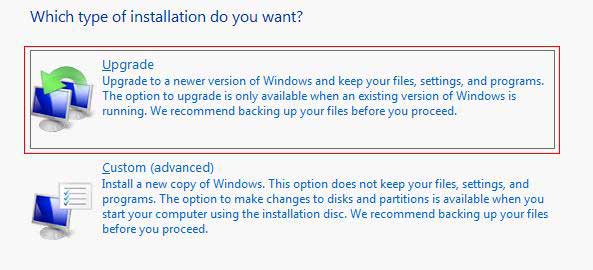
Now click on “Upgrade” to begin the Repair.

Step 6:

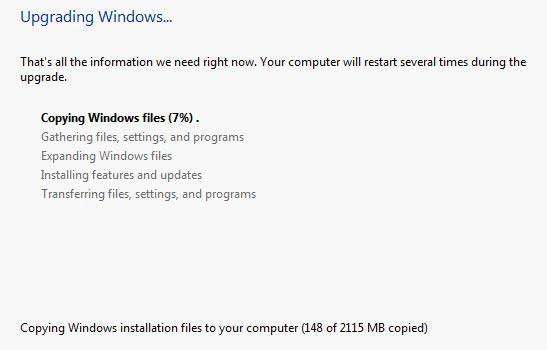
Once the Repair is complete the setup will reboot your computer.

Step 7:

You need to activate your Windows 7 and do the initial setup like setting up date time etc.

Step 8:

In case your missing any user setting copy them from C:\Windows.old folder or under C:\$INPLACE.~TR and C:\WINDOWS.~Q backup folders ( Thanks to Shawn Brink, MVP for the Tip).

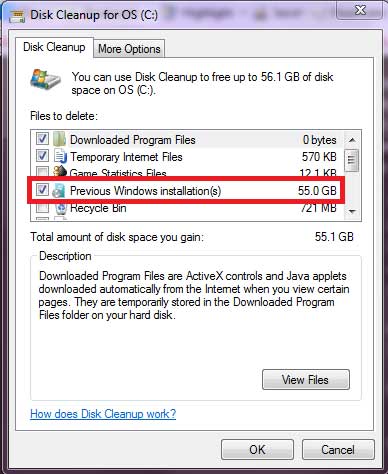
Make sure you enable Hidden Files folder. Once you confirmed everything run the Windows Disk Cleanup to remove the old installation files.

select “Files discarded by Windows Upgrade“.

Congratulations, you’ve successfully brought your Windows 7 PC back from the brink of corruption! Make sure to keep this guide handy, in case you ever need to repair a corrupted copy of Windows 7 again.

Note: If the Upgrade option is unavailable for some reason, you can still perform a repair by using a simple workaround: Right-click the Setup.exe file before you run it, and select the Properties menu. From there, navigate to the Compatibility tab, and check Run this program in compatibility mode for:. Then select Windows Vista (Service Pack 2) from the drop-down menu. Be sure to also check the box at the bottom labeled Run this program as an administrator; then click OK. Run the Setup utility again, and the upgrade installation option should be available.