Archive for October, 2012

How to Copy and Paste Files Across Remote Desktop

October 23rd, 2012 by Admin

There are occasions when you need to copy or transfer files between your local and remote computers via remote desktop. However the copy and paste generally doesn’t work. The well-known solution is to enable drive mapping in remote desktop, so you can access your local drive from the remote computer. But it will expose your personal local drive to that computer, which can also lead to virus attack.

Actually, you can make the copy and paste function work by starting the Rdpclip utility. Rdpclip (remote desktop clipboard) is responsible for providing copy/paste functionality over a remote desktop connection, which is available in all versions of Windows. To regain the copy and paste function, you’ll need to manually restart the Rdpclip.exe utility.

How to Copy and Paste Files Across Remote Desktop?

  1. Click Start, type mstsc in the Run box to start up a remote desktop connection dialog.
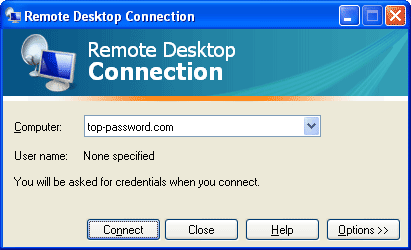
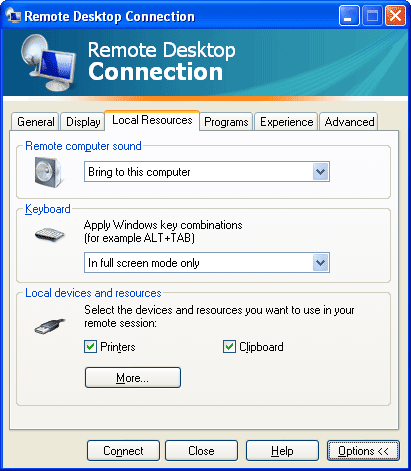
  2. Then expand the dialog by clicking on Options, then check the Local Resources tab.
  3. Make sure the Clipboard is checked, so the Rdpclip utility will be automatically started in your remote computer after setting up a remote desktop connection.
  4. The next step is to launch the Rdpclip utility on your local computer. Just click Start menu, type rdpclip in the Run box, press Enter key. The program will run in the background.
  5. Now you should be able to copy and paste files from your local computer to a remote desktop session, drag and drop files from the remote desktop machine to your local machine.

If the copy and paste function still does not work or stops working all of a sudden, you may need to kill the Rdpclip process and start it again.
How to Disable Prompt for Password on Wake Up from Sleep/Standby

October 22nd, 2012 by Admin

The prompt for user password upon wake up from sleep, standby or hibernate is a feature provided in Windows 7/Vista/XP for security reason. But if you are the sole owner of PC and you do not have any threat from someone gaining access to your PC then you might find this feature an annoying one and may want to disable it. It’s easy to disable the prompt for password when computer wakes up from sleep, standby or hibernate in Windows 7/Vista/XP.

How to Disable Password Prompt on Wake Up in Windows 7?

  1. Go to Control Panel –> Hardware and Sound –> Power Options.
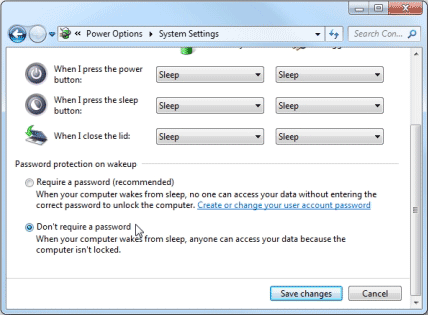
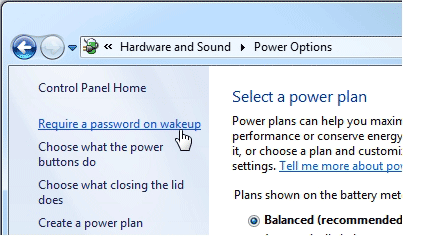
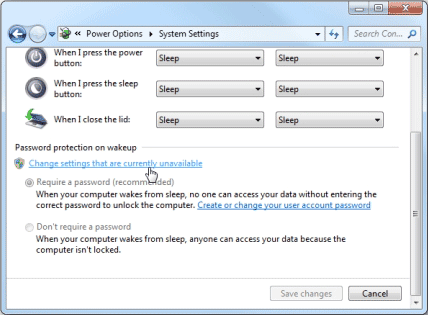
  2. On the left side, click the Require a password on wakeup option. You navigate to System Settings as shown in the breadcrumb.
  3. Click the Change settings that are currently unavailable link under the Password protection on wakeup section. This will enable the two options below the link.

  4. Select the Don’t require a password option.
  5. Click the Save changes button.

How to Disable Password Prompt on Wake Up in Windows Vista?

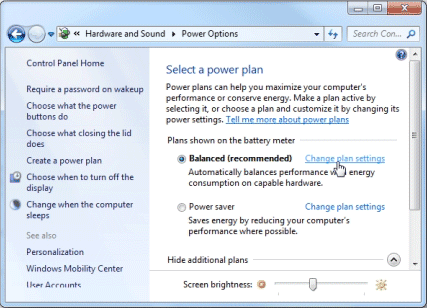
  1. Go to Control Panel –> Hardware and Sound –> Power Options.
  2. Find the power plan you’re using, and then click the Change plan settings link
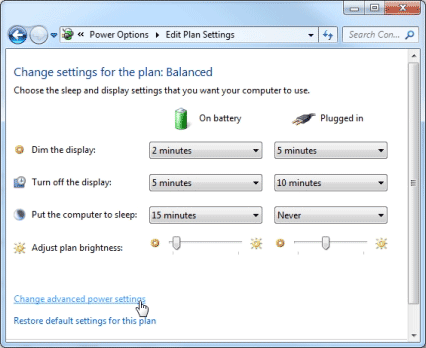
  3. Click the Change advanced power settings link. The Power Options dialog box is displayed.
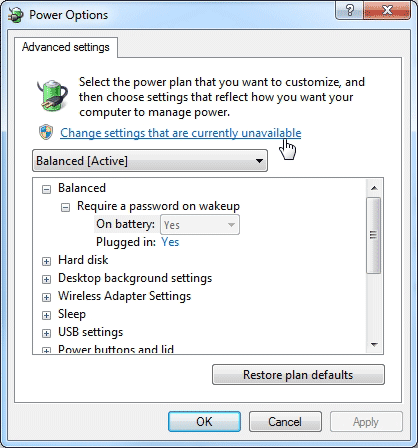
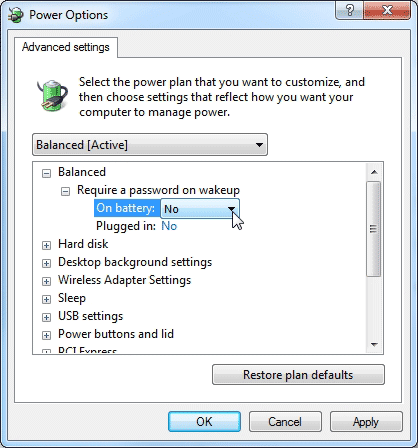
  4. Click the Change settings that are currently unavailable link. This will enable the On battery drop-down list in the list box.
  5. Select No from the On battery drop-down list under the Require a password on wakeup node.
  6. Select No from the Plugged in drop-down list below the On battery drop-down list.
  7. Click OK.

How to Disable Password Prompt on Wake Up in Windows XP?

  1. Click Start, and then click Control Panel.
  2. Click Performance and Maintenance.
  3. Click Power Options.
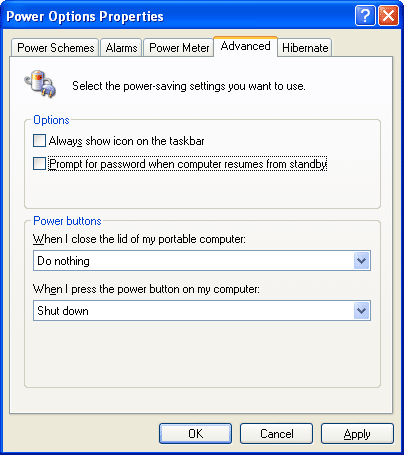
  4. Click Advanced tab.
  5. Under the Options section, uncheck the check box for Prompt for password when computer resume from standby option.
After re-configuration, Windows won’t prompt and ask user to enter a password on resume or wake up from sleep or standby state anymore.

How to Remove Windows Vista Password

October 20th, 2012 by Admin

I have a friend who just bought a desktop computer with Windows Vista. Her daughter create a login ID with a password (as the administrator) but she forgot the password. How can I remove this password?

How to remove Windows Vista password when you forgot it? Whether you have forgotten your own password, or you want to help others remove forgotten Vista password, here is a very easy trick or method, which does not require you to go through complex steps to remove Windows Vista password. Reset Windows Password utility is the fastest and easiest way to remove a Windows Vista password. All you have to do is create a password removal boot CD and insert it into your computer, the tool does the rest for you.

How to Remove Windows Vista Password?

1. Download the Reset Windows Password utility. Unzip the download file, you’ll get the CD ISO image: ResetWindowsPwd.iso, which contains a Windows password removal program.

2. Write the boot CD ISO image to a blank CD using a CD writer and CD writing program. If your computer doesn’t have a CD drive, you can burn the ISO image to a USB flash drive using ISO2Disc.

3. Insert the freshly-written boot CD into the computer whose password needs to be removed. Restart the computer and boot from the CD.

4. After booting from the CD, it will load the operating system inside the CD and start the Reset Windows Password program.

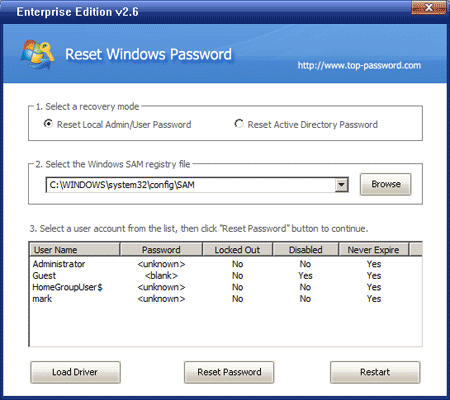
5. Select the SAM registry hive from the drop-down list, it will display a list of local user accounts for your Windows installation.

6. Choose the user account whose password you forgot, then click on the Reset Password button, it will remove your forgotten password immediately.

7. Exit the password removal program and restart your computer. You can then log on Windows Vista with a blank password.

Besides removing Windows Vista password, you can also use the boot CD to remove forgotten login password in Windows 8/7/XP/2008/2003/2000.

How to Perform Active Directory Offline Defragmentation

October 19th, 2012 by Admin

The Active Directory database tends to become fragmented over time, just like any other database does. Although Windows Server 2008/2003/2000 performs behind-the-scenes online defragmentation periodically, this defragmentation only moves data around the database file (NTDS.DIT) and doesn’t reduce the file’s size – the ntds.dit database file cannot be compacted while Active Directory is online. If you have significantly fewer objects in AD than you had previously, you can shrink the size of the ntds.dit file by performing an offline defragmentation.

Tips: If you forgot domain administrator password in Active Directory and can’t log on the domain controller, you can reset/unlock any domain user account passwords easily with Reset Windows Password utility.

Performing an offline defragmentation can increase performance, however, the main reason would normally be to free up disk space. Please note, you should backup your database before doing this by copying your ntds.dit to another location.

How to Perform Active Directory Offline Defragmentation?

First, you need to stop the Active Directory Domain Service. You can defrag / compact the ntds.dit database file when AD is not running. It’s not necessary to reboot into Directory Services Restore Mode.

After the services have been stopped, open a Command Prompt on the server, and enter the following commands:
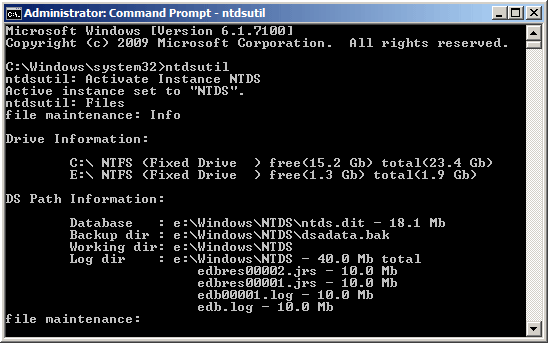
NTDSUTIL
Activate Instance NTDS
Files
Info

At this point, you should see a summary of the files that are used by the Active directory database. To begin the defragmentation process, enter the following command:
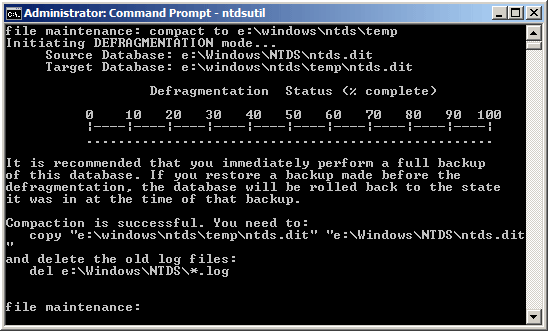
Compact to e:\windows\ntds\temp
The command shown above assumes that you have created a folder named Temp beneath the e:\windows\ntds\temp folder.

When the process completes, you need to do what it says and copy the defragged database from e:\windows\ntds\temp\ntds.dit to e:\windows\ntds\ntds.dit.

Finally, restart the Active Directory Domain Services (the dependency services will restart automatically). You now have a smaller and better performing Active Directory.

How to Backup Windows Server 2008 Active Directory

October 19th, 2012 by Admin

Backing up Active Directory is essential to maintain an Active Directory database. A system state backup is particularly important for disaster recovery purpose in case of a accidental corruption or deletion of Active Directory objects. Since Windows Server 2008, you won’t find the well-known ntbackup.exe, the native backup tool in previous Windows versions. Instead, you use Windows Server Backup, the new native backup solution, which is available as an installation option in all versions of Server 2008.

Tips: If you forgot domain administrator password in Active Directory and can’t log on the domain controller, you can reset/unlock any domain user account passwords easily with Reset Windows Password utility.

In this tutorial we’re going to demonstrate the steps of backing up Windows Server 2008 Active Directory. To get started, you need to install Windows Server Backup from the Server Manager, so you can then use it to perform a system state backup.

Part 1: Install Windows Server Backup

  1. Go to Start menu, and then select Administrative Tools, click on Server Manger.
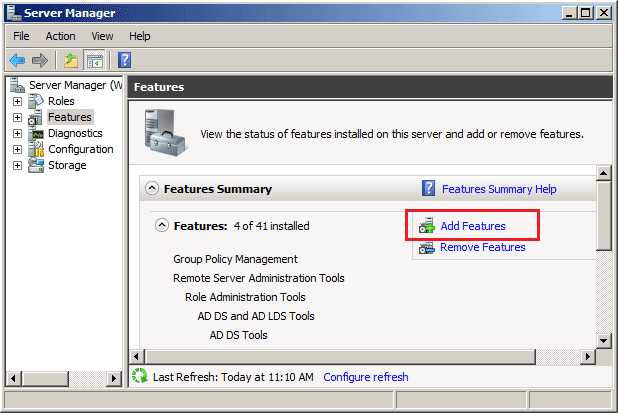
  2. Under Server Manager window, click on the Add Features link from the features summary section.
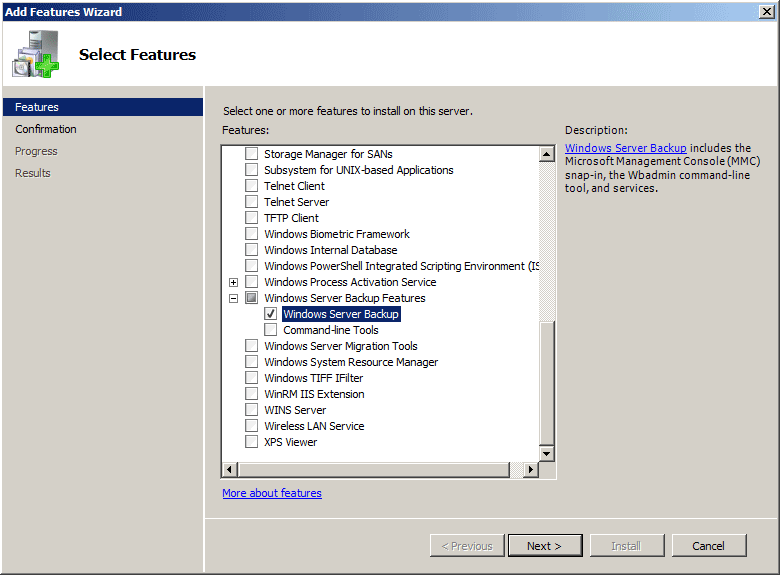
  3. Select the Windows Server Backup Features, and then click on Next. The Command-line Tools allows you to perform a DC backup and recovery from the command line.
  4. Click on Install to complete the installation.

Part 2: Backup Windows Server 2008 Active Directory

Now that we have Windows Server Backup installed lets perform our first backup of Active Directory in Windows Server 2008.

  1. Go to Start menu, and then select Administrative Tools, click on Windows Server Backup.
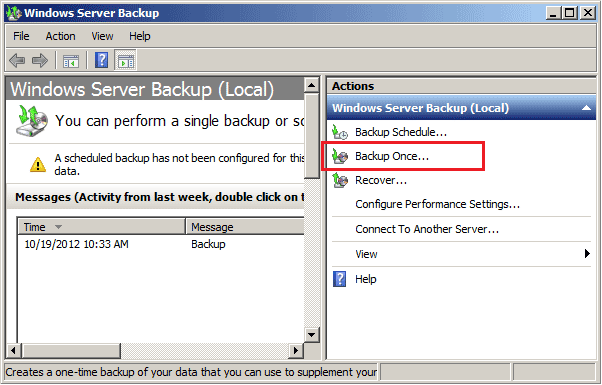
  2. Select the Backup Once option to perform an immediate backup as illustrated in the screen below.
  3. It will bring up the Backup Once Wizard, select Different Options and then click Next.
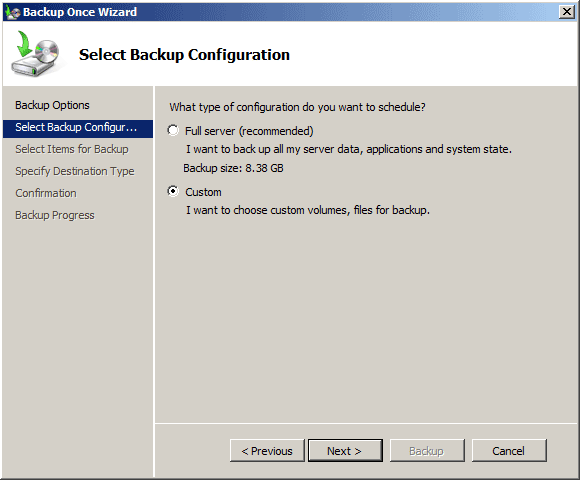
  4. If you want to perform a full backup of your server, click on the Full server option. Now we’re going to perform a system state backup, so we choose the Custom option.
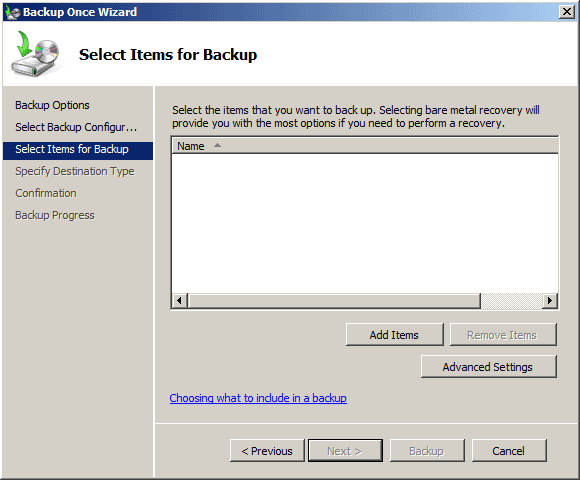
  5. In the next window, you can customize the items you want to backup.
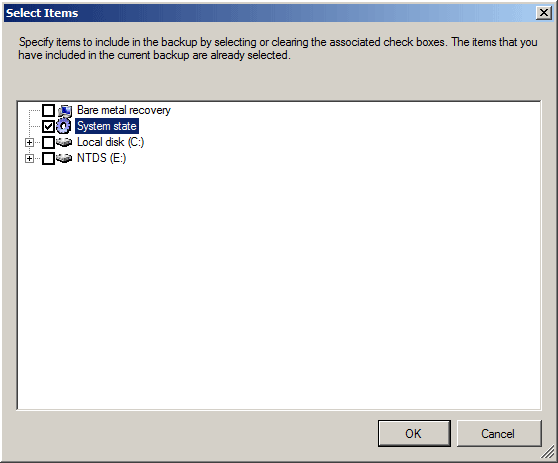
  6. Click on Add Items button, check the System state option from the list. You can also choose to backup the entire NTFS volume on your computer.
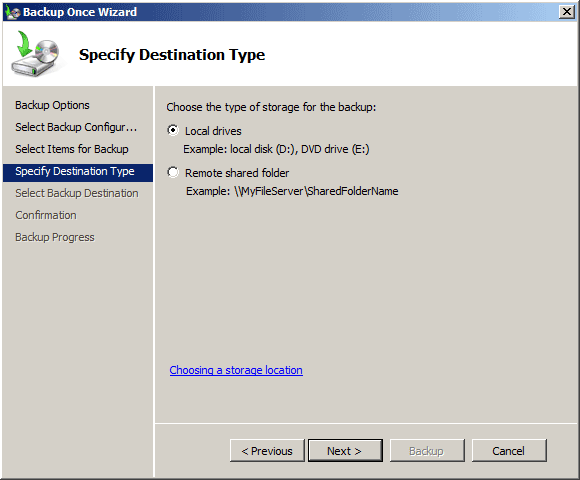
  7. Specify the destination type for your backup. A system-state backup can’t be performed directly to a network share so we have to choose the Local drives.
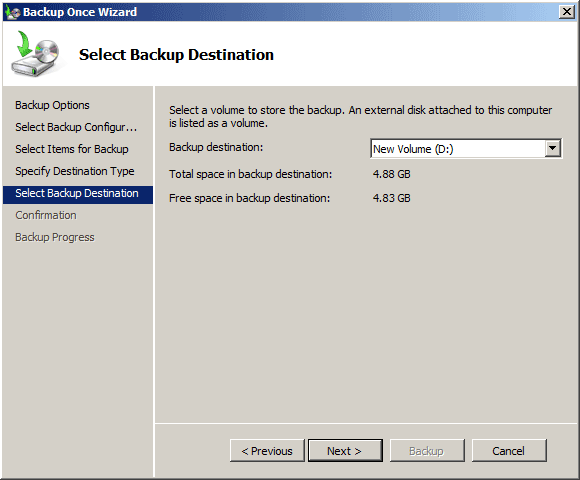
  8. Next select a volume to store the backup. Windows Server Backup requires you to provide a separate target volume for the backup data. In single-volume server, you may need to shrink the existing partition to create a volume dedicated solely to backup data.
  9. In the next window, confirm the options you have selected and then click on Backup.

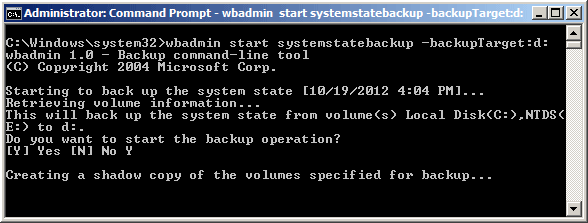
If you want to script the backup process, or if you are backing up a server on a Server Core installation, you can use the WBADMIN.EXE command-line program. WBADMIN provides a complete set of options that perform essentially the same functions as the MMC snap-in, including performing a system state backup.

How to Get Around Windows Password to Log on Your Computer

October 17th, 2012 by Admin

How to get around Windows password when you forgot it? It seems to be extremely difficult if you don’t have the right tools. Here I would recommend Reset Windows Password utility, which enables you to get around Windows 8/7/Vista/XP password easily. The process can be undertaken with a basic knowledge of computer and a bit of time, and will allow you to reset the password on any user account.

How to Get Around Windows Password to Log on Your Computer?

1. Download the Reset Windows Password utility. Unzip the download file, you’ll get the CD ISO image: ResetWindowsPwd.iso, which contains a Windows password reset program.

2. Write the boot CD ISO image to a blank CD using a CD writer and CD writing program. If your computer doesn’t have a CD drive, you can burn the ISO image to a USB flash drive using ISO2Disc.

3. Insert the freshly-written boot CD into the computer whose administrator password needs to be reset. Restart the computer and boot from the CD.

4. After booting from the CD, it will load the operating system inside the CD and start the Reset Windows Password program.

5. Select the SAM registry hive from the drop-down list, it will display a list of local user accounts for your Windows installation.

6. Choose the user account whose password you forgot, then click on the Reset Password button, it will remove your forgotten password immediately.

7. Exit the password reset program and restart your computer. You can then log on your computer with a blank password.

With the password reset CD you can easily get around Windows password on almost all versions of Windows operating systems, quickly log on to your computer without losing any files.

How to Reset Local Administrator Password in Windows

October 16th, 2012 by Admin

Forgot Windows local administrator password? People often find themselves locked out of their Windows operating systems as a result of a lost password for the administrator account. Usually people consider the system a lost cause and start rebuilding it. However, you can use the following tip to work around this problem.

In this tutorial I’ll show you how to reset local administrator password in all versions of Windows, in case you forgot the admin password or you are locked out of your computer.

How to Reset Local Administrator Password in Windows?

Before resetting forgotten local administrator password, you need to find an alternative computer with internet access to download and create a password reset CD or USB stick. Boot your target computer from the CD or USB stick, you are allowed to reset the forgotten local administrator password easily! Here are the complete instructions:

  1. Download the Reset Windows Password utility, which comes as an ISO image. Unzip the download file, you’ll find the ResetWindowsPwd.iso file.
  2. Burn the ISO image file to a blank CD or USB stick using any CD-recording freeware: ISO2Disc or BurnCDCC.
  3. Insert the password reset CD or USB stick into the target computer whose local administrator you want to reset.
  4. Set the computer to boot from the CD/USB. To do this you need to set CD or removal device as the first boot device in computer BIOS.
  5. After booting from the password reset CD/USB, it will launch the Reset Windows Password program.

  6. Click on the Reset Local Admin/User Password option, the program will display a list of Windows local user accounts inside the SAM database.
  7. Select the local administrator account and then click on the Reset Password button, it will remove your forgotten local admin password immediately.

With the created password reset CD/USB, you can reset local administrator password on Windows 8/7/Vista/XP/2000 and Windows Server 2008/2003/2000, including 64-bit operating system.

How to Access the Directory Services Restore Mode on a Remote DC

October 15th, 2012 by Admin

When Active Directory (AD) isn’t working, the steps you’d typically follow would be to boot into Directory Services Restore Mode (DSRM) for repairing or recovering Active Directory. To access Directory Services Restore Mode, you typically press F8 prior to the machine booting into Windows, then select the Directory Services Restore Mode option from the menu that appears.

Tips: If you forgot DSRM password or domain admin password, you can reset the forgotten password easily with Reset Windows Password utility.

But sometimes you need to fix a problematic DC in a remote location, but nobody is close enough to troubleshot. Obviously, you can’t boot the domain controller into DSRM as usual. In this tutorial we’ll show you how to access Directory Services Restore Mode on a remote DC.

How to Access Directory Services Restore Mode on a Remote DC?

  1. On your machine, select Run from the Start menu, type Mstsc /console, and click OK.
  2. Type the IP address of the remote domain controller you want to connect to.
  3. Log on to the server using the Active Directory account.
  4. On the DC, right-click My Computer, click Properties, and then click the Advanced tab.
  5. Click Settings for startup and recovery.
  6. Click the Edit button to edit the startup options file.
  7. Modify the default entry to include the /SAFEBOOT:DSREPAIR switch, as shown in the following example:multi(0)disk(0)rdisk(0)partition(2)\WINNT="W2K DC \\ your server name " /fastdetect /SAFEBOOT:DSREPAIR
  8. Save the modified Boot.ini file, and then close Notepad.
  9. Restart the domain controller.
  10. After waiting a few minutes, perform steps 1 and 2 again.
  11. When you reconnect, the server should state that it’s in Directory Services Restore Mode. Log on using the Local Administrator account (not the Active Directory account).

Once you have restarted the server in Directory Services Restore Mode, you are ready to begin the repairing or recovery process.