Archive for November, 2012

3 Ways to Close a Metro App in Windows 8

November 22nd, 2012 by Admin

How to close a metro app in Windows 8? Apparently a metro app goes full screen without a conventional close button like the one which you will find in desktop applications. It is designed in such a way that a user should never need to close an app, because you wouldn’t normally shutdown apps on a phone or tablet. However, most Windows users will feel lost and can’t find a way to exit or minimize the app. If you really want to close a Metro app, there are at least 3 ways you can do this.

Method 1: Alt + F4 Shortcut

If you are not using Windows 8 on a touch device and you have a physical keyboard, then you just press Alt + F4. The metro app will close instantly. This is a traditional Windows shortcut with which most of the users must be comfortable.

Method 2: Click and Drag

The simplest way to close a metro app in Windows 8 is the move your mouse cursor to the top of the screen while the app is open, click it, and drag the window down to the bottom of the screen. This will close the app the majority of the time.

Method 3: Close via Thumbnail

Place your mouse in the left hand corner (also known as hot corner) of the screen. It will display a thumbnail of your last active applications. Dragging down the mouse further will show you the list of all open apps. Then right-click on the thumbnail of the App that you want to close, and then select Close option to force the application to exit.

Conclusion

The most powerful way to close a metro app is using the Task Manager. Press Ctrl + Shift + Esc to bring up the Task Manager. Find the app, select it, and click End Task. But if you want a metro app out of the way, but you don’t want to close it, you can minimize it. One way is to move the mouse to the extreme, lower, left corner of the screen to show the mini Start screen button and click it. The Start screen displays, but the app is still running in the background.
How to Decrypt EFS Files with Backup Certificate

November 21st, 2012 by Admin

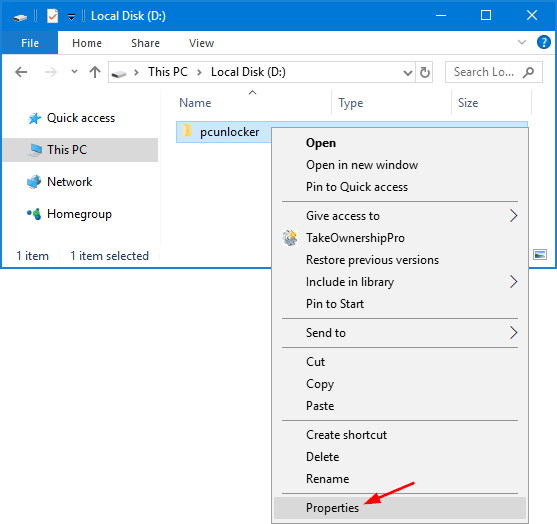
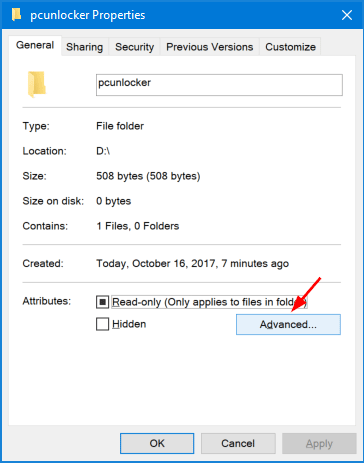
In the previous post we’ve covered how to encrypt files with EFS in Windows. If you still have access to the encrypted files, you can remove EFS encryption easily by right-clicking the files or folders, then click Properties. On the General tab, click Advanced button. Next clear the Encrypt contents to secure data check box.

The EFS files are encrypted using a certificate that’s attached to a specific Windows account, which means that any change to the password or account has the effect that the files cannot be decrypted anymore. If you prepare to reformat a computer or move the EFS files to another computer, you first have to backup the certificate in order to regain access to the encrypted data.

Backup EFS Certificate

Press Windows + R key combinations to bring up the Run box. Type certmgr.msc in the box and hit Enter. This opens the Windows Certificate Manager. Go to Personal > Certificates under Current User. You should see a certificate for your user account. Right-click that certificate and select All Tasks -> Exports from the context menu, this launches the Certificate Export Wizard. You will be asked to enter a password which will be used to protect the EFS certificate from third party access. Backup the certificate in a safe location.

2 Ways to Backup or Export EFS Certificate in Windows 10 / 8 / 7

Decrypt EFS Files with Backup Certificate

After re-installing Windows or move the EFS files to another computer, you need to import the EFS certificate to view the encrypted files. Just double-click the EFS certificate file that you have backed up. This will prompt for the password that you have set up during exporting the certificate. If the password is correct, the certificate will be imported, after which it becomes active and the encrypted files and folders are readable.

How to Import EFS Certificate into Windows 10, 8 and 7

Conclusion

It is essential that you backup your EFS certificate before you reformat your computer or change Windows account password! If you are encrypting files and don’t have the EFS certificate backed up, you will lose that data!

How to Encrypt Your Files with EFS in Windows

November 20th, 2012 by Admin

EFS (Encrypting File System) is a built-in component of the NTFS file system, which comes with all professional versions of Windows since Windows 2000. Using EFS, you can encrypt files and folders so that only authorized logged-on users can view the data. If someone else logs in with unauthorized users, or boots from a Windows PE or Linux CD, or removes the hard drive, the files remain encrypted and they are inaccessible.

To use EFS, you simply change the property of a folder and enable encryption. Once a folder is encrypted with EFS, all the files you create within that folder or move into that folder are automatically encrypted.

How to Encrypt Your Files with EFS in Windows?

Select one or multiple files and folders in Windows Explorer, right-click the selection afterwards and select Properties from the context menu.

Click on Advanced button from the Properties window.

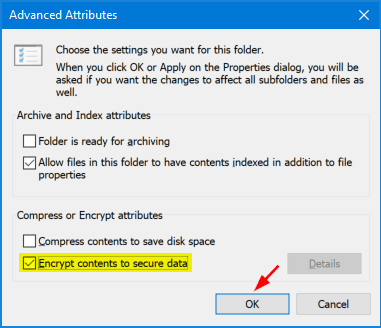
Tick the Encrypt contents to secure data checkbox on the new window, and click OK.

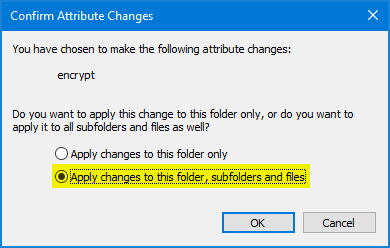
If you have selected at least one folder, you will be asked if you only want to encrypt the root files of that folder, or files in sub-folders as well.

The files and folder in question are then displayed in green in Windows Explorer. Congratulations, you have just encrypted your first files or folders with EFS.

Note: If the original EFS certificate is lost or corrupted in your system, you’ll lose access to your EFS encrypted files. It is important to backup your EFS certificate in a safe location.

Conclusion

Because it is already included in a typical Windows installation, EFS is the quickest way to encrypt your files if you’re already using Windows. There’s nothing to download or install and encrypting a folder can be done with just a few clicks. Unless you really have very sensitive information that requires a very strong encryption solution, EFS should suffice.

Forgot Administrator Password for Your Windows 7 Laptop

November 20th, 2012 by Admin

I forgot Windows 7 administrator password and can not log into my laptop. I have tried every password I can think of and can’t remember the correct one. I have tried putting my computer in safe mode, does not work. All of my school files are on my computer. If anyone knows how I can reset my password myself, that would be great.

Most password recovery programs require your system to up and running in order to crack Windows password. But what if you can’t log in to Windows. Reset Windows Password utility is a Live disc which can be burned onto a CD or USB drive. Boot your locked computer from the Live disc and it allows you to reset Windows 7 password easily.

How to Reset Forgotten Administrator Password for Your Windows 7 Laptop?

  1. Download the Reset Windows Password utility onto an alternative computer. Unzip the download file, you’ll get the ResetWindowsPwd.iso file. Burn the ISO file to CD using an CD burning software such as ISO2Disc or BurnCDCC.
  2. Set your Windows 7 laptop to boot from the Live CD. To boot from the CD-ROM drive, you may need to press a key such as F8 or F12 while your computer is starting up and set CD/DVD as the first boot device in BIOS.
  3. After the CD boots, you will have a mini operating system loaded into memory which will launch Reset Windows Password utility. It will not install anything to your hard drive.
  4. Click on the Reset Windows Local Admin/User Password option, the program will automatically detect the Windows SAM registry hive and local user accounts existing in your local computer.
  5. Choose the administrator account and click on Reset Password button, it will remove your forgotten Windows 7 administrator password in a short time.

Restart the laptop and reject the Live CD, you can then log in to the administrator account with a blank password. After logging into your Windows 7 system, you’ll find that all your files on your hard drive are there and remain intact.

How to Break Windows 8 Password

November 18th, 2012 by Admin

Forgot your Windows 8 password? If you couldn’t find a way to break the password, you’ll have to rebuild your PC from scratch. There are many different ways to break Windows login password, but most of them don’t support the latest Windows 8 operating system. In this tutorial we’ll show you an effective way to break Windows 8 password easily.

To accomplish this, we’ll use a tool called Reset Windows Password that can break your password so you can log in to Windows 8 without losing any information on your PC.

Step 1. Create a Bootable Password Breaker CD or USB Drive

The first thing you’ll need to do is download the Reset Windows Password utility, which comes as an ISO image file. Once the download is complete, unzip the download file and you’ll get the ResetWindowsPwd.iso file.

Burn the ISO image file to a blank CD using any CD burning software such as BurnCDCC. If your computer doesn’t have a CD/DVD drive, you can burn the ISO image to USB drive using ISO2Disc software.

Step 2: Set Windows 8 PC to Boot from CD or USB Drive

Change the boot order in BIOS so the CD, or USB drive is listed first. Some computers are already configured this way but many are not. If you still can’t get it to boot from password breaker CD/USB or doesn’t know how to boot into BIOS, please refer your computer’s manual or check out this article: How to set computer to boot from CD/USB.

Step 3: Break Windows 8 Password

After booting from password breaker CD/USB drive, the computer will load the Windows PE operating system inside the CD/USB drive and launch the Reset Windows Password utility. Choose a user account whose password you want to break, and then click on Reset Password button. It will remove your forgotten Windows 8 password immediately.

Conclusion

The method could be used to break the password for both local account and Microsoft account in Windows 8. Additionally, it also enables you to break lost Windows 7/Vista/XP passwords, and reset local administrator and domain administrator passwords on Windows Server 2012/2008/2003/2000.

How to Recover Windows Server 2012 Administrator Password

November 17th, 2012 by Admin

I forgot the administrator password on my Windows Server 2012, and I have been locked for a few days. Now I need to get into my server and get my job done. I have try many free and paid programs to recover Windows Server 2012 administrator password, but none of them really work. Is there any way to recover or reset my forgotten password?

If you have only one administrator account on Windows Server 2012 and you forgot the password, you’re in a tough spot, and your options are limited. You may be able to recover your password with a hint or a recovery key, but if neither of those works, you may think that you’re generally left with having to rebuild your PC from scratch.

Actually, with Reset Windows Password utility you can easily remove forgotten local administrator and domain administrator passwords on Windows Server 2012. This software will allow you to reset your password in a secure fashion without losing any information on your PC.

How to Recover Windows Server 2012 Administrator Password?

  1. Download the zip archive of Reset Windows Password utility. Unzip it and burn the ISO image to a blank CD or USB stick.
  2. Insert the CD or USB stick into your locked computer and let your computer boot from it.
  3. After a while the bootdisk will launch the Reset Windows Password utility, which shows all Windows user accounts available for your Windows installation. By default the Reset Local Admin/User Password option will be selected, the program will display a list of Windows local user accounts. If you want to reset domain administrator password, please choose the Reset Active Directory Password option.
  4. Choose the administrator account whose password you forgot, then click Reset Password button. The program will quickly reset the unknown/forgotten password as well as unlock the user account if it is disabled or locked out.

Now you’ve reset the forgotten Windows Server 2012 administrator password. You can then successfully login and regain full control over your server. With this password reset CD/USB, you’ll never be bothered by a forgotten Windows Server 2012 password!

Google Chrome Password Recovery Tutorial

November 16th, 2012 by Admin

Google Chrome, like any other web browser has its password manager for remembering the login credentials of websites you visit. If you have forgotten the login credentials (username and password) for a web site, then do not worry – there are lot of ways to recover Chrome password, anyway now you can recover your Chrome browser login and password easily with help of Password Recovery Bundle. Password Recovery Bundle makes it easy to decrypt or recover the login credentials stored by all versions of Google Chrome browser.

How to Recover Google Chrome Password?

  1. First install Password Recovery Bundle on your local computer.
  2. Launch the program, then click Start Recovery button. The program will pop up a drop-down menu that displays all supported password types.
  3. Select the Chrome Password option. The program automatically detect the default Chrome profile path for the current user and displays all saved passwords along with website URLs and logins.

It’s better to copy and save the login credentials to a file for safe keeping. This will be very useful in following cases:

  • To take backup of the login secrets for the stored websites
  • To transfer the secrets from one system to another.
  • To store the website passwords at more secured centralized location
  • To recover the passwords in case Chrome becomes not accessible or non functional.

Reset Windows Password v2.6 Released!

November 15th, 2012 by Admin

Great news for all Windows 8 users! We’ve recently updated this application and more than sure you will like new features we’ve added. What’s new in Reset Windows Password v2.6?

First of all, this update brings full support of Windows 8 so you can now reset lost or forgotten Windows 8 password without any problems or issues. It allows you to reset both local account password and Microsoft account password in Windows 8.

Secondly, Windows Server 2012 64-bit support was also added in this update. You are allowed to reset both local account password and domain user password on Windows Server 2012 in case you lost or forgot the password.

This update is absolutely free for you if you are a registered user of Reset Windows Password utility. For unregistered users, you can try or purchase the software at this link: http://www.top-password.com/reset-windows-password.html.

Switch Local Account to Microsoft Account in Windows 8

November 13th, 2012 by Admin

While installing Windows 8, right before the setup is about to make your PC ready it asks you whether you would like to use a local account or the Microsoft account to log on the computer. If you have chosen local account while configuring Windows, it’s not too late and you can change to use Microsoft account anytime.

In this tutorial I’ll show you how to switch local account to Microsoft account in Windows 8. Before getting started, make sure your computer has internet access so you can connect to your Hotmail or Windows Live account.

How to Switch Local Account to Microsoft Account in Windows 8?

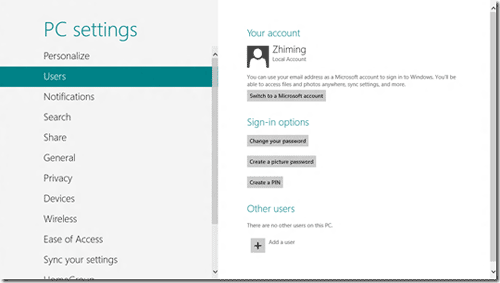
  1. From the Metro UI, click or swipe the upper right corner of the screen to show the Charms menu. Click or tap on the More PC settings link.

  2. Select Users. Then click/tap on “Switch to a Microsoft account”.

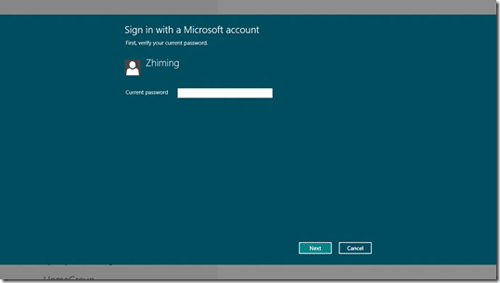
  3. Type in your local account password.

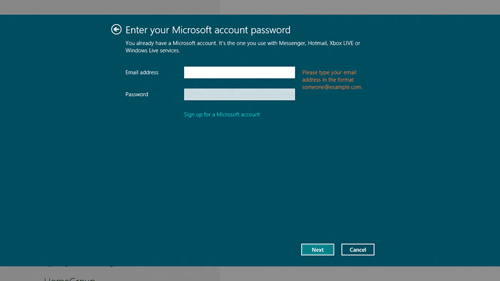
  4. And then enter your Live ID or your Hotmail account. If you don’t have one already, you can create one by clicking the link “Sign up for a new email address”.

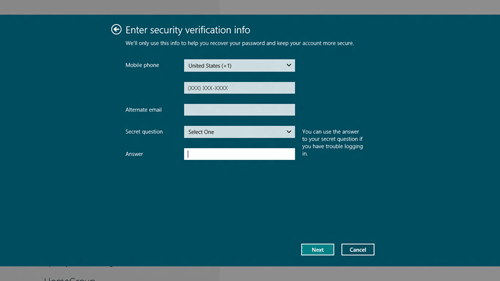
  5. Answer the security question to confirm your identity. You may receive an SMS message from your mobile phone that shows “Security info was added for xxx”.

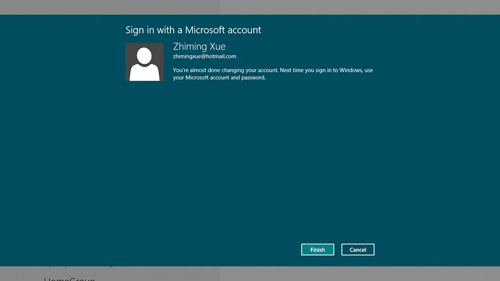
  6. Click on Finish. You’ve completed the setup procedure.

  7. Next time you start your computer, you can log on to Windows 8 with Windows Live ID. After logging in, some of your Metro apps will show data e.g. email, photos, and documents associated with your Windows Live ID account.

One benefit of signing in to your PC with a Microsoft account is that you can sync info between any PCs you use that are also running Windows 8 or Windows RT. When you sign in with a Microsoft account, your PC is connected to the cloud. This means that many of your personal settings and preferences are stored on Microsoft servers online, and then are synced to any PC that you sign in to.