Archive for August, 2013

How to Change Forgotten Windows 8 Password with Installation Disc

August 7th, 2013 by Admin

Forgot your Windows 8 administrator password? How to change or reset the password without any third-party software? We have previously talked about how to reset Windows 7 password with Windows installation CD. That trick also works with Windows 8. Here we’re going to walk you through the procedure to change forgotten Windows 8 password with Windows 8 installation disc.

Note: This trick is only intended for experienced users who forgot Windows 8 password. For average computer users, please use the easy-to-use software PCUnlocker to reset lost or forgotten Windows 8 password.

How to Change Forgotten Windows 8 Password with Installation Disc?

  1. Boot your Windows 8 computer from Windows 8 installation disc. Once the message “Press any key to boot from CD…..” appears, press the Enter key to continue.
  2. As soon as you get to the Windows Setup screen, press the SHIFT + F10 key combination to bring up the Command Prompt.
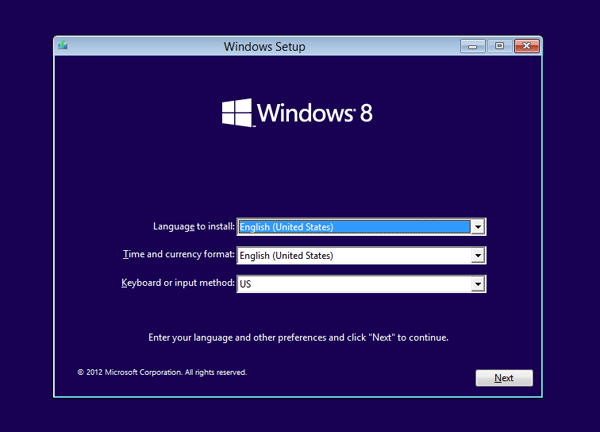
    windows-8-setup

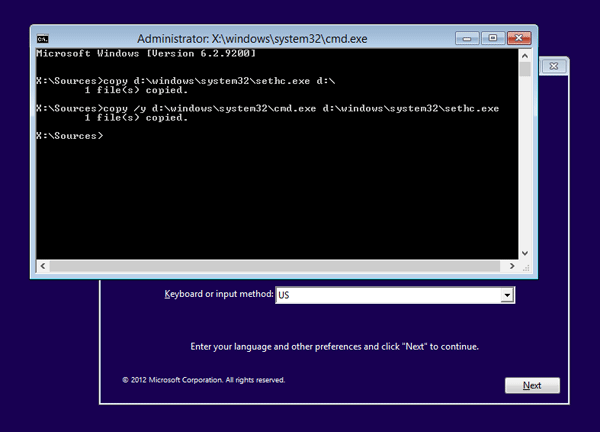
  3. Type the following command (replace “d:” with the correct drive letter if Windows is not located on D:):
    copy d:\windows\system32\sethc.exe d:\
    This creates a copy of sethc.exe to restore later.
  4. Type this command to replace sethc.exe with cmd.exe:
    copy /y c:\windows\system32\cmd.exe c:\windows\system32\sethc.exe
    replace-sethc

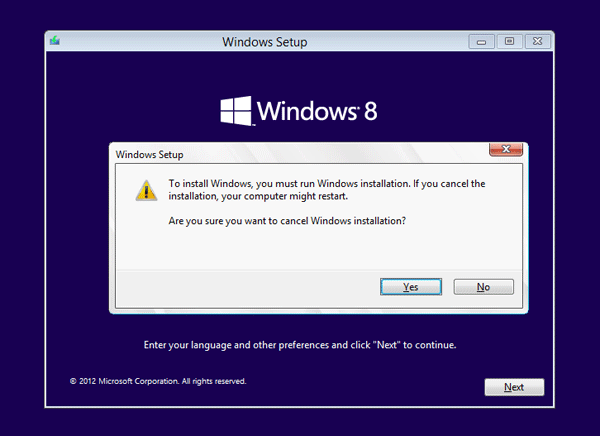
  5. Now close the Command Prompt, and cancel the Windows Setup application. Eject Windows 8 installation disc and reboot your computer.
    cancel-windows-setup

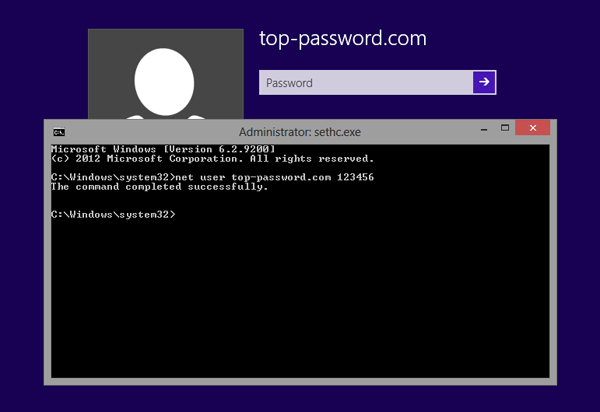
  6. When you reach to the Windows 8 login screen. Press the SHIFT key 5 times in a row, the Command Prompt will then open.
  7. Enter the following command to change your forgotten Windows 8 password:
    net user top-password.com 123456
    reset-windows-8-password

    Replace top-password.com with your account’s name, and change the password 123456 with whatever you want.

  8. Congratulation! Now exit the Command Prompt and you can then log on your Windows 8 system with your new password.

    login-windows-8

Remember to copy the c:\sethc.exe file back to c:\windows\system32\sethc.exe to restore the original sethc.exe file. This trick works with Windows 8, Windows 8 Professional, Windows 8 Enterprise and Windows 8.1.
How to Fix Error 0x0000005D When Booting from Windows 8 Installation Disc

August 4th, 2013 by Admin

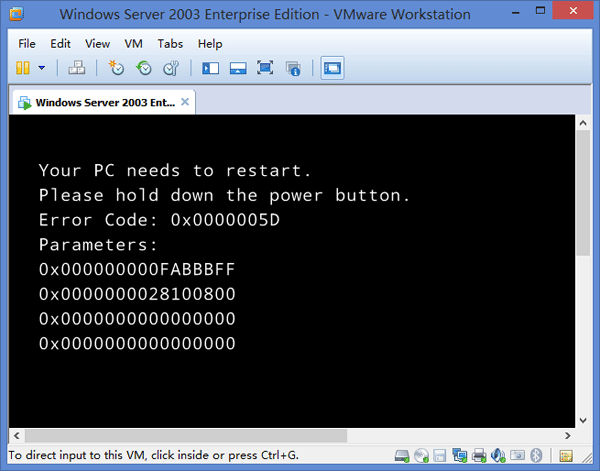
When installing Windows 8 on a new PC or in Oracle VM Virtual Box or VMware, many users are getting the error that says “Your PC needs to restart. Please hold down the power button. Error Code: 0x0000005D.” during the booting process.

Unlike Windows Vista and 7, Windows 8 is not compatible with all models of AMD/Intel processor. To fix the 0x0000005D error, you must have processor that supports Data Execution Prevention features. It has two different names. For, Intel processor its called “Execute Disable (XD)” and for AMD processor “No Execute (NX)”. Most CPUs have support for these features, so if you receive this error, it is likely because the XD or NX feature is not enabled on your system.

How to Enable Data Execution Prevention feature?

Once you enter in BIOS, go to Advanced Options and select Processor then No Execute Memory Protection, if not, then Security > Options and Select Execute Disable. Change this to ‘Enable’ or ‘On’.

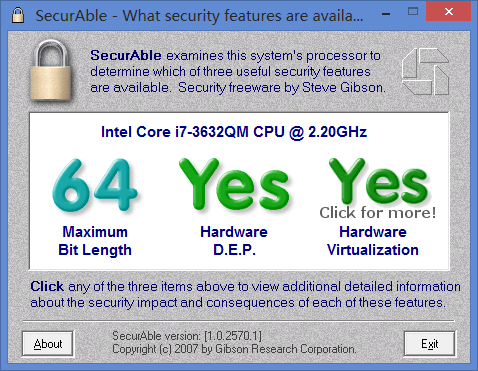
If the BIOS setting for the XD/NX support option is not available on your system, you may need to contact the manufacturer for updating the BIOS. Note that some older processors may not contain these features and will be incompatible with Windows 8. If you want to check if XD/NX is available or enabled in your system, you can download Securable which will tell you.

If your processor supports Virtualization Technology (VT) & Data Execution Prevention features, then you should see the following result in your screen:

securAble

Getting Error Code 0x0000005D during Booting Virtual Machine from Windows 8 Installation Disc?

When trying to boot a virtual machine from Windows 8 installation disc, you may also get the 0x0000005D error.

windows-8-boot-error

To fix this problem, you also need to follow the instructions above to enable Data Execution Prevention feature in the BIOS of your physical machine. Moreover, enable the “Virtualization Technology (VT)” feature in BIOS.

Here is how to enable VT option in DELL poweredge server:

Reboot your DELL poweredge server, press F12 to go to the BIOS, select “Processor Settings”, and set “Virtualization Technology” to “Enabled”.

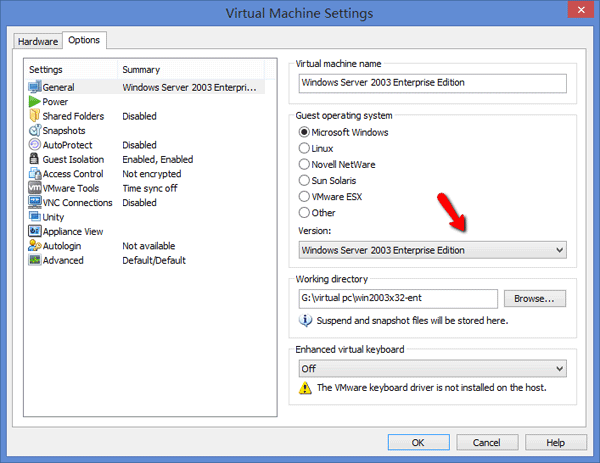
However, from my experience, even if I have enabled both the “Data Execution Prevention” and “Virtualization Technology (VT)” features in the BIOS of host OS, I still get the 0x0000005D error while booting a VMware virtual machine from Windows 8 ISO image. Eventually I fix the error by changing the operating system version under Virtual Machine Settings of VMware Workstation.

vmware-settings

As long as you change the version to any x64 edition, the 0x0000005D error will disappear immediately.

How to Hack Windows XP Password with DreamPackPL

August 3rd, 2013 by Admin

What to do if you forgot Windows XP password? The easiest way is boot your computer from PCUnlocker Live CD and it can help you remove forgotten Windows XP password instantly. In this tutorial we’ll show you another method which could be used to hack into Windows XP computer without changing the password or recovering the original password on your computer.

DreamPackPL allows any user to bypass Windows login security and logon to Windows XP or Windows 2000 computer even though the user have forgotten or lost the valid password, and without the need to reset, recover or change the existing passwords that are currently set with the accounts. DreamPackPL (version 2oo4.o6.1o) is actually built on DreamPack which consists only the hacked and patched sfcfiles.dll.

How to Hack Windows XP Password with DreamPackPL?

  1. Get physical access to the machine. Remember that it must have a CD or DVD drive.
  2. Download DreamPackPL from this link. Unzip the downloaded dpl.zip and you’ll get dpl.ISO.
  3. Burn or write the ISO image to CD using ISO2Disc.
  4. After you have the disk, boot from the CD or DVD drive. You will see Windows 2000 Setup and it will load some files.
  5. Press “R” to install DreamPackPL.
  6. Press “C” to install DreamPackPL by using the recovery console.
  7. Select the Windows installation that is currently on the computer (Normally is “1” if you only have one Windows installed)
  8. Backup your original sfcfiles.dll by typing: “ren C:\Windows\System32\sfcfiles.dll sfcfiles.lld” (without quotes)
  9. Copy the hacked file from CD to system32 folder. Type: “copy D:\i386\pinball.ex_ C:\Windows\System32\sfcfiles.dll” (without quotes and assuming your CD drive is D:)
  10. Type “exit”, take out disk and reboot.
  11. In the password field, type “dreamon” (without quotes) and DreamPack menu will appear.
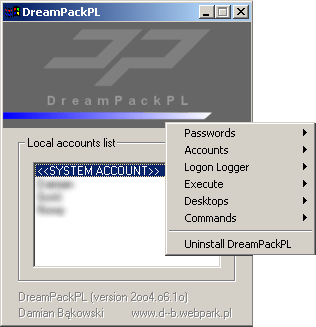
  12. Click the top gray graphic in the DreamPack window and you will get a menu popup.

    dreampackpl

  13. Go to commands and enable the options and enable the god command.
  14. Type “god” in the password field to get in Windows.

You can also go to the DreamPackPL Passwords menu and select “Logon with wrong password and hash”. This option allows you to login with ANY password instead of using god everytime.

How to Decompress A ZIP/RAR File with 7-Zip

August 1st, 2013 by Admin

Compressed files take up less storage space and can be transferred to other computers more quickly than uncompressed files. In this article we’ll show you how to decompress a .zip or .rar file with 7-Zip program.

How to Decompress A ZIP/RAR File with 7-Zip?

Here we’ll use the PCUnlocker program for demonstration purpose. PCUnlocker is the most popular Windows password recovery software, which comes as a bootable ISO image file and it is distributed as a .zip format. Now we’re going to decompress the PCUnlockerStd.zip file, which is the download file of PCUnlocker Standard.

Step #1: Go to the website http://www.7-zip.org/ and click on the Download link. Wait for the screen to load and click on Save File. Once downloaded, double-click on the file and follow the instructions to install it.

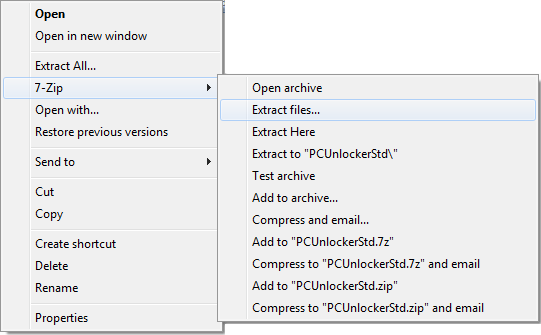
Step #2:Now simply right-click the PCUnlockerStd.zip file. Go to 7-Zip and select Extract files from the context menu.

7zip

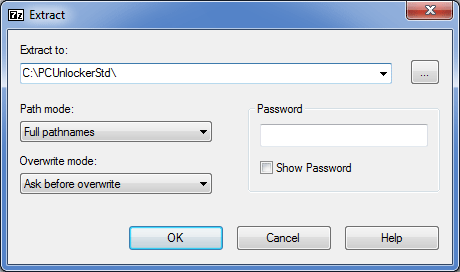
Step #3:In the Extract dialog box, you can specify where you would like to extract the given files to. Click OK.

7zip-extract

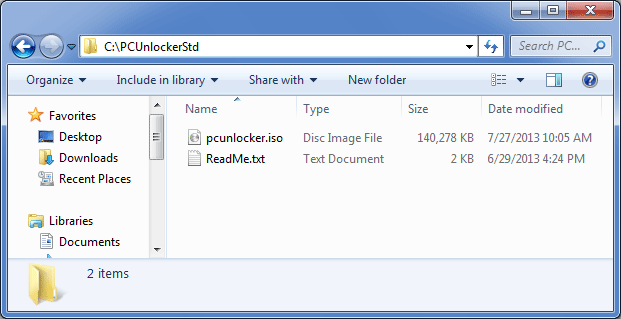
Step #4:The files will be extracted into a new folder that contains all the content.

extracted-files

How to Fix “Cannot Log on to Windows After Removing from Domain”

August 1st, 2013 by Admin

Problem:

After you change a computer’s membership from a domain to a workgroup and restart the computer, you cannot log on with your previous user name and password. You may also receive the following error message:

The system could not log you on. Make sure your user name and domain are correct, then type your password again. Letters in passwords must be typed using the correct case. Make sure that Caps Lock is not accidentally on.

Solution:

This problem occurs because the user name and password that you previously used are available for logon only to a domain. Your computer is no longer a member of a domain. Therefore, your logon attempt must be validated on the local computer by using the local security database. To log on to your computer, you must use the local user account existing in the Security Accounts Manager (SAM), not the domain user account.

If you do not know the local user account and password, you cannot log on to the computer. To resolve this issue, the easiest way is to use PCUnlocker Live CD to blank your local admin/user password. Here are the step-by-step instructions:

1. Download the zipped ISO image of PCUnlocker using another computer you have access to. Unzip the download file and burn the pcunlocker.iso file to a blank CD using ISO2Disc program.

2. Put the PCUnlocker Live CD into the CD drive of the locked computer that you’re trying to gain access to. Have the computer to boot from PCUnlocker Live CD.

3. After booting from the Live CD, it will start the PCUnlocker program after a while. Choose the local administrator account and then click on “Reset Password”. The program will blank the local administrator password instantly.

4. Restart the machine and remove the PCUnlocker Live CD, you can then log on to Windows with the local administrator account, without being prompted to enter a password!