Archive for September, 2013

How to Reset Windows 8.1 Password When You Forgot It

September 29th, 2013 by Admin

Windows 8.1, previously known as Windows Blue, is a few update for Windows 8. As usual it also lets you to log in your computer using traditional text password and Microsoft account. In many occasion because of your stress there you have a chance to forget the password. Sometimes it may occur due to the security consciousness of the user as they frequently change the password.

Have you ever re-installed Windows just because you forgot your logon password? Well you don’t need to do that again! With PCUnlocker you can reset your forgotten Windows 8.1 password and get into your administrator account or Microsoft account easily!

How to Reset Windows 8.1 Password When You Forgot It?

  1. Simply download the PCUnlocker ZIP file from this link, extract to get an ISO file and then burn the ISO file to a CD/DVD to get a bootable PCUnlocker CD.
  2. Once you have the bootable PCUnlocker CD, insert it into your Windows 8.1 computer. Make sure that the boot sequence has Optical Drive above the Hard Drive. Once PCUnlocker CD has booted, it will automatically look for the SAM file in your computer.
  3. After a while you’ll see the PCUnlocker program. It displays a list of Windows local accounts existing in your SAM file. If you’re using a Microsoft account with your Windows 8.1 system, you should be able to find the local account which is associated with your Microsoft account.

  4. Choose your administrator account or a local account associated with your Microsoft account, then click on “Reset Password” button. It will reset your forgotten Windows 8 password immediately.
  5. Restart your computer and take out the PCUnlocker CD. When the Windows 8.1 login screen comes up, just leave the password empty and hit Enter! You’ll be logged into your Windows account without entering any password!

Note: Now Windows 8/8.1 installed mostly as OEM in the laptop or desktop computers. As they use the UEFI secure boot. To get your computer to boot from PCUnlocker CD, you have to change the BIOS boot settings from UEFI to Legacy.
How to Find Windows 8.1 Product Key in 3 Steps

September 28th, 2013 by Admin

How to recover and find Windows 8.1 product key? Here is a simple way through which you can find out the product key of your Windows 8.1 installation. We will use a special software called Product Key Finder for this purpose.

Product Key Finder lets you show the product keys of software installed on your computer. This is not limited to Windows 8.1 product key. You can get keys from many other software installations, such as Microsoft Office and Adobe Acrobat, etc. Follow the steps below to recover your Windows 8.1 product key.

How to Find Windows 8.1 Product Key in 3 Steps?

  1. Download the setup package of Product Key Finder on your computer. After you’ve downloaded it, double-click the setup file to install it.
  2. Start the Product Key Finder program. Click on “Start Recovery” button and choose the “From current system” option.
  3. The program will scan your computer and find the product keys of supported programs, including various versions of Windows and Microsoft Office. Make sure you write down the product keys and put them in a safe place for future reference.

That’s it! Product Key Finder can be really useful for you to backup the product key before beginning to upgrade, downgrade or reinstall the existing version of your Windows operating system.

How to Password Protect A Folder in Mac OS X

September 25th, 2013 by Admin

Have confidential data in your Mac that needs to be locked with a passwords to prevent unwanted access? If you’re using a Windows computer, you need to use some third-party software such as Protect My Folders to achieve this. But things get much more easier with a Mac computer. Apple has provided a way to password protect certain files and folders no matter what your situation might be. Here’s how it’s done.

How to Password Protect A Folder in Mac OS X?

  1. Click “Applications”, then “Utilities”, and then open up “Disk Utilities”.
  2. Once disk utility has launched, click on ‘new image’ on the top. Depending on your Macintosh’s security settings, you may be prompted to enter your administrator password to do this.
  3. Name you image file, and choose your preferred location.
  4. Select a disk size depending on the size of the files or folder you want to place inside.
  5. Make sure you select ‘128-bit encryption’ under the ‘Encryption’ drop down.
  6. Under ‘image format’, select ‘sparse disk image’ and click on create.
  7. A window should appear where you need to set your password. Uncheck the “add password to keychain” box.
  8. Once you’ve done that, the image will mount automatically.
  9. Copy-paste all the files you need to protect to this image, and unmount the image once it’s done.
  10. The next time you mount the image again, it will ask you to enter your password!

How to Protect Files from Being Deleted Accidentally

September 21st, 2013 by Admin

Is it possible to protect files/folders from being deleted? I have some files that have been encrypted so they cannot be read but wondered if there was an way to protect them from being deleted. I know I could hide the file in the “Properties” menu but I want to stop them from being deleted if possible.

Looking for a way to protect your important files from being deleted by mistake in Windows 8, 7, Vista or XP? Sometimes you need to ensure that your valuable photos or videos cannot be deleted accidentally by yourself or other family members. In this situation, Protect My Folders will really come in handy.

How to Protect Files from Being Deleted Accidentally?

  1. Download and install Protect My Folders program on your computer. After installing, double-click the shortcut on your Desktop to start the program.
  2. The first time you start the program, it will require you to set a new password for Protect My Folders. Don’t forgot this program as you need it to open and use the program next time.
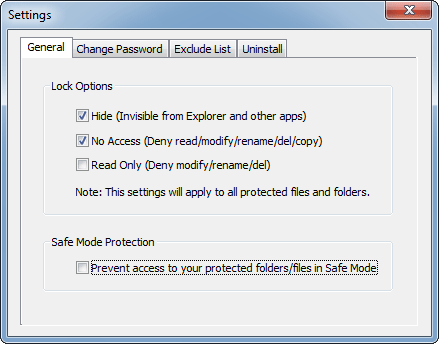
  3. When you see the main interface of Protect My Folders, click on Settings button. Check the “Read Only” option under the Lock Options section. If you don’t want to hide your private files, you can uncheck the “Hide” option. Close the Settings dialog.

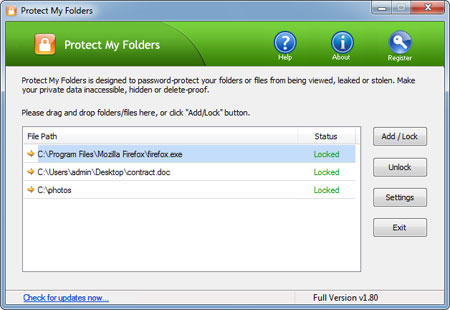
  4. Click on Add/Lock button to add your desired folders or files. It allows you to add one or multiple folders or files at a time. Afterwards, you can exit this program.

  5. Open the Windows Explorer and try to delete your protected folders or files, you’ll keep getting the “Access Denied” error message. The protected files will remain there even if you try to delete the top-level folder.

This is how can you protect your files from being deleted in Windows 8/7/Vista/XP. If you need a better security protection for your private data, you can hide and block any access to your files with Protect My Folders.

How to Password Protect Any Windows Application

September 18th, 2013 by Admin

Need to lock your application so that other can’t open it? Or don’t want an unauthorized people to look at your e-mail or calendar while you’re away from your computer? Protect My Folders is what you need. It is a small application that lets you password protect any executable file in Windows 8/7/Vista/XP, without altering the program itself.

How to Password Protect Any Windows Application?

Protect My Folders is a simple tool to use. In order to use it to password protect your Windows application, first download the installer from this link and then install it.

Once installed, run Protect My Folders. During the first startup, you will be asked to create a new password. Put your desired password in that filed and then confirm the password. Once done, click OK. Remember that you are going to need that password each time you start the application.

Now the main window of Protect My Folders will be show. Click on the “Add/Lock” button, a file explorer will open and select the executable file of your application from there to protect. Now others can’t run or open your application without the password you used.

Conclusion

To sum up with, Protect My Folders is a robust small application which lets you protect your Windows application with a password so that others can’t open or use it. In case you forget the password there is no way to access your protected Windows application since it will remain permanently locked. Try it if you remain concerned with privacy of your Windows application.

How to Securely Hide A Folder or File in Windows 8/7/Vista/XP

September 18th, 2013 by Admin

These days, hiding a folder or file is probably something you will need if you use a computer shared with others. By default, you can change the file attribute and make your private files hidden. The problem is that just as many people know you can show files and folders that have the “hidden” attribute by simply changing a radio button under the folder view options.

In this tutorial we’ll show you a secure method to hide a folder or file in Windows 8/7/Vista/XP. Make your private folders or files invisible from Windows Explorer and Command Prompt, even computer geeks can’t find out your hidden secrets. This can be achieved by a computer security program – Protect My Folders.

How to Securely Hide A Folder or File in Windows 8/7/Vista/XP?

Download the setup package of Protect My Folders and save it on your computer. Once you’ve downloaded it, double-click the setup file to install it on your computer.

Start the Protect My Folders program. The first time you start the program, it will prompt you to set a new password for Protect My Folders. This password is designed to prevent others from unlocking your protected folders or files, or uninstalling this program.

After logging into the program, you’ll see the main interface of Protect My Folders. Simply click the “Add/Lock” button and you can add a folder or file to the protected list. After that, your folder or file will be protected and disappear from Windows Explorer and other applications.

Exit the program. Your protected folders or files will keeping invisible until you unlock your folders / files with Protect My Folders program. It’s that easy!

Can’t Open CHM Files in Windows 8 64-bit System

September 15th, 2013 by Admin

Can’t open your chm files in Windows 8 64-bit operating system? CHM is a popular format for e-books and help documents and it’s natively supported on Windows. But when you double-click a .chm file in Windows 8, you may be prompted with selecting a program to open it and Windows 8 can’t automatically locate a program associated with .chm files. In this article we’ll show you a quick trick to fix this problem easily.

Can’t Open CHM Files in Windows 8 64-bit System? How to Fix It?

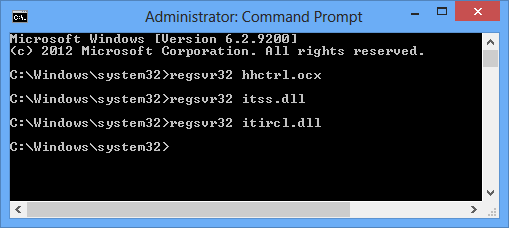
  1. Press the WINDOWS and R keys together to bring up the Power User menu, and then click on Command Prompt (Admin). This will open an elevated command prompt.
  2. Run the following commands:
    regsvr32 hhctrl.ocx
    regsvr32 itss.dll
    regsvr32 itircl.dll

    register-chmhelp-dll

  3. You’ll get a success dialog after each one. That’s all there is to it! No reboot required and everything was magically working as it should.

Lost Windows Password? Here’s How to Bypass It

September 3rd, 2013 by Admin

I lost the administrator password and do not have any other account. How can I bypass the password so I can get into my Windows system?

Losing Windows password could be a nightmare that will leave you without access to your system. This could happen out of forgetfulness, the result of idiotic roommates with nothing better to do, or any number of other situations that could result in a total loss of access to your computer. But don’t worry! Here we’ll show you an easy way to bypass Windows password after you lost your password.

All you really need is a USB drive and another computer to create a PCUnlocker Live USB drive on. In many cases, you can bypass lost Windows 8/7/Vista/XP password in just a few minutes.

Lost Windows Password? How to Bypass It?

  1. First, you are required to create a PCUnlocker Live USB drive from another computer that you have access to. This can be your work PC, or a friend or family member’s PC (any PC within your reach). Download the ISO image of PCUnlocker and burn it to your USB drive using ISO2Disc program.
  2. Insert the PCUnlocker Live USB into your own machine and boot the computer from it. Before that ensure you have set your BIOS to boot from USB drive. After successfully booting from PCUnlocker Live USB, it will load the operating system that is installed on the USB drive.
  3. When the boot process is complete, it will start the PCUnlocker program. This program automatically searches your Windows installations and displays all user accounts existing in Windows SAM registry file. In the list box, you can also find out which user account is password protected, disabled or locked out.

  4. Choose one of your user accounts and click on “Reset Password” button. The program will bypass your lost Windows password instantly.
  5. Restart the computer and disconnect the Live USB. The account that you’re trying to regain access to will no longer require a password. Quickly get back into your system without data loss!