Archive for March, 2016

4 Ways to Take Screenshot in Windows 10 Without Third-Party Software

March 10th, 2016 by Admin

A screenshot is an image that captures what appears on your screen. In this tutorial we’ll show you 4 simple ways to take quick screenshots in Windows 10, without using any third-party software.

Method 1: Take screenshot of whole screen with [PrtScn] key (copy to clipboard)

This method is the easiest and most popular way to capture your whole screen. It works in all versions of Windows, including Windows 10/8/7/Vista/XP.

Just press the PrntScr key on your keyboard, which creates a screenshot of the whole screen and saves it to the clipboard. Want to save it in file? It will take some extra clicks. Open an image editing program like Paint and hit Ctrl + V to paste the image from the clipboard, you can then save it as a file.
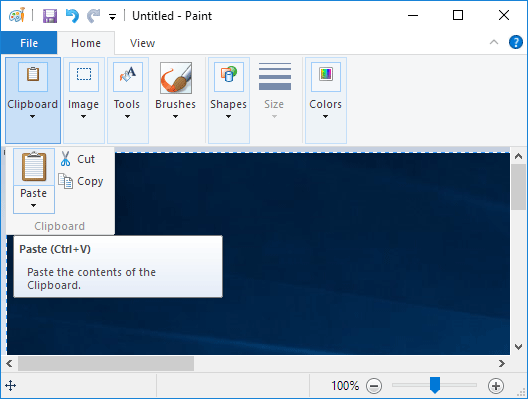
mspaint

Method 2: Take screenshot of whole screen with [Win] + [PrtScn] (as a File)

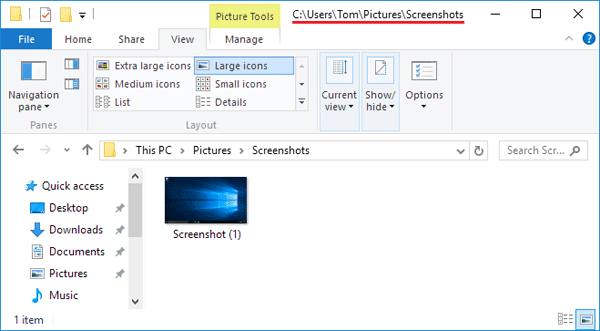
Simultaneously press the Windows logo Key + PrtScrn on your keyboard. This will take a screenshot of the whole screen and save the image directly into the User’s Pictures folder (e.g. C:\Users\Tom\Pictures\Screenshots), in .png format. No need to open Paint and paste. A real time saver for computer novices!
windows-prntscr

Method 3: Take screenshot of active window with [Alt] + [PrntScr] (copy to clipboard)

Instead of capturing the whole desktop and all opened apps, this method captures only the currently active window.

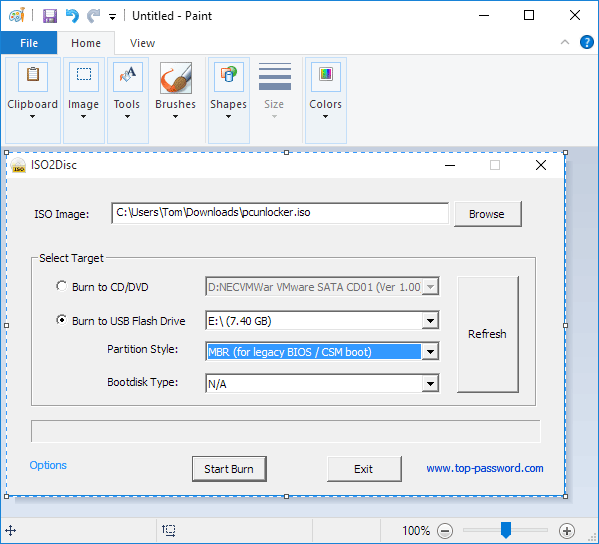
Click on the title bar of the window that you want to capture. Press Alt + PrtScn keys together. A screenshot of your currently active window will be copied to the clipboard. Next paste it into your favorite image editing program for saving or editing.
alt-prntscr

Method 4: Take screenshot with built-in Snipping Tool

Snipping Tool was introduced in Windows 7, and available in Widows 10 as well. It is very handy for capturing specific areas of your screen. Follow these steps and you can take all kinds of screenshots like a pro:

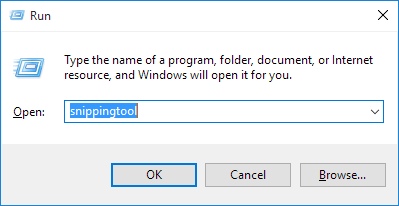
Press the Windows logo key + R to open the Run box. Type snippingtool and hit Enter. If you’re running Windows 7/Vista, you can go to the Start Menu, choose Accessories and then click Snipping Tool.
run

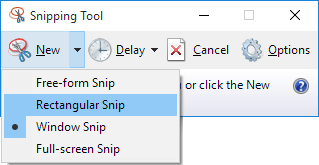
When the Snipping Tool window opens, click on New button and you can choose from one of four types of snip:

  • Free-form Snip – let you draw and captures any irregular part of the screen
  • Rectangular Snip – allow you to drag the cursor around an object to form a rectangle
  • Window Snip – let you select an open window, such as a browser window or dialog box and let you capture it
  • Full-screen snip – enable you to capture the entire screen, like the old-fashioned PrntScr key.
rectangular-snip

Once you’ve captured your screenshot, it opens in the Snipping Tool editing window. The Snipping Tool editor allows you to edit and annotate the screenshot.

snipping-tool

3 Ways to Turn On / Off ClearType Text in Windows 10

March 9th, 2016 by Admin

ClearType is a font technology that makes the text on your screen almost as sharp and clear as text that’s printed on paper. ClearType is designed for LCD screens, so if you’re still using an old CRT monitor you will likely get best results from turning ClearType off. In this tutorial we’ll show you 3 ways to turn on or off ClearType Text in Windows 10.

Method 1: Turn On / Off ClearType Using Search

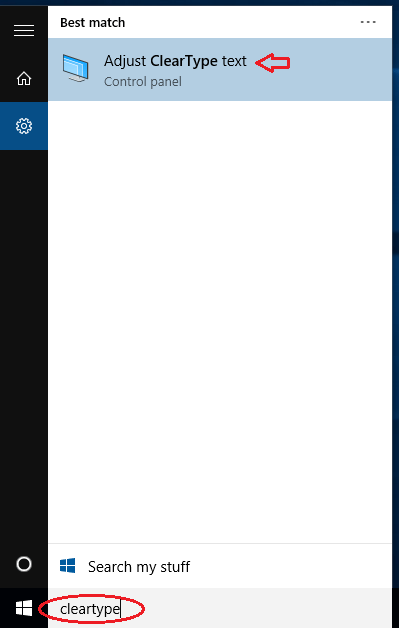
  1. Click the Cortana search box on the taskbar, type cleartype.

    cleartype

  2. Click Adjust ClearType text from the search results.
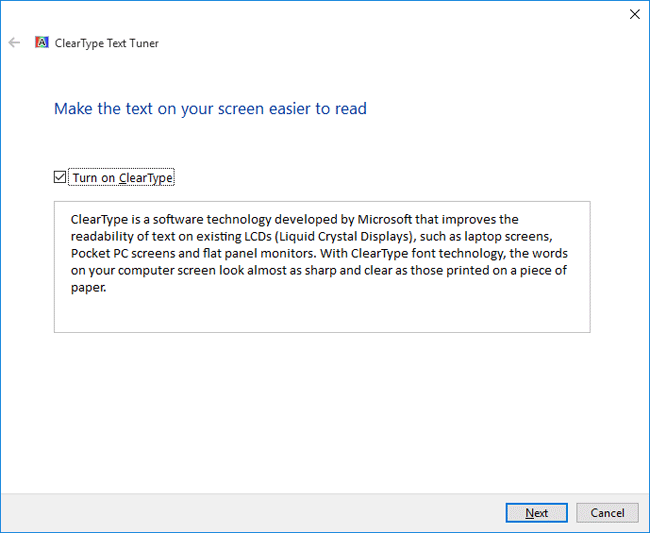
  3. The ClearType Text Tuner should open. Select the “Turn on ClearType” check box to enable ClearType, or deselect it if you want to turn off ClearType. Click Next.

    turn-on-cleartype

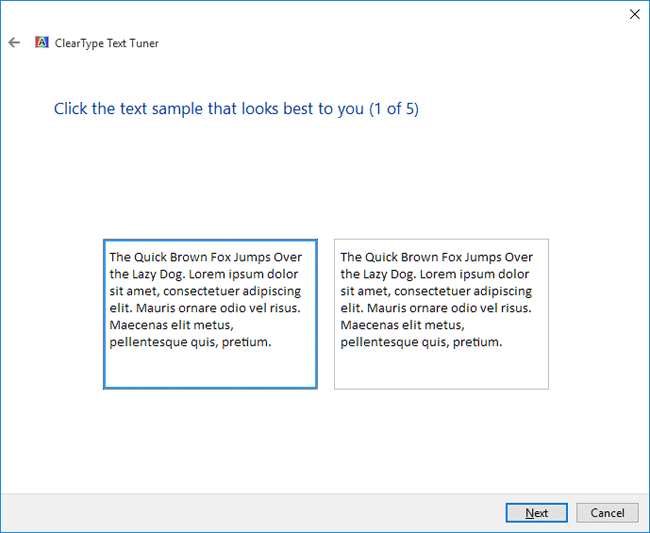
  4. Select the text that looks better to you and click Next, The ClearType Text Tuner will ask you to repeat this step four times with different blocks of text.
    cleartype-text-tuner

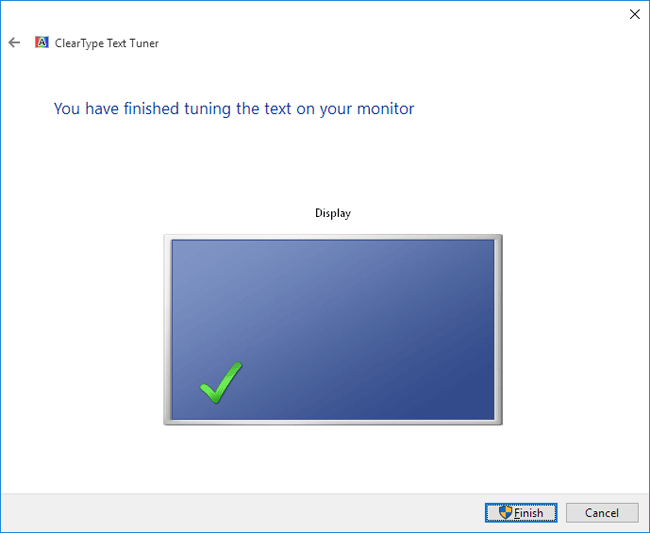
  5. On the appearance of last window click Finish after completing the tuning of the text for your monitor.

    finish-tuning-text

Method 2: Turn On / Off ClearType from Settings Charm

  1. Click the Start button and select Settings from the Start Menu.
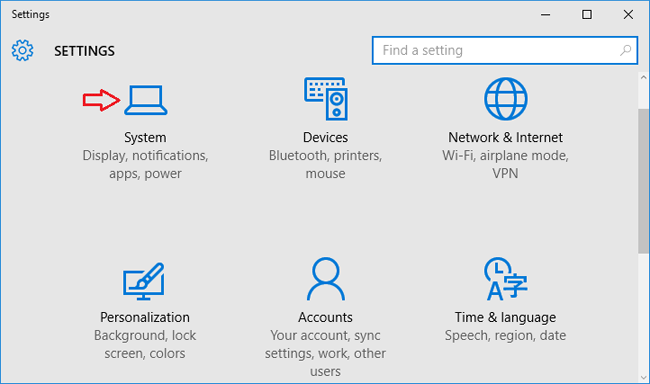
  2. When the Settings app opens, click System.

    settings-charm

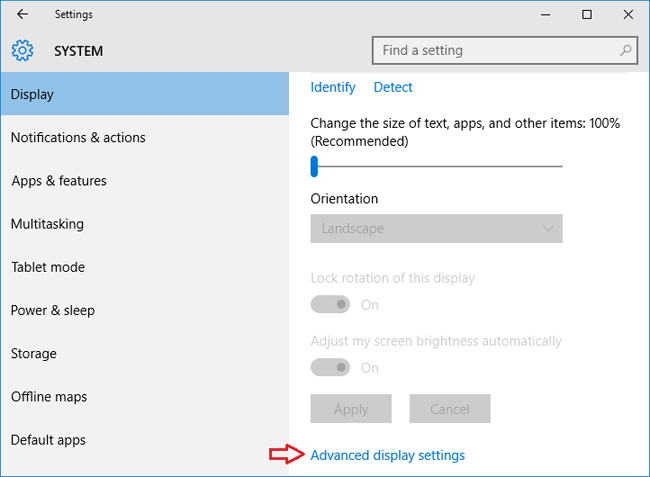
  3. From the Display settings, select Advanced display settings.

    display-settings

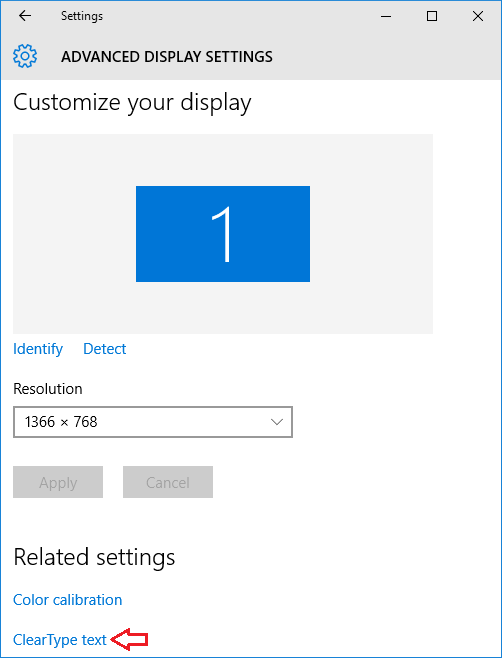
  4. Choose ClearType text below Related Settings. The ClearType Text Tuner window will appear. It lets you to turn on / off ClearType, and fine tune how the text on your computer looks.

    cleartype-text

Method 3: Turn On / Off ClearType from Control Panel

  1. To get started, you need to access the Control Panel. In Windows 10, just press the Windows key + X to open the WinX menu and click Control Panel.
  2. When you see the Control Panel, set the View by option to Large icons. Click on Display.

    control-panel

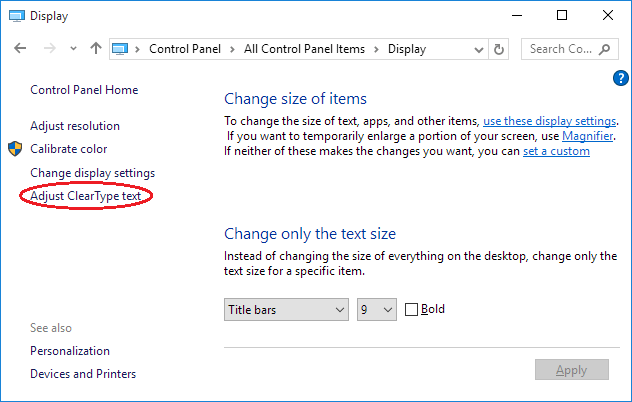
  3. On the right pane of the Display window click on Adjust ClearType Text link.

    adjust-cleartype

  4. A ClearType Text Tuner window will appear on your screen. Check or uncheck the checkbox Turn on ClearType and click Next button to begin tuning the text on your monitor.

How to Stream Video / Audio from PC to Sony TV Wirelessly

March 8th, 2016 by Admin

Like many people, you probably have lots of music, video and photo files stored on your computer. There might be times when you want to play them on your TV. In this tutorial we’ll walk you through the steps of streaming video / audio from a Windows PC to Sony TV wirelessly. No need to install any third-party software.

You’ll need:

  • A computer running with Windows 10, 8 or 7
  • Sony TV with built-in WiFi and DLNA support
  • Wireless network with DHCP enabled (WiFi)

How to Stream Video / Audio from PC to Sony TV Wirelessly

There’s actually an open standard for sharing media files across a home network. It’s called the Digital Living Network Alliance (DLNA), and you probably already have everything you need to use it. Here we’ll set up your PC as a DLNA media server, and the TV will work as a DLNA renderer to receive stream over the LAN.

Part 1: Connect Your TV to A Network Using Wireless Connection

It’s pretty easy to configure your Sony TV to connect to wireless LAN. Follow these steps:

tv-settings

Press the HOME button, then select [Settings] > [Network] > [Network setup] > [Easy].
Choose Wi-Fi and follow the on-screen instructions to complete the set-up.

Note: When entering Wi-Fi passwords, press OK to bring up the virtual keyboard. Click NEXT key on the virtual keyboard when it’s done.

Part 2: Set Up Your Computer as a Media Server

Windows Media Player is the built-in software available in Windows 10/8/7 that you can use to share your media over the network to DLNA-compliant devices. Before getting started, you need to turn on media streaming options in Windows.

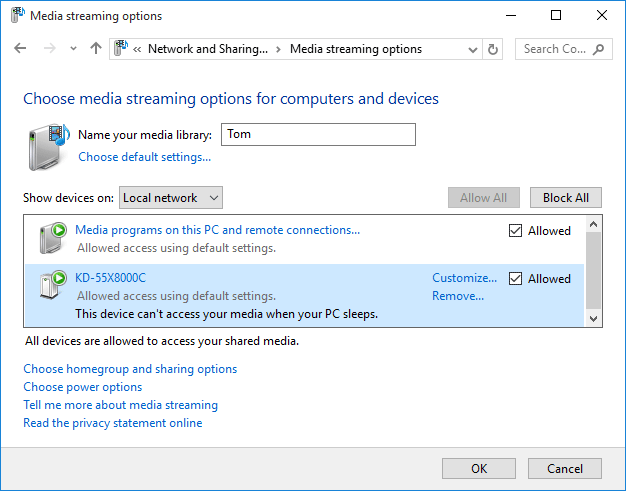
media-sharing-options

You will then be prompted with a list of DLNA-compliant devices that Windows has found on your wireless network. Select the Sony TV you want to share with and then OK. In my example, my Sony TV is shown with its model KD-55X8000C.

Now open Windows Media Player. Drag your favorite movies, musics or photos stored on your computer, then drop them into Windows Media Player’s library.

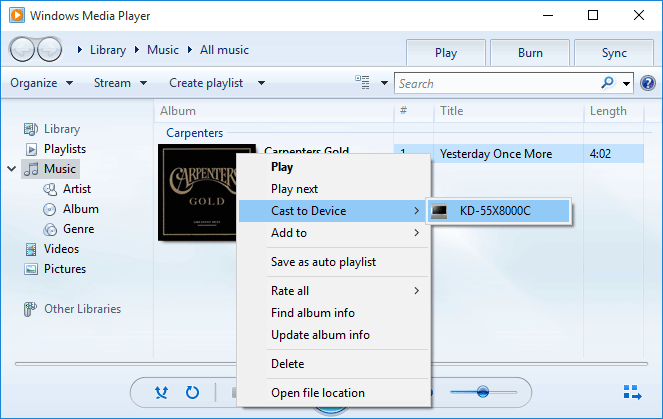
Right-click on the videos or audios you want to watch on TV, select “Cast to Device” and choose your TV from the menu.

cast-to-device

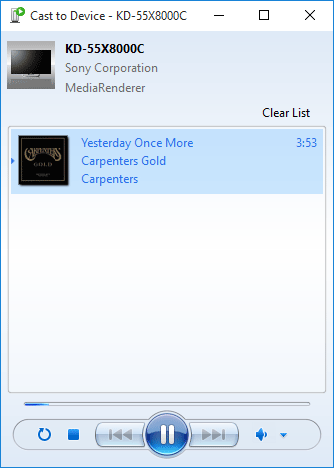
Once the “Cast to Device” remote control window is launched, you can reorder or delete items, add to the queue, or toggle repeat. It’s even possible to add new media items from Windows Media Player or Windows Explorer by dragging them into this window.

play-video-on-TV

So this is how you can stream a video or audio fro a Windows PC to TV over a wireless network. Enjoy it!

How to Turn On Media Streaming in Windows 10, 8 and 7

March 8th, 2016 by Admin

Is it possible to stream your favorite movies from a Windows PC to TV or Xbox 360? Nowadays most of new TVs support the DLNA feature, just turn on the Media Streaming in Windows, and you can then watch your videos on TV connected to LAN, without having to transfer the videos over a USB drive. In this tutorial we’ll show you 2 ways to turn on media streaming in Windows 10, 8 and 7.

Method 1: Turn On Media Streaming from Windows Media Player

  1. Launch Windows Media Player.
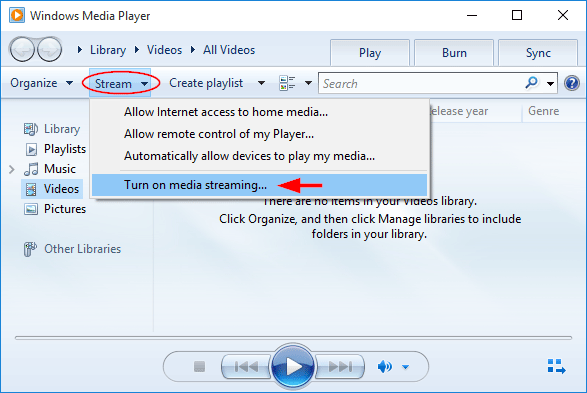
  2. From the Player Library view, click on Stream and choose “Turn on media streaming“.

    turn-on-media-stream

    If “More streaming options” is shown in the drop-down menu, it indicates media streaming is already turned on.

  3. Click on Turn on media streaming.

    turn-on-media-sharing

  4. Here you can give your media library a name. You’ll also see a list of detected media devices and players on your network. You can allow or block each player from accessing your media. Simply select “Local network” and click on “Allow All“, it will allow all devices on the LAN access to your media library.

    media-sharing-options

    If you want to turn off media streaming later, just click on “Block All“.

However, the “Turn on media streaming” option is not available in all versions of Windows Media Player, and you might have to turn on media streaming using the Control Panel.

Method 2: Turn on Media Streaming from Control Panel

  1. Open the Control Panel. If you’re running Windows 10 or 8, just press the Windows key + X to open the WinX menu and then select “Control Panel“.
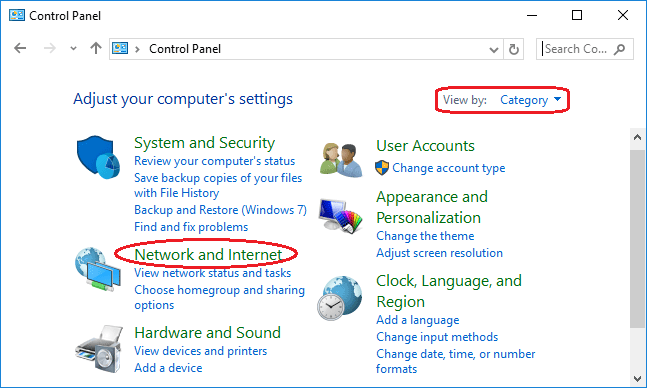
  2. By default, the Control Panel should open in Category view. Click Network and Internet.

    network-and-internet

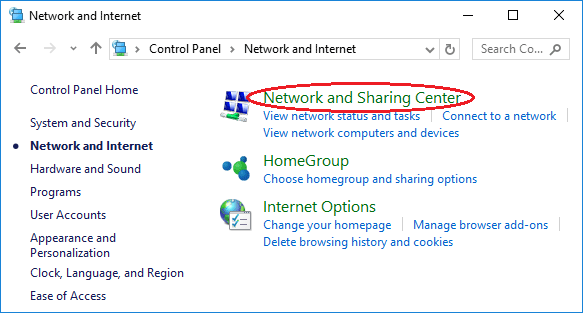
  3. Click Network and Sharing Center.

    network-sharing-center

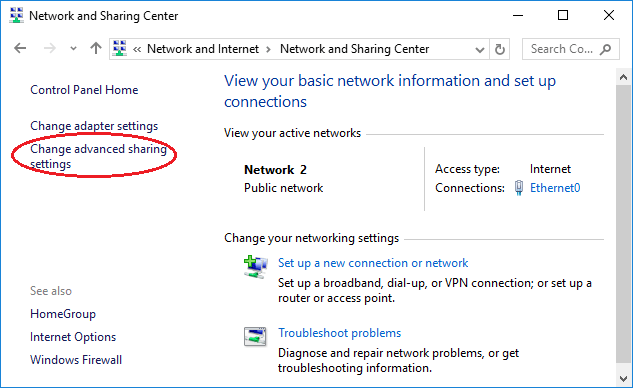
  4. In the left pane, click Change advanced sharing settings.

    advanced-sharing-settings

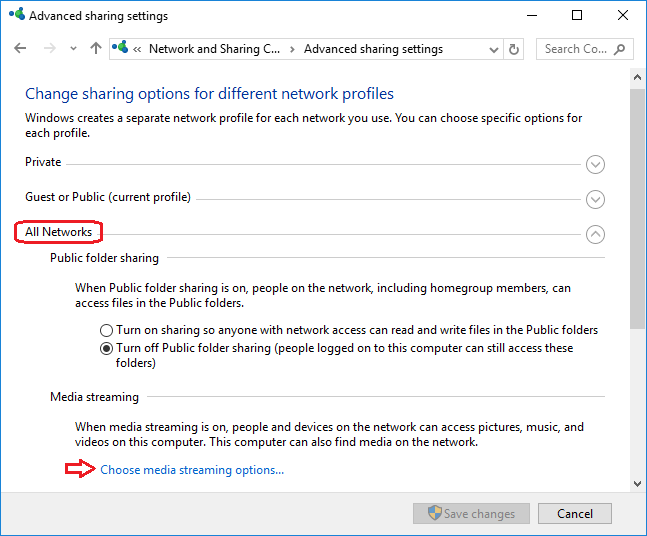
  5. To enable media streaming and other options, select “All Networks” type and click on “Choose media streaming options” as shown below.

    choose-media-sharing-option

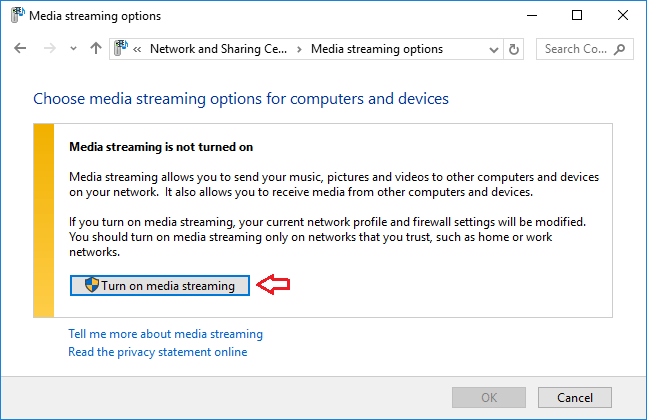
  6. Click on Turn on media streaming. If you don’t see that button, media streaming is already turned on. You’re done.

    turn-on-media-sharing

  7. On this screen, you’ll see all of the DLNA-compatible devices that Windows Media Player recognized on your local network. Click on Allow All and this will allow all networked machines access to your media library. (If you want to turn off media streaming later, just click on “Block All“.)

    media-sharing-options

3 Simple Ways to Open Windows Media Player in Windows 10

March 8th, 2016 by Admin

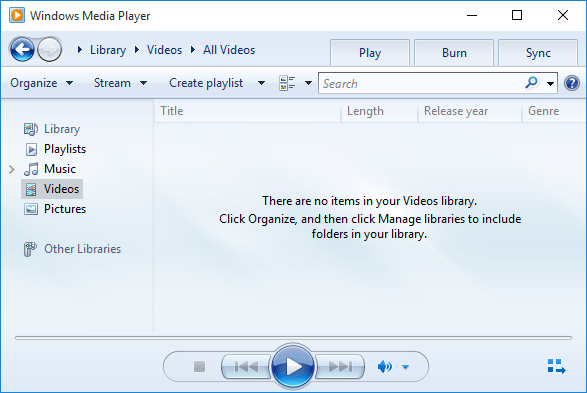
Windows Media Player 12 is still available as part of Windows 10 that can play more music and video than ever. In this article we’ll show you 3 ways to open Windows Media Player in Windows 10.

windows-media-player

Option 1: Open Windows Media Player from Start Menu

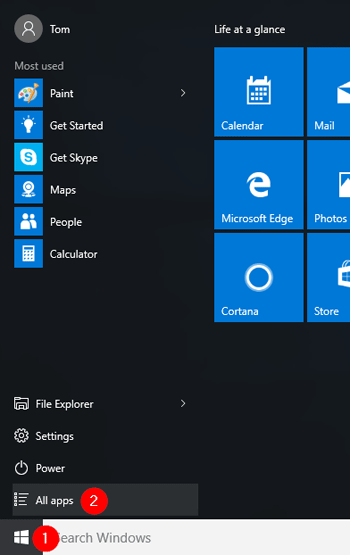
Click the Windows icon from the bottom-left corner of the screen, this will open the Start Menu. Next click on All apps to view all apps in alphabetical order.

start-menu

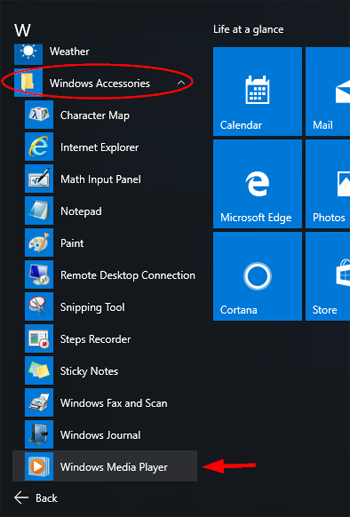
Scroll down to the letter “W” in the list. Expand the “Windows Accessories” folder and you can find the shortcut named “Windows Media Player“. Click on it to launch Windows Media Player.

browse-all-apps

Option 2: Open Windows Media Player by Search

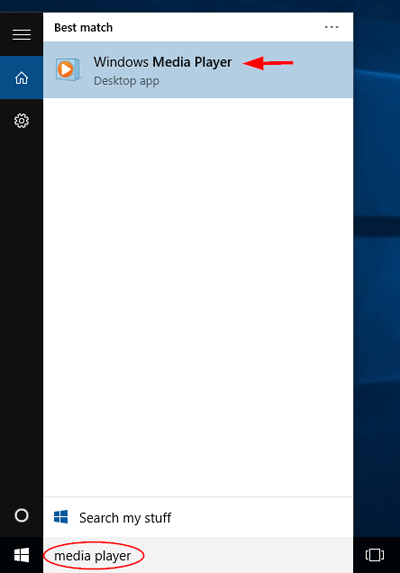
Click on the Cortana Search Box in the taskbar and type in media player. If the Cortana Search Box is hidden, you can access it by pressing the Windows key + S.

search-for-media-player

Click on Windows Media Player that is shown in the search results.

Option 3: Open Windows Media Player from the Run box

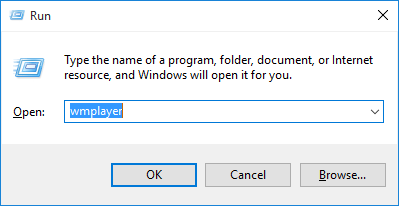
Just press the Windows key + R to open the Run box.

wmplayer

Type wmplayer and hit Enter. This will also open the Windows Media Player quickly.

Windows 10 Command Prompt: New Console vs. Legacy Console

March 4th, 2016 by Admin

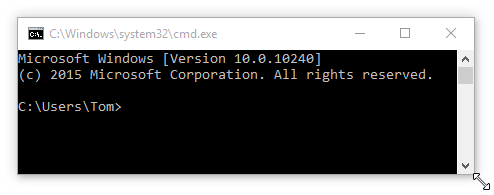
If you have upgraded to Windows 10, you may have noticed that it features an improved Command Prompt. For years, we have suffered the limitations of the Command Prompt such as not able to paste text using Ctrl+V or resize the window. Now all these features are included with the new Command Prompt.

resize-command-prompt

The new Command Prompt also allows you to switch back to use only legacy console. In this article we’ll explain in detail the differences between new console and legacy console for Windows 10 Command Prompt.

Part 1: Enable / Disable Legacy Console in Windows 10 Command Prompt

Open a Command Prompt. Right-click on the title bar and select Properties from the context menu that opens up..

cmd

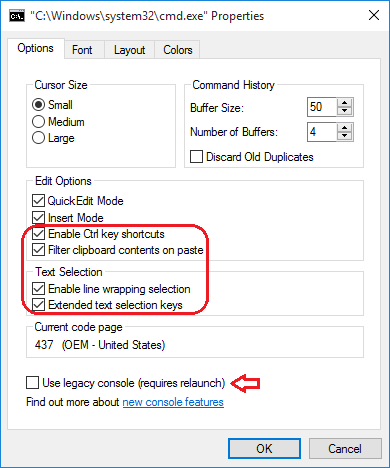
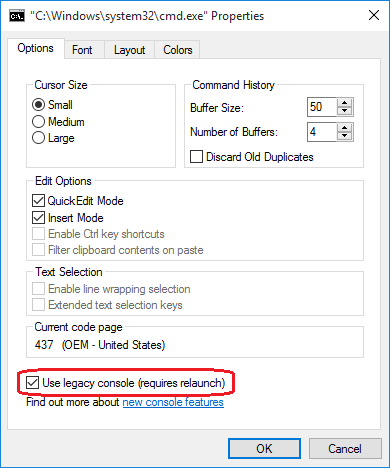
Go to the Options tab and you can see a new option called “Use legacy console (requires relaunch)“. In Windows 10, the new console is enabled by default so you should see the “Use legacy console” option is unchecked.

new-cmd-console

If you want to use an old legacy Command Prompt, just uncheck the “Use legacy console (requires relaunch)” option. When legacy console is enabled, only two edit options are available: QuickEdit Mode, Insert Mode. To access other edit options such as “Enable new Ctrl-key shortcuts“, you have to enable the new console by unchecking the “Use legacy console (requires relaunch)” option.

legacy-cmd-console

Part 2: List of Windows 10 Command Prompt Features

To help you understand the differences between new console and legacy console, we’ll go over the most important features available in Windows 10 Command Prompt:

QuickEdit Mode (available in both legacy console and new console)

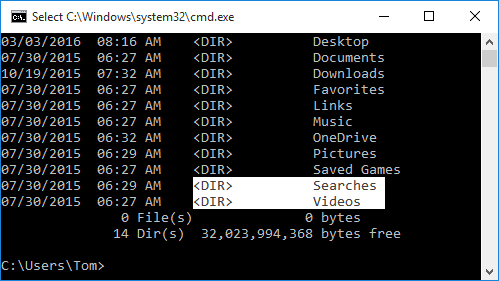
This option allows you to use the mouse to copy and paste text to and from the Command Prompt window. When QuickEdit Mode is disabled, you need to right-click the title bar of the Command Prompt, click Edit and then Mark, before you can drag the mouse to select the data you want to copy.

text-selection

Insert Mode (available in both legacy console and new console)

It has the same function as the Insert keyboard key: the cursor inserts a character at its current position, forcing all characters past it one position further. If Insert Mode is disabled, then when you type, what you’re typing overwrites any text that is present in your current location.

Enable Ctrl key shortcuts (available in new console only)

It lets you use a set of keyboard shortcuts like Ctrl + C or Ctrl + V inside the Command Prompt, which is something you couldn’t do in previous versions.

CTRL + A – Select all
CTRL + C – Copy
CTRL + F – Find
CTRL + M – Mark
CTRL + V – Paste
CTRL + ↑/↓ – Scroll (line) up/down
CTRL + PgUp/PgDn – Scroll (page) up/down

Filter clipboard contents on paste (available in new console only)

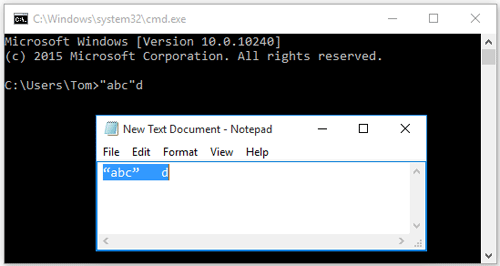
When you paste contents from the clipboard to the command prompt, tabs are automatically removed and smart quotes are converted to regular ones.

filter-clipboard-contents

Enable line wrapping selection (available in new console only)

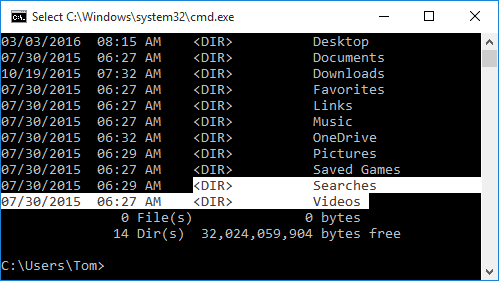
Previous versions of Command Prompt only allow you to use a square selection box for selecting text in block mode. After you copied the text, you have to correct the line wrapping with a text editor. In Windows 10, if you’ve enabled the “Enable line wrapping selection” option, you can select the text just like you select text in a regular text editor like Notepad.

line-wrapping-selection

Extended text selection keys (available in new console only)

This option allows you to use a set of common keyboard shortcuts in Command Prompt. For example, you can use Shift + Arrow keys to select characters or lines of text, or Ctrl+ A to select all the text on the command line or all the text in the window.

That’s it. Now you know about all new features in Windows 10 Command Prompt, and the differences between new console and legacy console.

5 Ways to Run Powershell as Administrator in Windows 10

March 2nd, 2016 by Admin

Is there a way to run a PowerShell Prompt with elevated privileges from a command line? In this tutorial we’ll show you 5 simple ways to open PowerShell as Administrator in Windows 10.

Method 1: Run PowerShell as Administrator Using Cortana Search Bar

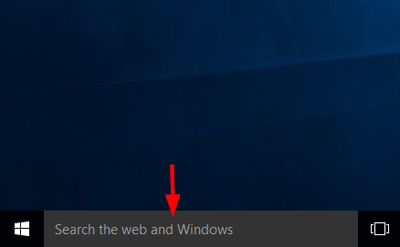
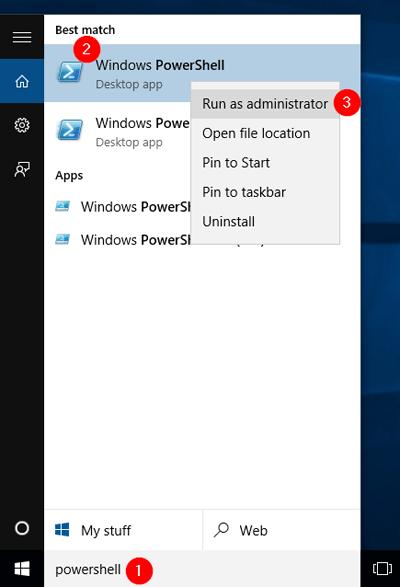
Windows 10 comes with a Cortana search box in the taskbar. Just type powershell in the search box.

cortana

Right click on Windows PowerShell on the results and select Run as administrator.

run-powershell-from-cortana

The UAC prompt will ask you for your consent. Click Yes, and the elevated PowerShell prompt will open.

run-powershell-as-admin

Method 2: Run PowerShell as Administrator Using the Run Window

Press Windows + R keys together on the keyboard to open the Run box. Type powershell and hit Enter.

run

Windows PowerShell will launch with the rights of the current user.

If you want to switch from normal mode to administrator mode, type the following PowerShell command and press Enter.
Start-Process powershell -Verb runAs

switch-to-admin-mode

Method 3: Run PowerShell as Administrator from Command Prompt or WinX Menu

Open the Command Prompt as administrator, type powershell and press Enter.

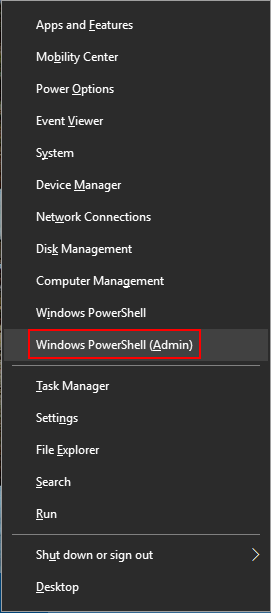
Since Windows 10 Creators Update, you can also access PowerShell from the WinX menu. Press Windows + X keys together on the keyboard to open the WinX menu. Click on “Windows PowerShell (Admin)“.

Method 4: Run PowerShell as Administrator from Task Manager

First of all you need to access the Task Manager. This can be done by pressing Ctrl + Shift + Esc in Windows 10 / 8. By default Task Manager shows fewer details, and you need to click More Details.

Click on File menu and select New Task.

task-manager

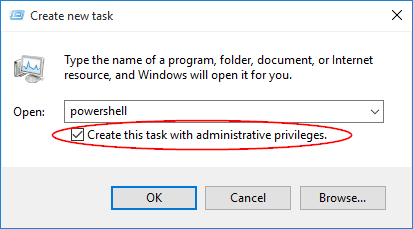
Type powershell and select the “Create this task with administrative privileges” check box and click OK to open an elevated PowerShell prompt.

create-new-task

Method 5: Run PowerShell as Administrator from Start Menu

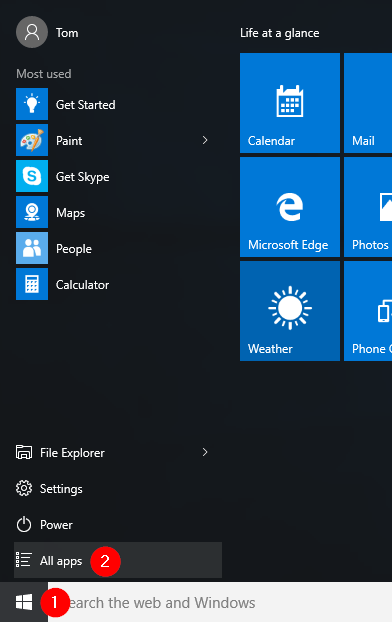
Click on the Start button to open the Start menu. Next click on All apps button at the bottom to expand the list of apps.

start-menu

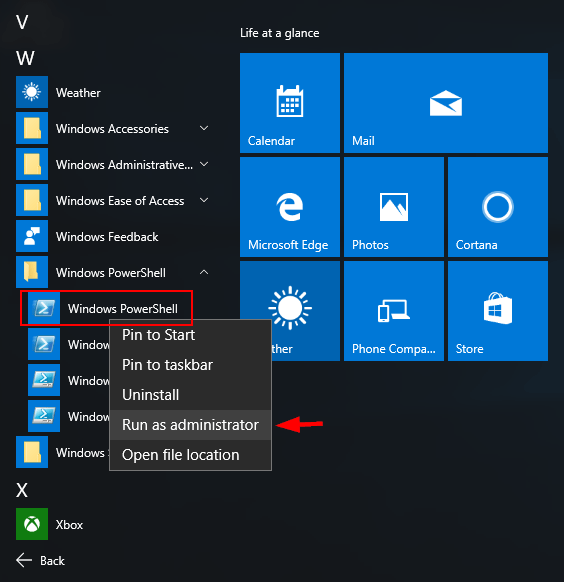
Scroll to the Windows PowerShell folder. Expand the folder and then right-click on Windows PowerShell shortcut. Select “Run as administrator“.

run-powershell-from-start-menu

If you’re running Windows 7, Vista or XP, in order to start Windows PowerShell with administrator privileges, you need to click Start -> All Programs -> Accessories, point to Windows PowerShell, right-click Windows PowerShell, and select Run As Administrator.