Archive for June, 2016

Windows 10: Make File Explorer Open This PC Instead of Quick Access

June 8th, 2016 by Admin

If you’re using Windows 10, you might noticed that whenever you open File Explorer, it would always show you the Quick Access view by default. Quick Access only displays recently viewed files and frequently used folders, and most of us have accustomed to seeing the drives upon launching File Explorer. In this tutorial we’ll show you how to make Windows 10 File Explorer open This PC instead of Quick Access.

How to Make Windows 10 File Explorer to Open to the This PC View?

Open File Explorer and from the Ribbon, select the File menu, and then choose Change folder and search options.
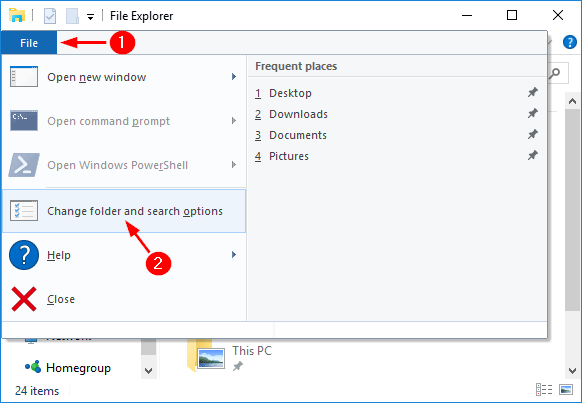
change-folder-options

This will display the Folder Options window. Click the General tab, select “This PC” from the Open File Explorer To drop-down box, and click OK.
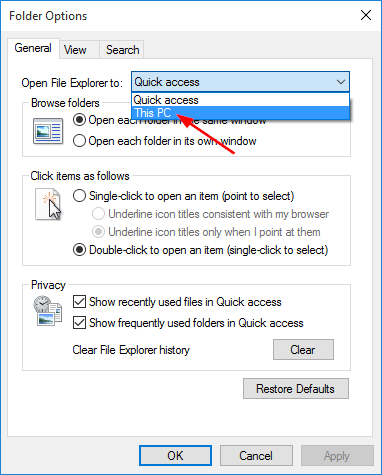
open-file-explorer-to-this-pc

Close out of the File Explorer. Now, when you launch a new File Explorer window, you’ll start at This PC view, which you’re probably used to from past versions of Windows.

file-explorer

How to Reset,Pin or Unpin Folders to Quick Access in Windows 10

June 7th, 2016 by Admin

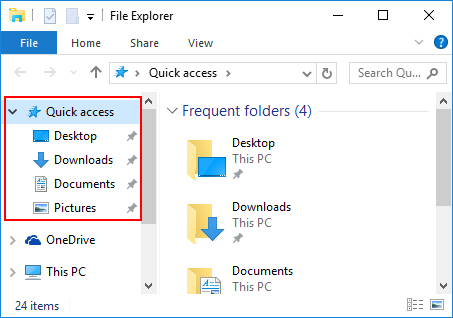
Quick Access is a new feature introduced in Windows 10, replacing Favorites in previous versions of Windows which allows you to pin folders for easy access. The frequently-used shortcuts, like Desktop, Downloads, Documents and Pictures, are pinned to Quick Access by default.

quick-access

This tutorial shows you how to pin your own personal folder to Quick Access, unpin a folder or reset Quick Access to default.

Part 1: Pin Folders to Quick Access

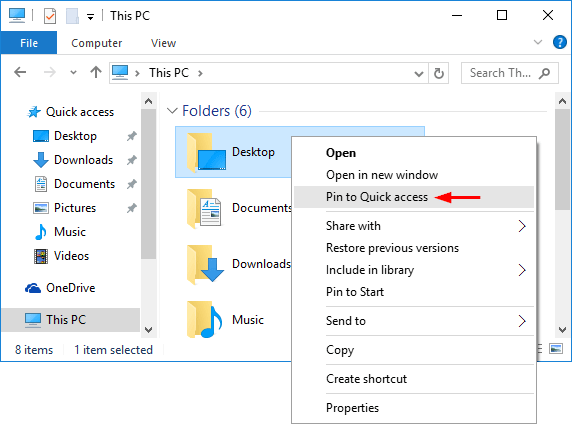
Open the File Explorer. Now select the folder, library or even a drive that are to be pinned to Quick access. Right-click on it and select “Pin to Quick access” from context menu.

pin-to-quick-access

Your selected item will be quickly pinned to the Quick access section from File Explorer.

Part 2: Unpin Folders from Quick Access

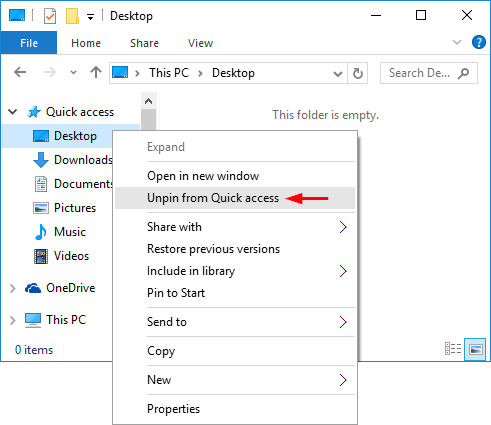
Open the File Explorer. From the left Quick Access pane, right-click on the item you want to unpin and select “Unpin from Quick access” from the drop-down menu.

unpin-from-quick-access

Now your selected item will disappear from Quick Access.

Part 3: Reset Quick Access Folders to Default

Get Quick Access messed up? Here’s a simple way to reset / restore Quick Access folders to default:

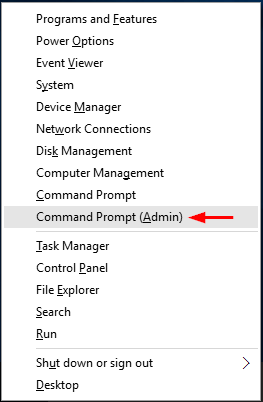
  1. Press the Windows key + X to open the WinX menu. Select Command Prompt (Admin).

    winx-menu

  2. Now copy the following command and paste it into the Command Prompt. Press Enter.
    del /F /Q %APPDATA%\Microsoft\Windows\Recent\AutomaticDestinations\*

    reset-quick-access-to-default

  3. Close Command Prompt and re-launch File Explorer. You’ll see that the Quick Access is restored to default and only the default folders are pinned.

Prevent Users from Changing Lock Screen Image in Windows 10 / 8

June 5th, 2016 by Admin

The lock screen appears when you boot your PC or press Windows + L key combination. It gives you only the basic information such as date, time and weather. You have to click it or swipe away before you can login into Windows 10/8. In this article we’ll show you 2 methods to prevent users from changing lock screen image in Windows 10 / 8.

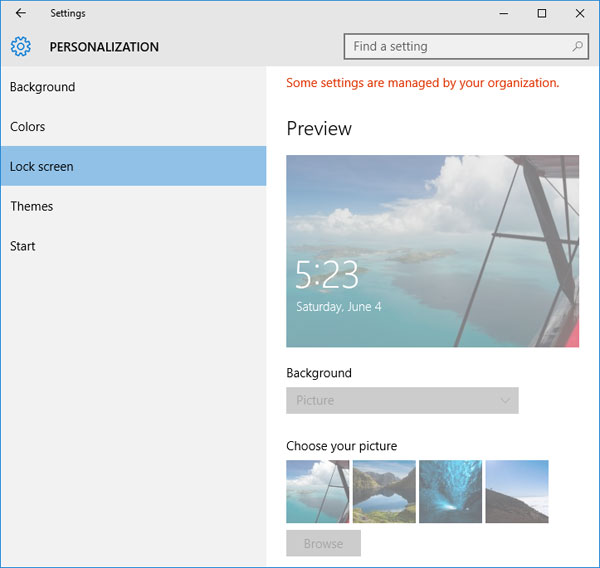
unable-change-lock-screen

Method 1: Disable Changing Lock Screen Using Group Policy

This first method is the easiest, but it may not work for some users, as the Group Policy Editor program is not included in the Home edition of Windows.

  1. Press the Windows key + R on your keyboard to open the Run dialog. From here, type gpedit.msc and press Enter.
  2. You should see the Group Policy Editor window pop up. Navigate to:
    Computer Configuration -> Administrative Templates -> Control Panel -> Personalization
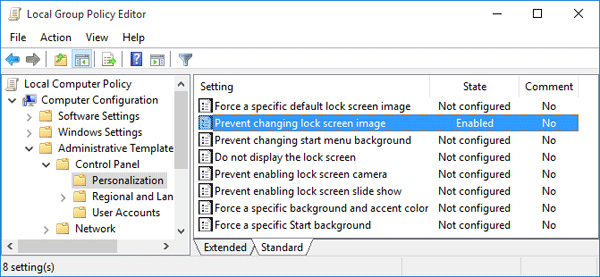
  3. Double-click the “Prevent changing lock screen image” entry on the right side of the window. Change the setting from Not Configured to Enabled.

    prevent-changing-lock-screen

  4. Close the Local Group Policy Editor window. When you want to change the lock screen image, you will notice that the options are grayed out.

Method 2: Disable Changing Lock Screen Using Registry Editor

  1. Press the Windows key + R on your keyboard to open the Run dialog. From here, type regedit and press Enter.
  2. In the left pane of Registry Editor, navigate to the following registry key:
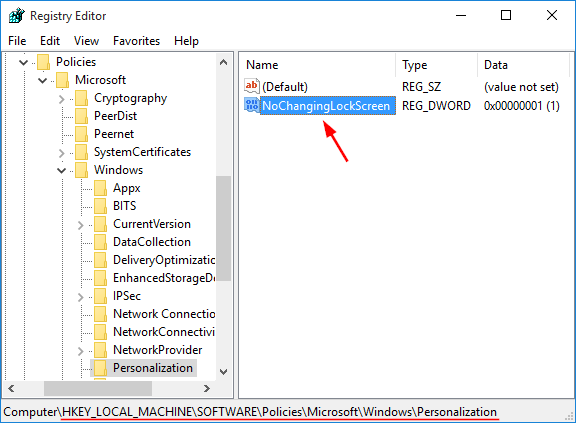
    HKEY_LOCAL_MACHINE\SOFTWARE\Policies\Microsoft\Windows\Personalization

    If the Personalization key is not present, create a new key under Windows and rename it to Personalization.

  3. On the right side of the window, right-click on an empty space, and choose New -> DWORD (32-bit) Value. Name it NoChangingLockScreen.
  4. Double-click on the newly created DWORD value, and change its value from 0 to 1. Click OK.

    no-changing-lock-screen

  5. Now you should be unable to change / modify the lock screen background image.