Archive for November, 2016

2 Ways to Mount and Unmount VHD / VHDX from Command Line

November 2nd, 2016 by Admin

Virtual hard disk (VHD / VHDX) is a disk image file format for storing the complete contents of a hard drive. In this tutorial we’ll show you how to mount and unmount VHD / VHDX file from Command Prompt and PowerShell.

Method 1: Mount and Unmount VHD/VHDX from Command Prompt

This method allows you to mount and unmount VHD/VHDX file in all versions of Windows, including Windows 10 / 8 / 7 and Windows Server.

  1. Open the Command Prompt in Administrator mode.
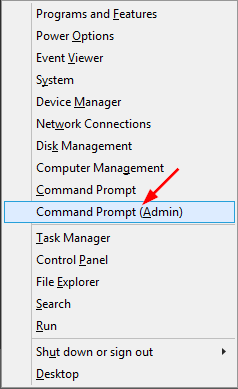
    winx

  2. At the Command Prompt, type diskpart and press Enter to access the command-line disk partitioning utility.
  3. Before mounting or unmounting virtual disk, you need to specify the location of your vhd/vhdx file. Type the following command and hit Enter.
    select vdisk file="[location of vhd]"
  4. You can now mount or mount your VHD/VHDX file using the below commands:

    • To mount VHD/VHDX file, type attach vdisk and press Enter. You can see a new virtual hard drive in your Disk Management and Windows Explorer.
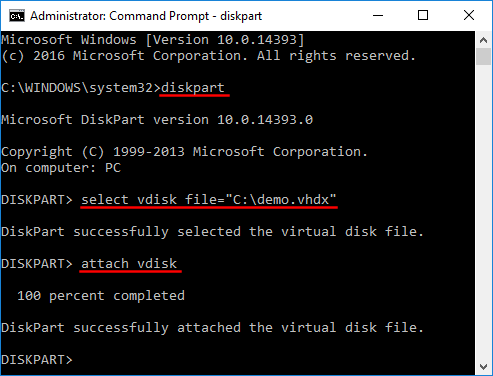
      mount-vhd-from-command-line

    • To unmount a virtual hard disk, type detach vdisk and press Enter.

Method 2: Mount and Unmount VHD/VHDX from PowerShell

In Windows Server 2016 / 2012 / 2008, you can also mount and unmount VHD/VHDX file using the PowerShell cmdlet. Here’s how:

  1. Open the PowerShell as Administrator.
  2. When the command-line window opens, you can run the Mount-VHD cmdlet to mount your vhd/vhdx file.
    Mount-VHD –Path "[location of vhd]"
  3. To unmount your virtual hard disk, just run the Dismount-VHD cmdlet instead.
    Dismount-VHD –Path "[location of vhd]"

If you get the error message like “Mount-VHD is not recognized as the name of a cmdlet“, you need to add a feature named “Hyper-V Module for Windows PowerShell” to your server.
Bypass Windows Admin Password on Panasonic Toughbook

November 2nd, 2016 by Admin

Haven’t used your Toughbook for a long time and forgot the admin password? Not being able to log into your own computer is annoying. Luckily there is a bootable CD that can help you get back into your Panasonic Tougbook – PCUnlocker. Here we’ll walk you through the steps of bypassing Windows 10/7 admin password on Panasonic Toughbook.

Note: This method requires you to change the boot priority order in the Panasonic Toughbook. If you’ve forgotten the BIOS password, please try the backdoor password Biostar, or contact Panasonic customer support for help.

Part 1: Create A Bootable USB Drive

To get started, download the PCUnlocker Enterprise and save the .zip file to the local hard drive of your current PC. Double-click the zip file and drag the pcunlocker.iso file and drop it to your desktop.

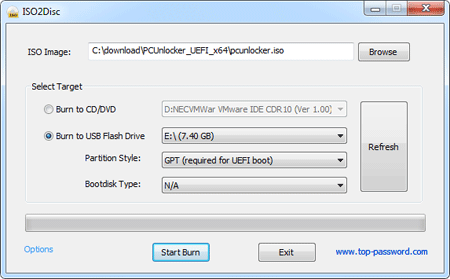
Download the free USB/CD creator software ISO2Disc. Launch ISO2Disc, then click the Browse button to select the pcunlocker.iso file on your desktop. Choose your USB drive from the device list. If your Panasonic Toughbook is running Windows 10, select the “GPT (required for UEFI boot)” option. Otherwise choose the default option “MBR (required for legacy/CSM boot)“.

Click Start Burn. It begins creating a bootable USB drive and installing PCUnlocker onto it.

Part 2: Reset Panasonic Toughbook Password

Plug the USB drive into the USB port of Panasonic Toughbook. While turning on the machine, hold down the F2 key (or DEL key) until you see the UEFI/BIOS Setup screen. Under the UEFI/BIOS Setup, select the Boot tab and move your USB drive to the top of boot priority order. Save your changes and exit.

After booting from USB, it will load the WinPE OS temporarily. When you get to the PCUnlocker program, select the administrator account and click on Reset Password button. This will remove your lost Windows password and restore your account’s properties to default: unlocked, enabled and never expire.

Reboot your machine and unplug the USB drive. Boot into the UEFI/BIOS again and change the boot priority order back to hard drive first. You can then boot Panasonic Toughbook into Windows desktop without entering a password.

5 Ways to Open Task Scheduler in Windows 10

November 1st, 2016 by Admin

How can I access Task Scheduler from command line? Task Scheduler is a built-in utility in Windows that allows you to run an application, service or script at a certain time. In this tutorial we’ll show you 5 ways to open Task Scheduler in Windows 10.

Method 1: Open Task Scheduler from Run

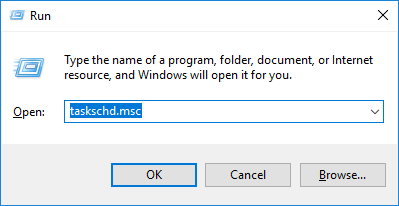
Just press the Windows key + R to open the Run box. Type taskschd.msc and press Enter.

taskschd

Method 2: Open Task Scheduler from Command Prompt

Open the Command Prompt. In Windows 10, you can press the Windows key + X and select Command Prompt from the Power User menu.

winx

At the Command Prompt, type control schedtasks and hit Enter.

task-scheduler-via-cmd

Method 3: Open Task Scheduler Using Cortana Search

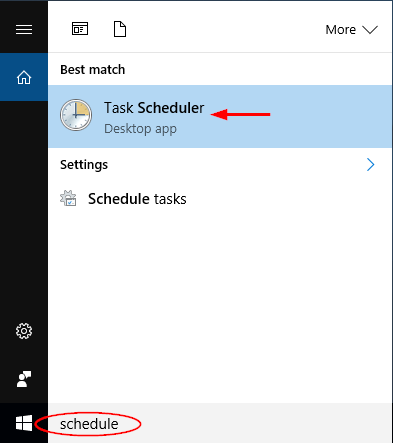
Click the Cortana Search box on the Windows 10 taskbar, type schedule and click on the Task Scheduler search result.

search-task-scheduler

Method 4: Open Task Scheduler from Control Panel

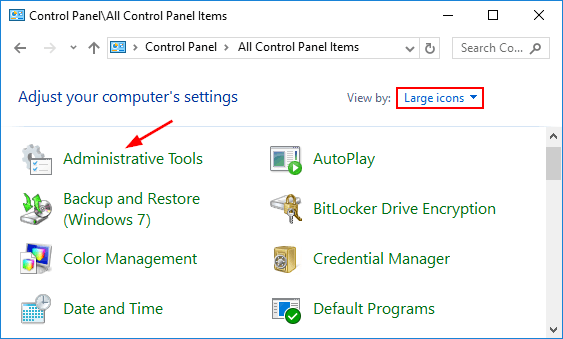
Open the Control Panel in Windows 10. Set the View by option to Small icons or Large icons. Click Administrative Tools.

administrative-tools

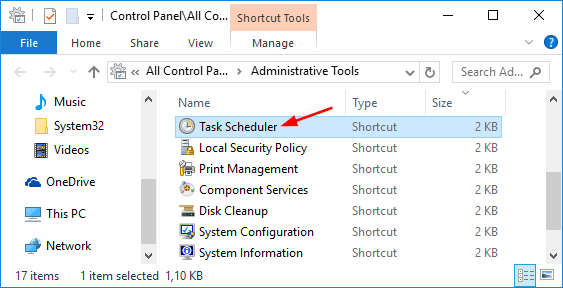
From the new window, you can click the Task Scheduler shortcut to launch it.

task-scheduler-shortcut

Method 5: Open Task Scheduler from Start Menu

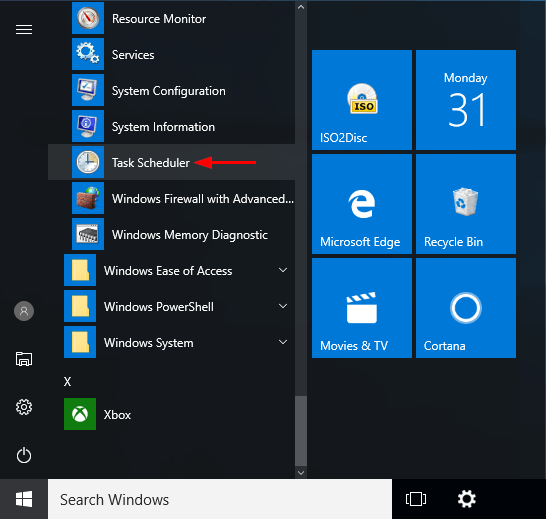
Click the Start button in Windows 10. From the Start Menu, expand Administrative Tools and then click Task Scheduler.

task-scheduler-via-start-menu

If you’re running Windows 7, you can find Task Scheduler by going to Start Menu -> All Programs -> Accessories -> System tools -> Task Scheduler.