Archive for February, 2025

How to Remove “Edit in Notepad” Context Menu in Windows 11

February 26th, 2025 by Admin

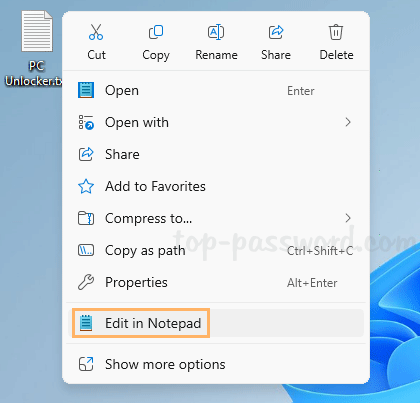
Is there a way to remove “Edit in Notepad” or other unnecessary entries from context menu? If you never choose to use Notepad to open text files, the “Edit in Notepad” context menu will become redundant and you can delete it to keep your context menu neat. In this tutorial we’ll show you an easy way to remove “Edit in Notepad”, “Edit with Photos” or “Edit with Paint” context menus in Windows 11.

How to Remove “Edit in Notepad” Context Menu in Windows 11

  1. Open Registry Editor and head to this location: HKEY_CURRENT_USER\Software\Microsoft\Windows\CurrentVersion\Shell Extensions. Right-click the “Shell Extensions” key and choose New -> Key.
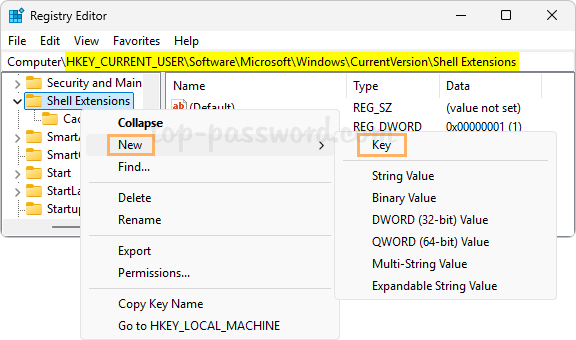
  2. Name the new key Blocked.

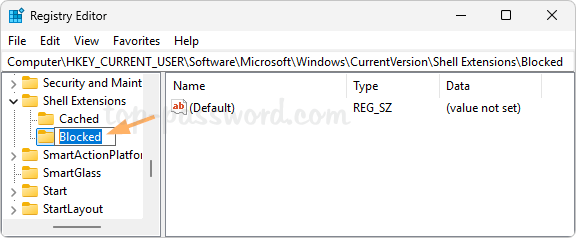
  3. Highlight the “Blocked” key and then go to the right pane, right-click any blank area and choose New -> String Value.

  4. To remove the “Edit in Notepad” context menu, name the new string {CA6CC9F1-867A-481E-951E-A28C5E4F01EA} and press Enter.

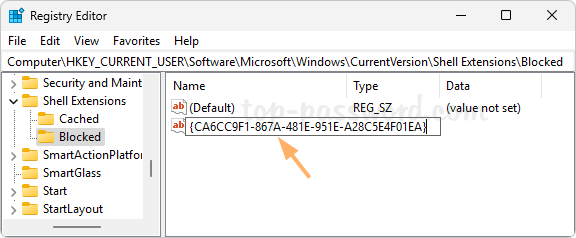
    You can also create a string named {BFE0E2A4-C70C-4AD7-AC3D-10D1ECEBB5B4} to remove the “Edit with Photos” context menu, or a string named {2430F218-B743-4FD6-97BF-5C76541B4AE9} to get rid of the “Edit with Paint” menu entry.

  5. Close Registry Editor. When you right-click any text file on your desktop, you’ll see that the “Edit in Notepad” entry has already disappeared from the context menu. Whenever you need to restore it, just delete the string you’ve created above in the Registry Editor.

Conclusion

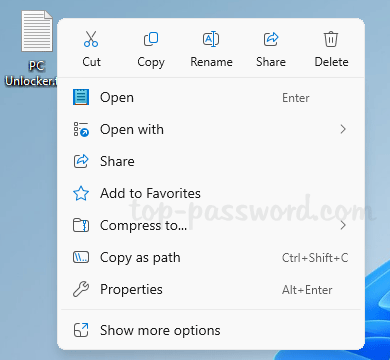
The above method allows you to remove “Edit in Notepad”, “Edit with Photos” or “Edit with Paint” from the standard context menu, but these menu entries are still visible from the extended context menu when clicking “Show more options”.

2 Ways to Uninstall DeepSeek Models from Windows 11

February 19th, 2025 by Admin

How can I get rid of unused DeepSeek models? Everyone can consider installing the DeepSeek AI model locally and use it internally for their own purposes. When you no longer need to use one or all of your DeepSeek models, here are simple ways to uninstall or remove DeepSeek models from Windows 11.

Method 1: Uninstall DeepSeek Models Using the Terminal Command

  1. Right-click the Start button on the taskbar, and then select “Terminal (Admin)” from the pop-up menu.

  2. In the Terminal window, type the following command to show the DeepSeek models you’ve installed. You need to take a note of the “Name” column which will be used in the next step.
    ollama list

  3. Run the following command to remove an installed model, replacing “your_model_name” with the model you want to remove.
    ollama rm your_model_name

  4. This will delete the specified model from your system. You can repeat the above step to uninstall other DeepSeek models one by one.

Method 2: Uninstall Ollama and all DeepSeek Models at one time

If you don’t want to experiment with Ollama and DeepSeek, simply uninstall Ollama from the Settings app and it will also help you delete all DeepSeek models at the same time.

  1. Press the Windows key + I to launch the Settings app. Select Apps in the left sidebar and then click “Apps & features” on the right pane.

  2. Type ollama in the search box to locate the Ollama app.

  3. Next, click the three dots button beside the Ollama app and select “Uninstall” in the menu that appears.

  4. After uninstalling Ollama, open File Explorer and go to the following location, you’ll find that all the installed DeepSeek models are also deleted automatically.
    C:\Users\username\.ollama\models

That’s it!

Beginners Guide: Install DeepSeek Locally in Windows 11

February 5th, 2025 by Admin

DeepSeek-R1 is a free yet powerful AI model, with performance comparable to OpenAI-o1. Unlike ChatGPT, DeepSeek-R1 can even function without internet connection and you can install it on your local PC. In this tutorial we’ll walk you through the steps to install DeepSeek-R1 locally in Windows 11 using Ollama.

How to Install DeepSeek Locally in Windows 11

  1. Before getting started, we need to download Ollama from its official website, which enables us to quickly run DeepSeek-R1 locally with minimal configuration. Once the download is complete, double-click it to install on your local system.

  2. Open the DeepSeek-R1 model page in Ollama, you’ll see different versions available including 1.5b, 7b, 8b, etc. Once choosing the appropriate version based on your PC’s hardware, the installation command will appear in the text box on the right side and you need to copy that command for running it later on.

    • 1.5b: Minimal resource usage (8 GB RAM).
    • 7b, 8b: Balanced performance and resource requirements (GPU: at least 8 GB VRAM).
    • 14b, 32b: Intermediate options for higher performance (GPU: 12-24 GB of VRAM).
  3. Right-click the Start button in the taskbar and choose “Terminal (Admin)“.

  4. When the Terminal window opens, paste the command you’ve copied previously and then press Enter. Wait for Ollama to download the DeepSeek-R1 model and this process could take a few minutes depending on your internet speed, as the model is several gigabytes in size.

  5. Once it’s done, you can begin interacting with DeepSeek-R1 via the command line. When the session is closed, you can launch a new session by running the command: ollama run deepseek-r1.

Conclusion

That’s how to easily install DeepSeek-R1 model locally on Windows 11 computers. If your computer has a high performance GPU and enough memory, you can install multiple versions of DeepSeek-R1 and find out which one works the most ‌efficiently‌.