Author Archive

Restore Dell/HP/Acer/Sony/ASUS/Toshiba Computers to Factory Settings

February 12th, 2015 by Admin

Whether your system has been running slow or caught a virus, just perform a factory reset and everything will come back to normal. This will completely wipe your hard drive and restore the Windows system back to the state when you first bought it.

Most computers don’t come with Windows setup discs any more. Instead PC manufactures create a hidden recovery partition for their PCs. If your computer has a recovery partition, you can run the manufacturer’s recovery tool to restore your PC to factory settings. Here we’ll show you how to restore Dell/HP/Acer/Sony/ASUS/Toshiba/Gateway/Lenovo computers to its original factory shipped state.

Note: Factory reset will remove all your programs, files, passwords and other sensitive information. Make sure you back up all your personal files and gather the programs you’d like to reinstall. If you’ve forgotten the saved passwords or misplace your software license key, you can recover them with Password Recovery Bundle.

DELL: Dell Factory Image Restore
  1. Turn on the computer. When the Dell logo appears on the screen, press F8 several times to open the Advanced Boot Options menu.
  2. Use the Arrow keys to select Repair Your Computer and then press Enter.
  3. Specify the language settings that you want, and then click Next.
  4. Log in as a user who has administrative credentials, and then click OK.
  5. Depending on your configuration, you may need to select Dell Factory Tools and then Dell Factory Image Restore. Click Next to open the Confirm Data Deletion menu.
  6. Select the Yes, reformat hard drive and restore system software to factory condition check box and click Next.
  7. When the restore operation is completed, click Finish to restart the computer.
HP: HP System Recovery or Recovery Manager
  1. Turn on the computer and repeatedly press the F11 key, about once every second, until Recovery Manager opens.
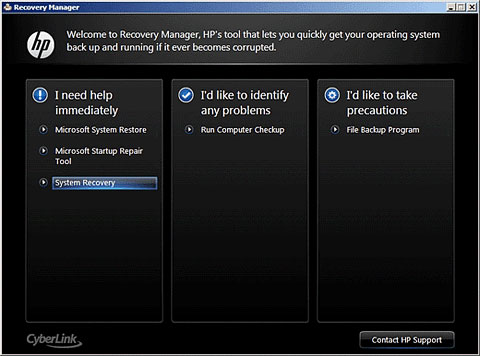
  2. Under I need help immediately, click System Recovery.

    hp-recovery-manager

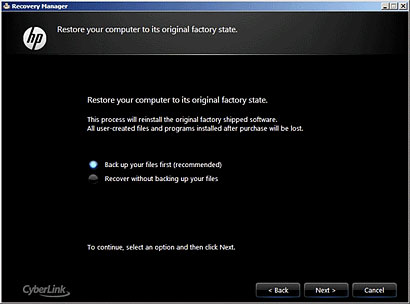
  3. Before restoring the computer to its original factory shipped condition, the program will prompt you to back up your files. Select Recover without backing up your files and click Next if you’ve already backed up personal files.

    hp-factory-reset

  4. Click OK in the warning that appears.
  5. After the system recovery is complete, click Finish to restart the computer. Complete the setup screens and wait until the computer finishes the setup.
Acer: Acer eRecovery
  1. Once your computer turned on, press and hold Alt key, then continuous press F10 button until you see Acer eRecovery System is running.
  2. Click Restore Operating System to Factory Defaults.

    Acer-eRecovery

  3. Click Next. Your hard drive’s original, factory-loaded contents will be recovered. The entire system restoration process takes about 40 minutes (may be vary for different computer).
Sony: Sony Vaio Recovery
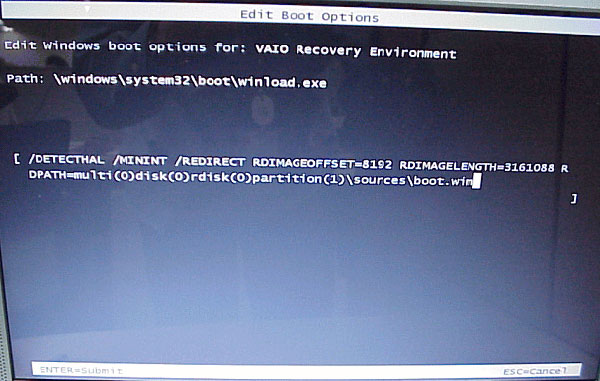
  1. Restart the computer and immediately begin tapping the F10 key until the Edit Boot Options screen is displayed.
  2. At the Edit Boot Options screen, press the Enter key.

    sony-edit-boot-options

  3. Choose Restore C: Drive and click Next.
  4. Tick the checkbox next to I Understand, click Start and confirm with Yes when prompted
  5. The recovery process will continue automatically up to the Welcome to Windows screen. Depending on the model, this process may take extended time to complete, but requires no user interaction until completion.
ASUS:
  1. Turn on your computer, and immediately press the F2 key until you reach the BIOS Setup Utility.
  2. Using the arrow keys, move to the Boot tab, disable the Boot Booster option. Save your changes and exit the BIOS.
  3. Restart the computer. Immediately press the F9 key while the computer is booting up.
  4. Select “Recover Windows to Entire HD” and press Enter.
  5. Press “Y” three times when asked if you are sure that you want to restore. The laptop will restore the factory settings.
Toshiba:
  1. Press and hold the 0 (zero) key on top of the keyboard (not the zero key on the numeric keypad) and at the same time, press the power button once to switch on your computer.
  2. When the Toshiba screen appears; release the 0 key.
  3. If prompted select 32bit or 64bit operating system, click Next.
  4. When prompted by the warning screen; click Yes to continue with the system recovery.
  5. Select Recovery of Factory Default Software, and click Next.
  6. Select Recover to out-of-box state, and click Next again.
  7. Please read and acknowledge this last warning screen. Click Next to start recovery.
Gateway:

Switch on your computer, press the Alt key on your computer keyboard, and then hit the F10 key during the startup process. This will redirect you to the Gateway Recovery Management program.

Next up, you need to click on the Restore System From Factory Default option and then choose the Next button to start out the restoration process. Wait for some time until the process is completed.

Lenovo:
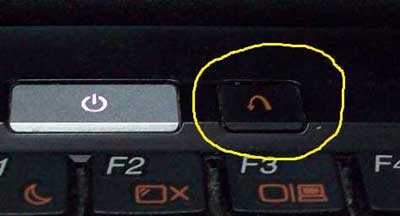
  1. Press on the Novo button at the top of your keyboard, your Lenovo computer should boot up and start the Lenovo OneKey Recovery System.

  2. Choose Restore to factory settings from the screen and proceed for the restoration.

Windows 10 to Add Native Support for FLAC and MKV

February 10th, 2015 by Admin

Microsoft has already confirmed that Windows 10 will come with native support for MKV (Matrsoka Video) and FLAC. FLAC (Free Lossless Audio Codec) is a commonly used lossless audio format that provides a more accurate reproduction of recordings. In other words, it sounds better than other formats, such as MP3, which compress recordings down to a more manageable size but lose quality in the process.

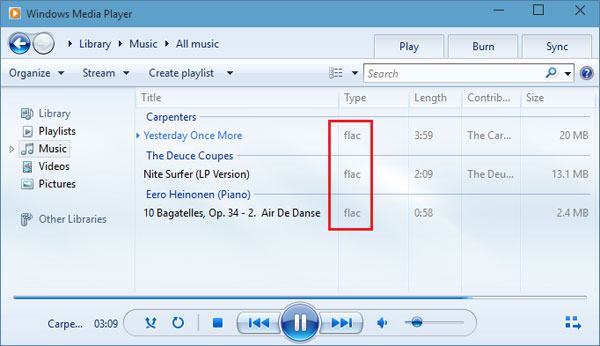
It’s also worth mentioning that MKV and FLAC are currently supported in Windows 10 Technical Preview and that file support will continue on to the final version when it hits the market. Here’s a look at playing some .flac audio files with Windows Media Player on Windows 10 build 9901 (The download is available through the Windows Insider Program website).

windows-media-player

MKV and FLAC are two file formats that have been increasing in popularity over the years. They produce great quality audio and video, are compressed so the files aren’t too large and are feature rich. Windows 8.1 and prior did not provide any supporting software out of the box, requiring end users to download third party apps to convert FLAC/MKV formats, such as the Video Converter Assist. With Windows 10, Windows Media Player will be able to handle those duties.

How to Convert DMG Image to ISO format in Windows

February 8th, 2015 by Admin

Most software on Mac OS X is distributed as a DMG image format. The Mac users can open .dmg files on Mac OS X without using third-party software. But if you are a Windows user, you will be in trouble, since Windows can not recognize dmg format by default. In this article we’ll show you how to convert DMG files to ISO format in Windows using the freeware dmg2img.

How to Convert DMG Image to ISO format in Windows?

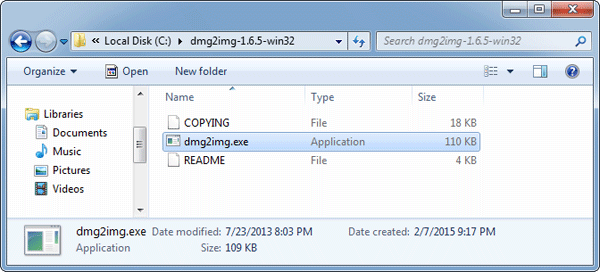
  1. First head over to this website and grab yourself a copy of dmg2img by clicking on the win32 binary link. Extract the contents of the downloaded dmg2img-1.6.5-win32.zip file to a new folder.

    dmg2img

  2. Open a Command Prompt and then use the cd command to navigate to the folder where you extracted the dmg2img file.
  3. Now use the following command syntax to convert your DMG file:

    dmg2img.exe {source file.dmg} {destination file.iso}

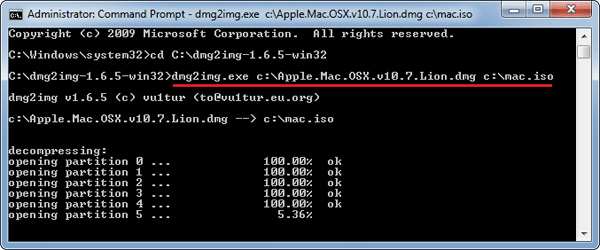
    In my example I want to convert a Mac installer image called Apple.Mac.OSX.v10.7.Lion.dmg, and save the converted ISO as mac.iso, so my command would be:

    dmg2img.exe c:\Apple.Mac.OSX.v10.7.Lion.dmg c:\mac.iso

    convert-dmg-to-iso

  4. After a few minutes of processing, your DMG will be converted to ISO format. You can then burn the ISO image to your disc or mount it to CD drive for your own purpose in Windows.

5 Methods to Open File Explorer in Windows 10 / 8.1 / 8

February 4th, 2015 by Admin

Since Windows 8, Windows Explorer has been renamed to File Explorer and updated in significant ways. One of the first things I do after installing a new Windows OS is to find the explorer. In this article we’ll show you 5 methods to access File Explorer in Windows 8.1 and Windows 10.

Method 1: Open File Explorer with Win + E Shortcut

The easiest and quickest way to open File Explorer on all Windows is to press the Windows Key + E combination. Just press Win + E keyboard shortcut and you’ll see the File Explorer open where you can browse through all files on your hard drive.

Method 2: Open File Explorer from WinX Menu

You can bring up the WinX Menu (also known as Power User Menu) with your keyboard by pressing the Windows key and the X key together. This menu contains quick access to system utilities like the File Explorer, Control Panel, Command Prompt, Task Manager, Device Manager, and more.

winx-menu

Method 3: Open File Explorer from the Taskbar

By default, Windows 8.1 includes a File Explorer shortcut pinned to your taskbar. Simply click the shortcut icon on the taskbar and it will launch File Explorer immediately.

taskbar

Method 4: Using the Search Charm

Swipe in from the right edge of the screen, tap Search (or if you’re using a mouse, point to the upper-right corner of the screen, move the mouse pointer down, and then click Search), enter File Explorer in the search box, and then tap or click File Explorer.

search-app

Method 5: Add a Shortcut on the Desktop

However, most computer users have become accustomed to the way of opening the File Explorer by double-clicking the “My Computer” icon or “This PC” icon on the desktop.

my-computer-shortcut

To bring the “My Computer” icon back to your desktop, please refer to this article: Display My Computer Icon on Desktop in Windows 10.

Disable Command Prompt Using Group Policy or Registry Trick

February 2nd, 2015 by Admin

Command Prompt is a built-in tool in Windows that is rarely used by the average user. It’s not so user-friendly but advanced computer users with malicious intent can use the Command Prompt to bypass most restrictions that are enforced on the Windows Explorer based GUI. In this post, we will explain how to disable Command Prompt in Windows 11/10/8/7.

Note: If you need to use the Command Prompt frequently, or run batch scripts or use the Terminal Services, disabling Command Prompt is not recommended.

Option 1: Disable Command Prompt Using Group Policy

  1. Press the Windows key + R to bring up the Run box, type gpedit.msc and hit Enter.

  2. This will open the Local Group Policy Editor. Now, go to the following location in the left pane:
    User Configuration/Administrative Templates/System

    Make sure click on the System node rather than expanding it. In the right side pane you will see the “Prevent access to the command prompt” policy. Double-click it to modify.

  3. In the pop-up window, select Enabled. If you also want to prevent running .bat or .cmd script files, select Yes from the dropdown under the Options section. Click Apply/OK and you are done.

  4. You do not have to restart your computer for the setting to take effect. If you try to launch the Command Prompt, you’ll see the message “The command prompt has been disabled by your administrator.

Option 2: Disable Command Prompt with Registry Trick

Unfortunately, the Local Group Policy (gpedit.msc) is not available in all editions of Windows. For those users running the Home edition of Windows, you can still disable Command Prompt with this registry tweak:

  1. Press the Windows key + R to bring up the Run box, type regedit and hit Enter.

  2. This will open the Registry Editor. Navigate to the registry key: HKEY_CURRENT_USER\Software\Policies\Microsoft\Windows. Right-click the Windows key in the left sidebar and choose New -> Key.

  3. Name the newly-created as System. When the System key is selected, right-click the blank area in the right pane and select New -> DWORD (32-bit) Value.

  4. Name the DWORD as DisableCMD and then give it a value 1 for disabling the Command Prompt and preventing batch files from running. If you want to disable the Command Prompt but allow batch files, set the value to 2. This change will take effect immediately.

    To enable the Command Prompt again, just change the value to 0.

Conclusion

So this is how you can disable the Command Prompt in all versions of Windows. If you need a more secure method to lock the Command Prompt, you can use the third-party software – Protect My Folders, which allows you to protect c:\windows\system32\cmd.exe with a password.

Repair Your Corrupted Outlook Personal Folders (PST) File

January 30th, 2015 by Admin

PST (also known as Personal Folders File, or Outlook Data File) is a file where Microsoft Outlook stores your mail messages, calendar events, contacts, tasks and other. If you can’t open your .pst file, or you supect the data file is damaged or corrupted, you can use the Inbox Repair tool (scanpst.exe) to diagnose and repair your pst file for any problems.

Scanpst.exe is a built-in tool in Outlook. The location of scanpst.exe depends on your version of Outlook and whether or not you are using a 64-bit version of Windows.

Outlook 2013
32-bit Windows: C:\Program Files\Microsoft Office\Office15\
64-bit Windows: C:\Program Files (x86)\Microsoft Office\Office15\

Office 365 / Outlook 2013
any Windows: C:\Program Files\Microsoft Office 15\root\office15\

Outlook 2010
32-bit Windows: C:\Program Files\Microsoft Office\Office14\
64-bit Windows: C:\Program Files (x86)\Microsoft Office\Office14\

Outlook 2007
32-bit Windows: C:\Program Files\Microsoft Office\Office12\
64-bit Windows: C:\Program Files (x86)\Microsoft Office\Office12\

How to Repair A Corrupted Outlook Personal Folders (PST) File?

Before you start the repair process, make sure you have a backup of your pst file.

  1. Open up Windows Explorer and then locate the scanpst.exe file. In my example, it is located in this folder C:\Program Files (x86)\Microsoft Office\Office12\.

    scanpst

  2. Once you open up the scanpst.exe utility, you’ll have to find the location of your damaged PST file by clicking the Browse button. If you can’t figure out the location, please check out this article: Introduction to Outlook Personal Folders File (.pst).

    inbox-repair-tool

  3. Click on the Start button to scan. At this point, nothing will happen to your pst file yet. Scanpst will do an analysis first. This analysis consists out of 8 phases of which some can take quite a bit longer to complete than others depending on the size and level of corruption of the file.

    repair-pst

  4. After the analysis scan has completed, it will present you with a scanning report and options for the next step. You can press the Details button for more information about the type of corruption.

    outlook-pst-repair

  5. Click on the Repair button, and after a while you’ll finally get the “Repair complete” message. Assuming that all succeeds, you can now re-open Outlook and hopefully the errors will have been resolved.

How to Boot An Existing VirtualBox VM from USB Drive

January 23rd, 2015 by Admin

How can I get a VirtualBox virtual machine to boot from a physical USB drive? The problem is that the GUI of Oracle VirtualBox does not have an option to set boot from USB. Luckily there is a workaround to boot a VirtualBox virtual machine from USB drive.

Just create a new virtual hard disk (VMDK) file and use it as a raw disk that VirtualBox maps to your USB drive. When you boot your virtual machine from the newly-created virtual hard drive, it will load the operating system on your USB stick. Here’s how.

How to Boot An Existing VirtualBox VM from USB Drive?

  1. Before doing anything, make sure you’ve created a bootable USB drive and plugged it into your computer. Now we need to find the disk number of your physical USB drive.
  2. Press Windows Key + R to bring up the Run box, type diskmgmt.msc and press Enter to open the Disk Management window. Locate your USB drive and note its disk number. In my case, the USB drive is listed as “Disk 1“, so the disk number is 1.

    disk-management

  3. Once you have the disk number, open up the Command Prompt as administrator. Use the cd command to navigate to VirtualBox’s installation directory. If you have installed VirtualBox in any other directory or drive, then change the command accordingly.

    cd %programfiles%\Oracle\VirtualBox

  4. Enter the following command while replacing # with the actual disk number you found above.

    VBoxManage internalcommands createrawvmdk -filename C:\exusb.vmdk -rawdisk \\.\PhysicalDrive#

    create-virtual-hard-drive

    You can replace C:\extusb.vmdk with any file path you want. This command creates a virtual machine disk (VMDK) file that points to the physical USB drive.

  5. Now open up the VirtualBox with administrative rights. If not, VirtualBox will fail to boot from the USB drive. In the VirtualBox main window, select your target virtual machine and click Settings.

    virtualbox-manager

  6. Click on the Storage tab. Under the Storage Tree section, highlight Controller:IDE and then click on the “Add Hard Disk” icon to the right.

    virtualbox-settings

  7. In the popup box, click Choose existing disk and then choose the VDMK file (C:\exusb.vdmk in the example) you created in step 4. When this is done, click OK to save your changes.

    add-virtual-hard-drive

  8. Now starts Virtual machine and you’ll see that it starts booting from your physical USB drive. As you can see from the image below, I’ve successfully booted into my PCUnlocker Live USB drive.

    pcunlocker

With this method you can install the operating system from the USB stick, or boot your existing VirtualBox virtual machine from other third-party rescure & recovery USB drives.

How to Reset Windows 7 to Factory Settings without Install Disc

January 23rd, 2015 by Admin

How do I reset or restore a Windows 7 PC to factory settings? As we all know, Windows 7 doesn’t have the built-in refresh and reset options like Windows 8/8.1 and you have no other way to restore your computer to factory settings unless you have a manufacturer-provided install media or recovery disc.

Many computer manufacturers are pre-installing Windows without giving you the actual installation media to go with it. Instead, they create a hidden recovery partition for users to perform a factory reset. If your hard drive has such a recovery partition, you can then reset your Windows 7 system to factory settings without needing any discs or external drives. Here’s how.

How to Reset Windows 7 to Factory Settings without Install Disc?

  1. Click Start, then choose Control Panel. Click System and Security.

    control-panel

  2. Next choose Backup and Restore.

    system-and-security

  3. In the Backup and Restore window, click on the Recover system settings or your computer link.

    backup-and-restore

  4. Next, choose Advanced recovery methods.

    recovery

  5. Now you’ll be presented with two options: “Restore files from a system image backup” and “Return Your Computer to Factory Condition“. Click on “Return Your Computer to Factory Condition”.

    Note: If your computer doesn’t have a recovery partition, then the factory reset option is not available and you’ll see the “Reinstall Windows (requires Windows installation disc)” option instead.

  6. Select to either create a Back up now, or to Skip it and continue the factory reset without backing up any of your current files.

    user-file-backup

  7. Click the Restart button to reboot your computer and to start the factory reset process.

    restart

Bypass Windows Password with Freeware UBCD4Win

January 20th, 2015 by Admin

Locked out of a computer but need to be able to log in as a local admin? What you need to do is set up a UBCD4Win (also known as Ultimate Boot CD for Windows) live CD, boot up the computer with it and run the NTPWEdit tool to clear forgotten Windows password.

UBCD4Win is based on BartPE, and it requires the Windows XP CD (with SP1 or SP2). This article we’ll walk through the steps required to create a UBCD4Win bootable CD and then use it to bypass Windows administrator password.

Note: UBCD4Win is a freeware so don’t expect it to work with domain controllers. If you want to find a more powerful yet easy-to-use password recovery software, try the PCUnlocker Live CD.

Part 1: Create A UBCD4Win Bootable CD

  1. Download the freeware UBCD4Win from its official website. The download is pretty big (about 269Mb), so expect to wait a while if your network connection is slow.
  2. After installing, start the UBCD4Win (UBCD4WinBuilder.exe) program. Point the “Source” path to your Windows XP setup CD or Windows 2003 installation CD. However, Vista is not yet supported as a source.

    UBCD4Win-PE-Builder

  3. Insert a blank CD, select “Burn to CD/DVD” and click Build. The whole process will take a little while.

Part 2: Bypass Windows Admin Password

  1. Once the CD has been created, go to the BIOS and make sure your CD-ROM is set as the first boot device. Start up the computer with UBCD4Win in the CD-ROM and you will have some boot options. Choose the “Launch The Ultimate Boot CD for Windows” option.

    ubcd4win-boot-menu

  2. It will take a few minutes to load fully, but when it does you should see a Windows XP like interface. Once there, go to Start > Programs > Password Tools > NTPWEdit.

    ubcd4win

  3. Once the utility is open, you need to click the (Re)open button to open up the SAM file which should show you the list of local system accounts for your Windows installation. Select the Administrator account and click on Change Password.

    nwpwedit

  4. Type your new password twice, or leave the password fields blank if you want to clear the password. Click OK.

    change-admin-password

  5. Restart the computer, remove the UBCD4Win Live CD from the drive, and you should be able to log into Windows administrator account with the new password you’ve set.