Author Archive

How to Hide A Drive / Partition from Windows Explorer

December 24th, 2014 by Admin

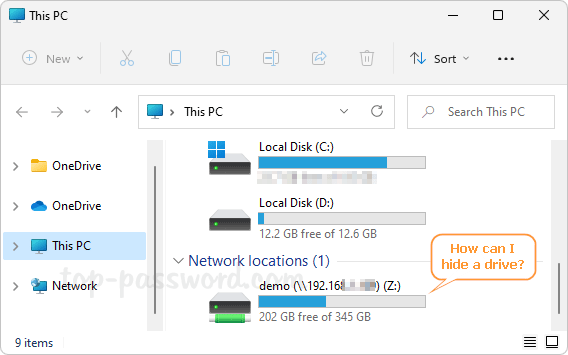
Do you have some private files that you want to hide from your children? Here is a registry trick to hide a drive or partition in Windows 11/10/8/7/Vista/XP, so it cannot be accessed from Windows Explorer by inexperienced users.

The method is not foolproof though, and users can still access the contents of the hidden drive from Command Prompt or Disk Management. If you have some confidential or sensitive data on a local disk and want to lock / protect it securely, I recommend you use the Protect My Folder application.

How to Hide A Drive / Partition from Windows Explorer?

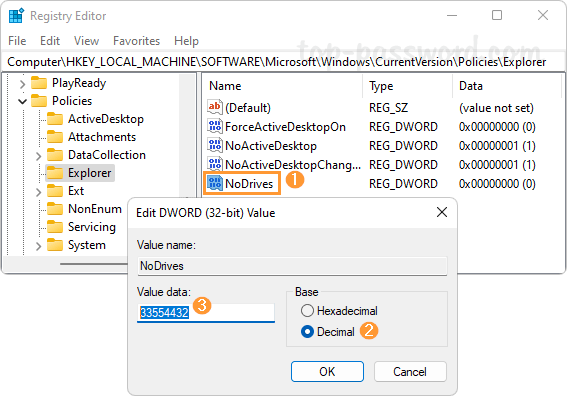
  1. Open Registry Editor and navigate to the following key: HKEY_LOCAL_MACHINE\Software\Microsoft\Windows\CurrentVersion\Policies\Explorer. In the right pane, right-click the blank area and choose New -> DWORD (32-bit) Value.

  2. Name the newly-created DWORD as NoDrives and then double-click it. In the pop-up window, choose Decimal, enter a proper number for hiding your desired partition. In my example, I want to hide the network drive Z:, so I type in the value 33554432.

    Here’s a list of the values (decimal number) you’ll want to enter for different drive letters:

    • A: 1
    • B: 2
    • C: 4
    • D: 8
    • E: 16
    • F: 32
    • G: 64
    • H: 128
    • I: 256
    • J: 512
    • K: 1024
    • L: 2048
    • M: 4096
    • N: 8192
    • O: 16384
    • P: 32768
    • Q: 65536
    • R: 131072
    • S: 262144
    • T: 524288
    • U: 1048576
    • V: 2097152
    • W: 4194304
    • X: 8388608
    • Y: 16777216
    • Z: 33554432
    • ALL: 67108863

    But what to do if you want to hide more than one drive in Windows? Just add the values of the drives that you want to hide. For example, if you want to hide the drives E:, F: and A: you would enter 49 (16+32+1) in NoDrives as the decimal value.

  3. Restart your computer and your target drive will disappear from Windows Explorer.

    You can even hide the C: drive without corrupting your system. When you want to get your drives back, just set NoDrives to 0 or simply delete NoDrives altogether.

PXE-Boot: Reset Forgotten Windows Password without CD or USB Drive

December 23rd, 2014 by Admin

Many Windows password tools require creating a bootable CD or USB drive, and then booting it to recover / reset lost admin password. However, what if you encounter an old computer that doesn’t support USB booting, neither have a CD drive? Thankfully, you can reset forgotten Windows password via PXE network boot.

PCUnlocker is a bootable utility that can reset lost Windows password from a bootable CD, USB device or network over PXE. Just set up a PXE server on your LAN to store the PCUnlocker CD image, and you can then boot any other PC on the same LAN to reset a lost password. Here’s how.

Part 1: Set Up A PXE Server

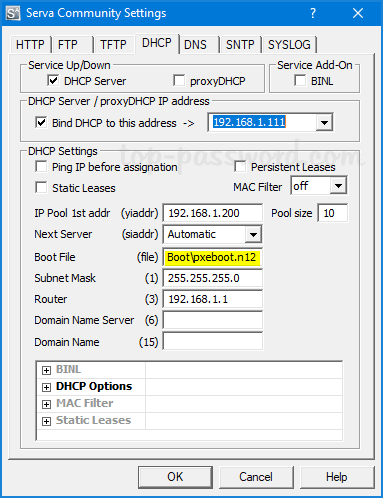
A PXE server can be any accessible Windows PC on your LAN network. Before get started, you need to disable DHCP in your router and use a static IP address for your PXE server. Follow the steps below to set up a PXE server which is required for PXE booting.

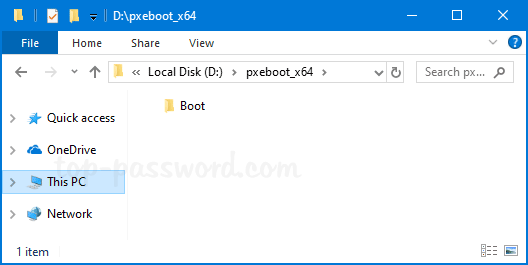
  1. After you’ve purchased PCUnlocker Enterprise, download the pxe-boot version (pxeboot_x64.zip) via this link included in your order confirmation email. Extract all files from pxeboot_x86.zip to a folder of your choice. Here, I extracted the ZIP file to the folder C:\pxeboot_x64.

  2. Download and install the freeware Serva from this link (Use the Serva_Non-Supporter_64 version if you are running 64-bit Windows). Run the program and click on the Settings button at the bottom.
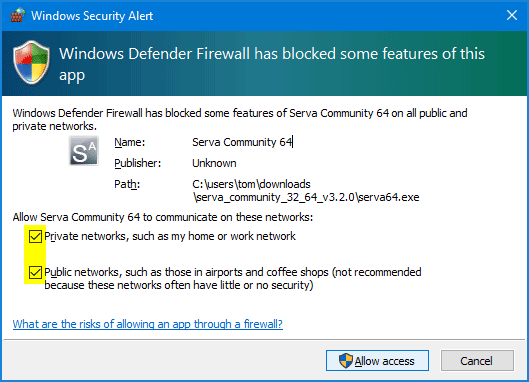
  3. If the Windows firewall displays a prompt named Windows Security Alert, asking you to allow Serva to access the network, click Allow Access.

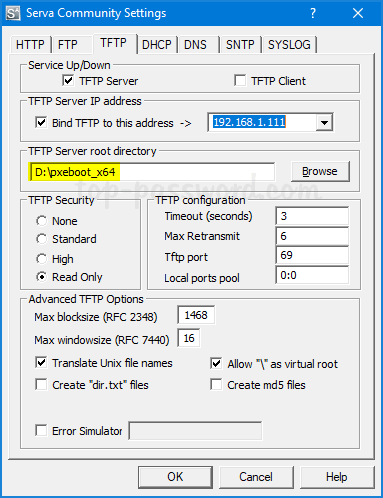
  4. In the Serva Settings window, click on TFTP tab. Tick TFTP Server and set the root directory to the folder where you extracted the pxeboot_x64.zip file (in my case D:\pxeboot_x64). Check the Allow ‘\’ As virtual root option.

  5. Click on DHCP tab. Setup the IP pool starting address and Size of pool for your network. Type Boot\pxeboot.n12 in the Boot File box.

  6. Click OK to save your settings and restart Serva.

Part 2: PXE-Booting Your Locked PC on LAN

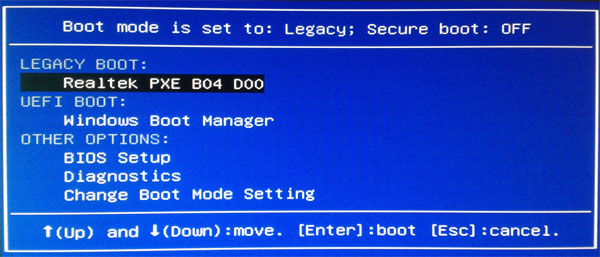
  1. Power on your locked PC and press a proper key to access the Boot Menu. Select Realtek PXE or your network device and press Enter.

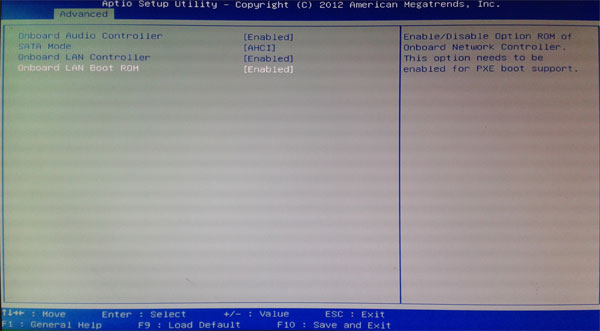
    If your PXE NIC device is not listed in the boot order, you need to enable an option labeled “PXE”, “PXE ROM”, “Network ROM” or “Realtek PXE OPROM” in the BIOS.

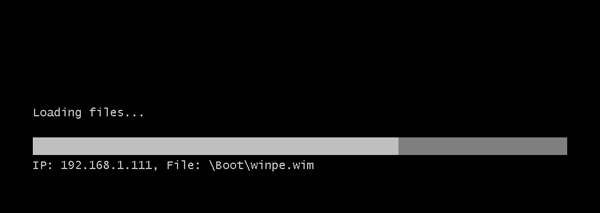
  2. Once you’ve chosen to boot from PXE Network, your computer will broadcast a DHCP request over the network. After receiving a IP address from the PXE server, it begins to download the PCUnlocker CD image that is stored on the PXE server.

Part 3: Reset Forgotten Windows Password

  1. After loading the PCUnlocker CD image into RAM, Windows 8 PE will start and boot directly to the PCUnlocker program itself. The program automatically searches Windows SAM file on the local hard drive and lists all your user accounts.

  2. Select a user account whose password you forgot, and click on Reset Password button. It will unlock / reset your Windows login password in no time.
  3. Reboot your computer and boot it from local hard drive. You can then login without a password!

How to Resize Video or Change Resolution in Windows

December 18th, 2014 by Admin

There are many situations where you might need to resize a video and change the screen resolution. It could be because the video screen size is too big to be uploaded to YouTube, or you need to enlarge a small video to fill up your large monitor. Sometimes resizing the video can also bring its actual file size down. This tutorial will guide you through the steps required to resize a video / movie.

How to Resize Video or Change Resolution in Windows?

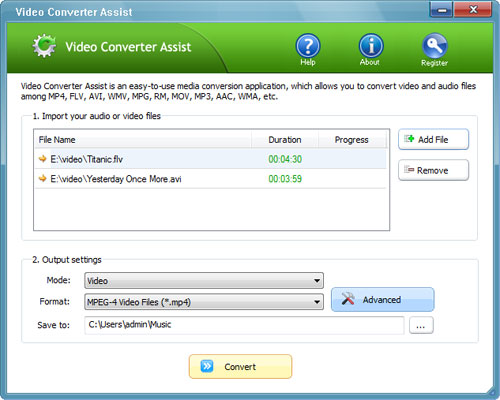
Download and save the Video Converter Assist program to the desktop of your PC. After the download is complete, double-click on the setup file to install it.

Open Video Converter Assist. Click on Add File button to import the video whose resolution you want to change. This program allows you to convert multiple video files all at once.

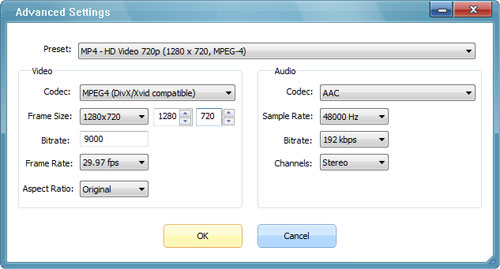
Now, under Mode, select Video from the drop-down list. Under Format, you can change the destination format from the list. Now go ahead and click on Advanced button.

Next, the Advanced Settings window will open. From here you can customize the output video settings. Do not be intimidated by this screen if you’ve never heard of most of things listed. What you’re interested in is the Frame Size where you can change the width and height of your videos. Click OK to save your changes.

Under Save to, choose a folder to save the resized videos. Click on Convert to begin conversion. The process can take anywhere from a couple of minutes to.. quite a while, depending on the length and quality of the video and/or the speed of your PC.

Once the process has completed, give your resized video a watch. That’s it!

How to Install WinPE to Portable Hard Drive

December 12th, 2014 by Admin

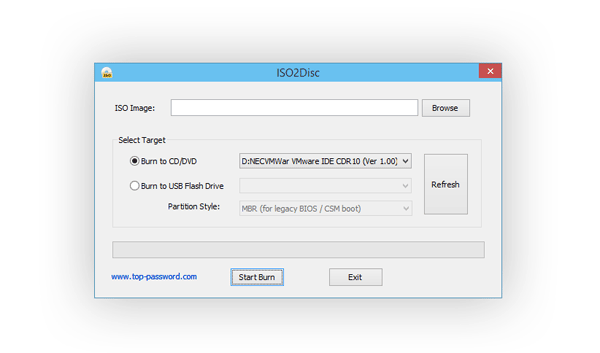
As you likely know, there are many freewares (for example, ISO2Disc and Rufus) that allow to create a bootable CD or USB stick from WinPE ISO image. However, these tools don’t support USB hard drive as it is not recognized as removable media in Windows. So here I’m going to explain how to manually install WinPE to a portable hard drive.

What You Will Need:

How to Install WinPE to Portable Hard Drive?

This procedure will erase all data on your portable hard drive. Make sure you backup all files on your portable hard drive before following the steps below.

Part 1: Prepare the Partition for WinPE

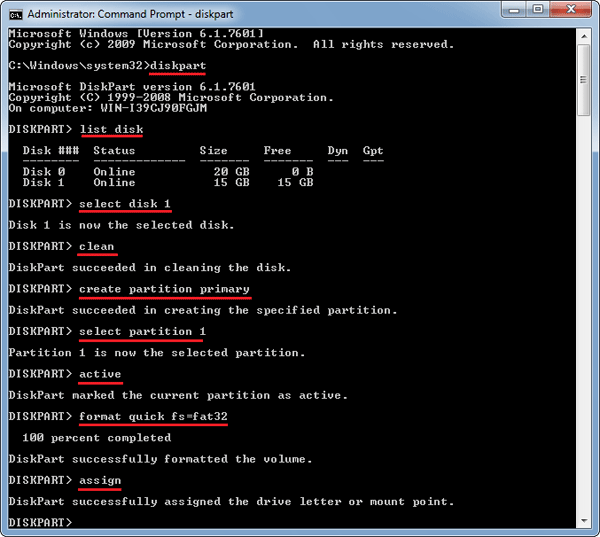
  1. Open an elevated command prompt and type diskpart and hit Enter.
  2. Next type list disk. This will show a list of hard drives currently plugged into your PC. Note the disk number, of the portable hard drive you want to install WinPE to.
  3. Type select disk x, replacing the x with the disk number of your portable hard drive.
  4. Type clean to wipe the disk.
  5. Type create partition primary to create a single primary partition.
  6. Next type the following commands to format the newly created partition and set it as active, hit Enter after each one.

    select partition 1
    active
    format quick fs=fat32
    assign
    exit

    partition-hard-drive

Part 2: Copy WinPE to Portable Hard Drive

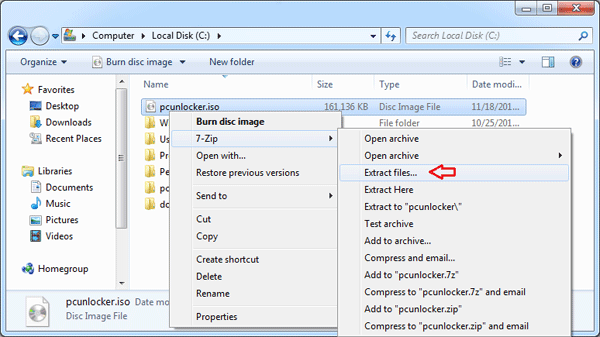
Once the portable hard drive has been prepared, you can now use a free utility like 7-Zip to extract your WinPE ISO directly to the drive, by following these steps:

  1. Right-click on your WinPE ISO image (here we’ll use pcunlocker.iso which is a CD image based on Windows 8.1 PE), and then select “7-Zip” -> “Extract files”.

    extract-iso-to-hard-drive

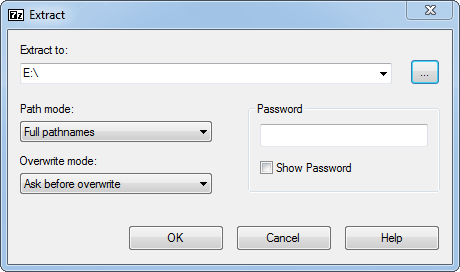
  2. When the Extract dialog box appears, click on … button to select the root path of your portable hard drive. Click OK.

    7-zip-extract

  3. This will copy the contents of the WinPE ISO image to your portable hard drive.

Part 3: Make Portable Hard Drive Bootable

The last but not the least, we need to use the bootsect_x86 utility to make the portable hard drive bootable.

  1. Open an elevated command prompt
  2. Type c:\download\bootsect_x86.exe /nt60 e: and press Enter. Here assume you’ve download and saved the bootsect_x86.exe file to c:\download. You also need to replace e: with the drive letter of your portable hard drive.

    make-the-drive-bootable

Conclusion

After successfully installing WinPE to your portable hard drive, you should be able to use it to boot a PC. BTW. This process will also work when installing a Windows setup ISO image (Windows 10, 8, 7 and Windows Server 2012/2008) to external or portable USB hard drive.

How to Change Default Web Browser in Windows 8 / 7

December 11th, 2014 by Admin

Is there a way to set Chrome as the default browser for all my applications? By default, Windows will launch the built-in Internet Explorer for you to access the Internet, when you click a link in an email or external application. In this tutorial we’ll show you how to change the default web browser in Windows 8.1, 8 and 7. Set Firefox, Chrome, Safari or whatever web browsers you like as the default.

How to Change Default Web Browser in Windows 8 / 7?

First you need to open the Control Panel. In Windows 8.1/8 you can press the Windows key + R to bring up the Power User menu and then select “Control Panel”, while navigate to Start -> Control Panel in Windows 7.

Under Control Panel, set the View by option to Small icons. Click on the Default Programs icon.

control-panel

Under Default Programs, click on the Set your default programs link.

set-default-programs

You’ll see all web browsers that you’ve installed in the left-hand pane. Just select the one you want to use as default browser, and then click on the Set this program as default link. Click OK and you’re done!

set-default-web-browser

Now you’ve successfully change the default web browser that Windows will use. If you click on a link included in a Word document, email or external programs, Windows will now open the link with your favorite web browser.

Install Windows 8 from Hard Drive – without Using CD or USB

December 8th, 2014 by Admin

It’s super easy to install Windows 8 from a USB drive or a CD/DVD. But, what to do if you don’t have a USB drive in hand, or your optical drive doesn’t work properly? Here we’ll show you how to install Windows 8 directly from a hard drive, without using a CD or USB drive.

This method requires you to create a bootable hard drive from Windows 8 ISO image, so you can then install Windows 8 without formatting. It also works with Windows 10, Windows 8.1 and Windows 7.

Part 1: Copy Windows 8 Installation Files to Hard Drive

  1. First connect your hard drive to another working computer as a slave/second drive.
  2. Open the Disk Management utility by right-clicking on the My Computer icon on the desktop (or Start Menu) and selecting Manage from the drop down menu.
  3. The Computer Management console will appear as shown below. Click on Disk Management in the left-hand panel, you’ll see the attached hard drive shown as Disk 1. From there you can repartition your hard disk and create a primary partition for install Windows 8 later.

    disk-management

  4. Now we need to copy the setup files from Windows 8 ISO to your hard drive. This can be done using the freeware 7-Zip. After installing 7-Zip locally, right-click on your Windows 8 ISO image and select 7-Zip -> Extract files.

    decompress-win8-iso-image

  5. Next you need to specify where the destination should be. Click button to select the root path of the attached hard drive. Click OK.

    7-zip-extract

  6. Now the extracting progress window will display.

    extracting-iso-image

    When this is done, the extraction dialog will automatically close. Now you’ve successfully copied all contents of Windows 8 ISO to your hard drive.

Part 2: Make Hard Drive Bootable

  1. Open the Command Prompt with admin privileges. In Windows 7, go to Start > All Programs > Accessories. Right-click on Command Prompt and select Run as administrator.
  2. In the Command Prompt, type in the following commands, and press Enter key after typing each command.

    Diskpart
    List Disk
    Select Disk 1
    List Partition
    Select Partition 1
    Active
    Exit

    set-partition-active

    The commands above will set the first partition of your attached hard drive as active.

  3. Next type this command to mark your hard drive as bootable:
    e:\boot\bootsect.exe /nt60 e:

    set-partition-bootable

    Assuming that e: is the drive letter of attached hard drive, where the Windows 8 installation files are copied to.

  4. At this moment your external hard drive is bootable and you can then use it to install Windows 8. Close the Command Prompt and shutdown the computer.

Part 3: Install Windows 8

Place the hard drive back into the target machine. Make sure that the BIOS is configured to boot from the hard drive. If you did everything correctly, you should see the blue Windows logo and setup will load. Install Windows 8 as usual (but don’t format your hard drive this time otherwise it will erase the Windows 8 setup files too).

After successfully installing Windows 8, you can then go to the system partition and optionally delete the Windows 8 installation files you previously copied from ISO image.

delete-setup-files

Windows 10: Associate a File Type with a Specific App

December 6th, 2014 by Admin

A default program is the program that Windows uses automatically when you open a particular type of file. For example, when you double-click a file with .wmv, Windows Media Player opens up and that’s because the extension name .wmv is associated with Windows Media Player by default.

But sometimes you might want to change file association from the default program to your favorite app. Here are two ways to re-associate the file back to the program of your choice in Windows 10. The methods below apply to Windows 8.1/8/7 too.

Method 1: Change File Associations in Control Panel

  1. Open the Control Panel. At top right of the Control Panel, set the View by option to Small icons. Click on the Default Programs icon.

    control-panel

  2. Under the Default Programs window, click on the “Associate a file type or protocol with a program” link.

    default-programs

  3. In the Set Associations window, scroll down the list until you see the file extension that you want to change the default program for. Select your desired file extension and click on Change Program.

    set-associations

  4. The Open With dialog box should appear. Choose a program from the list or recommended or other programs or else click Browse to select one.
  5. Click OK when you’re done. Windows 10 will refresh the list of file associations to show the new default program to open this type of file.

Method 2: Change File Associations from Context Menu

  1. In Windows Explorer, navigate to the file you want to change the file association with. Right-click on that file and select Open with -> Choose default program from the pop-up menu.

    choose-default-program

  2. Click the program you want to use to open the file. If you want all files of that type to open in the same software program, select the Always use the selected program to open this kind of file check box, and then click OK.
  3. From this point forward, when you double-click on any file with this particular file extension, the new program you associated it with will launch and open the particular file.

Windows 8.1 Displays Context Menu on the Left Instead of Right Side

December 5th, 2014 by Admin

If you’ve upgraded to Windows 8.1 or Windows 10, you may notice that the context menu is displayed at left side of where you click at, but in Windows 8, 7 or Vista the menu expands to right side by default. For example, when you right-click a file, the context menu may appear on the left hand side, rather than on the right-hand side. This misbehavior also happens with the drop-down menus in other applications.

right-handed-menu

This has to do with a Tablet PC Setting which controls how the menu items are displayed. This tutorial will show you how to set the context menu to open to the right side of where you click at in Windows 8.1 and Windows 10.

How to Set Context Menu to Open to the Left Instead of Right Side?

  1. Press the Windows key + R to bring up the Run box.
  2. Copy and paste shell:::{80F3F1D5-FECA-45F3-BC32-752C152E456E} into the Run box, and then press Enter.
  3. You should see Tablet PC Settings dialog box, regardless of your PC type. Go to the Other tab and check the box Left-handed.

    handedness

  4. Click OK. You should now see the context menu expand to right side.

    left-handed-menu

    This trick also works for Windows 8, 7 and Vista.

Fix ‘VMware Workstation Does Not Recognize USB Drive’

December 4th, 2014 by Admin

VMware Workstation does not recognize your USB drive? If you’ve used VMware Workstation for some time, you might ever face the situation where you can use the USB drive well on the host PC (physical machine), but no USB drive is shown up under the VM -> Removable Devices menu within VMware Workstation. Here is how to fix it.

First of all, shutdown the virtual machine if it’s running, and then exit the VMware Workstation program. Right-click on the VMware Workstation shortcut from your desktop and then select “Run as administrator” to run it with admin privilege. This has fixed the problem that I experienced just a few days ago and eventually found out that VMware Workstation have insufficient privileges to capture the USB device.

vmware-not-recognize-usb

If you still don’t see the USB drive in the VM menu, follow the below steps to check if the VMware USB Arbitration service is not running:

  1. Press the Windows key + R to bring up the Run box.
  2. Type services.msc and press Enter.
  3. Search for a service named VMware USB Arbitrator Service. If this service is not running, right-click on it and select Properties, set Startup Type to Automatic and also click Start button to run it.

Note: After starting the VMware USB Arbitrator Service manually, you need to re-launch the VMware Workstation to make the changes to take effect.

Additionally, VMware Workstation does not support USB3.0 natively and you need extra drivers in the guest for the USB device. I highly recommend to use USB 2.0 for your virtual machine. Go to the Virtual Machine Settings and Make sure the USB Controller is present in the device list and USB compatibility is set to USB2.0.

vmware-usb-version

I hope this article helps someone out there that has encountered this issue.