Author Archive

Microsoft Tool to Download Windows 8.1 ISO and Create Installation Media

November 12th, 2014 by Admin

Ready to install or reinstall Windows 8.1 but you don’t have a installation disc? In the past, it’s quite difficult to grab a copy of Windows setup ISO image, even if you have a genuine product key at hand. And now, thanks to a new online tool from Microsoft – Windows Installation Media Creating Tool, which lets you to download Windows 8.1 ISO image and create a installation media right away.

To download and create a bootable CD or USB flash drive with the Windows 8.1 installation files, please follow the steps below:

  1. Head over to Microsoft’s installation tool webpage, and then click the Create media button to download Windows Installation Media Creation Tool (about 1.26 Mb).
  2. Once the file finishes downloading, double-click it to launch the Windows Installation Media Creation Tool. Connect your USB flash drive (at least 4 GB of space should be available) or insert a blank DVD.
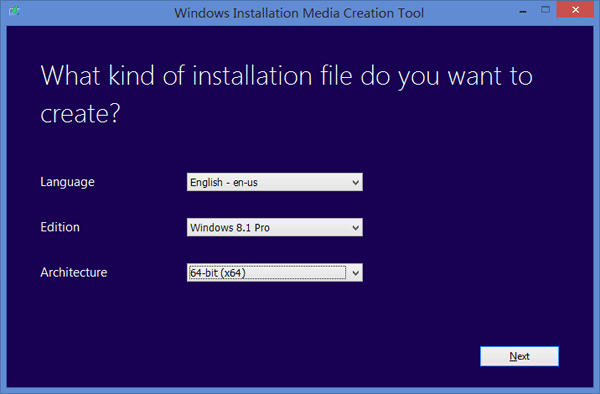
  3. This program allows you to select your desired language, Windows 8.1 edition and system architecture (32-bit or 64-bit). As far as editions are concerned, you can get Windows 8.1, Windows 8.1 Pro, the N versions of both operating systems, or a single language Windows 8.1 version.

    media-creation-tool

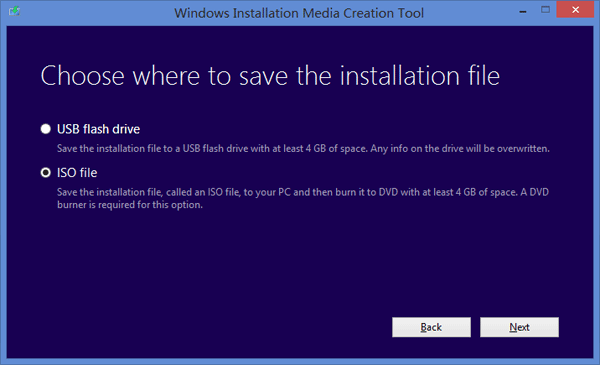
  4. After clicking the Next button, you’ll be presented with two options to save the installation file: create a Windows 8.1 installation USB drive or save the setup ISO image for later user. If you don’t have a USB drive at hand, you should select the 2nd option to save the installation ISO image on your PC which can then be burned to a DVD.

    save-windows-installation

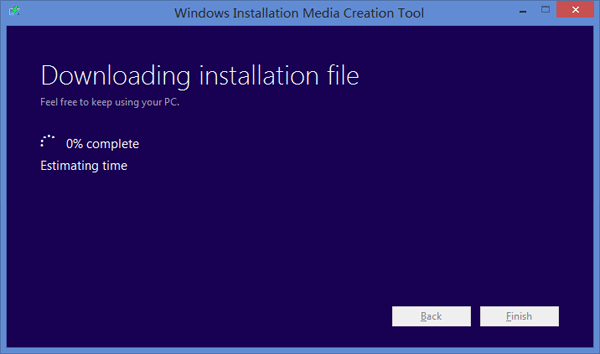
  5. Click Next to download or create the install media. This will take a while depending on the speed of your Internet connection and Windows 8.1 edition that you’re downloading.

    download-installation-file

    Once this is done, you can use the USB flash drive to perform a clean install of Windows 8.1 right away, or burn the ISO image to CD/USB with the freeware ISO2Disc.

How to Restore Windows Registry to A Previous State

November 11th, 2014 by Admin

Did you mess up the Windows registry and need to restore it to a previous state? Problems with the Windows registry can cause your computer to freeze, slow down, restart randomly, or be unusable. Luckily, since Windows 7, the system will automatically make a backup of your registry files after a successful boot. Here we’ll explain how to restore your Windows registry to a previous state, in order to fix / repair a corrupted registry.

How to Restore Windows Registry to A Previous State?

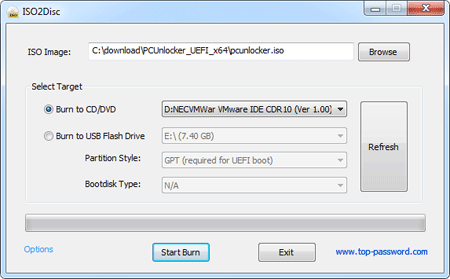
As the registry files are inaccessible while Windows is running, you need to boot your PC from a boot media for replacing the registry. Here we’ll use the PCUnlocker utilty, which comes as a self-extracting zip file containing a bootable CD image. Download the program and unzip it locally. Burn the CD image to a blank CD with your favorite burning program or ISO2Disc.

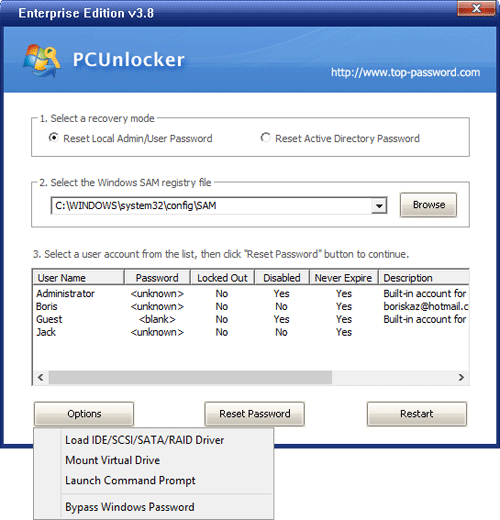
Boot your computer from the newly burned CD. After booting from the CD, you’ll get to the PCUnlocker program. Despite this program is mainly designed for resetting lost Windows password, it can also be used to backup the files on your computer, including the registry. Click on the “Option” button and select “Launch Command Prompt”.

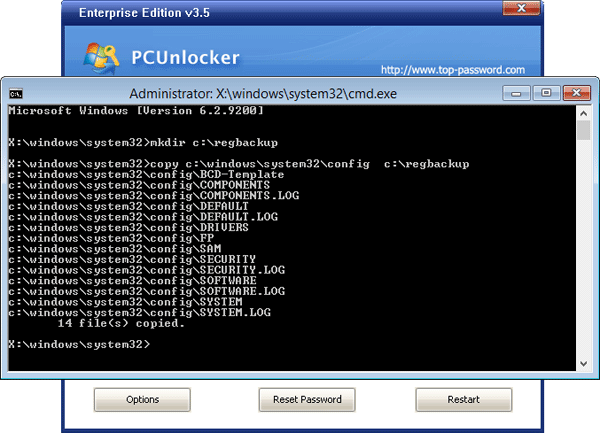
Before restoring, I highly recommend you to take a backup of your current registry files, by typing these commands, one by one, and press Enter after each (Assuming C drive is the driver letter of your Windows installation).

mkdir c:\regbackup
copy c:\windows\system32\config c:\regbackup

These commands will create a backup folder and copy all your current registry files to that folder.

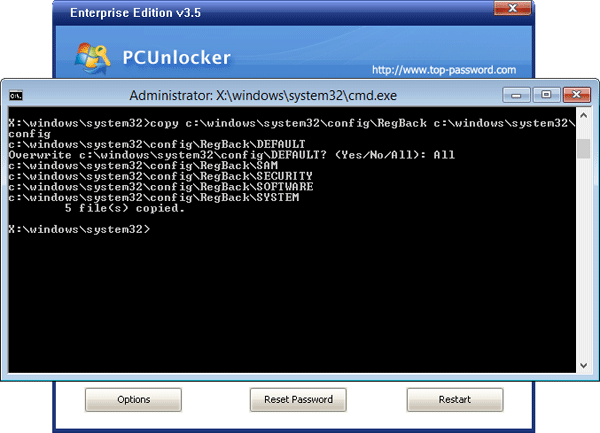
In Windows 10, 8 and 7, there is a folder called RegBack on your system partition which contains the most recent copy of registry files that were backed up automatically by Windows. Here we need to copy the registry files from C:\Windows\System32\config\RegBack   to C:\Windows\System32\config. To do so type in this command:

copy c:\windows\system32\config\RegBack c:\windows\system32\config

Now you’ve successfully restored your Windows registry files to last known good state. Remove the CD and restart your computer to see if you are able to boot into Windows properly.

How to Hide User Name from Windows Lock Screen

November 1st, 2014 by Admin

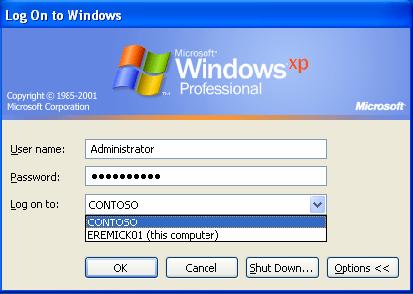
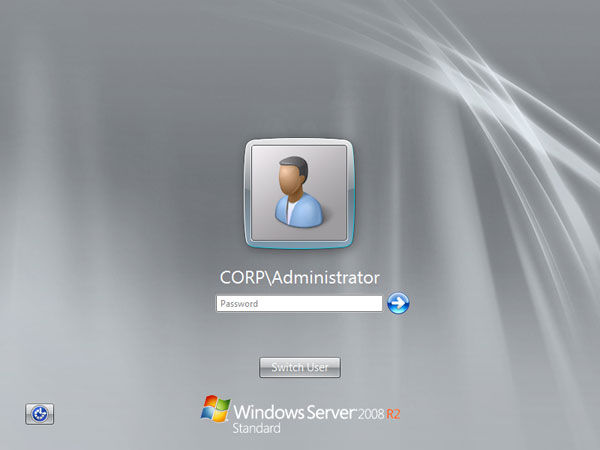
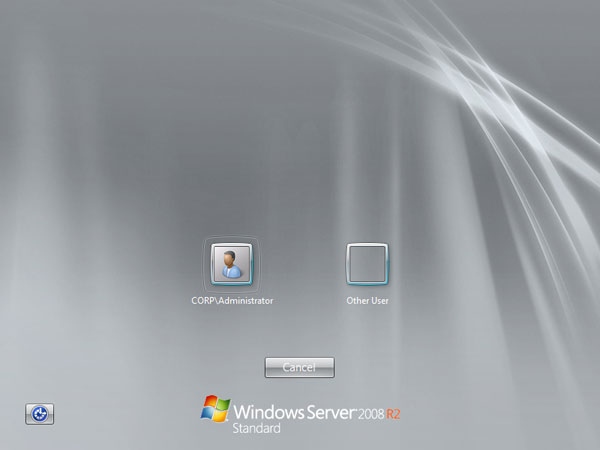
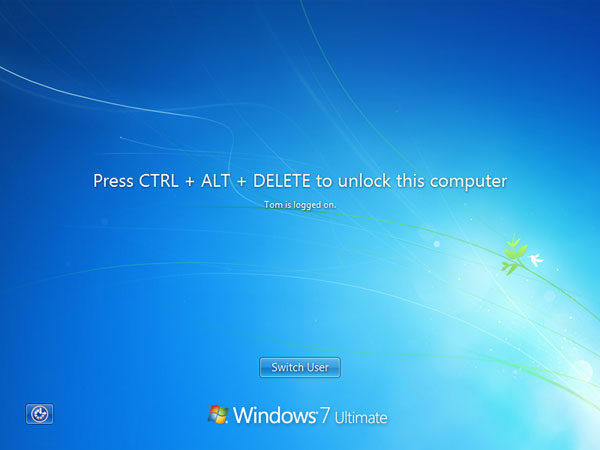
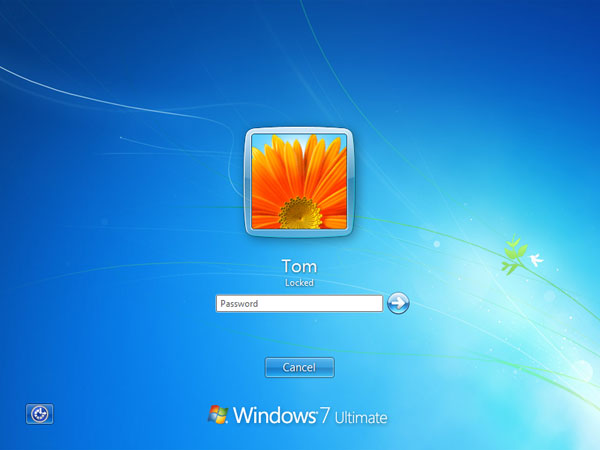
It’s a common security practice to lock your Windows desktop screen by pressing Windows + L keys every time you walk away from your computer. This can prevent other people from accessing your computer in your absence. However, did you realize that Windows will display the user name on the screen while your PC is locked? A user name can be just as sensitive as a password in a lot of scenarios. Luckily there is a simple way to hide your user name from Windows lock screen.

How to Hide User Name from Windows Lock Screen?

  1. Open the Registry Editor by pressing Windows + R keys simultaneously.
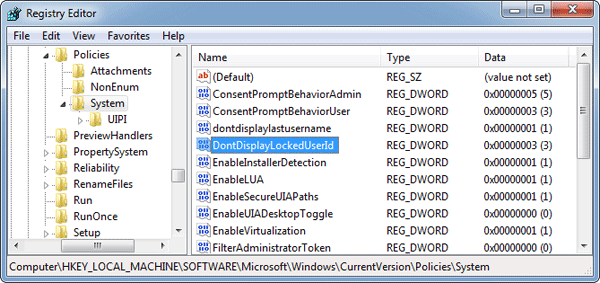
  2. Browse down to the following registry key:
    HKEY_LOCAL_MACHINE\Software\Microsoft\Windows\CurrentVersion\Policies\System
  3. On the right-hand side, create a new DWORD 32-bit value named DontDisplayLockedUserId and give it one of these values:
    • 1 = User display name, domain and user names
    • 2 = User display name only
    • 3 = Do not display user information

    dont-display-locked-user

    If you change this value to 3 then it will remove all user information from your Windows lock screen.

    Note: To prevent the last logged on user to be displayed in the Windows logon screen, also set the dontdisplaylastusername value to 1.

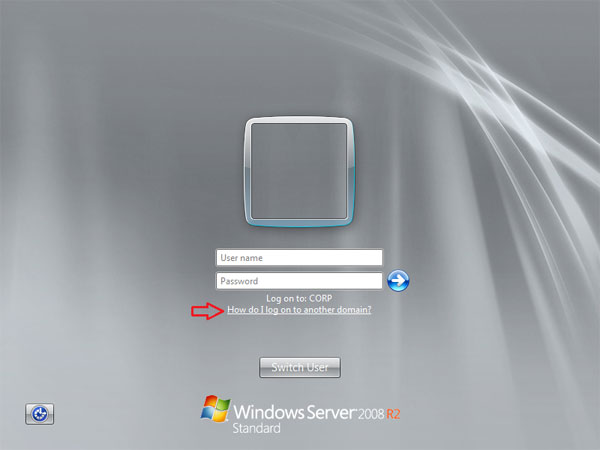
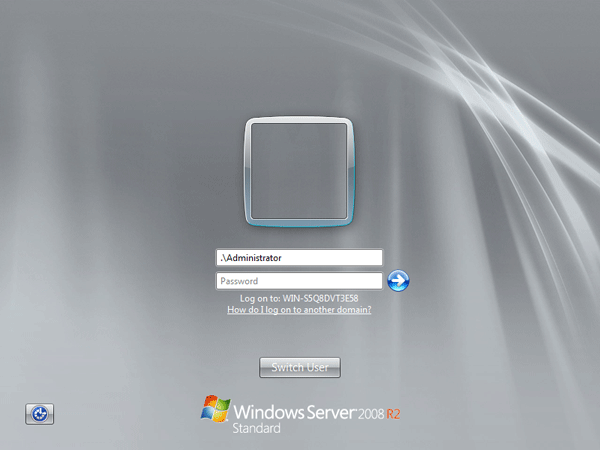
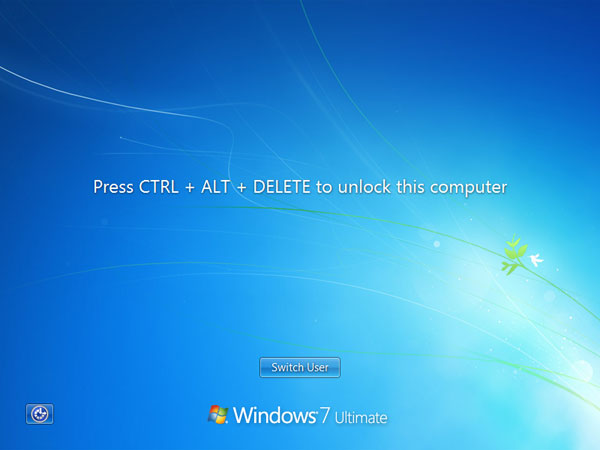
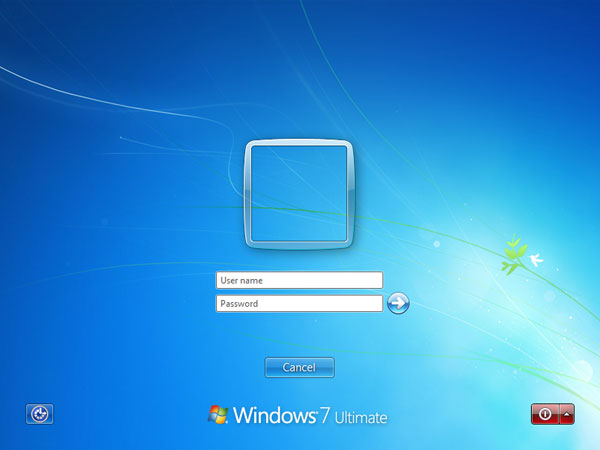
  4. Exit Registry Editor and reboot your computer. The next time you press Windows + L to lock your computer, your user name will not be displayed on the Windows lock screen any longer. User will be required to enter both their user name and password when logging back in from the locked workstation.

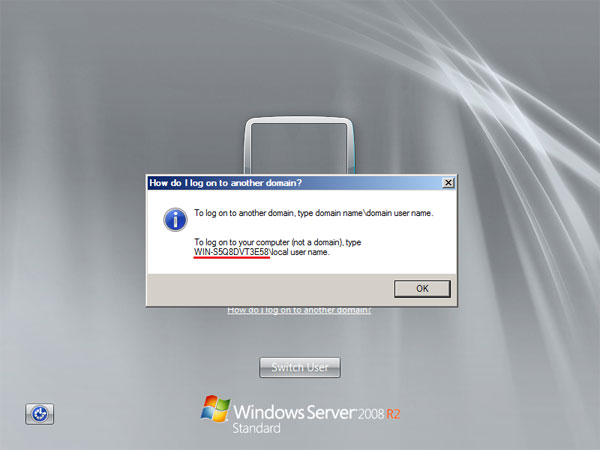
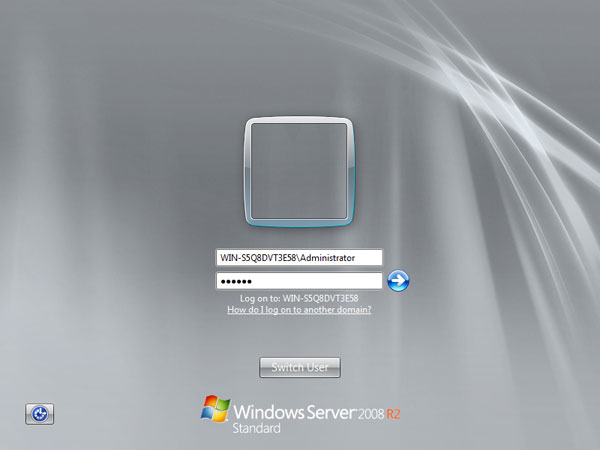
This is how it looks like on a Windows 7 machine.
Before:

press-ctrl-alt-del-2

windows-logon2

After:

press-ctrl-alt-del

windows-logon

How to Disable UAC in Windows 8 and 10

October 31st, 2014 by Admin

UAC (User Access Control) is a security feature introduced since Windows Vista, which helps prevent unauthorized changes to your computer. When you try to install a program or make changes to Windows settings, the UAC prompt will show up asking for your approval, even though you are already logged on as an administrator.

user-account-control

If the changes are not approved by the administrator, they are not executed and Windows remains unchanged. It is as if nothing happened. However, most of the windows users simply keep it disabled as you have to bear the pop-up and press Yes every time you run an application. Here’s how to disable UAC in Windows 8 and 10.

How to Disable UAC in Windows 8 and 10?

  1. Press the Windows key + X to open the power user menu, and then select Control Panel from the list.

    win+x-menu

  2. Once Control Panel is launched, type UAC in the search box in the upper right corner of the window. Click Change User Account Control settings in the search results.

    search-uac

  3. Use the vertical slider to select the desired UAC security level. To turn off UAC entirely, drag the slider down to Never notify, and click OK.

    uac-settings

    You need to reboot the computer before it takes effect.

How to Boot Windows 8 in Safe Mode If Your PC Won’t Start

October 30th, 2014 by Admin

In my previous post I’ve covered the procedure to access the Safe Mode from Windows 8 login screen. But that method won’t work in case your computer is crashed or unable to start. Since Windows 8, the boot process is now so fast that it’s also impossible to access the Safe Mode by pressing the traditional F8 key. So here I’m going to explain another method to boot Windows 8 in Safe Mode if your computer won’t start.

How to Boot Windows 8 in Safe Mode with A Recovery Drive?

  1. Boot your problematic computer from Windows 8 recovery drive. If you don’t have a recovery drive, you can create one on another Windows 8 PC which you can access, by following this guide: How to Create a Recovery Drive in Windows 8.
  2. After your computer boots from the recovery drive and you’re presented with the Choose your keyboard layout screen, choose the keyboard layout appropriate for your device. On the next screen, click Troubleshoot.

  3. When you see the Troubleshoot screen, click Advanced options.

  4. On the Advanced options screen, click Startup settings.

  5. On the next screen, click Restart.

  6. Once the PC has restarted, you will be given the option to boot to Safe Mode by pressing F4.

How to Track User Logon Activity with Logon Auditing

October 29th, 2014 by Admin

Ever wonder how to keep a track of who logged into your computer and when they log in? Or want to find out who is trying to break into your Windows account? Luckily Windows comes with a built-in feature – Logon Auditing, which enables you to record logon, logoff and logon failure events, along with the user information and the time at which the computer was accessed.

In this article we’ll show you how to enable logon auditing to have Windows track which user accounts log in and when. This is particularly helpful in determining and analyzing any attacks on a local computer or over a network.

Part 1: Enable Logon Auditing in Windows

To enable Logon Auditing, we need to configure Windows Group Policy settings. Press Windows + R, type gpedit.msc and press Enter.

After the Local Group Policy Editor opens up, navigate to Local Computer Policy –> Computer Configuration –> Windows Settings –> Security Settings –> Local Policies –> Audit Policy. Double-click the Audit logon events policy in the right pane.

audit-logon-events

When the logon event property window opens up, check both Success and Failure to audit all types of account logon activities. Click Apply to save your changes.

logon-audit-settings

From now on, every log in, log off and failed log in attempts will be recorded in the Event Viewer.

Part 2: View Logon Audit Events

To launch Event Viewer, click Start, type Event Viewer and hit Enter. In Windows 8, you can press the shortcut Windows + W and search for the Event Viewer applet.

open-even-viewer

In the Event Viewer window, navigate to the Windows Logs -> Security option to see the logs for both the successful and failed logon attempts.

event-viewer

Double click on one of the logon events, you will find out the details like the user that has been logged in or logged out, logon date and time, etc.

logon-failure-event

Conclusion

So that is how you can record and view logon events in Windows 7 Pro. Logon Auditing is also available in Windows 8 (Windows 8 Pro, Ultimate and Enterprise editions) too, although not in all the versions.

Fix: Unable To Execute Files In The Temporary Directory. Setup Aborted

October 27th, 2014 by Admin

When you try to install a program downloaded from the Internet in Windows 8, 7 or XP, you might receive the following error message:

Unable to execute file in the temporary directory. Setup aborted. Error 5: Access is denied.

unable-execute-file

Right-click your downloaded .exe file and select Run as administrator. This is a temporary fix and Microsoft needs to patch it up in their updates. The problem is with the security permissions on your profile temp folder. Here are step-by-step instructions to fix this error permanently:

Before sorting out this issue, we need to find out where the temp folder is located. This folder is different for each Windows user i.e., each logged-in user gets a separate “Temp” folder. Simply press Windows key + R to bring up the Run box. Type cmd and press Enter.

The Command Prompt will run with permissions of the current logged-on user. Type set TEMP and press Enter. It will display your profile temp folder. By default, the temp folder is stored in C:\Users\{username}\AppData\Local directory in Windows 8/7/Vista, and in C:\Documents and Settings\{username}\Local Settings directory in Windows XP and previous versions.

command-prompt

Navigate to your profile temp folder. Right-click on the Temp folder and choose Properties. In the Properties window, click the Security tab, and then click Edit to change permissions.

folder-properties

Here select your account from the list and check the Full Control checkbox. When done, hit OK. Note that when you will check the Full Control checkbox, all other permissions will be automatically checked too.

folder-permissions

Now go ahead and you should be able to install your program successfully.

2 Methods to Start SQL Server in Single User Mode

October 26th, 2014 by Admin

What is single-user mode?

There are certain situations when user may have to start a SQL Server instance in single-user mode. For example, you might need to restore your master database from a backup in the event of a failure or damage, detach the database and kill all the connections. Both actions require starting an instance of SQL Server in single-user maintenance mode.

When a database is started in single-user mode, the following events occur:

  • Any current connections to the database are dropped without warning
  • Only one user can connect to the database
  • The CHECKPOINT process is not started

I’m going to walk you through the process of putting your SQL Server database into single-user mode. This can be either done via SQL Server Configuration Manager by setting the startup parameters or through the Command Prompt.

Method 1: Start SQL Server in single-user mode through SQL Server Configuration Manager

Run SQL Server Configuration Manager. Choose SQL Server Services from the left panel and then right-click on desired SQL Server service that needs to run in single-user mode. Select Properties from the drop-down menu.

configuration-manager

In SQL Server 2014 or 2012, click Startup Parameters tab. Type -m in the Specify a startup parameter box and then click Add.

sql-startup-parameters

If you’ve installed SQL Server 2008, 2005 or an earlier version, click Advanced tab. Append the ;-m to the end of the Startup Parameters box.

startup-parameters

Click Apply to save your changes. Restart your SQL Server instance and it should then run in single-user mode.

Method 2: Start SQL Server in single-user mode through Command Prompt

First of all, you need to figure out the name of your SQL Server instance. Press Windows key + R to bring up the Run box. Type services.msc and press Enter to open the Services window.

Find your desired SQL Server service in the list, double click it. This will open the Properties dialog box for that service. Copy the service name listed there. In my example, the service name is MSSQL$SQLEXPRESS.

sqlserver-service

Open up a Command Prompt with administrative privileges and run the following command to stop the SQL Server service.
net stop service_name

The next step is to start the service in single-user mode. This is done by specifying /m parameter with net start command.

single-user-mode

How to know if a running SQL Server instance is in single-user mode

When your SQL Server instance is started in single-user mode, it prevents multiple clients from connecting to the server at the same time. For example, if you’ve already connected to your DB with the SA account, and then try to login again through SQL Server Management Studio (SSMS), you’ll get the following error message:

Login failed for user”. Reason: Server is in single user mode. Only one administrator can connect at this time. (Microsoft SQL Server, Error: 18461)

sqlserver-connect-error

To fix this issue, you need to remove -m from the startup parameters and restart your SQL Server instance, which will bring the database back to multi-user mode.

How to Extract Background Music from A Song or Movie

October 24th, 2014 by Admin

Is it possible to extract audio from a video file so that I can play music with MP3 player? Video Converter Assist is a handy utility that everyone needs nowadays which can extract audio, sound, or background music from home movies, YouTube videos, songs or any other video file. Here’s how.

How to Extract Background Music from A Song or Movie?

Click here to download the Video Converter Assist application. After the download is finished, run the setup file (about 8.2Mb) and follow the installation wizard to install it on your computer.

Launch the Video Converter Assist program. Click on Add File button and pick your video file which can be in AVI, FLV, MP4, MPG, WMV, MOV, SWF, RM format. It even supports more video formats than that, but those are the most common.

Set the mode as Audio, and then choose mp3, flac, wav, aac or mp2 as the output audio format. Click on the … button and choose the destination folder for storing your converted audio files.

Now, go ahead and click Convert and the extraction process will begin. The program is pretty fast, it took only one minute to extract audio from a 19 minute video clip. When extraction is over, you can see your audio file at the location specified! I checked the sound quality between the video and the audio file and they were exactly the same, so you’re not going to lose any quality in the extraction process. That’s it!