Can’t login to SQL Server with Windows Authentication? Forgot to add the local administrator account to the sysadmin server role but SQL Server is configured for Windows Authentication only? If you can change SQL Server to mixed mode Authentication, it would save you having to do a reinstall.
The SA account will be automatically created on every new SQL Server installation. But this account is disabled by default if you select Windows Authentication during setup. In this article I’ll show you how to enable mixed mode authentication after installation, and unlock / enable the SA account login if you’re locked out of a SQL Server instance.
Part 1: Enable Mixed Mode Authentication
If you can connect to SQL Server with SQL Server Management Studio, you can easily switch to mixed mode with just a few mouse clicks! However, what to do if you’re locked out of every SQL Server account and can’t login even with Windows Authentication? Here is a simple registry trick:
- Press the Windows key + R to bring up the Run box. Type
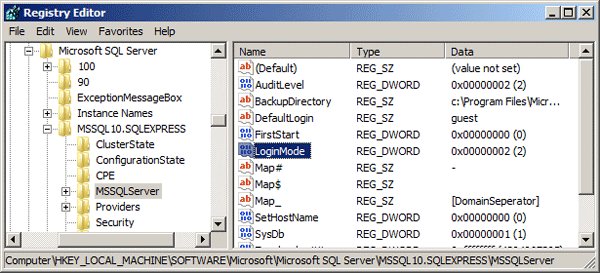
regeditand press Enter. - Navigate to the registry location:
HKEY_LOCAL_MACHINE\SOFTWARE\Microsoft\Microsoft SQL Server\MSSQL10.SQLEXPRESS\MSSQLServer, whereMSSQL10.SQLEXPRESSis the name of your SQL Server instance. - In the right panel, change the LoginMode from 1 to 2. (1 = Windows authentication Only. 2 = Mixed mode.)
- Restart your SQL Server instance for this change to take effect.
Part 2: Enable / Unlock SA Account
Even if the authentication mode is switched to SQL Server mixed mode after the installation, the SA account is still disabled and must be manually enabled. With SQL Server Password Changer you can offline enable / unlock your SA account in case your SA account is disabled, locked out or you simply forgot the password. Here are steps:
- First of all, you need to stop your SQL Server service so the password recovery software can access the master.mdf database offline.
- Download the SQL Server Password Changer on your computer. After you’ve downloaded it, double-click the setup file to install it.
- Start SQL Server Password Changer. Click on Open File button and select the master.mdf database for your SQL Server instance. In my example, the master.mdf file is located in
C:\Program Files\Microsoft SQL Server\MSSQL10.MSSQLSERVER\MSSQL\DATA.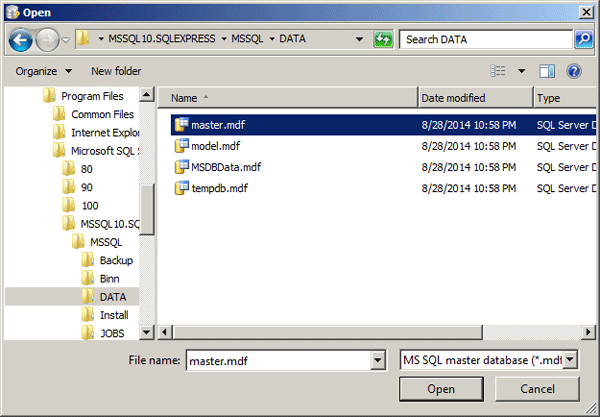
- The program will extract all the SQL Server logins from the master.mdf database. Choose the SA account and click on Change Password button. Set a new password in the popup window and click OK.
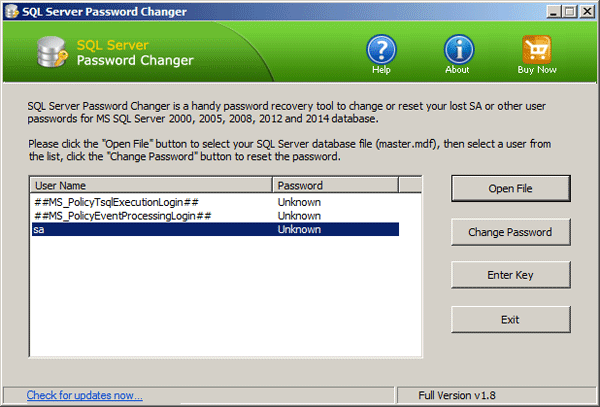
- Now you’ve successfully enabled / unlocked the SA account. Start your SQL Server service and you can now login to the SA account with your new password! It’s that easy!