Author Archive

How to Crack and Decrypt PDF Password at Ease

April 19th, 2013 by Admin

Do you have a password protected PDF document that you can’t copy or edit its content? Can’t open a password protected PDF document? There are two types of password that exists when working with PDF files. The user password will encrypt the file and prevent it from opening whereas the owner password will prevent the user from printing, copying text and adding notes in the PDF document. So if you are looking to unlock your PDF file, you can use PDF Password Recovery program to crack and decrypt PDF password at ease.

How to Crack and Decrypt PDF Password at Ease?

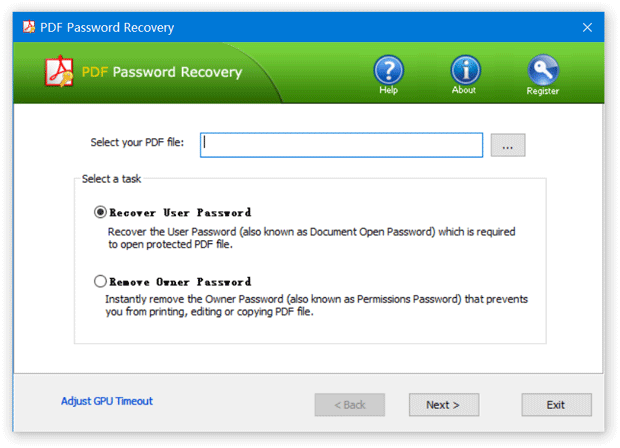
Simply download and install PDF Password Recovery application on your computer. After installing, start the application and you’ll see that there are two options on the main interface: Recover User Password and Remove Owner Password.

If the document’s original creator used a password to restrict copying or printing, please choose the Remove Owner Password option, the program will decrypt the PDF document and then generate a fresh copy of your original PDF file, but the new file is not protected with printing or editing restrictions. You can copy, print or edit any part of the PDF file at ease. This cracking procedure is instant, no matter how complex or strong your owner password is!

If the document is completely password-protected and won’t even allow you to open it, you need to choose the Recover User Password option. This program offers three cracking methods for you to recover the file open password: Dictionary attack, Mask attack and Brute-force attack. The recovery time could take a very long time, especially if the document’s original creator used a strong password.

Conclusion

The password protection imposed on PDF document can sometimes lock out owner yourself, PDF Password Recovery is a recommended option which allows you to crack and decrypt PDF password at ease.

Windows 7 Password Recovery

April 17th, 2013 by Admin

Forgot your Windows 7 password or someone changes it without your knowledge? In such situations, you will be locked out of Windows 7. This tutorial covers the process of recovering Windows 7 password even after you forget the administrator password. Like previous versions of Windows, Windows 7 stores the encrypted user account passwords in a file called SAM. This file is commonly found in \windows\system32\config, which is in a binary format and not easily accessible. We will be using a utility called Reset Windows Password to perform the recovery.

Requirements:

  • A blank CD/DVD or a USB flash drive.
  • Another PC where you can burn the software provided here to CD/DVD or the USB flash drive..
  • A basic know how about how to change the Boot Priority in BIOS.

Windows 7 Password Recovery

This method can enable you to reset/remove forgotten Windows 7 password in minutes, but it cannot tell you what the password for an account actually is. Reset Windows Password utility woks by overwriting the password hash in your SAM file so you can then log back to your account with a blank/empty password. Here are the Windows 7 password recovery steps:

Step 1:
First, download the Reset Windows Password utility on another PC in order to make a bootable Windows 7 password recovery CD/USB drive.
After the download is complete, extract the ISO image file from the zip and burn the ISO to a CD or DVD using your favorite CD Burning utility such as ISO2Disc.

Step 2:
Now move to the Windows 7 PC you want to reset the password, either insert the CD/DVD or the USB flash drive what you opted for and select it as the first boot device in computer BIOS.

Step 3:
Once you have booted into it you will see that the computer is loading the Windows PE operating system inside the CD/USB drive. After one or two minutes, the Reset Windows Password program will open up and automatically detect the SAM registry files for all your Windows installations.

Step 4:
Choose the SAM registry file for your Windows 7 installation, it will show you all the user accounts that are associated with your Windows system. Select the user account you forgot password of, and then click on “Reset Password” button. It will remove/reset your forgotten Windows 7 password instantly!

Step 5:
After you are completed with all the above steps successfully, remove the Windows 7 password recovery CD/USB drive and restart the computer. you can then happily log in to your Windows 7 system again.

How to Blank or Clear a Forgotten Windows Password

April 16th, 2013 by Admin

Is there anyway to blank or clear Windows password if I’ve forgot my password? I changed my password on Friday and by Monday I have no idea what I changed it to. I don’t want to reinstall OS. Please help!

Forgot your Windows password and locked yourself out of the system? No problem! This tutorial will show you an easy way to blank or clear a forgotten Windows password easily! This method works with all versions of Windows, including Windows 8/7/Vista/XP.

How to Blank or Clear a Forgotten Windows Password?

Reset Windows Password is a small boot disk that you can use to blank/clear lost Windows password quickly and easily. This utility can enable you to blank or delete passwords, but it cannot tell you what the password for an account actually is. No matter how strong your password is, it can clear your forgotten password instantly.

  1. First, download the compressed ISO image of Reset Windows Password utility on an alternate PC and extract it locally. Burn the resulting ResetWindowsPwd.iso file to a blank CD or USB flash drive using ISO2Disc program.
  2. Second, insert the CD or USB drive into the locked computer that has a forgotten password and reboot it. Before the Windows OS loads (while the manufacturer’s screen is briefly displayed), hit the appropriate key (usually one of the twelve ‘F’ keys) to enter the boot menu option where you can specify a device to boot to.
  3. Your computer will load the contents of the bootable CD or USB drive. When it is finished you will be prompted with the Reset Windows Password screen.
  4. The program will search your PC for Windows SAM registry files and display the local user accounts on your system. Choose a desired user account and click on “Reset Password” button. It will blank/clear your forgotten Windows user password immediately.
  5. After clearing Windows password, remove the CD or USB drive and restart the computer. You can then log in to Windows without typing a password! It’s so simple!

At this point the user account should have no password. You can reset the password once you successfully log in to Windows.

How to Find Office Product Key

April 15th, 2013 by Admin

How to find a lost Microsoft Office Suites product key? I had to do a system restore but to reinstall Office I need the product key. The product key was written down and a family membership accidentally threw it away.

Losing your Office product key (CD key) might not seem like a big deal but it can quickly become one if you end up needing it for some reason. Office product key is a necessity for reinstalling or verifying your Office software. If you couldn’t find the product key sticker or it is scratched, you can still find the keys from your Microsoft Office installation. Follow this guide to help locate your MS Office product key easily!

How to Find Office Product Key?

  1. Download Product Key Finder and follow the installation process to install it on your computer.
  2. Launch the program and then click on “Start Recovery” button. It shows a list of recovery options.
  3. Choose the “From current system” option, the program will scan Windows registry and find the product keys of supported programs, including various versions of Windows and Microsoft Office.
  4. When the scan is complete, the program will display a text box with product keys for whatever installed versions of Windows and Office it detected.
  5. Right-click inside the text box and select “Select All” option from the context menu, all the product keys will be selected. You can then use Ctrl + C and Ctrl + V to paste them into a text file for safe keeping.

The product key finder utility can quickly locate your Office key (along with the keys for many other installed programs) and display it for you. If you are out of luck and fail to find your key, Microsoft may be able to replace a lost product key. Contact Microsoft support online or by phone to see what your options may be.

Lost Windows XP Password – How to Get Back In?

April 12th, 2013 by Admin

Lost Windows XP password? How do you get back in? Is there a way to override or reset the password without wiping the entire system? Well, it is nearly impossible to recover the original password, but you can reset it easily, and Reset Windows Password utility can help. This tutorial will explain the process involved for resetting lost Windows XP password so you can get back in your computer quickly!

Lost Windows XP Password? A Simple Way to Get Back in Your Computer

Reset Windows Password utility is a program which runs from a bootable CD or USB flash drive. To reset your lost Windows XP password, you need to access to a computer with internet access in order to install the program to a CD or USB drive. After installing, you can use the CD/USB drive to boot off your locked PC and remove the login password instantly. Here are detailed instructions:

Step 1: Download

Download the Reset Windows Password utility on an alternate PC with internet access. Once the download completes Right-click the .zip file and Select “Extract All”. This will decompress the contents, which there should just be a single .iso file inside.

Step 2: Installing to CD or USB Drive

Next, use the freeware ISO2Disc to make a bootable CD/USB drive from the ISO image you downloaded in the previous step. Open up ISO2Disc program and click on “Browse” button to locate the ISO file and choose the blank CD or USB flash drive you’ve plugged in, then click on Start Burn. A password reset bootdisk will be created in minutes.

Step 3: Change Boot Order in BIOS

Insert the bootable CD/USB drive into your Windows XP computer which is locked out. Restart the computer and hold down F2 or whatever the setup key is shown as during the initial boot screen. This should bring up the BIOS. Change the boot order in BIOS so your computer will boot from the CD/USB drive prior to the hard drive.

Step 4: Boot from the CD/USB Drive

If you set up the BIOS correctly the computer should automatically boot from the bootable CD/USB drive. When it loads to the Reset Windows Password screen, click on “Reset Local Admin/User Password” option. It will display a list of Windows local user accounts existing in your Windows XP system.

Step 5: Reset Lost Windows XP Password

Choose a user account and click on “Reset Password” button, it will reset/remove your lost Windows XP password in seconds. Remove the CD/USB drive and restart the computer, you can then immediately get back in your Windows XP system without typing a password!

The procedure is so simple that nearly every user with some basic computer skills can use it to reset Windows XP password easily when they forgot or lost Windows XP password. This method also works with Windows 8, 7, Vista and other operating systems.

How to Reset Forgotten Safe Mode Password in Windows

April 11th, 2013 by Admin

Stuck in Safe Mode and can’t login? Forgot Safe Mode password on your computer? Many times in order to remove a piece of spyware or for troubleshooting and diagnostic purposes, you’ll have to start Windows in Safe Mode. After booting into Safe Mode you’ll be prompted for a password to get past the logon screen. What to do if the Safe Mode won’t accept your password?

safe mode password

In this tutorial we’ll show you how to reset Safe Mode password using a password removal bootdisk (CD, DVD or USB flash drive). To get into Safe Mode, we need to log on with the built-in administrator account or other local account that has administrator permissions. Follow these instructions to see how can you reset forgotten Safe Mode administrator password easily! This works with all versions of Windows, including Windows 8/7/Vista/XP and Windows Server operating systems.

How to Reset Safe Mode Administrator Password in Windows?

  1. Download the Reset Windows Password utility on an alternate PC with internet access. Once the download completes Right-click the .zip file and Select “Extract All”. This will decompress the contents, which there should just be a single .iso file inside.
  2. Next you need to burn this iso image file to a blank CD or USB flash drive using the freeware ISO2Disc. Here I’ll make a password removal Live CD. After starting ISO2Disc program, click on the “Browse” button to locate the iso file you’ve downloaded, then choose the “Burn to CD/DVD” option, click on “Start Burn” button and the password removal Live CD will be prepared in minutes.

  3. Put the Live CD into the CD/DVD drive of the computer that needs a Safe Mode password removal. Restart the computer and hold down F2 or whatever the setup key is shown as during the initial boot screen. This should bring up the BIOS. After getting into BIOS, look for a option similar to Boot order or Boot Device Priority. Set your CD drive as the first boot device. Once you’ve got it, save changes and reboot.
  4. If you set up the BIOS correctly the computer should automatically boot from the Live CD. When it loads to the screen shown below, click on “Reset Local Admin/User Password” option. It will display a list of Windows local user accounts existing in your system.

  5. Choose the built-in administrator account and then click on “Reset Password” button. The program will reset/blank your Safe Mode administrator password immediately! Now you’re almost done. Remove the Live CD and restart your computer. Now you should be able to log into Safe Mode without typing a password!

Can’t Log into Safe Mode Using the Password Which Works in Normal Mode?

Only thing that comes to mind is that you are joined to a domain. To log into domain user account in Safe Mode, you need to choose the “Safe Mode with Networking” option from the Advanced Boot Options, which allows your computer to connect to the domain controller to validate your password. If you choose the “Safe Mode” option, you would have to log into the PC with a local account instead of a domain account.

How to Unlock Your Netbook After Forgetting Windows Password

April 10th, 2013 by Admin

Forgot Windows password on your netbook? Get locked out of your netbook and can’t remember the login password? There are plenty of ways to reset forgotten Windows password with a CD/DVD. But this doesn’t work because most the netbooks don’t have the CD/DVD drive. So here I will show you how to use a USB flash drive to unlock any netbook when you lost or forgot your password.

How to Unlock Your Netbook After Forgetting Windows Password?

After forgetting netbook password, you’ll be locked out of your Windows account and unable to get past the Windows login screen. In such a situation, we have to make a bootable password cracking USB drive on another computer which we can access. Boot your netbook off the USB drive and it enables you remove/reset your forgotten Windows password easily! Let’s proceed.

  1. Download the Reset Windows Password utility on an alternate PC with internet access. Once the download completes Right-click the .zip file and Select “Extract All”. This will decompress the contents, which there should just be a single .iso file inside.
  2. Next you need to install this iso image file to your USB flash drive. The freeware ISO2Disc allows you to make a bootable USB flash drive easily. After starting ISO2Disc program, click on the “Browse” button to locate the iso file you’ve downloaded, then choose the USB drive you’ve plugged in, click on “Start Burn” button and the bootable USB drive will be prepared in minutes.

  3. Plug in your USB drive to the netbook that you need to unlock. Restart the computer and hold down F2 or whatever the setup key is shown as during the initial boot screen. This should bring up the BIOS. After getting into BIOS, look for a option similar to Boot order or Boot Device Priority. Set your USB flash drive as the first boot device. Once you’ve got it, save changes and reboot.
  4. If you set up the BIOS correctly your netbook should automatically boot from the USB flash drive. When it loads to the screen shown below, click on “Reset Local Admin/User Password” option. It will display a list of Windows local user accounts existing in your netbook.

  5. Choose the user account that you need to reset password for, then click on “Reset Password” button. The program will reset/blank your netbook login password immediately! Now you’re almost done. Unplug the USB flash drive and restart your netbook. Now you should be able to log into your netbook without typing a password!

By follow this step-by-step tutorial you can reset netbook password quickly and easily, no matter what version of Windows operating system are running on your netbook, including Windows 8, 7, Vista and XP.

How to Fix a Lost Administrator Password Using Windows 7 or Vista System Restore

April 8th, 2013 by Admin

Lost or Forgot the administrator password on your Windows PC? There are tons of password cracking tips and tricks available on the internet which can help you recover or reset a lost admin password, but most of them involve in many complex steps and often it’s hard to get them to work if the security holes in your system are already blocked.

Thankfully, you can easily fix a lost administrator password using Windows 7 or Vista system restore. Just restore Windows to a point that includes an old password you can remember. This will definitely save you a lot of trouble and may also save your data and user settings. For this to work, you only need a System Repair Disc or the original Windows installation DVD. If you don’t have a System Repair Disc, you can create one easily by following this guide: Create a Windows System Repair Disc for Emergency Use.

How to Fix a Lost Administrator Password Using Windows 7 or Vista System Restore?

Insert your Windows Installation DVD or System Repair Disc into your drive, turn on the computer, and wait until you see the message “Press any key to boot from CD or DVD”. Press any key to continue. (Note: If you don’t see this message, you probably have to change the boot order in the BIOS and/or disable Secure Boot.)

When the system boots from the DVD, follow along with the prompts as you normally would. When you get to the Install Windows screen, click the Repair Your Computer link.

After searching the Windows installations on your hard drive, you’ll then be prompted to select the operating system to repair. Just select your desired operating system and click Next.

The System Recovery Options dialog box will open up and offer different recovery options to help you troubleshoot computer problems. Here we need to click System Restore to load the System Restore wizard.

When you see the first window of the System Restore wizard, click Next.

At this screen you’ll be prompted to select the restore point that you want to use. Click Next.

Finally, you’ll be prompted to confirm your restore point and if everything looks right, click Finish.

Click Yes to the warning message that comes up making sure you want to restore the computer to the selected restore point. The restore process will begin. It may take a while to complete, so sit back and be patient.

Once the restore operation is complete, you’ll be prompted to restart your system.

Remove the DVD and restart the computer. You can then log in to your machine with an old password which you used before. Done!

Conclusion

Windows 7 or Vista system restore will make sure that you don’t lose any documents or files. However, any programs or updates that have been installed since the corresponding restore point have to be installed again. This approach works perfectly with Windows 8, 7 and Vista. But it doesn’t work with Windows XP.

If you can’t even do a system restore or can’t afford to lose any software recently installed on your computer, I would highly recommend you using some commercial software to unlock your forgotten password, such as Reset Windows Password utility.