We are taking over a new company and nobody knows the administrator password to log on the Windows Server 2008 domain controller, we try with few users to see if they were administrator in the domain with no luck. no way to contact the person that set it up. Is there a way that we can change or reset the password? Thanks in advance.
I think it is a fairly common occurrence these days that IT Administrators forget the password of a domain controller after they have got back from a vacation or there has just been a situation where the previous system admin has left without leaving the server password.
There are lot of different Windows password recovery utilities that are available on the web. Some open source and some paid ones and it can get a bit confusing when deciding which one to go with.
There is one utility that you can rely on and believe it works on all Windows Server OS, including Windows Server 2012/2008/2003/2000. This is called Reset Windows Password. Once you have downloaded the ISO image, burn it on a CD and then boot the server of it. Resetting forgotten domain administrator password for a domain controller is a 2-step procedure.
How to Reset Forgotten Domain Administrator Password on Windows Server 2008?
First, you will need to download the Reset Windows Password utility on any PC that you can access. This can be your work PC, or a friend or your co-worker’s computer. After the download is complete, unzip the download file and you’ll get the ResetWindowsPwd.iso file.
Burn the ResetWindowsPwd.iso file to a CD using your preferred CD Burning software. If you don’t have one, you can use the freeware such as ImgBurn or ISO2Disc. If your domain controller doesn’t come with a CD/DVD-ROM, you can choose to burn the ISO image to a USB flash drive using ISO2Disc.

Put the CD into the CD drive of your domain controller, then change the boot order in BIOS to set the computer to boot from CD. Once the computer has booted, it will load the OS inside the CD drive and launch the Reset Windows Password utility.

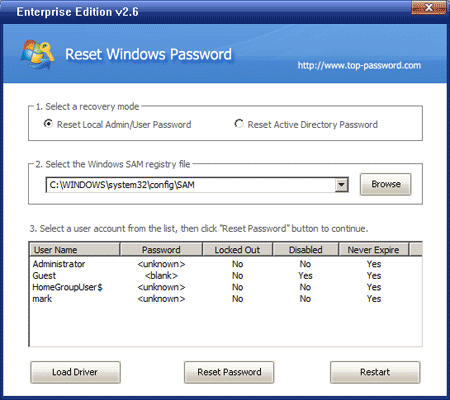
Choose the Reset Active Directory Password option, the program will locate the ntds.dit file which is used to stored domain user login details on your domain controller.
Choose the domain administrator account and then click on Reset Password button, the program will change the forgotten/unknown password to Password123 by default, and also unlock/enable the account in case it is locked out or disabled.
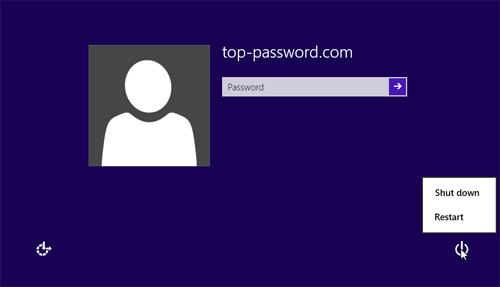
The last step is remove the CD and restart the domain controller, you’ll be able to log in to your Windows Server 2008 using the domain administrator account. This is it!! You have successfully hacked your own server.