Author Archive

How to Start Windows in Safe Mode

November 28th, 2012 by Admin

Safe Mode is a special boot mode available in all versions of Windows, which is mainly used for troubleshooting purposes. Many times when you can’t boot into Windows because of a virus infection, a faulty software or driver installation, you can boot into Safe Mode and fix the problem.

While in Safe Mode, only basic files and drivers absolutely necessary to run the operating system are loaded. Graphic drivers are among the dispensable ones and do not load, hence Safe Mode looks rather bleak. However, because just the essential programs and files are loaded in Safe Mode, this allows us to remove some spyware, hardware, viruses and such that cannot be removed in Normal Mode.

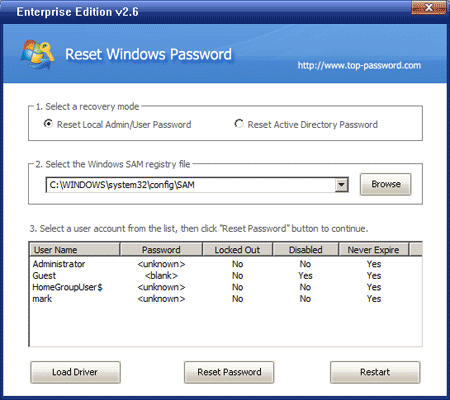
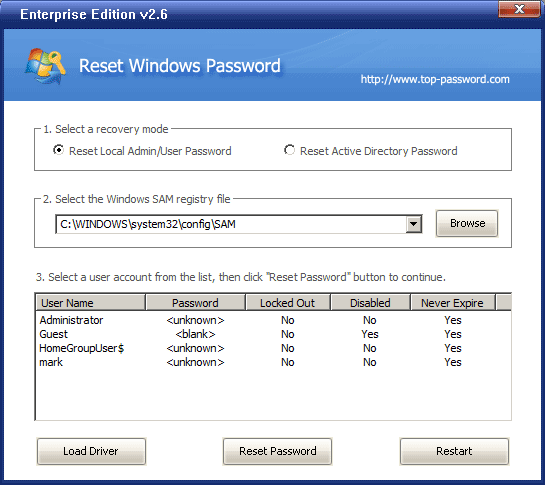
This article explains how to start Windows in Safe Mode. Note that you will need an Administrator account in order to log into Safe Mode. If you forgot the administrator password, please reset the password first using Reset Windows Password utility.

How to Start Windows in Safe Mode?

  1. Restart or turn on the computer.
  2. Press and hold the F8 key while you wait for the Windows logo to appear. If the Windows logo appears or if the operating system begins to load, you may need to restart the computer and try again.
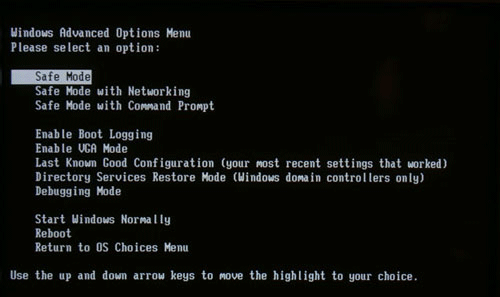
  3. The Advanced Boot Options screen for Windows will appear. Use the arrow keys on your keyboard to select Safe Mode, and press Enter key.

  4. Windows will boot into Safe Mode. When the desktop appears, it will display ‘Safe Mode’ in all four corners to let you know that you’re in this special mode.

After booting into Safe Mode, you can scan your system with antivirus, uninstall faulty software or driver which you’ve installed recently so you’ll be able to boot into Windows normally without any problem.

How to Change Windows 8 Product Key?

November 27th, 2012 by Admin

Do you need to change your product key so you can activate Windows 8 properly? After installing Windows 8, you’ll find that there is no option to enter a product key under Computer properties. Or, at least I did not see it. Luckily, the good old Command Prompt and slmgr.vbs tools came to rescue. Just follow this tutorial to change Windows 8 product key using Command Prompt and slmgr.vbs.

How to Change Windows 8 Product Key?

  1. Move the mouse cursor to the bottom right corner of the screen, click the Search icon.
  2. Type in cmd in the search box, then right-click on the “Command Prompt” icon on the top-left of the search result page. A tick sign appears on the icon.

  3. Click on the Run as Administrator icon from the bottom options.
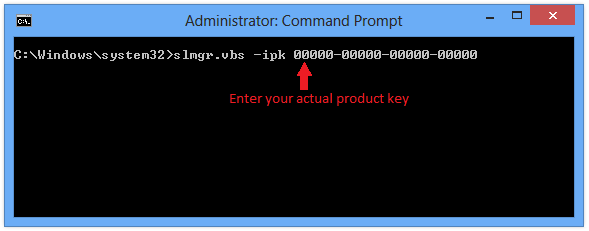
  4. Once the command prompt is launched with administrator privilege, run the following command to enter your product key:
    slmgr.vbs -ipk {insert your product key here}

  5. Then run the following command to activate Windows after changing the key:
    slmgr.vbs -ato
  6. You will get a confirmation on product activated successfully.

How to Reset a Forgotten Administrator Password on a Domain Controller

November 27th, 2012 by Admin

Network administrators change the administrator account password often to provide an extra level of protection for the account. The administrator account is a target for hackers, because it has complete control over the network. But frequently changing the administrator password can also cause losing it easier. What to do if you forgot the administrator password on a domain controller?

In this tutorial we’ll demonstrate how to reset a forgotten administrator password on a Windows Server 2010/2008/2003/2000 domain controller, if you forgot the administrator password and can’t login using any other alternative administrative accounts.

How to Reset a Forgotten Administrator Password on a Domain Controller?

  1. Download and install Password Recovery Bundle on another computer that you can log in.
  2. Prepare a blank CD and insert it into the computer.
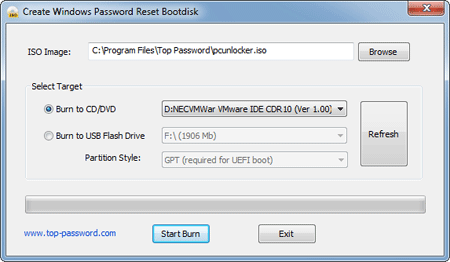
  3. Launch Password Recovery Bundle and click on Windows Password button, it will display a password reset bootdisk creating dialog.

  4. Choose the CD you’ve plugged in and then click on Start Burn button to create a Live CD.
  5. After you have the Live CD, put it into the CD drive of your domain controller.
  6. Turn on the server and have it boot from the Live CD. You may need to go into BIOS and set CD/DVD as the first boot device.
  7. After booting from the Live CD, it will load the Windows PE operating system inside the Live CD and start the Reset Windows Password program.

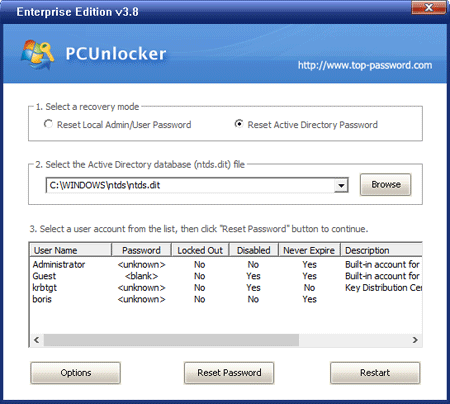
  8. Choose the Active Directory NTDS.dit database, it will display a list of domain user accounts inside the NTDS.dit database.
  9. Choose the administrator account from the list, then click on Reset Password button, the program will replace the forgotten/unknown administrator password with the new password: Password123.

Reject the Live CD and reboot the domain controller, you can then log in to the administrator account with the new password. No need to format the hard drive and re-install your domain controller.

How to Set Up Parental Control in Windows 8

November 26th, 2012 by Admin

We’re glad to see that parental controls in Windows 8 are simple and not nearly as complex as previous versions of Windows parental controls. It is much easier for all parents out there who want to protect their kids while they are using their computers. Parents can set up parental control to set limits on the hours that children can use the computer, the types of games that they can play, the websites that they can visit, and the programs that they can run.

How to Set Up Parental Control in Windows 8?

The key to using parental control in Windows 8 is to properly configure multiple accounts on your PC. You, as a parent you should have access to an administrator-level account. You need to set up a standard user account for your children as only this type of account can have parental controls applied.

Step 1: Move the mouse cursor to the lower right corner of the screen and then right-click to bring up a small menu. The menu gives you quick access to some common administrative tasks, including Control Panel.

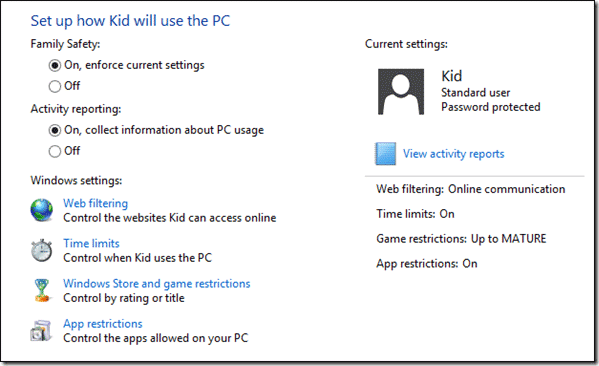
Step 2: Open Control Panel and then open Family Safety. In family safety, click on the account you would like to configure and proceed. You will now have to configure some of the settings like Web Filtering, Time Limit, App restriction and, Windows Store and game restrictions.

Step 3: As all the settings are similar to Windows 7 and Vista, you can refer to our complete guide – How to Use Parental Controls in Windows 7. The article shows you how you can allot time limit, moderate games and apps and filter inappropriate websites. Finally at the end of the day you can view your kid’s activity log and see how he has spent his time on the computer.

Conclusion

That’s it. Keep in mind that if you have more than one PC that you allow your child to use, you might want to consider setting up an online Microsoft account for them. You can use local accounts, but you’ll probably have to set up their Family Safety settings for every PC, rather than just once with a Microsoft account.

Find a Forgotten Password Saved in Chrome

November 23rd, 2012 by Admin

Chrome, like many popular browsers, includes a built-in functionality to save your password. Often we’ll use the saved password feature so we can login to the same website next time without re-entering your password. But we often tend to forgot the password when we need to login to the same website on another computer. Here’s how to find your forgotten password saved in Chrome.

How to Find a Forgotten Password Saved in Chrome?

1. Download and install Password Recovery Bundle.

2. Run Password Recovery Bundle, then click on the Start Recovery button. It will bring up a drop-down menu that shows all supported password recovery options.

3. Select the Chrome Password option.

4. The Chrome saved logins and passwords will be revealed instantly.

Password Recovery Bundle can be used on any Windows platform including Windows 8, 7, Vista, XP and if you have lost your passwords then you can use it to find your forgotten Chrome passwords easily.

3 Ways to Close a Metro App in Windows 8

November 22nd, 2012 by Admin

How to close a metro app in Windows 8? Apparently a metro app goes full screen without a conventional close button like the one which you will find in desktop applications. It is designed in such a way that a user should never need to close an app, because you wouldn’t normally shutdown apps on a phone or tablet. However, most Windows users will feel lost and can’t find a way to exit or minimize the app. If you really want to close a Metro app, there are at least 3 ways you can do this.

Method 1: Alt + F4 Shortcut

If you are not using Windows 8 on a touch device and you have a physical keyboard, then you just press Alt + F4. The metro app will close instantly. This is a traditional Windows shortcut with which most of the users must be comfortable.

Method 2: Click and Drag

The simplest way to close a metro app in Windows 8 is the move your mouse cursor to the top of the screen while the app is open, click it, and drag the window down to the bottom of the screen. This will close the app the majority of the time.

Method 3: Close via Thumbnail

Place your mouse in the left hand corner (also known as hot corner) of the screen. It will display a thumbnail of your last active applications. Dragging down the mouse further will show you the list of all open apps. Then right-click on the thumbnail of the App that you want to close, and then select Close option to force the application to exit.

Conclusion

The most powerful way to close a metro app is using the Task Manager. Press Ctrl + Shift + Esc to bring up the Task Manager. Find the app, select it, and click End Task. But if you want a metro app out of the way, but you don’t want to close it, you can minimize it. One way is to move the mouse to the extreme, lower, left corner of the screen to show the mini Start screen button and click it. The Start screen displays, but the app is still running in the background.