Author Archive

How to Locate and Encrypt PST File in Outlook 2010

October 12th, 2012 by Admin

Microsoft Outlook 2010 stores your email in a .pst file. The PST file format is also be known as a Personal Folder File. Outlook uses this file format to store your data including emails, contacts, calendars, email account settings, etc. When you install Outlook 2010 and set up an email account, Outlook creates the .pst file for that account in a specific folder on your computer’s hard drive. In this tutorial we’re going to show you how to locate and encrypt .pst file with a password in Microsoft Outlook 2010.

The Quickest Way to Locate PST File in Outlook 2010:

  1. Launch Microsoft Outlook 2010.
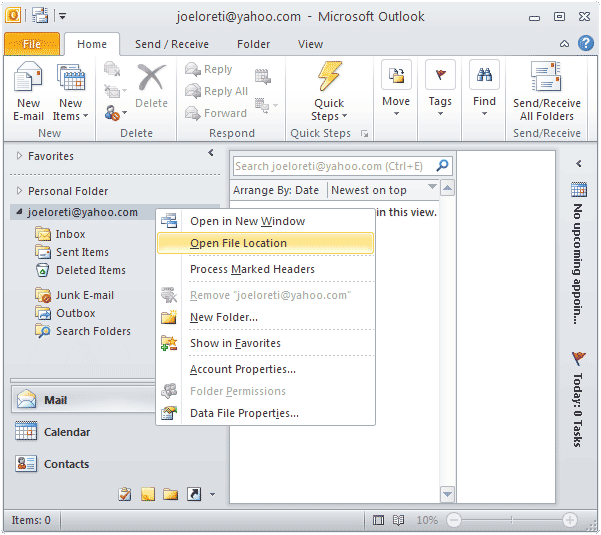
  2. Right-click on the Data Store for your email account on the left panel in Outlook 2010 and select Open File Location.
  3. It will quickly locate the .pst file in Windows Explorer.

How to Encrypt PST File in Outlook 2010?

  1. Launch Microsoft Outlook 2010.
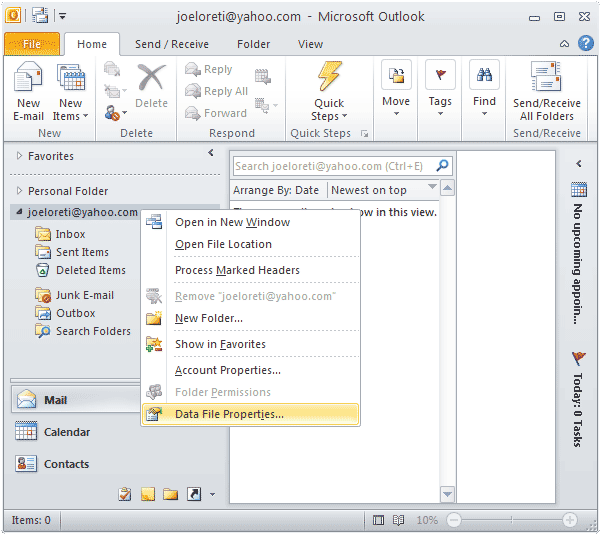
  2. Right-click on the Data Store for your email account on the left panel in Outlook 2010 and select Data File Properties.
  3. This will bring up the Properties window. Click on the Advanced button.
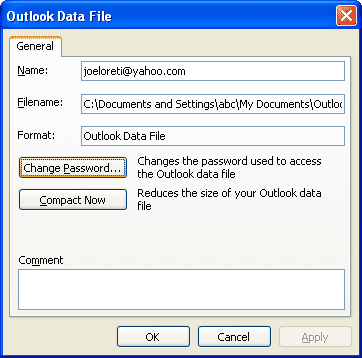
  4. Click on the Change Password button on the Outlook Data File window.
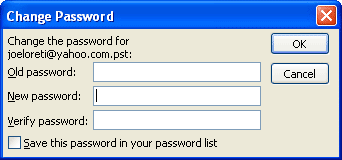
  5. Set a new password for your .pst file. If the .pst file is already protected with a password, you also need to enter the old password. Click OK.

After setting up a password to encrypt the .pst file, you need to enter the password to access all your data in Outlook every time you launch Microsoft Outlook application. MS Outlook users often encrypt PST file to ensure their confidential data are not accessed by unauthorized users. But sometimes when you lost your pst file password then you need to use Outlook Password Recovery program to recover lost password.

How to Reset Lost 2008 Active Directory Admin Password

October 11th, 2012 by Admin

We have a few customers, who have forgot their AD Administrator password on their Windows 2008 server. Is there really any way to recover it? I know it’s possible to reset your Windows 7, XP and Vista password. But is it possible to get the AD administrator password on a 2008 server? I hope we can avoid a re-install. Cheers.

Lost or forgot the administrator password on Active Directory 2008? There isn’t any efficient way to recover the password as Active Directory encrypts the password using some very strong encryption algorithms. But you can reset or replace the forgotten password easily. Today’s tutorial will be covering a technique that will allow you to reset your lost 2008 Active Directory Administrator Password.

How to Reset Lost 2008 Active Directory Admin Password?

  1. Download and install Password Recovery Bundle on another computer that you can log in.
  2. Prepare a blank CD and insert it into the computer.
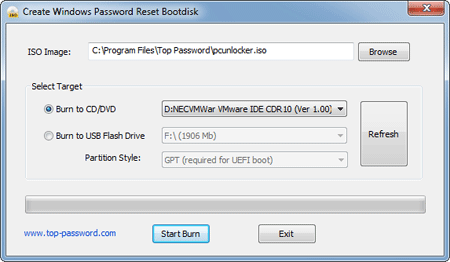
  3. Launch Password Recovery Bundle and click on Windows Password button, it will display the ISO burning dialog.

  4. Choose your CD you’ve plugged in and then click on Start Burn button to create a Live CD.
  5. After you have the Live CD, put it into the CD drive of your Active Directory server whose password you want to reset.
  6. Turn on the Active Directory server and have it boot from the Live CD. You may need to go into BIOS and set CD/DVD as the first boot device.
  7. After booting from the Live CD, it will load the Windows PE operating system inside the Live CD and start the Reset Windows Password program.

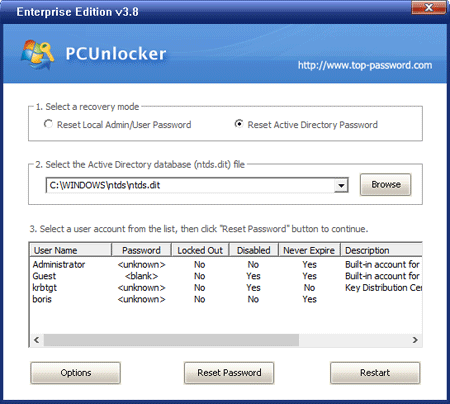
  8. Choose the Active Directory NTDS.dit database, it will display a list of domain user accounts inside the NTDS.dit database.
  9. Choose the administrator account from the list, then click on Reset Password button, the program will replace the forgotten/unknown administrator password with a new password: Password123.

Take out the Live CD and reboot the Windows 2008 server, you can then log in to your domain administrator account with your new password. With the Live CD you can also reset lost admin password on Windows 8, 7, Vista, XP.

How to Install Windows 8 on a Virtual Hard Drive for Dual Booting

October 8th, 2012 by Admin

In my previous blog post, Dual-boot Windows 7 and Windows 8, I showed you how to configure your Windows 7/Vista system to dual-boot Windows 8 from a new partition on your existing Windows 7 hard disk. Here I’ll show you how to install Windows 8 on a virtual hard drive (VHD) for dual booting. No need to shrink your existing partition or repartition your hard drive.

How to Install Windows 8 on A Virtual Hard Drive for Dual Booting?

The first step is to create a virtual hard drive on your Windows 7 system. Microsoft recommends a minimum of 20 GB for Windows 8 64-bit. I suggest setting the VHD disk size to at least 30 GB so you have disk space for apps. If you don’t know how to create one, please refer to this step-by-step guide: How to Create a Virtual Hard Drive (VHD) in Windows 8/7.

Next, reboot your computer and boot up with a Windows 8 DVD or USB flash drive. After a few minutes, you’ll see the Windows Setup screen. Specify your language settings before clicking Next.

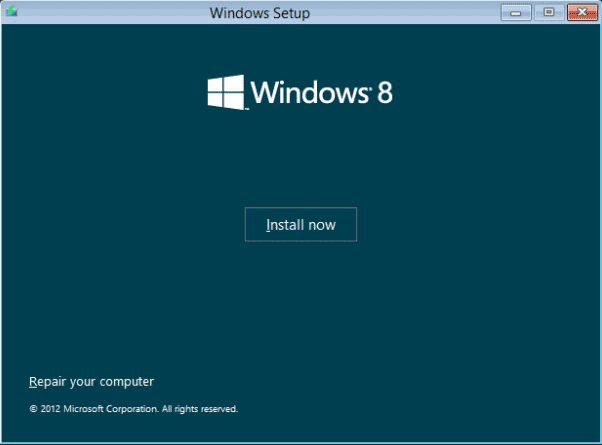
You’ll see the Windows Setup screen shown as follow. Click the Install Now button.

When you see the next Windows Setup screen, you will immediately press Shift +F10 to open the Command Prompt.

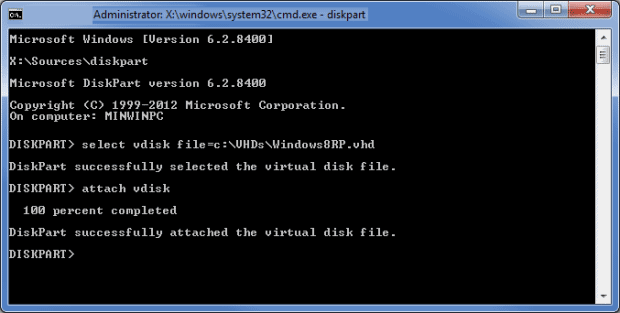
The virtual hard drive that you created earlier needs to be attached so you can select the VHD as the install destination. Once the command prompt is open, run the following:
diskpart
select vdisk file=c:\VHDs\Windows8RP.vhd
attach vdisk

Replace c:\VHDs\Windows8RP.vhd with the full path to the VHD file you created. The drive letter may be different from what you see in Windows 7. You can use the dir command to confirm the VHD file path.

Once you are done, you can type exit to leave the Diskpart environment and then click the Close button the close the Administrator Command Prompt window. When you return to the Windows Setup screen, you select the Custom option.

Windows Setup will prompt you to choose the location to which you want to install Windows 8 and you can now select your VHD. Keep in mind that when you select the VHD, you’ll see a warning message that says that Windows cannot be installed to this disk. Just ignore it as the procedure does indeed function correctly.

As soon as you click Next, the installation will begin. When the installation is complete, Windows Setup will reboot your system and you will then see the new Windows 8 style dual boot screen. Done!

How to Create a Virtual Hard Drive (VHD) in Windows 11/10/8/7

October 8th, 2012 by Admin

Have you ever wished you had an extra hard drive or partition to setup a dual-boot or multi-boot operating system? You can shrink your existing partition to create a new partition but it always carries some risk of data loss. Beginning with Windows 7, you can create a virtual hard drive (VHD) which acts as a separate hard drive in your computer.

The virtual hard drive (VHD) is stored as a .vhd or .vhdx file on your physical disk. By mounting a virtual hard drive, you can easily copy files to and from the virtual disk. Additionally, Windows 11/10/8/7 can be configured to boot from a VHD. In this tutorial we’ll go through the steps of creating a virtual hard drive (VHD) in Windows 11/10/8/7.

How to Create a Virtual Hard Drive (VHD) in Windows 11/10/8/7?

  1. Press the Windows + R key combination to bring up a Run box, type compmgmt.msc and hit Enter.

  2. The Computer Management dialog opens, click Disk Management in the left pane of the window and wait until you see all currently installed disks in the right pane.
  3. Right-click Disk Management and then select Create VHD.

  4. Click Browse to choose the location where you want your VHD stored, and give it a descriptive name. Choose the size you want it to be, and select dynamic or a fixed. If you want the disk to expand in size as you add files to it, then pick Dynamically expanding. Check Fixed size if you want a specific size and for it to stay that way. Click OK.

  5. You will see the virtual hard drive listed as unallocated space in Disk Management. Right click on the virtual hard drive (Disk 1) and select Initialize Disk.

  6. Press OK in the Initialize Disk box.

  7. Now it is time to create a volume by right-clicking the unallocated space and select New Simple Volume.

  8. The New Simple Volume Wizard starts up and just press Next until the wizard is complete.

  9. Now the new virtual disk is ready to be used, just like any other disk. You can see the virtual hard drive on your computer.

    Windows will automatically dismount the virtual hard drive after a restart. You can also manually dismount the drive by right-clicking it in File Explorer and selecting Eject.

  10. Whenever you need to mount a vhd/vhdx file as a virtual hard disk, just right-click it in File Explorer and choose Mount.

How to Dual Boot Windows 8 and Windows 7

October 7th, 2012 by Admin

Want to install Windows 8 and explore the new features but don’t want to overwrite your current Windows setup? You can easily create a dual boot setup of Windows 8 along with your current Windows 7 or Vista system.

Note: Since the boot manager of Windows 7/Vista is not well compatible with Windows 8, please make sure that you install 7/Vista before installing Windows 8. If you install Windows 8 first and then install the old versions of Windows, the Windows 8 boot menu will be lost in the dual-boot menu and you won’t be able to boot into Windows 8 anymore.

How to Dual Boot Windows 8 and Windows 7?

Follow this guide to configure your Windows 7 or Vista system to dual-boot Windows 8. The whole procedure can be divided into 3 steps: Create a new partition, Install Windows 8 and optionally set default boot operating system.

Step 1: Create A New Partition

You need to create a new partition of at least 16GB ( 20GB for 64-bit Windows 8 ) for your Windows 8 installation. If there is already a free partition up to the requirement, just skip this step. Otherwise you need to shrink the existing partition to create unallocated disk space, from which you create a new partition during the installation of Windows 8.

  1. Open the Start Menu and right click on the Computer option. Click Manage, and in the window that appears, click on Disk Management in the left sidebar.
  2. Right-click the volume you want to shrink, and then click Shrink Volume.
  3. Shrink it down so you have at least 16GB of space left on the end of the drive, and click OK.

Step 2: Install Windows 8

Create a Windows 8 installation disk, boot from it and start the Windows 8 setup. Follow this step-by-step guide: How To Install Windows 8 from USB Flash Drive.

For a dual-boot setup, the steps are the same as in that guide. The only difference is that when you are asked to select where to install Windows 8, select the partition that you created and make sure you don’t select the partitions where other operating systems are installed.

Step 3: Set Default Boot Operating System

When the installation is complete, Windows Setup will reboot your system and you will then see the new Windows 8 style dual boot screen shown as follow.

As you can see, Windows 8 is set as your default boot operating system.If you plan to use it as a secondary operating system and change the default boot operating system, you can click the Change defaults or choose other options at the bottom of the boot screen.

How to Reset Lost Password in Windows XP Tablet PC

October 5th, 2012 by Admin

I got a HP tablet PC that has Windows XP Tablet PC Edition on it. I have forgotten the admin password and can’t log back into Windows. How can I remove or reset the lost password?

Forgot the login password for your Windows XP Tablet PC? Nothing to panic! This article will show you an easy way to reset Windows admin/user passwords in Windows XP Table PC if you forgot the password. Instantly regain access to your Tablet PC without erasing any data on your hard drive.

How to Reset Lost Password in Windows XP Tablet PC?

This guide involves burning a Live CD or USB stick (or SD Card) on another computer, and then boot up your Windows XP Tablet PC with the Live CD/USB so you can reset the lost login password offline.

  1. Download the Reset Windows Password utility. Unzip the download file, you’ll see the ISO image file: ResetWindowsPwd.iso.
  2. Burn that ISO image to a blank CD or USB stick with ISO2Disc tool.
  3. Insert the CD or USB stick you’ve just created into your Windows XP Tablet PC.
  4. Boot your Tablet PC from the CD or USB stick, it will load the operating system inside the CD or USB stick, and launch the Reset Windows Password utility.

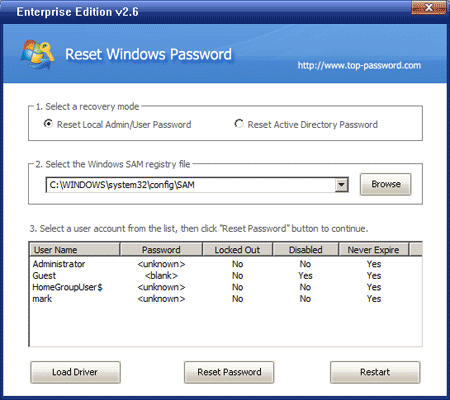
  5. From the screen of Reset Windows Password utility, you can see the Windows SAM registry hives detected on your hard drive. Choose one of your Windows SAM registry hives from the drop-down list, the program will show a list of Windows user accounts for your Windows XP Tablet PC.
  6. Select your desired user account and then click Reset Password button. It will remove your forgotten Windows password immediately.

Remove the CD or USB stick and reboot from hard drive, you can then log in to Windows XP Tablet PC with a blank password. If your Tablet PC don’t come with CD drive, you can use a SD card or data stick instead to go through the steps of resetting Windows XP Tablet PC password.

How to Break Domain Controller Password without Logging In

October 4th, 2012 by Admin

Forgot domain administrator password and couldn’t log on your domain controller? This is the most common password problems that many network administrators and system administrators face when dealing with domain controller. Here we’ll show you an easy way to break domain controller password quickly and easily.

Reset Windows Password is the powerful utility which enables you to break domain controller password on Windows Server 2008/2003/2000. This utility works offline, that means you need to shut down your computer and boot off your computer using a CD or USB stick.

How this software works?

Windows Active Directory stores the domain user passwords and other account information in a file called NTDS.dit. This file can be usually found in:\windows\ntds. This file is a part of Active Directory database and remains inaccessible as long as the domain controller is running. Hence, it is necessary that you boot off your computer and access this NTDS.dit file via the boot disk. This tool intelligently gains access to this file and will reset/change the password associated with administrator or any other domain user account.

How to break domain controller password without logging in?

The steps involves burning a Live CD on another accessible computer, and then boot up your domain controller with the Live CD so you can break domain controller without even logging in.

  1. Download the Reset Windows Password utility. Unzip the download file and you’ll get a ResetWindowsPwd.iso file.
  2. Burn the ISO image file to a blank CD using any burning program (we recommend BurnCDCC) that can burn ISO images.
  3. After you have the Live CD, bring it to boot off your domain controller whose password you want to break. You’ll see that the computer will load some files inside the Live CD and launch the Reset Windows Password utility.
  4. Click on the Reset Active Directory Password option, then choose the Active Directory ntds.dit database file from the drop-down list. It will display the domain user accounts and you can find which account is password-protected, locked out or disabled.
  5. Choose a user account and then click on the Reset Password button, it will break your domain account and change the forgotten/unknown password to a new one: Password123.
  6. Now remove the Live CD and restart the computer, you can then log in to your domain user account with the new password.

With the Live CD you can also use it to reset local admin/user passwords on Windows Server 2008/2003/2000 and Windows 8/7/Vista/XP. It’s a must-have Live CD for network administrators and system administrators.

How to Crack PST Password if You Forgot It

October 4th, 2012 by Admin

When you lost or forgot Outlook PST password, it means that you are not able to open Outlook and read email from the protected PST file. To explain, the PST file is used by Outlook to hold all of your emails, appointments and contacts in Outlook. You can copy the file to another computer or a USB drive, but when trying to import the file onto a fresh install of Outlook, a window will pop up asking you to enter the PST password.

It is good practice to set up a password to prevent unauthorized access to your PST file, but we often forgot the password for various reasons. Here I’ll show you an easy way to crack PST password if you forgot it. Outlook Password Recovery is the best PST password cracker which allows you to crack PST password in seconds on all versions of Outlook files.

How to Crack PST Password if You Forgot It?

  1. Download and install Outlook Password Recovery program on your computer.
  2. Launch the program and then click on the Unlock PST File button.
  3.  On the pop-up dialog, locate your Outlook PST file and then click on the Open button. If you don’t know where the PST file is located, please refer to this article: Introduction to Outlook Personal Folders File (.pst)
  4. Your Outlook PST password will be cracked and recovered immediately.

After cracking, you can use the recovered password to open your password-protected PST file in Outlook. The method works on PST files created in Microsoft Outlook 2010, 2007, 2003, XP, 2000 and 98. Happy cracking!