Author Archive

How to Boot from USB Drive without BIOS Support

September 11th, 2012 by Admin

I’ve created a bootable USB flash drive with Windows 7 on it, however my laptop (Gateway M520) doesn’t have an option to boot from USB. I’ve also checked and there is no BIOS upgrade available from Gateway. Is there anyway to boot from a CD-ROM that will allow the computer to read from the USB drive?

You may have created a bootable USB flash drive with you to solve computer problems, or prepared a USB drive as a Windows installation disk, but what if a PC’s BIOS doesn’t support USB boot?

I have written about making a USB installation disk for Windows 7, but it is of no use if the motherboard or BIOS does not support USB booting, if you are stuck in a situation where BIOS does not support booting from USB or CD-ROM, free boot-manager PLoP would be the best solution for the problem.

How to Boot from USB Drive without BIOS Support?

These instructions will allow you to boot from a USB drive when your BIOS does not support USB booting.

  1. Download Plop Boot Manager from plop’s website.
  2. Once the download is finished, extract the downloaded file. You see the image file: plpbt.iso.
  3. Burn that image to a blank CD or DVD using whatever burning software you prefer, such as BurnCDCC.
  4. Connect your USB drive to the computer and insert the plop boot manager disc.
  5. In order for the boot manager disc to load, you need to enter into BIOS and set CD/DVD as the first boot device.
  6. Restart the computer. The boot manager will load and allow you to select your USB drive from the list.

  7. Your computer will then start to boot from your USB flash drive.

If your computer doesn’t come with a CD/DVD drive, you can put the boot manager ISO image on a floppy disk instead.

How to Set Your Computer to Boot from CD or USB Drive

September 11th, 2012 by Admin

Computers normally boot from the hard drive, which makes sense as this is where Windows operating system is stored. However, in some cases you will need to boot from CD or USB drive instead – e.g. if you need to install/reinstall Windows, or boot from a rescue CD/USB to backup your files, diagnose and repair a faulty Windows installation, or reset forgotten Windows password, etc. So in this tutorial we’re going to show you how to set your computer to boot from CD or USB drive.

Generally, there are two options to make your computer boot from CD or USB drive. When you power on your computer, check the boot-screen for setup key or boot menu key.

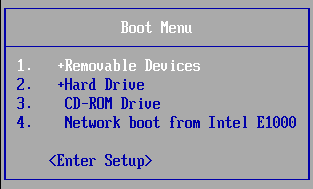
Option 1: By pressing the boot menu key, the screen will show a list of devices that your computer can boot from. Just use the arrow key to select your desired device (CD, USB or Hard Drive) and then press Enter. Your computer will directly boot from a specific device. This is the simplest way to set your computer to boot from CD/USB drive without changing computer BIOS settings. But the boot menu key is not available on some computers, then you need to turn to Option 2 instead.

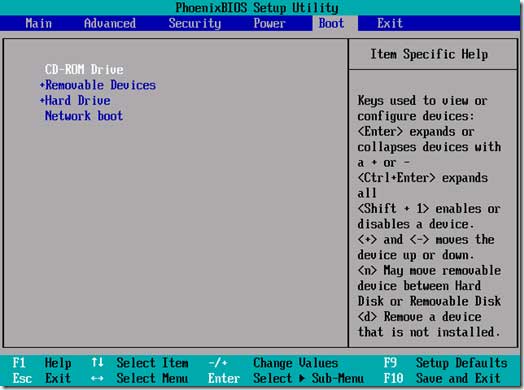
Option 2: By pressing the setup key, it will bring up the BIOS Setup Utility. Once in the BIOS, navigate to the option that controls the boot order (this may be under “Boot” or “System Configuration” or “Storage”). There should be a list for “Boot Priority”. Place the CD/DVD or USB drive at the top of this list. Save your changes. Now restart the computer, it will try to boot from CD/DVD or USB drive before hard drive.

Usually, when you turn on your PC, there is a very short period, when the BIOS entrance command appears on the screen, but if you miss the moment, you will have to start all over again. If you know, what the keys combination you should use is, you need to press it immediately upon computer reboot, and sometimes you need to try pressing the key repeatedly as soon as the computer starts up.

The BIOS setup keys and boot menu keys are different as per computer manufacturer and even as per computer model. For you convenience, I am listing the BIOS setup keys and boot menu keys for the most popular computer models.

Brand Destination Hotkey
Dell BIOS Key
F2
Boot Menu F12
HP BIOS Key
F10 Note: Pressing ESC will bring up a menu with all hotkey options
Boot Menu F9
Lenovo BIOS Key
F2 or blue “Thinkpad” button
Boot Menu F12 or “Novo” button
Toshiba BIOS Key
F2
Boot Menu F12
Acer BIOS Key
Notebook: F2 Desktop: DEL
Boot Menu F12
Sony BIOS Key
Press F2, select the 2nd option
Boot Menu F10 or “Assist” button
Samsung BIOS Key
F2
Boot Menu F10 (Not always implemented)
Asus BIOS Key
DEL or F2
Boot Menu ESC
Gateway BIOS Key
F1 or F2
Boot Menu ESC, F10 or F12

 
For Windows 10 or 8 computers, there are also another two ways to access the BIOS(UEFI) Setup:
2 Options to Access UEFI BIOS Setup in Windows 8 / 10

2 Ways to Run a Program as Administrator in Windows

September 10th, 2012 by Admin

One of the features that make Windows 8/7/Vista securer than its previous versions is that most of the applications are launched by default without having local admin rights, even when you log in as an account that belongs to local administrator group.

And you probably already know that if you want to launch an application with local admin rights, you would have to use Run as Administrator to fire up the application.

Many applications need to be run as administrator in order to function properly, especially older software that haven’t been updated to support Windows 7 or Vista yet. So here I’ll show you 2 ways to run a program as administrator in Windows 8, 7, Vista.

Method 1: Run a Program Once as an Administrator

  1. Navigate to the program folder of the program you want to run. For example, C:\Program Files\Top Password.
  2. Right-click the program icon (the .exe file).
  3. Choose Run As Administrator.
  4. If you see a User Account Control prompt, accept it.

Method 2: Always Run a Program as an Administrator

  1. Navigate to the program folder of the program you want to run. For example, C:\Program Files\Top Password.
    Right-click the program icon (the .exe file).
  2. Choose Properties.
  3. On the Compatibility tab, select the Run This Program As An Administrator option.
  4. Click OK.
  5. If you see a User Account Control prompt, accept it.

You can run a program once as an administrator, or you can set a program to always run as an administrator, which fully depends on your choice.

Forgot Windows 7 Password and No Reset Disk?

September 8th, 2012 by Admin

I forgot Windows 7 password to my computer, and it is the only account on the computer. I do not have a reset disk and I don’t think I ever had a reset disk. I cannot use that computer at all. No I have no idea how to log on to Windows. I can’t re-install windows now because I have data in it. How can I get in?

Forgot Windows 7 password and don’t have a password reset disk? Windows has a built-in password reset feature, which allows you to reset forgotten Windows password easily. But you need to create a password reset disk before you forget Windows password. But Many people may not be aware of do the preparation, so they tend to run into the situation of forgetting Windows 7 password without reset disk.

Here we’ll discuss on how to reset Windows 7 password easily if you forgot Windows 7 password and don’t have a password reset disk. So you can regain access to your computer without formatting or reinstalling the entire operating system.

How to Reset Forgotten Windows 7 Password without Reset Disk?

First of all, choose a software tool that can help you solve this forgotten Windows 7 password problem. If you don’t have option in front of you, Reset Windows Password is recommended. It will let you boot your computer and reset the password without changing anything else on your computer.  Here are the steps:

  1. Download the self-extracting Zip file of Reset Windows Password package.
  2. Unzip the download file, there is an ISO image: ResetWindowsPwd.iso. Burn it onto a blank CD/DVD or USB flash drive using ISO2Disc or any CD/DVD burning software you like.
  3. Boot your locked computer from the CD or USB flash drive.
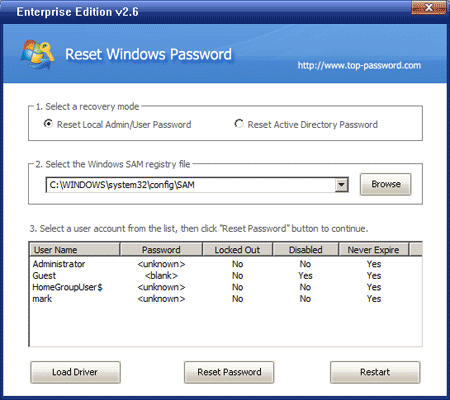
  4. Wait until the boot process is complete. When a window pops up with all your Windows 7 user accounts, select an user account and then click the Reset Password button.

    Reset Windows Password

  5. It will reset your forgotten Windows 7 password immediately.

Now all things are done, reboot the computer as usual and you can get into the system without being asking for any password. The forgotten Windows 7 password has been removed. If you are about to set a new password, make sure it’s safe and you’ll never forget it again.

How to Bypass the Parental Control Time Limits in Windows 7/Vista/XP

September 7th, 2012 by Admin

Windows parental controls have the capacity to control when a user, such as your child, may use the computer. The time limits feature, when set up properly, will prevent your child from using the computer at the times you specify. If the child attempts to log on before the set time, Windows will prevent him from logging on. If he remains on the computer after the set time ends, the system will log off his account.

However, your children can still find their ways to bypass the parent control time limits. Here we’ll show you one method that kids use to bypass the parental control time limits in Windows 7/Vista/XP.

How to Bypass the Parental Control Time Limits?

To get started, you need to find another computer that you can log on as administrator, and create a password reset disk on a CD or USB stick. So you can then boot the computer with parental controls enabled from the CD/USB and it enables you to bypass Windows time limits immediately.

  1. Download the self-extracting Zip file of Reset Windows Password package.
  2. Unzip the download file, there is a CD ISO image: ResetWindowsPwd.iso. Burn it onto a blank CD/DVD or USB stick using ISO2Disc or any CD/DVD burning software you like.
  3. Boot the computer with parental controls enabled from the Windows password reset disk.
  4. Wait until the boot process is complete. When a window pops up with all your Windows accounts, select your limited user account and then click the Reset Password button.

    Reset Windows Password

  5. It will blank your user password and also remove the time limits that is set up on your user account.
  6. Take out the CD/USB and restart the computer, you can then log in to your account and use the computer without time limit.

When children use this technique, you may never know that they have bypassed the time limits settings. To block this method of bypassing the parental control time limits, the only option is to disable the USB and CD-ROM in computer BIOS and set a BIOS supervisor password to prevent your kids from modifying your BIOS settings again.

Forgot Windows Logon Password?

September 5th, 2012 by Admin

I have forgotten my Windows logon password. I am afraid to cut my computer off for fear I won’t be able to get back into it. Please help me recover my password or bypass it, either one. I need a baby steps tutorial since I am not too computer savvy as you can see. Please help. I’ll stay online until I get a response.

The Windows logon password is one of the most important passwords we have memorized and if you’ve lost or forgotten this password, the entire world can seem just out of reach. People are constantly locking themselves out of their personal laptops and home computers by forgetting the logon password. Luckily there is an easy way to reset forgotten Windows logon password so you can then log on to your computer in minutes.

How to Reset Windows Logon Password?

  1. Download the .zip archive of Reset Windows Password utility. Unzip the download file, you’ll get a bootable ISO image: ResetWindowsPwd.iso, which can run from CD, DVD or USB flash drive.
  2. In my case, I’m going to reset Windows logon password on a netbook without CD/DVD drive, so I choose to burn the ISO image to USB flash drive with ISO2Disc utility.
  3. Once the burning process is complete, we need to make some changes to the computer with a forgotten Windows logon password: Get into computer BIOS and set USB or Removable Device as the first boot device.
  4. Plugin the USB flash drive into your locked computer. Restart the computer, it will then boot from the USB flash drive.
  5. When the Reset Windows Password program is launched, you’ll see the Windows SAM registry hive and user accounts on the boot screen.
  6. Choose a user account and then click Reset Password button, it will reset your forgotten Windows logon password immediately.

Restart the computer and unplug the USB flash drive, you’ll find you can log on to your computer without being asked to enter a password. As you can see, the dread of forgetting your Windows logon password can typically be put behind you. It’s the simplest option to reset forgotten Windows 8/7/Vista/XP logon password.

How to Reset Windows Password with Ubuntu for Free

September 3rd, 2012 by Admin

Windows has an in-built option to create password reset disk to log into system in case a user forgets the Windows account password. However, in a worst case scenario, where you don’t have a password reset disk nor have access to any administrator account, Ubuntu Live disk may help. In this article, we will guide you through step-by-step procedure of resetting Windows user account password.

While Ubuntu Live CD is widely used to troubleshoot PC problems, you can use it to reset Windows user account passwords as well. The process requires creating a Ubuntu Live CD or Live USB, and then booting it to gain full system access for resetting forgotten Windows password.

Note:  This method is free and easy for Linux users. For Windows users, we recommend you to try the Reset Windows Password bootable utility – Which is based on Windows PE and you can use it to easily reset forgotten Windows password on Windows 8/7/Vista/XP/2008/2003/2000.

Step 1: Create a Bootable Ubuntu Live USB

To get started, grab Universal USB Installer, and then download Ubuntu 10.10 (32-bit or 64-bit) from here.

Launch Universal USB Installer, select Ubuntu 10.10 from drop-down menu, and then click Browse to select the Ubuntu ISO file. Now, select the USB drive letter and set the persistent file size.

Once all settings are in place, click Create to begin creating a bootable Ubuntu Live USB.

Step 2: Boot from Ubuntu Live USB

After the Ubuntu Live USB is created, reboot your PC and access computer BIOS by pressing ESC, F2, F10, F9 or other system defined key. Head over to Boot menu and set USB/Removable Hard disk as first boot option. Once boot priority is changed, save the changes and reboot the system. From boot menu, choose Run Ubuntu from this USB option to load Ubuntu 10.10.

Step 3: Install Chntpw

Once your booted into Ubuntu, hit Ctrl + Alt + T to open a Terminal window. I know this may seem a little scary but it is actually quite easy. Once this window is open, simply type sudo apt-get install chntpw and hit Enter. It should download and install the program without needing further assistance. Once it’s finished and your back at the regular prompt, simply type exit and hit Enter. Now you should be back on the Desktop.

Step 4: Reset Windows Password

Now, you need to mount the hard disk partition where Windows is installed. You will be able to access all the removable drives and hard disk partitions from Places menu.

Open all partitions to find the drive with Windows folder. When you find it, make a note of the drive’s label that appears in the menu bar of the file browser.

Once the drive with Windows folder is mounted, open Applications menu from panel, and select Terminal from Accessories menu.

In Terminal window, enter cd /media command, and then list all mounted media drives with ls command.

Once listed, you have to navigate to drive that contains Windows folder. Enter the following command to do so.
cd <hard drive label>

Since we have to make changes to Security Accounts Manager (SAM), which is residing in Windows/System32/config folder. Enter:
cd Windows/System32/config

Once you’re in config folder, use chntpw tool to read Windows user account credentials and make changes to saved passwords. Enter following command to run chntpw tool.
sudo chntpw SAM

The chntpw shows all the configured Windows user accounts with their current status.

It presents 4 different Windows user account tweaking options at the bottom, including clear the admin account password, replace current password/edit password, promote standard user, and unlock locked user accounts. You can reset Windows admin user account password by pressing ‘1’ followed by ‘Y’,  However, to edit the admin password, press ‘2’, enter a new password, hit enter and then press Y to change the password.

The sudo chntpw SAM command can only make changes to Windows admin account password. If you want to change standard user’s password, use the switch –u followed by correct user account name.
sudo chntpw –u <user account name> SAM

Once you’ve changed the user account password, reboot your system, and plug out Ubuntu Live USB. If you’ve just reset the admin password, Windows will not prompt you to enter the password. However, if you changed the password, use the new password to log in to Windows.

Can’t Copy Text from a PDF File?

September 2nd, 2012 by Admin

I am using foxit PDF reader to view my text book. I would like to copy the text from the pdf file into a word document but it won’t let me. I can select the text fine but the option to copy text is not available. I can copy text from other documents but not some. Is there a way to get around this protection in Windows?

Can’t copy text from a PDF file? The reason why you can’t copy and paste is most likely due to the fact that the PDF file has had the copy and paste permission disabled by the creator. You can view the security settings by opening PDF file in Acrobat, click Document Property on File menu, then click Security tab. As you can seen in the screen below, you can protect PDF file from printing, copying or editing.

So how to remove PDF security settings? Without the permission password (also known as Owner Password) you are not allowed to modify, print, copy or extract text and graphics from the PDF file. If you have legal rights or are genuine owner to the PDF document, but forget the password, here is an easy way to help you remove PDF security settings without knowing the original password.

How to Remove PDF Security Settings?

  1. Download and install PDF Password Recovery software on your computer.
  2. Run PDF Password Recovery program, then click the button to select your password-protected PDF document (*.pdf), then choose the Remove Owner Password option.

    PDF Password Recovery

  3. Click the Next button.
  4. Immediately the tool will decrypt the owner password and remove the security restrictions imposed on it, and a new non-protected copy will be created. You will then be allowed to print, copy, modify the decrypted PDF document without even knowing the password.Remove PDF Owner Password

Once you’ve removed the security settings, you are then allowed you copy text from the PDF file. Can’t copy text from a PDF file? PDF Password Recovery can do the job of removing PDF security restrictions efficiently. It saved you a lot of time though not having to manually type all that text. Hopefully, this will help you copy the text you need from a PDF document.