Author Archive

How to Restore Windows Password with Ease

August 2nd, 2012 by Admin

Forgot Windows password and can’t log in to your computer? You can restore Windows to a recent restore point during which you were able to successfully log on to the system.  The System Restore feature will make sure that you don’t lose any documents. However, programs that have been installed since the corresponding restore point have to be installed again. So is there a better way to fix this issue without reinstalling anything?

The best and easiest way is to restore your forgotten Windows password. To begin, you need to create a Windows password reset CD on another accessible computer, then boot your locked computer from the CD so you can restore Windows password easily.

How to Restore Windows Password with Ease:

  1. Download the Reset Windows Password utility from this link: http://www.top-password.com/reset-windows-password.html. Unzip the download file. After you unzip it, there is an ISO image file: ResetWindowsPwd.iso, which is what you need to burn.
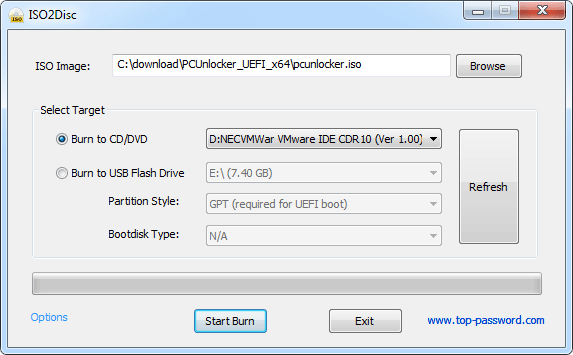
  2. Burn the ISO image file to a blank CD or USB drive using the ISO2Disc utility. Here we’re going to use CD to create a password reset disk.
  3. Now we need to set your locked computer to boot from CD. Turn on the computer. Normally, the BIOS screen tells you the keyboard key you need to press to enter into BIOS Setup Utility. On most computers is Del, F2, F9 or F12 but yours might be different, so watch out for that on the boot-up menu.
  4. After entering into BIOS, set CD/DVD as the 1st boot device so you can boot off the CD; or set Removable Device as the 1st boot device if you want to boot from USB drive.
  5. Once your computer boots from the CD, it will load the Windows PE operating system on your CD.
  6. After one or two minutes, it will launch the Reset Windows Password program.
  7. Select the Windows SAM registry file for your desired Windows installation if there is more than one. The program will list all your Windows user accounts.
  8. Choose a user account and then click Reset Password button. It will restore your forgotten Windows password and you can then log in to your system with a blank password.

After password restoring, you can regain access to all your data and files on your computer. No need to reinstall the operating system or any program installed on your computer.  With this guide you can restore Windows password on Windows 8, 7, Vista, XP and Windows Server 2008, 2003 and 2000.

How to Change Windows 7 Logon Screen

August 2nd, 2012 by Admin

Ever wanted to change the default background of the Windows 7 logon screen? It is easier than you might imagine. While there are loads of 3rd party tools out there that will do this, and more, we’ve got a nice technique that won’t require you to install any additional software at all.

All you have to do is change a single registry value and put an image file in the correct location. You can set any image you like as your logon screen. To change Windows 7 logon screen, please follow these steps:

Step 1: Enable Custom Backgrounds

Firstly, to enable the background of the logon screen to be changed, we need to make a change in the registry editor. Click your Start button and type in regedit and press enter.

Navigate to: HKEY_LOCAL_MACHINE\SOFTWARE\Microsoft\Windows\CurrentVersion\Authentication\LogonUI\Background

Here you’ll hopefully see an DWORD value named OEMBackground. If it isn’t there then you’ll need to create it – right-click in the right hand pane and choose New. Create a new DWORD value and call it OEMBackground.

Double click on the DWORD and set its value to 1.

Step 2: Select A Background Image

Windows will look for your background image in C:\Windows\System32\oobe\info\backgrounds – by default the info folder won’t exist, so create it inside of the oobe folder, open it up and then create a backgrounds folder. Place the image that you want to have as the background inside of here. For best results try to use an image which is the same size as your screen resolution so that it doesn’t get stretched or distorted. It is important to note that the maximum allowed size of the image is 256kb.

That’s all there is to it – the image will be the background for the logon screen with immediate effect, you don’t even need to restart your computer. If you are following the steps while reading this then press the Windows logo key+L to lock your screen and you’ll see the background image is the one you have selected.

How to Change Windows Domain Password if You Forgot it

August 1st, 2012 by Admin

I just lost my domain administrator password so can anyone please do tell me how to change it so that I can log onto domain controller or add any further machines into domain via that account. I would be waiting anxiously for all your suggestions.

In Windows 2008/2003/2000, if the server is a domain controller, you must set a strong password to meet the password policy requirements when you create a new account. By default, domain password requires at least 7 characters and at least 1 numeric character or at least 1 special character (*&^%$#@, etc.). You may also be forced to change the password on a regular basis. So there is a big chance that you would forgot the password. What to do if you forgot Windows domain password and can’t log in with any other account?

In this tutorial we’ll show you how to change Windows domain password if you forgot it. Follow the steps below you can change your forgotten domain password on Windows Server 2008/2003/2000 in minutes.

How to Change Windows Domain Password:

  1. Download Password Recovery Bundle and save it on any accessible computer. Install and launch Password Recovery Bundle, then click Windows Password button, the pop-up dialog enables you to create a password reset CD.
  2. To make your locked computer boot off the password reset disk, head over to the computer’s BIOS and make some changes: Set CD-ROM as the 1st boot device.
  3. Insert the password reset disk you’ve created into your locked computer. Restart the computer. You’ll notice the boot screen is not the same as usual because it is loading from the password reset disk now.
  4. It takes a while to load some necessary files and launch the Reset Windows Password utility. Here we’re going to change Windows Domain password, so we choose the Reset Active Directory Password option. It will display a list of domain user accounts on your domain controller.
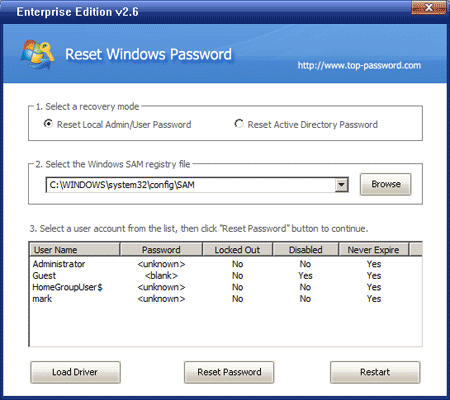
  5. Choose a domain account whose password you forgot, then click Reset Password button. The program will change its password to Password123 by default.
  6. Remove the password reset disk and restart the computer.

Now you’ve successfully changed Windows domain password on your domain controller. You can then log on the computer with your new password.

How to Show Computer Icon on Windows 8 Desktop

July 31st, 2012 by Admin

When you perform a clean install of Windows 7 or Windows 8, Windows doesn’t show Computer icon on the desktop by default. Users need to manually add the icon to the desktop.

In Windows 7 and previous Windows versions, adding the Computer icon to the desktop is a simple task. Open the Start menu, right-click on Computer, and click Show on desktop option to show Computer icon on the desktop. But how to place the Computer icon on desktop in Windows 8? As you know, Start menu doesn’t exist in Windows 8 and has been replaced with Metro-style Start screen. So, users can’t add Computer icon from the Start menu.

Windows 8 users who would like to see Computer icon on the desktop can follow the given below steps.

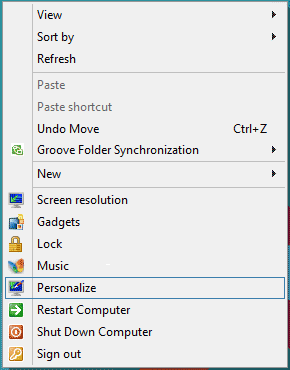
Step 1: Right-click on desktop and select Personalize to open Personalization window.

Step 2: In the left-pane of Personalization window, click on Change desktop icons. This will open Desktop Icon Settings.

Step 3: Here, under Desktop icons section, tick Computer checkbox and then click Apply button to show the Computer icon on the desktop. You can also show/hide Recycle Bin, Network, and Control Panel icons on the desktop from here. You are done!

The default icons Computer, Network, Recycle Bin and Control Panel can be replaced with a custom one by selecting the icon and then clicking on Change Icon button.

How to Reset Windows 2000 Password When You Forgot it

July 30th, 2012 by Admin

I can’t seem to remember my Windows 2000 password. It asked me that my password has expired and it requires a new one. The problem is, my laptop (Toshiba 1500) has been put away for a few months and I cannot find the original password. I need to get to my laptop and retrieve some important files. Can anyone tell me how I can recover or reset this password?

Forgot Windows 2000 password on a computer you haven’t used for a while? You logged off your PC and when you got back on the next day it wouldn’t accept your password? We all have the possibility of forgetting Windows password, so for those when your password completely escapes you, this guide will come to your rescue. Take a look at this tutorial to learn how to reset Windows 2000 password when you forgot it.

Step 1: Create a Windows Password Reset Disk

  1. First we need to find an accessible computer so we can create a Windows password reset disk on it.
  2. Download the ISO image of Reset Windows Password boot CD which is zipped.
  3. Extract the ISO file from the ZIP archive using WinZip.
  4. Burn the ISO file to a CD or USB drive using ISO2Disc. After a few minutes a Windows password reset disk will be created and we’ll used it later to reset forgotten Windows 2000 password.

Step 2: Set Your Locked Computer to Boot from Password Reset Disk

  1. Turn on your locked computer and hold down F2 or whatever the setup key is shown as during the initial boot screen. This should bring up the BIOS.
  2. In the BIOS look for the Boot Device Priority option, set CD/DVD as the 1st boot device if you want to boot from Windows password reset CD. You can either set Removable Device as the 1st boot device if you want to boot off a Windows password reset USB drive.
  3. Next save your changes and reboot the computer.

Step 3: Reset Windows 2000 Password

  1. Once your computer boots from the Windows password reset disk, it will launch the Reset Windows Password utility.
  2. This utility automatically scans your hard drive and find Windows SAM databases for all your Windows installations.
  3. Choose a Windows SAM database. The program will display all Windows user accounts inside it.
  4. Select the Windows user account whose password you forgot, then click Reset Password button to reset/remove the password.

Reboot your computer and eject the Windows password reset disk, the computer will boot normally and you can then log in to Windows 2000 system without entering a password. What’s more, this guide also works with Windows 8, 7, Vista, XP and Windows Server 2008, 2003.

How to Reset Windows Server 2003 R2 Password

July 28th, 2012 by Admin

Did you just set a new administrator password on Windows Server 2003 R2 and can’t remember it now? You have come to the right place. Although, resetting a forgotten Windows password is a bit tricky, but it is entirely possible. Today I will be covering the easiest way of resetting Windows Server 2003 R2 password if you forgot the local or domain administrator password.

You may be completely locked out of the computer. So we can’t install any software on it to reset the forgotten password. The only option is to create a Windows password reset disk on another accessible computer, and then use it to boot off your locked computer and perform password resetting.

Step 1:  Create a Windows Password Reset Disk

Download the Reset Windows Password utility.  Once the download completes, right-click the .zip file and select Extract All. This will decompress the zip archive which there should an ISO image file (ResetWindowsPwd.iso) inside.

Insert a blank CD or USB drive into the computer. Burn the ISO image to it with the ISO2Disc software. It will take about one or two minutes to create a Windows password reset disk.

Step 2:  Set Boot Device Order in BIOS

Turn on your locked computer and hold down F2 or whatever the setup key is shown as during the initial boot screen.  This should bring up the BIOS. In the BIOS look for the Boot Device Priority option, set CD/DVD as the 1st boot device if you want to boot from Windows password reset CD. You can either set Removable Device as the 1st boot device if you want to boot off a Windows password reset USB drive.

Next save your changes and reboot the computer.

Step 3: Reset Windows Server 2003 R2 Password

Insert the Windows password reset CD/USB into your locked computer. If you set up the BIOS correctly your computer should automatically boot from the password reset disk.

It will launch the Reset Windows Password utility after a few minutes. The program automatically scans your hard drive for partitions that may have Windows installed. In the example below it found the Windows SAM registry hive for Windows Server 2003 R2. To reset Windows domain password you need to switch to the Reset Active Directory Password mode.

Choose a user account whose password you want to reset, then click Reset Password button. You’ll see a short message appear that says password is reset successfully!

Now remove the Windows password reset CD/USB and restart your computer. You will then log on Windows Server 2003 R2 without entering a password.

Conclusion

The password resetting procedure is clear and easy that nearly every computer user with basic computer skills can get it to work. Apart from resetting Windows Server 2003 R2 password, you can also follow this guide to reset forgotten Windows password on almost all Windows operating systems, such as Windows 8/7/Vista/XP and Windows Server 2008/2000.

Delete Your Confidential Files Permanently with Secure Wipe

July 28th, 2012 by Admin

Once you decide to discard your hard drive or resell your PC, it is mandatory to remove all personal information, passwords, and other details that you saved on it. Just deleting the data or formatting the hard drive is not sufficient, because there are powerful tools to recover all deleted data. Therefore, you need to permanently wipe all data from the hard drive.

Secure Wipe is a small, free utility that allow you to completely delete sensitive data from your hard drive by overwriting it several times with carefully selected patterns. So, no one can recover your personal or important data from it.

How to use Secure Wipe?

After installation, run the tool. From the setting menu, select the deletion algorithm that you prefer (e.g. Gutmann 35). Then from the Eraser tab select a folder or file that contains your personal details. Then click Erase button to erase the data permanently.

Secure Wipe can be downloaded (917Kb) free at this link.

Transfer Files and Settings from Windows 7 to Windows 8

July 27th, 2012 by Admin

Whether you plan to upgrade your Windows 7 machine to Windows 8 or buy a new PC with Windows 8 pre-installed, you can use Windows Easy Transfer to copy all your files and settings from your old machine or old version of Windows to your new machine running Windows 8. In this article, I’ll walk you through the steps of using Windows Easy Transfer and an external USB drive to easily complete the task.

Before we get started, let me clarify exactly what you can transfer using Windows Easy Transfer:

  • User accounts
  • Documents
  • Music
  • Pictures
  • E-mail (including contacts and e-mail settings)
  • Internet Favorites
  • Videos
  • And more

Part 1: Save Windows 7 Files and Settings to USB Drive

  1. To get started, you need to open Windows Easy Transfer on your old PC. In Windows 7, just search for Easy Transfer and you’ll see it show up:
  2. Click on Windows Easy Transfer from the list of programs.
  3. You’ll be presented with the Welcome to Windows Easy Transfer screen, which gives you an overview of what items you can transfer. Click Next to start.
  4. Select An external hard disk or USB flash drive.
  5. Now, select This is my old computer option to transfer files and setting from current PC.
  6. In this step, it shows currently logged-in User Profile and Shared Items options. You can customize the default folder and file section by hitting Customize. The Customize link present in User Profile section lets you pick Documents, Music, Pictures, Videos, Program Settings and Windows Settings, whereas the Shared Items section’s Customize link will open a Shared Items menu, allowing you to choose the shared items that are to be moved.
  7. Once you’ve selected the files, it will ask you to enter the password to secure the transfer process. Clicking Save will prompt you to specify the USB drive where your files and settings are to be copied.
  8. When the destination folder is selected, it will start copying the settings and selected folders. The time it takes to complete the copying process depends upon the volume of selected data.
  9. Window 7 Easy Transfer wizard saves all the settings, user folders, and files from Windows 7 in a MIG file. Now, eject the USB drive, and move to PC running Windows 8.

Part 2: Restore Files and Settings from USB Drive to Windows 8

  1. To get started, open Windows Search from Windows 8 Start hover menu, enter easy transfer in search bar, and then click Apps. Now, launch Windows Easy Transfer utility from main window.
  2. In Windows Easy Transfer wizard, select An external hard disk or USB flash drive option to restore data and settings saved in MIG file.
  3. In next step, choose This is my new computer option.
  4. It will now ask you to plug-in the USB drive where the MIG file is saved. Plug-in the USB drive and select Yes to specify the Windows Easy Transfer file.
  5. On selecting the MIG file, it will ask you to specify the password. Enter the password to restore the data, and click Next.
  6. Once access is granted, it will ask you to choose what to transfer from old PC. At this point, you can select the files and settings that are to be transferred to your new PC. Click Customize under User Profile and Shared Items sections to select the folders.
  7. Once you’ve selected the settings and folders, hit Transfer to begin the settings and data migration process.
  8. After this has finished you will get a message telling you the transfer is complete. You can also see a list of what files and programs were transferred, or choose close to exit the wizard. Now you have the best of both worlds – all your important old files saved onto your new computer.

Windows Easy Transfer provides 3 options to transfer your files and settings: An Easy Transfer cable, A network and A external hard disk or USB flash drive. The first two options require connecting your new PC to old PC in order to send the files and settings. However, if you’re planning to upgrade your PC to Windows 8, select the third option that moves your system settings along with files to external hard drive.