Author Archive

3 Ways to Disable IPv6 in Windows 10 / 8 / 7

August 20th, 2020 by Admin

IPv6 causes connectivity issues? IPv6 is the latest version of the Internet Protocol, which is supposed to replace IPv4. However, most websites or softwares don’t work with IPv6 yet. It is common for IT administrators to disable IPv6 to fix some unknown, networking-related issue. In this tutorial we’ll show you 3 easy methods to disable IPv6 in Windows 10 / 8 / 7.

Method 1: Disable IPv6 in Network Adapter Properties

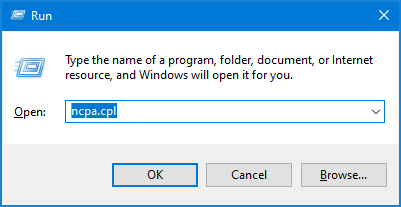
  1. Press the Windows logo key + R to open the Run dialog. Type ncpa.cpl and hit Enter.
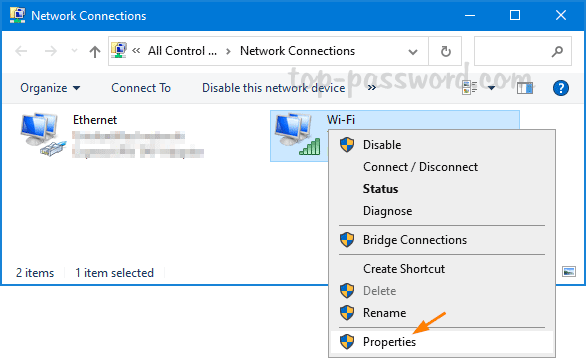
  2. It will open the Network Connections window. Right-click the network adapter you want to disable IPv6 on, and then select Properties.
  3. In order to disable IPv6, uncheck the box next to Internet Protocol Version 6 (TCP/IPv6). Click OK.
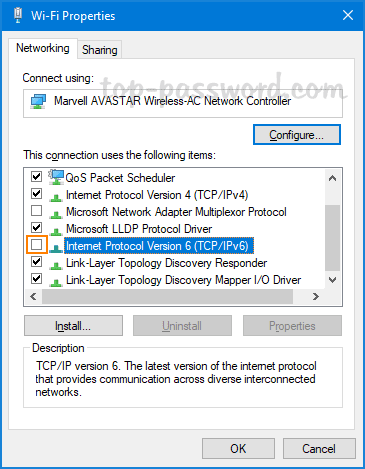
  4. You can use the same method to disable IPv6 for other network adapters.

Method 2: Disable IPv6 Using PowerShell

  1. First, you need to open Windows PowerShell as administrator. Next, run the following command to check the status of IPv6 for all network adapters available in your computer.

    Get-NetAdapterBinding -ComponentID ms_tcpip6
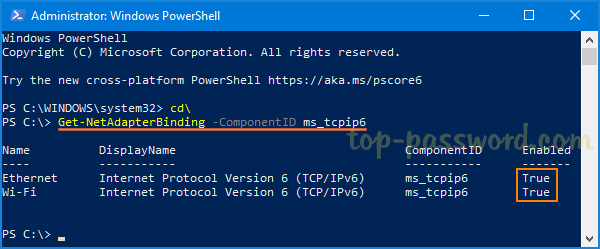
    In my example, “Wi-Fi” is the name of the network adapter I want to disable IPv6 on.

  2. To disable IPv6 on a specific network adapter only, type the following command. Replace “Wi-Fi” with the name of your network adapter card.
    Disable-NetAdapterBinding -Name "Wi-Fi" -ComponentID ms_tcpip6

    You can use the wildcard * to disable IPv6 on all network adapters, instead of disabling them one by one.
    Disable-NetAdapterBinding -Name "*" -ComponentID ms_tcpip6

  3. Whenever you need to enable IPv6 again, just run this command:
    Enable-NetAdapterBinding -name * -ComponentID ms_tcpip6

Method 3: Disable IPv6 Using Command Prompt

  1. Open the Command Prompt as administrator, and execute this command to disable IPv6 completely:
    reg add "HKLM\SYSTEM\CurrentControlSet\Services\Tcpip6\Parameters" /v DisabledComponents /t REG_DWORD /d 255 /f
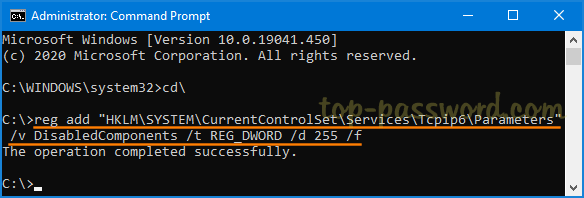
  2. Restart the computer for changes to take effect. To verify if IPv6 is disabled, run ipconfig /all and see if the interface shows IPv6 address.

    To revert and enable IPv6, you can delete DisabledComponents registry key with this command:
    reg delete "HKLM\SYSTEM\CurrentControlSet\Services\Tcpip6\Parameters" /v DisabledComponents /f

That’s all there is to it.
How to Enable the new Start Menu in Windows 10 version 2004

August 12th, 2020 by Admin

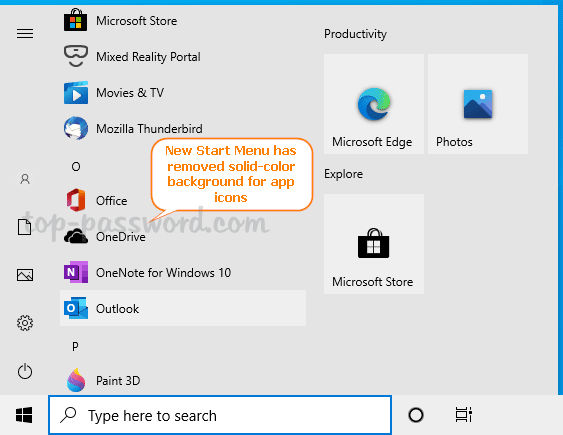
Microsoft has redesigned the Start Menu for Windows 10 and the new look Start Menu is expected to arrive in the the upcoming version – November 2020 update. The new Start Menu removes the ugly square backgrounds for app icons and the tiles are now also partially transparent. In this tutorial we’ll walk you through the steps to enable the new Start Menu in Windows 10 version 2004.

How to Enable the new Start Menu in Windows 10 version 2004

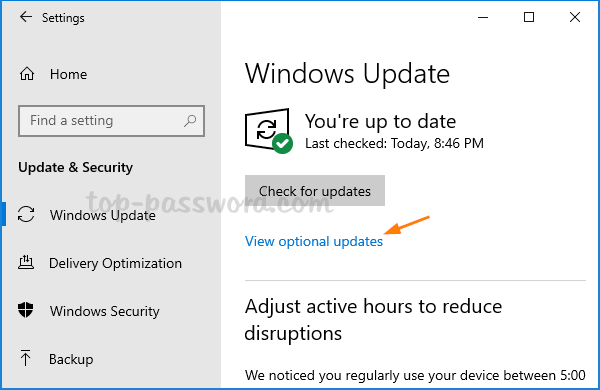
  1. Open up the Settings app and navigate to Update & Security – > Windows Update. Click on the “View optional updates” link. If this link is missing, click on the “Check for updates” button first.

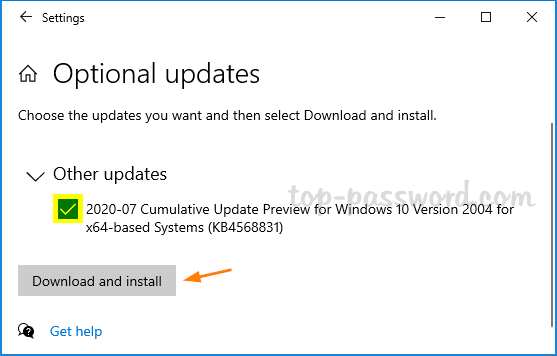
  2. Expand the “Other updates” category. Check the “2020-07 Cumulative Update Preview for Windows 10 version 2004 for x64-based systems (KB4568831)” option and then click on Download and install.

  3. Once the update is installed, reboot your computer. Next, open NotePad, copy the following lines into it, save the file with .reg extension.
    Windows Registry Editor Version 5.00
    [HKEY_LOCAL_MACHINE\SYSTEM\CurrentControlSet\Control\FeatureManagement\Overrides\0\2093230218]
    "EnabledState"=dword:00000002
    "EnabledStateOptions"=dword:00000000
  4. Double-click the saved .reg file to import the settings into Windows Registry. Restart your system again and you’ll see the new Start Menu, which removes the the solid-color backplates behind the logos in the app list of the Start Menu.

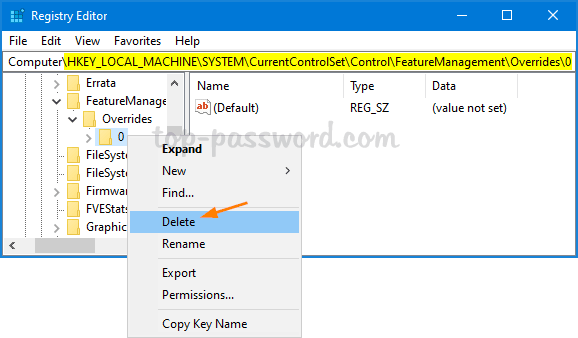
If you need to disable the new Start Menu later, just open Registry Editor and browse to HKEY_LOCAL_MACHINE\SYSTEM\CurrentControlSet\Control\FeatureManagement\Overrides. Right-click on the 0 subkey and select Delete.

Reboot and the old Start Menu will come back!

How to Change Default Font Size for Chrome Browser

August 9th, 2020 by Admin

The size of text in Chrome is too small or too large? Improper font size can make the text on the web pages hard to read. In this tutorial we’ll show you 2 easy methods to change default font size for Chrome browser.

Method 1: Change Font Size for Chrome Using Zoom Mode

Zoom mode allows you to quickly change the size for both text and images of any web site. You can set different zoom levels for each website. Here’s how:

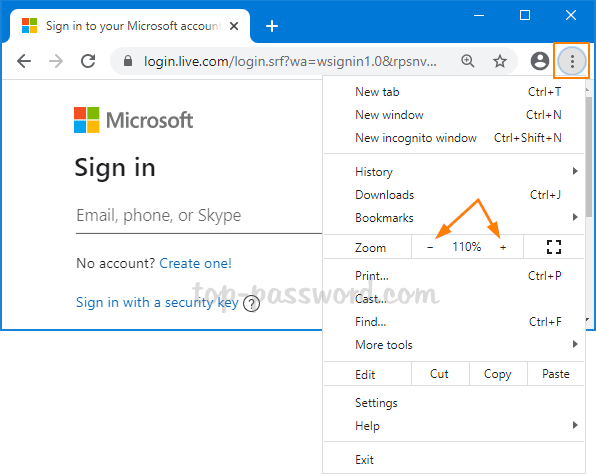
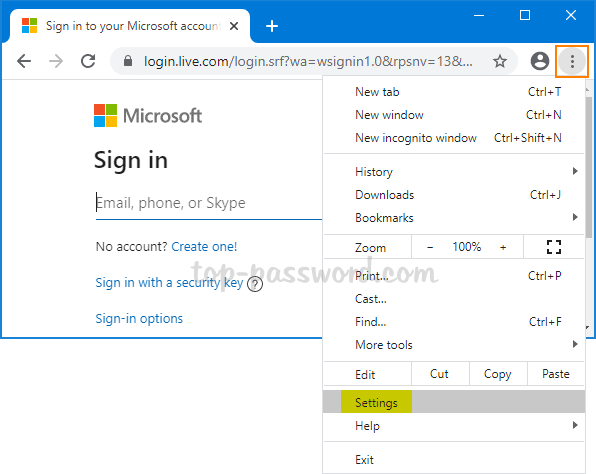
  1. Open the Chrome browser and go to the web page for which you want to change the font size. Click on the Menu button (three vertical dots) to the right of the URL bar.
  2. In the menu that pops up, look for the “Zoom” option. The default value of Zoom is 100%. You can click + to make everything on that page bigger, or click to make things smaller.

Method 2: Change Default Font Size for Chrome via Settings

This method lets you change Chrome’s default text size for every website at once, but it won’t affect the size of images. Here’s how:

  1. Open Google Chrome on your PC, click on the Menu button (three vertical dots) on the top-right corner and then select Settings.

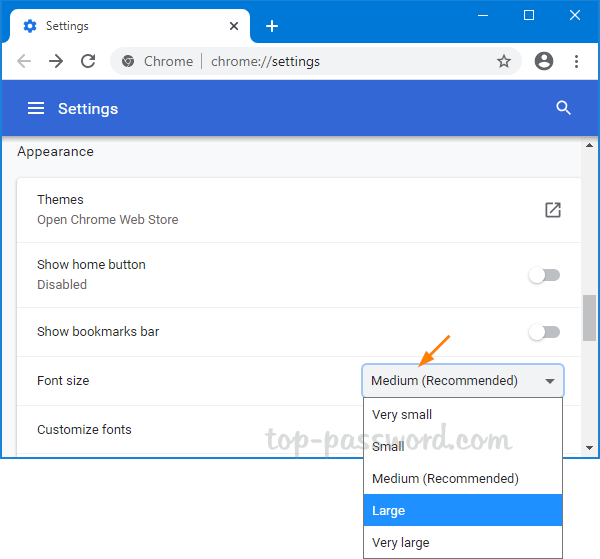
  2. Scroll down to the Appearance section. Click the Font Size drop-down list and you can choose the new font size for web pages: Very large, Large, Medium, Small or Very small.

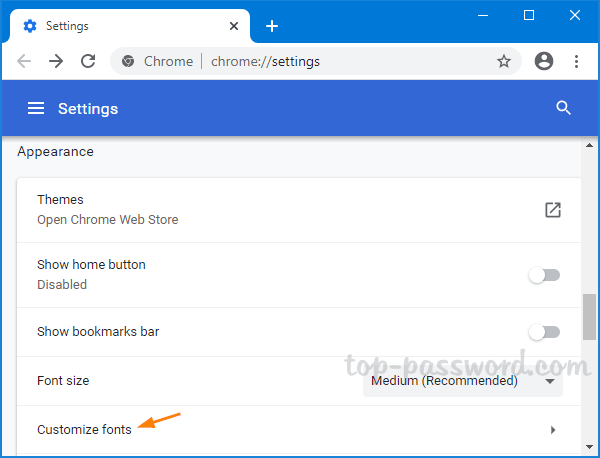
  3. If you still can’t get the fonts to the proper size, just click on Customize fonts.

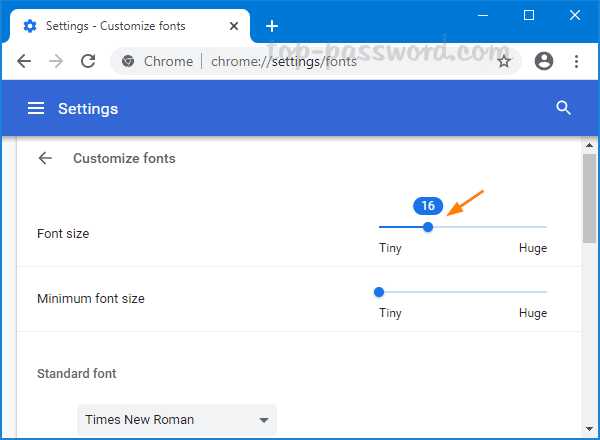
    You can move the slider to change the default font size to any value between 9 and 72.

That’s all there is to it!

3 Ways to Quickly Clear All Event Logs in Windows 10

August 4th, 2020 by Admin

Event Viewer is a built-in Windows application that lets you view all the important events that occur on your PC. Sometimes, you may need to delete old event logs at once if nothing has gone wrong. In this tutorial we’ll show you 3 ways to quickly clear all event logs in Windows 10 Event Viewer.

Method 1: Clear Windows Event Logs Using Event Viewer

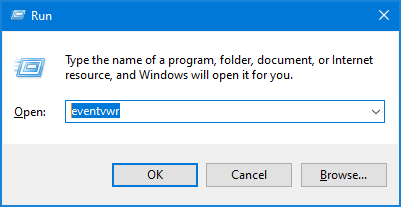
Press the Windows + R keys to open the Run dialog, type eventvwr.msc and click OK to open Event Viewer.

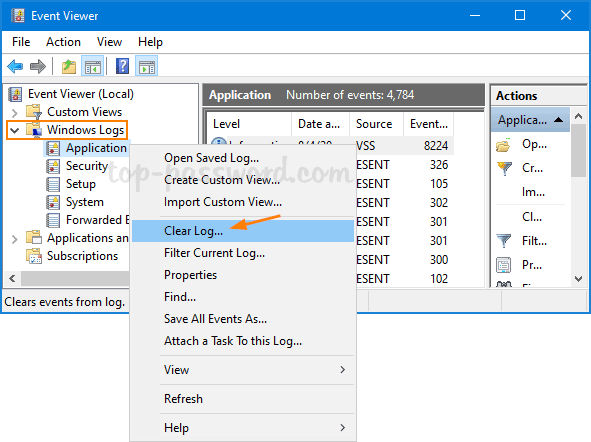
On the left sidebar of Event Viewer, expand “Windows Logs” and right-click one of the events categories, then select Clear Log from the menu that comes up.

Click either the “Save and Clear” or the Clear button to confirm.

The event logs will be cleared immediately.

Method 2: Clear Windows Event Logs Using Command Prompt

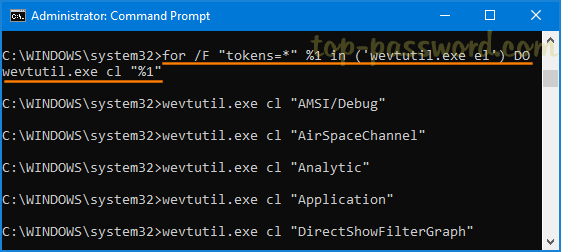
Open an elevated Command Prompt window. Copy and paste the following command into the Command Prompt, and then hit Enter.
for /F "tokens=*" %1 in ('wevtutil.exe el') DO wevtutil.exe cl "%1"

This will delete all types of Windows event logs at once.

Method 3: Clear Windows Event Logs Using PowerShell

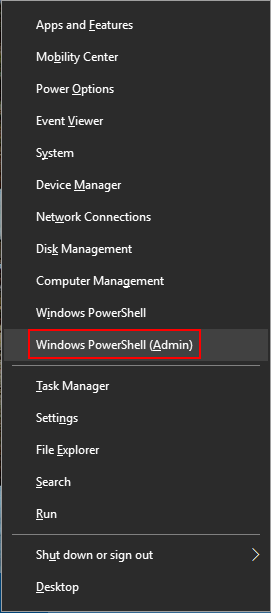
Press the Windows logo key + X to open the Quick Link menu, and then click on “Windows PowerShell (Admin)“.

To clear all event logs in Windows 10, just enter the below command and press Enter.
Get-EventLog -LogName * | ForEach { Clear-EventLog $_.Log }

That’s it!

How to Turn On Device Encryption in Windows 10 Home

July 25th, 2020 by Admin

Although BitLocker is not available on Windows 10 Home, you can still use a similar feature called “device encryption” to protect your data from unauthorized access. In this tutorial we’ll show you how to check if your computer supports device encryption, and walk you through the steps to turn on device encryption in Windows 10 Home.

Part 1: Check if Your PC Supports Device Encryption

Device encryption is usually available on most tablets or 2-in-1 laptops running Windows 10. These are the hardware requirements for device encryption:

  • Trusted Platform Module (TPM) version 2.0 or higher
  • Modern Standby support
  • UEFI firmware

The easiest way to check if your PC supports device encryption is by using the System Information tool. Follow these steps:

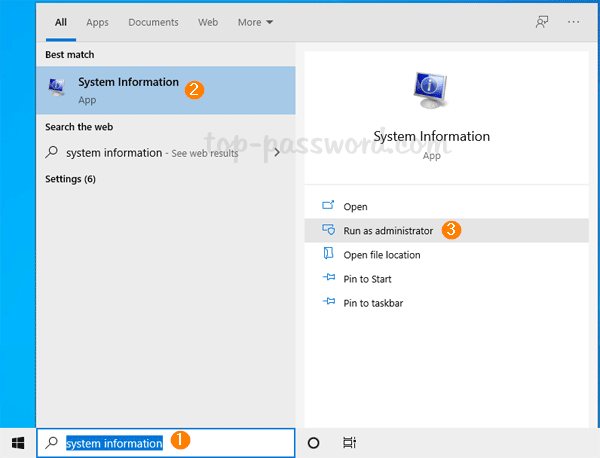
  1. Click the Search box in the taskbar and enter “system information”. When the results appear, select the System Information app and click on the “Run as administrator” option.

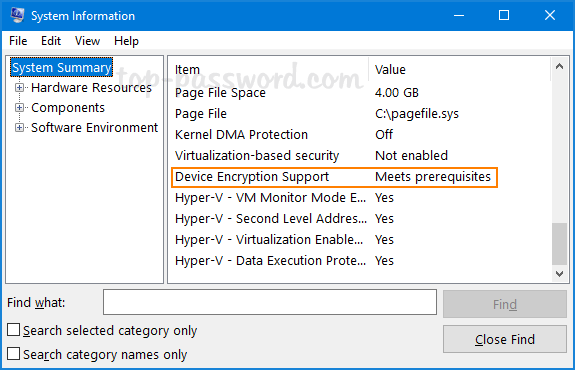
  2. At the bottom of the System Summary window, look for the “Device Encryption Support” item. If the value says Meets prerequisites, then device encryption is available on your PC.

Part 2: Turn on Device Encryption

If your PC meets the hardware requirements, you can proceed to enable device encryption on Windows 10 home by following these steps:

  1. Press the Windows key + I to launch the Settings app. Click on the Update & Security category.

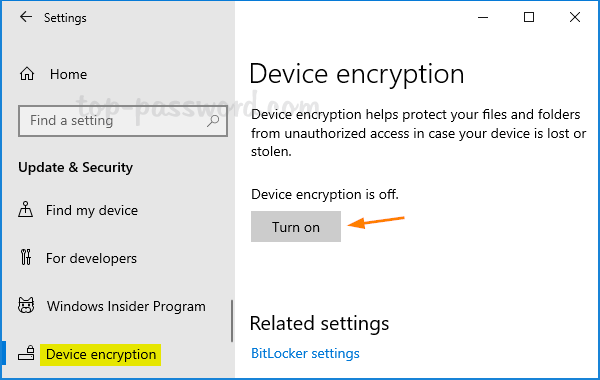
  2. Select Device encryption from the left pane, and click on the Turn on button on the right side. Windows will begin encrypting all current and future files automatically.

    If you’re logged in with a local account, Windows may prompt you to convert to Microsoft online account before turning on device encryption so it can upload your recovery key to OneDrive. This can help recover your files in case you forgot Windows password.

That’s it!

How to Prevent Windows 10 from Downloading Feature Updates

July 14th, 2020 by Admin

How can I stop or defer Windows 10 feature updates only? Feature updates are also known as major updates that are actually a new version of Windows 10, while cumulative updates are traditional security patches we’ve known over the years. In this tutorial we’ll show you 2 methods to prevent Windows 10 from automatically downloading the next feature updates, without blocking cumulative updates.

Method 1: Prevent Windows 10 Feature Updates via Group Policy

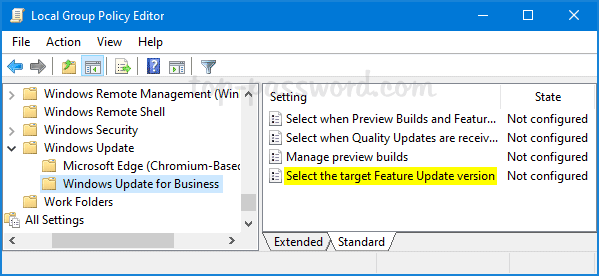
  1. Open Local Group Policy Editor and navigate to: Computer Configuration > Administrative Templates > Windows Components > Windows Update > Windows Update for Business.

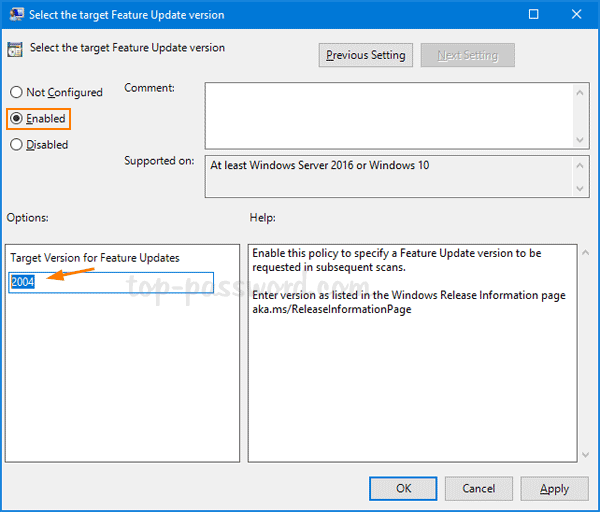
    In the right pane, double-click the “Select the target Feature Update version” policy.

  2. Select the Enabled option. Enter a version number (for example, “2004”) you want to stay on or upgrade to, and then click OK.

    If you’re running Windows 10 1909 and set the version ‘1909’, it will stop Windows 10 from installing any later version including Windows 10 v2004.

  3. When it’s done, close Local Group Policy Editor and reboot your computer.

Method 2: Prevent Windows 10 Feature Updates via Registry Editor

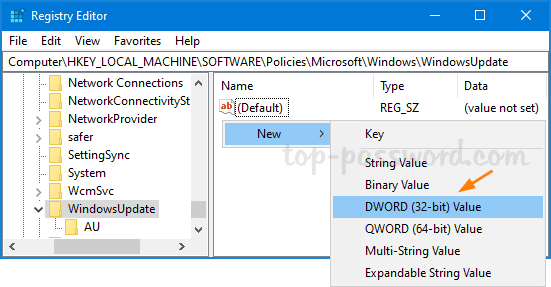
  1. Open Registry Editor and browse to: HKEY_LOCAL_MACHINE\SOFTWARE\Policies\Microsoft\Windows\WindowsUpdate. In the right pane, right-click the blank area and select New -> DWORD (32-bit) Value.

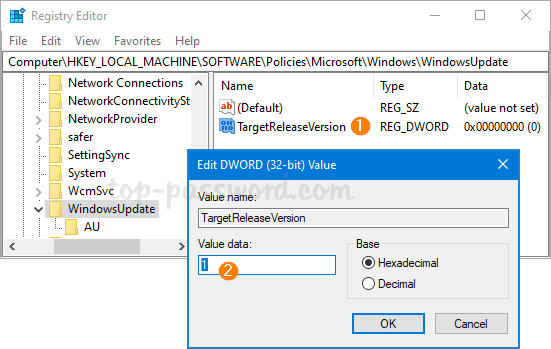
  2. Name the DWORD TargetReleaseVersion and then double-click it to set the value to 1.

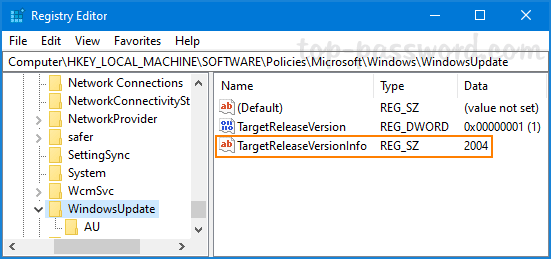
  3. Use the similar way to create a string named TargetReleaseVersionInfo and set the value to the Windows 10 version number that you wish to stay on. If want to stick to Windows 10 2004 and block newer feature updates, then set it to “2004”.

  4. Close Registry Editor and restart the system to apply the changes.

How to Remove “Restore previous versions” Context Menu in Windows 10

July 13th, 2020 by Admin

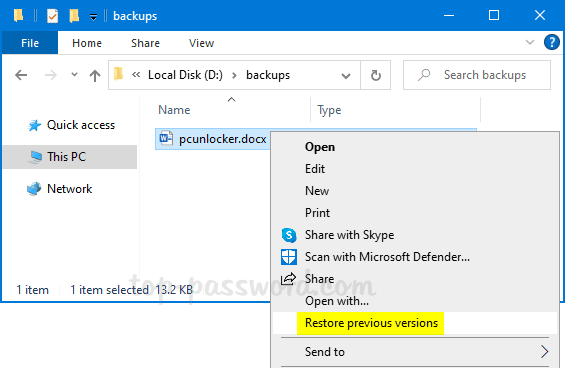
When you right-click a folder or a file in File Explorer, the “Restore previous versions” option will always appear as an option in the context menu. It lets you recover old versions of your files and folders that were backed up by File History or system restore points.

If neither File History nor system restore is enabled, then there will be no old versions available for your folders and files and the “Restore previous versions” option is useless. In this tutorial we’ll show you a simple way to remove the “Restore previous versions” option from File Explorer’s context menu in Windows 10.

How to Remove “Restore previous versions” Context Menu in Windows 10

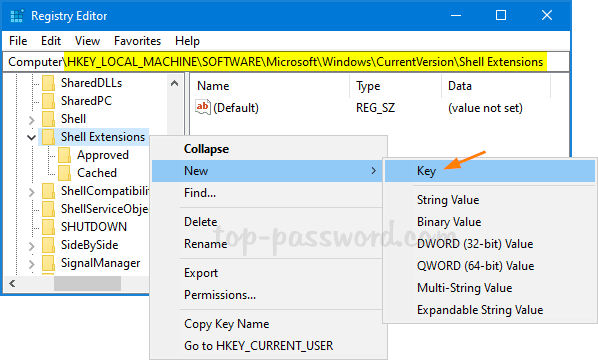
  1. Open Registry Editor and browse to HKEY_LOCAL_MACHINE\SOFTWARE\Microsoft\Windows\CurrentVersion\Shell Extensions.

    Expand “Shell Extensions” and look for the subkey “Blocked“. If it doesn’t exist, you can create it by right-clicking on the “Shell Extensions” key and selecting New -> Key.

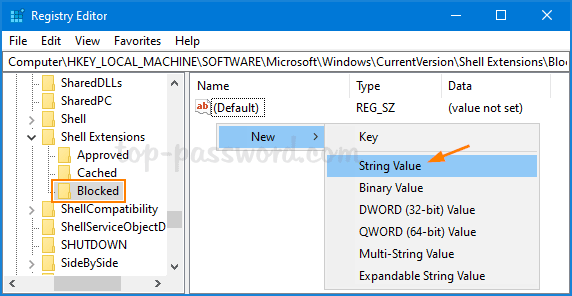
  2. While the “Blocked” subkey is selected, right-click any blank area in the right pane and select New -> String.

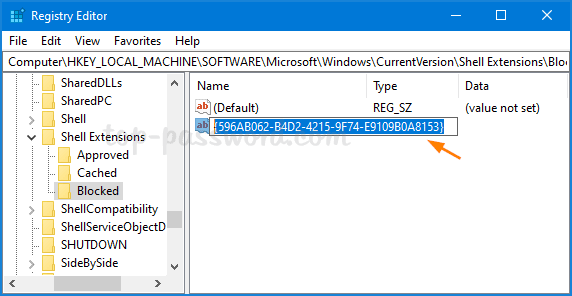
  3. Rename the string to “{596AB062-B4D2-4215-9F74-E9109B0A8153}” and leave its value data empty.

  4. Close Registry Editor and reboot your computer. Now you’ve successfully removed the “Restore previous versions” option from File Explorer’s context menu in Windows 10.

If you decide to restore that “Restore previous versions” option in future, just delete the “{596AB062-B4D2-4215-9F74-E9109B0A8153}” string you’ve created and it’s done!

How to Mute a Tab in Chrome, Microsoft Edge and Firefox

July 10th, 2020 by Admin

When you’re surfing the web with multiple tabs open, an ad may pop up suddenly on another tab and it starts playing sound automatically. This could put yourself into embarrassing situation if you’re in public. In this tutorial we’ll show you easy ways to mute a tab in Chrome, Microsoft Edge and Firefox.

Mute a Tab in Chrome

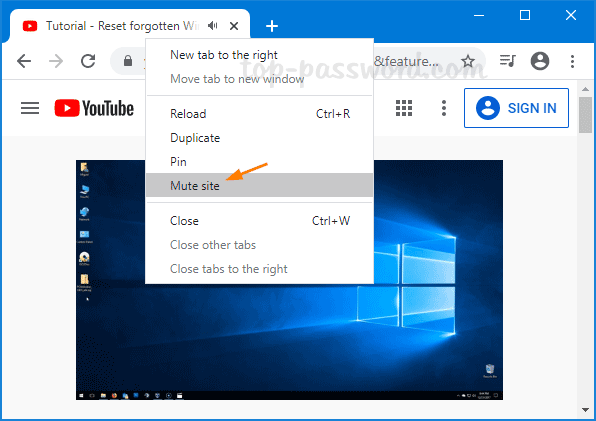
To mute a website in Chrome, right-click on a tab that is playing sound, and then select “Mute site” from the drop-down menu.

That tab will get muted immediately.

Mute a Tab in Microsoft Edge and Firefox

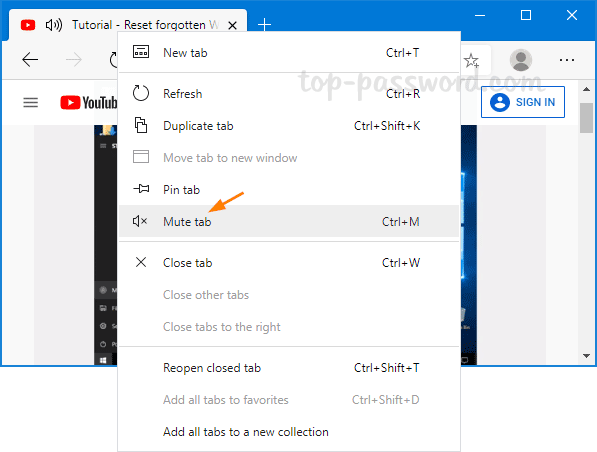
Just like Chrome, both Microsoft Edge and Firefox also offer a similar method to mute tabs individually. If you wish to mute a tab, right-click it and select the “Mute tab” option from the popup menu.

The easiest way of muting a tab is to click the small speaker icon that appears on a tab that is playing audio. Clicking the speaker icon once again will unmute the tab.

Conclusion

If you have tons of tabs opened in your Chrome, Microsoft Edge or Firefox browser, just look for the speaker icon on every tab and you can easily find which tab is playing background audio.

How to Block Video Autoplay on the New Microsoft Edge Browser

July 7th, 2020 by Admin

Is there any way to stop Microsoft Edge from automatically playing videos after page loaded? Luckily, the new Microsoft Edge browser comes with a setting called Media Autoplay, which lets users control video autoplay on websites. In this tutorial we’ll walk you through the steps to block video autoplay on the new Microsoft Edge in Windows 10.

How to Block Video Autoplay on the New Microsoft Edge

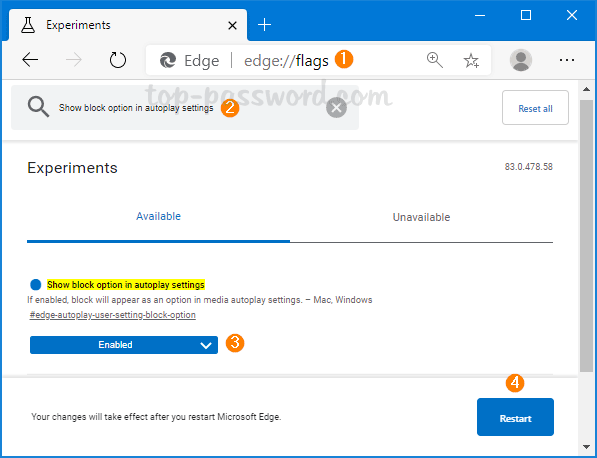
  1. Open Microsoft Edge. Type edge://flags/ into the address bar and hit Enter.

    Next, search for “Show block option in autoplay settings” and select the “Enabled” option from the drop-down menu next to the flag. Click the Restart button to relaunch Microsoft Edge.

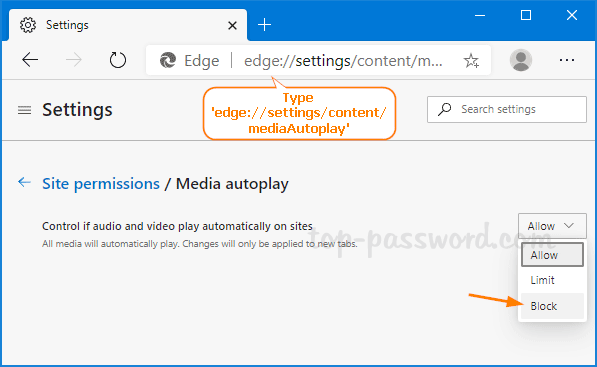
  2. When Microsoft Edge opens up again, type the following in the address bar and press Enter.
    edge://settings/content/mediaAutoplay

    Click the drop-down list next to “Control if audio and video play automatically on sites” and you will be presented with the following options:

    • Allow: This is the default setting and a site will play videos in the foreground.
    • Limit: Restricts autoplay to only work when videos are muted, so you’re never surprised by sound. Once you click anywhere on the page, autoplay is re-enabled and will continue to be allowed within that site.
    • Block: This prevents autoplay on all sites until you interact with the media content (you need to click the play button).

    Just choose the Block option and Microsoft Edge will prevent all websites from automatically playing videos without your consent.

That’s it!

3 Steps to Change Currency Format in Windows 10

July 1st, 2020 by Admin

Incorrect currency showing on a website or an app? How can I change the default currency in Excel? The currency format displayed may be based on the region and currency settings in Windows. In this tutorial we’ll show you how to change the default currency format in Windows 10.

How to Change Currency Format in Windows 10

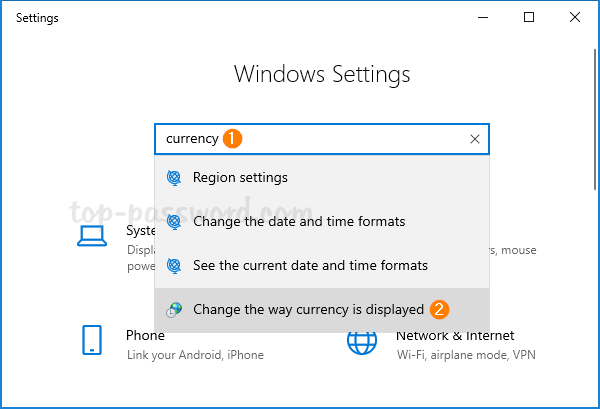
  1. Open the Settings app and type currency in the Search box, then click “Change the way currency is displayed” from the result. This will open the Region window.

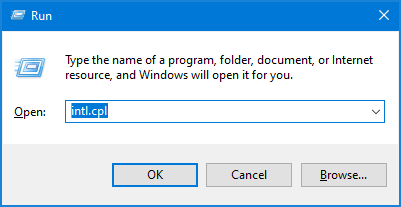
    Or press the Windows key + R to open the Run dialog. Type intl.cpl and hit Enter.

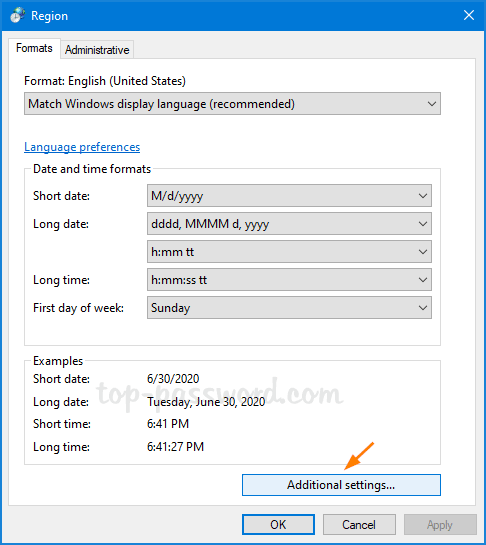
  2. Under the Formats tab, click on the Additional settings button at the bottom.

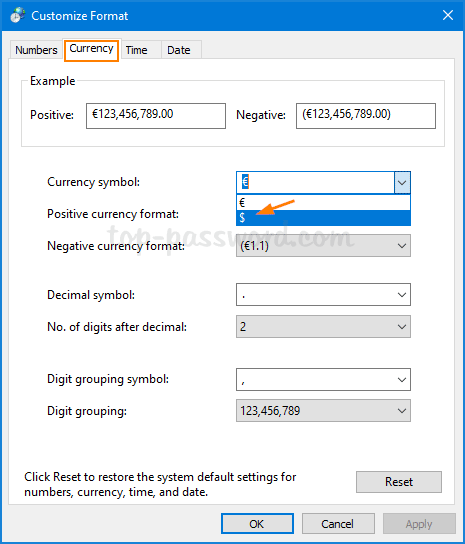
  3. When the “Customize Format” dialog box appears, select the Currency tab. Pick up your desired currency format from the “Currency symbol” drop-down list and click OK.

    If your desired currency is not shown in the list, you can open the built-in Character Map app. Look for your currency symbol and then copy & paste it into the “Currency symbol” drop-down list.

That’s it!