Author Archive

2 Methods to Remove Time and Date from Taskbar in Windows 11

December 29th, 2023 by Admin

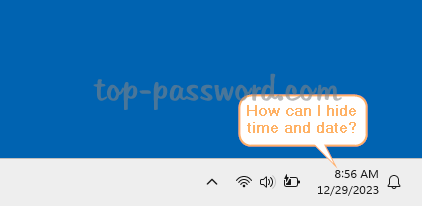
How can I hide time and date in the system tray on Windows 11? Previously we’ve covered a tricky way to achieve it. Luckily, starting with Windows 11 23H2, the system provides built-in options to remove time and date from the taskbar. In this tutorial we’ll show you another 2 methods to remove time and date from system tray in Windows 11 with ease.

Method 1: Remove Time and Date from Taskbar via Settings App

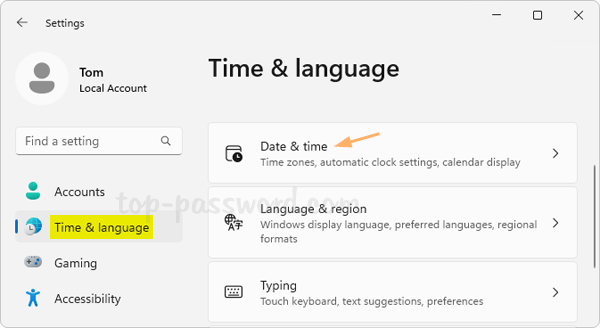
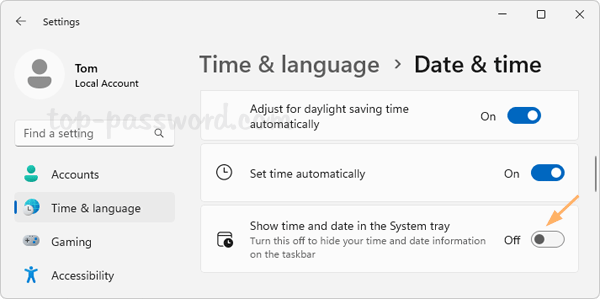
  1. Open the Settings app. Choose Time & language in the left navigation pane, and then click Date & time in the right side.

  2. Turn off the toggle switch for “Show time and date in the System tray“.

  3. The clock in your system notification area will disappear immediately.

Method 2: Remove Time and Date from Taskbar via Registry Editor

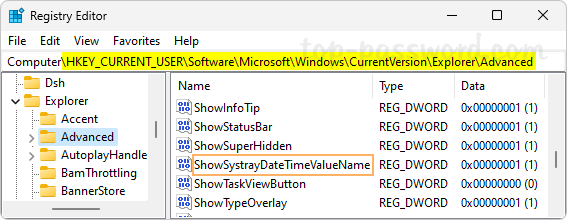
  1. Open Registry Editor and navigate to: HKEY_CURRENT_USER\Software\Microsoft\Windows\CurrentVersion\Explorer\Advanced, then double-click the DWORD HideSystrayDateTimeValueName in the right-side pane.

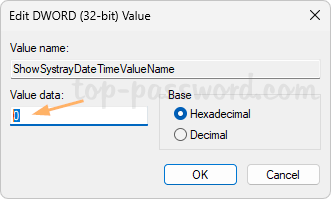
  2. Just change its value data from 1 to 0, click OK.

  3. Close Registry Editor. You’ll instantly see that the time and date is missing from the taskbar in Windows 11.Whenever you need to get back the time and date, just set the value data of HideSystrayDateTimeValueName to 1.

That’s it!

How to Enable or Disable Location Services in Windows 11

December 22nd, 2023 by Admin

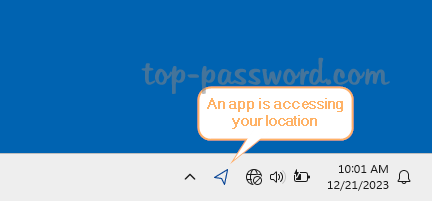
How can I disable location tracking in Windows 11? Can’t turn on my location service because it’s greyed out? Some apps might require accessing the location services so it can provide you with information which is more relevant to your PC’s geographic location.

However, turning on location services may arouse privacy concerns. In this tutorial we’ll show you 3 methods to enable or disable location services in Windows 11.

Method 1: Enable or Disable Location Services via Settings App

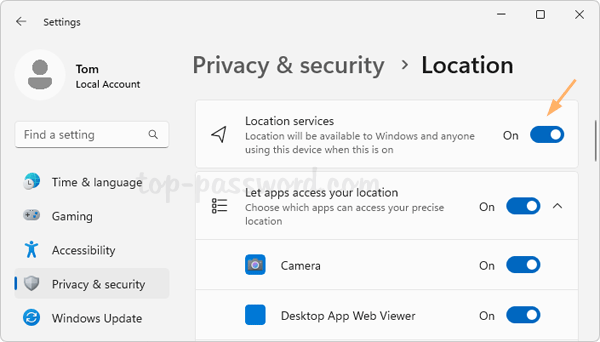
  1. Launch the Settings app. Select Privacy & security on the left side, and then click Location on the right side.

  2. You can then toggle the switch next to “Location services” to turn on or off location services in Windows 11.

Method 2: Enable or Disable Location Services via Registry Editor

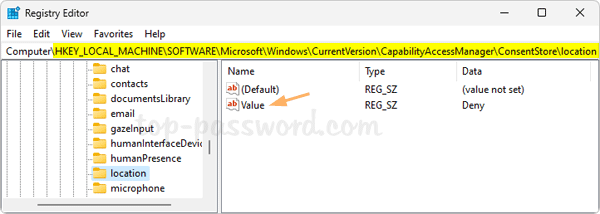
  1. Open Registry Editor and navigate to: HKEY_LOCAL_MACHINE\SOFTWARE\Microsoft\Windows\CurrentVersion\CapabilityAccessManager\ConsentStore\location. Next, double-click the string entry called “Value” on the right pane.

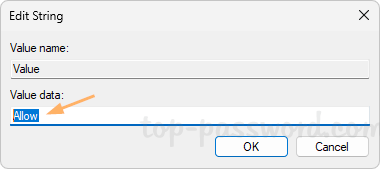
  2. Type “Allow” in the value data box to enable location services, or type “Deny” when you need to disable location services, click OK.

  3. Close Registry Editor.

Method 3: Permanently Disable Location Services via Group Policy

Whenever you need to permanently disable the location services or prevent others from turning on location services from the Settings app, the group policy method is a good choice.

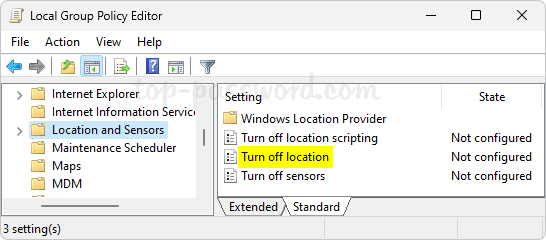
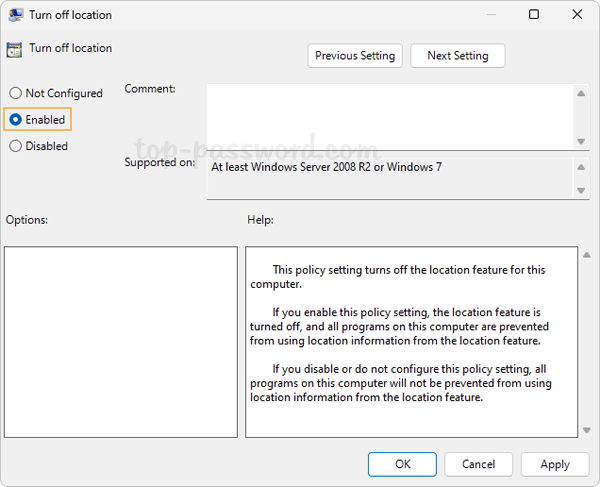
  1. Open the Local Group Policy Editor and browse to: Computer Configuration -> Administrative Templates -> Windows Components -> Location and Sensors​. Next, double-click the “Turn off location” policy.

  2. Choose the Enabled option, click Apply and then OK.

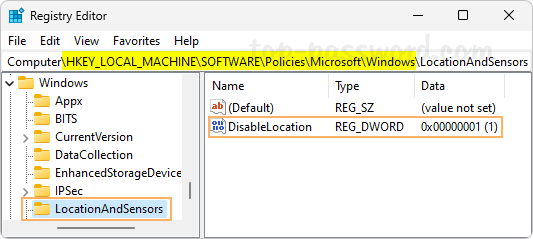
    If Local Group Policy Editor is not available on your Windows edition, try the alternative method: open Registry Editor and navigate to: HKEY_LOCAL_MACHINE\SOFTWARE\Policies\Microsoft\Windows\LocationAndSensors and set the value of the DisableLocation to 1. Note: If either the subkey LocationAndSensors or the DWORD DisableLocation doesn’t exist, you need to create it manually.

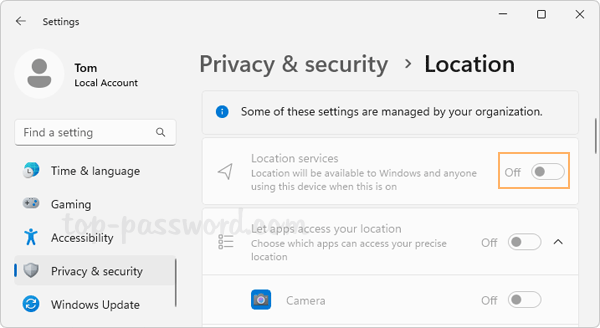
  3. Close the Local Group Policy Editor. When you open the Settings app and go to Privacy & security -> Location, you’ll find the “Location services” option is greyed out.

That’s it!

How to Stop Microsoft Edge from Showing Multiple Tabs in Alt+Tab

December 13th, 2023 by Admin

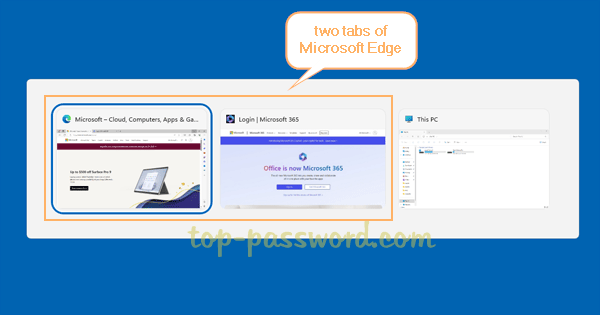
Edge browser shows each tab as a new window in Alt + Tab? How can I disable all tabs of Microsoft Edge while doing Alt+Tab? When switching between tasks in Alt + Tab, the Edge browser may show all tabs as a separate task. If you want Microsoft Edge to behave like other web browsers and show just one window, here are 2 simple methods to stop Microsoft Edge from showing multiple tabs in Alt + Tab in Windows 11.

Method 1: Disable Microsoft Edge Tabs in Alt+Tab Using Settings App

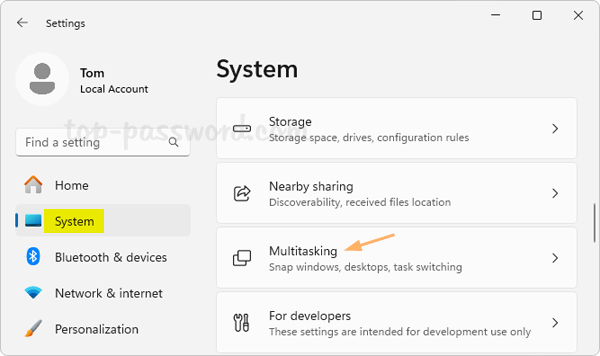
  1. Press the Windows logo key + I to open the Settings app, then go to System -> Multitasking.

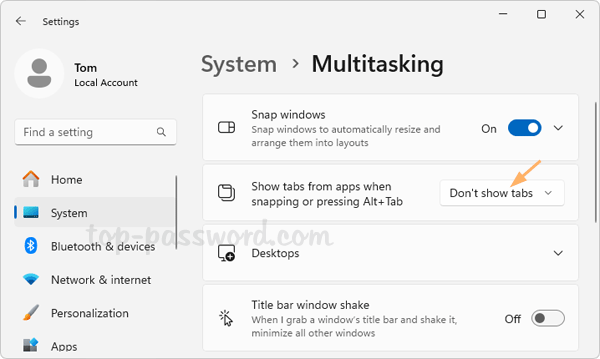
  2. Click the drop-down list next to “Show tabs from apps when snapping or pressing Alt + Tab” and select “Don’t show tabs“.

  3. When you now press Alt + Tab, you’ll find that only a single window of Microsoft Edge will show up even if you’ve opened many tabs.

Method 2: Disable Microsoft Edge Tabs in Alt+Tab Using Registry Editor

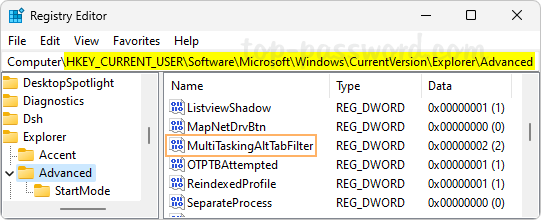
  1. Open Registry Editor and navigate to: HKEY_CURRENT_USER\SOFTWARE\Microsoft\Windows\CurrentVersion\Explorer\Advanced, then double-click the DWORD MultiTaskingAltTabFilter on the right pane.

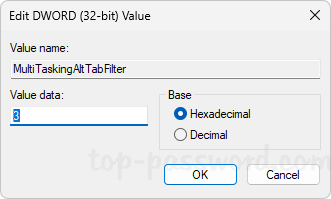
  2. Change its value data to one of the following depend on your choices. In my case, I set the value to 3 for preventing Windows 11 from showing tabs in Microsoft Edge.

    • 0 = Show 20 most recent tabs in Microsoft Edge
    • 1 = Show 5 most recent tabs in Microsoft Edge
    • 2 = Show 3 most recent tabs in Microsoft Edge
    • 3 = Don’t show tabs in Microsoft Edge
  3. Close Registry Editor. You need to log off your account and then log in to make the changes take effect.

That’s it!

2 Methods to Enable or Disable Title Bar Shake to Minimize in Windows 11

December 7th, 2023 by Admin

The title bar window shake feature is also known as Aero Shake, which lets you grab a windows title bar and shake it to minimize all other windows, and shake it again to restore all the minimized windows. It can save you time and improve your productivity. In this tutorial we’ll show you 2 simple methods to turn on or off the title bar window shake feature in Windows 11.

Method 1: Enable or Disable Title Bar Shake to Minimize via Settings App

  1. Open the Settings app. Select the System menu on the left navigation menu, and then click on Multitasking on the right panel.

  2. Toggle the switch for “Title bar window shake” to the On position to enable the title bar window shake, or toggle it to Off if you want to disable Aero Shake.

Method 2: Enable or Disable Title Bar Shake to Minimize via Registry Editor

  1. Open Registry Editor and navigate to: HKEY_CURRENT_USER\Software\Microsoft\Windows\CurrentVersion\Explorer\Advanced. Look for the DWORD DisallowShaking in the right pane, and then double-click it to modify.

  2. Set its value data to 0 for turning on title bar window shake, or set it to 1 if you want to turn off that feature.

  3. Close Registry Editor. This change will take effect immediately and a reboot is not required.

What to do if Title Bar Shake doesn’t work?

If you’ve enabled the “Title bar window shake” feature but it still doesn’t work, it’s possible that the group policy “Turn off Aero Shake window minimizing mouse gesture” is activated. Just follow these steps to disable the group policy:

  1. Open the Local Group Policy Editor and browse to: User Configuration -> Administrative Templates -> Desktop.

  2. Set the “Turn off Aero Shake window minimizing mouse gesture” policy to Not Configured.

That’s it!

3 Methods to Turn off Snap windows in Windows 11

December 6th, 2023 by Admin

How can I prevent auto-maximize when the window is dragged to the screen edge? When you move the cursor to the very top or bottom border of a windows, the cursor will turn into a vertical double arrow and then you can double-click to maximize the current window vertically. If you don’t like to use these ways to maximize or resize the window, you can turn off the Snap windows feature in Windows 11.

Method 1: Turn off Snap windows in Windows 11 via Settings App

  1. Open the Settings app. Choose the System category in the left column and then click Multitasking on the right side.

  2. Toggle the switch next to “Snap windows” from on to off. It will immediately disable the Snap windows feature in Windows 11.

Method 2: Turn off Snap windows in Windows 11 via Registry Editor

  1. Open Registry Editor and browse to: HKEY_CURRENT_USER\Control Panel\Desktop, then double-click the string WindowArrangementActive on the right pane.

  2. To turn off the Snap windows feature, change its value data from 1 to 0. Click OK.

  3. Close Registry Editor. A reboot is required for this change to take effect.

Method 3: Turn off Snap windows in Windows 11 via Control Panel

  1. Open Control Panel in Large icons view, click the “Ease of Access Center” icon.

  2. Click the “Make the keyboard easier to use” option.

  3. Scroll down to the “Make it easier to manage windows” section, uncheck the “Prevent windows from being automatically arranged when moved to the edged of the screen” option.

  4. Click Apply and then OK.

That’s it!

2 Methods to Turn Off Copilot in Windows 11

November 29th, 2023 by Admin

How can I disable Copilot on Windows 11? Looking for a way to completely remove Copilot from the taskbar? Copilot is a built-in feature of Windows 11, which can’t be uninstalled like a regular app. However, if you’re not going to use Windows Copilot, here are 2 ways to turn off Copilot in Windows 11.

Method 1: Turn Off Copilot in Windows 11 via Group Policy

  1. Open the Local Group Policy Editor and browse to: User Configuration -> Administrative Templates -> Windows Components -> Windows Copilot. On the right-side pane, double-click the “Turn off Windows Copilot” policy.

  2. Select the Enabled option. Click Apply and OK.

  3. Close the Local Group Policy Editor. The Copilot button should have been immediately removed from Windows taskbar, and you’re unable to see the Copilot option any longer via the Taskbar settings page.

Method 2: Turn Off Copilot in Windows 11 via Registry Editor

  1. Open Registry Editor. Use the left pane to navigate to: HKEY_CURRENT_USER\Software\Policies\Microsoft\Windows. Right-click the Windows key and choose New -> Key.

  2. Name the new key “WindowsCopilot” and highlight it, then right-click the blank area in the right pane and choose New -> DWORD (32-bit) Value.

  3. Name the new DWORD “TurnOffWindowsCopilot” and set its value data to 1. Click OK.

  4. Close Registry Editor. Microsoft Copilot will be removed from the taskbar, and the Copilot option will no longer be available in the Settings app as well. If you want to enable Windows Copilot again in future, just change the value data of TurnOffWindowsCopilot to 0.

That’s it!

How to Add Copilot to Taskbar or Desktop in Windows 11

November 27th, 2023 by Admin

How can I open Windows Copilot? Windows Copilot not showing in the taskbar? Microsoft Copilot is a new AI-powered chatbot that is released with Windows 11 23H2 update. If you need to access Copilot frequently, you can get the Copilot icon to appear in the taskbar or create a desktop shortcut for quick access. In this tutorial we’ll show you easy ways to add Copilot to the taskbar or desktop in Windows 11.

Method 1: Add Copilot to Taskbar in Windows 11 via Settings App

  1. Right-click the empty space in the taskbar and choose “Taskbar settings“. This will open the Settings app and take you to the page: Personalization -> Taskbar.

  2. Turn on the toggle switch next to the Copilot option.

  3. The Copilot icon will show up in the taskbar and you can click it to open Copilot with ease.

Method 2: Add Copilot to Taskbar in Windows 11 via Registry Editor

  1. Open Registry Editor and browse to: HKEY_CURRENT_USER\Software\Microsoft\Windows\CurrentVersion\Explorer\Advanced. In the right pane, double-click the DWORD ShowCopilotButton.

  2. To enable Copilot, change its value data from 0 to 1. Click OK.

  3. Close Registry Editor. You can immediately see the Copilot button in the taskbar.

Method 3: Create a Desktop Shortcut for Copilot in Windows 11

  1. Right-click the empty space on your desktop and choose New -> Shortcut.

  2. Copy and paste the following command in the location box, and click Next.
    microsoft-edge://?ux=copilot&tcp=1&source=taskbar
  3. Give a name for this shortcut and click Finish.

  4. You can now double-click the newly-created desktop shortcut to open Copilot quickly.

That’s it!

2 Methods to Remove the Home Page from the Settings App in Windows 11

November 13th, 2023 by Admin

After upgrading to Windows 11 23H2, you may find that Microsoft adds a new Home page to the Settings app, which shows a list of recommended settings including a shortcut to turn on/off Bluetooth. If you don’t like the new Home page, you can hide or remove it with ease. In this tutorial we’ll show you 2 simple methods to remove the Home page from the Settings app in Windows 11.

Method 1: Remove the Home Page from the Settings App Using Group Policy

  1. Open the Local Group Policy Editor and browse to: Computer Configuration > Administrative Templates > Control Panel, then double-click the policy called “Settings Page Visibility” in the right pane.

  2. Select Enabled. Under the Options section, type hide:home in the text box next to “Settings Page Visibility”. Click Apply and then OK.

  3. Close the Local Group Policy Editor. Relaunch the Settings app and the new Home page will be missing.

Method 2: Remove the Home Page from the Settings App Using Registry Editor

  1. Open Registry Editor and navigate to: HKEY_LOCAL_MACHINE\SOFTWARE\Microsoft\Windows\CurrentVersion\Policies\Explorer. In the right pane, right-click the empty space and choose New -> String Value.

  2. Name the string SettingsPageVisibility, and then double-click it to modify. Type hide:home in the Value data field and click OK.

  3. Close Registry Editor. When you open the Settings app again, it will open the System page by default, and the new Home page disappears.

That’s it!

How to Pause Windows Update for any Amount of Time in Windows 11

November 9th, 2023 by Admin

How can I pause Windows 11 update for a few months or permanently? By default, Windows 11 allows you to pause Windows update for up to 5 weeks (35 days) at maximum. Luckily, there is an undocumented method to pause updates in Windows 11 up to any desired number of days.

How to Pause Windows Update for any Amount of Time in Windows 11

  1. Open Registry Editor and navigate to the location: HKEY_LOCAL_MACHINE\SOFTWARE\Microsoft\WindowsUpdate\UX\Settings​, then right-click the blank area in the right pane, and choose New -> DWORD (32-bit) Value.

  2. Name the newly-created DWORD FlightSettingsMaxPauseDays, and then double-click it to bring up the “Edit DWORD Value” dialog. Choose Decimal and enter any desired number of days, click OK. If you want to pause Windows update for 10 weeks, then type 70 instead.

    Though there isn’t a value for pausing Windows updates permanently, you can enter a large number to pause updates for 10 years or even 100 years.

  3. Close Registry Editor and relaunch the Settings app. Go to Windows Update, click the arrow on the right side of the “Pause updates” drop-down box, and you can see how many weeks you can pause the update for.

    If you set FlightSettingsMaxPauseDays to 9 and then clicked “Pause for 1 week”, the “Extend for 2 days” button will appear so you can pause updates for 9 days totally.

    When you change your mind anytime, simple click the “Resume updates” button above.

That’s it!
How to Show or Hide Taskbar Labels in Windows 11

October 24th, 2023 by Admin

How can I restore the classic taskbar labels in Windows 11? By default, Windows 11 displays only application icons on the taskbar without any additional labels. To view the title of the window that you have open, you need to spend time moving your mouse and hovering over the icons on the taskbar. This tutorial will show you 2 methods to show or hide taskbar labels in Windows 11.

Method 1: Show or Hide Taskbar Labels in Windows 11 Using Settings App

  1. Right-click the empty space on the taskbar and choose “Taskbar settings” from the pop-up menu.

  2. When the Settings app opens to Personalization -> Taskbar, click “Taskbar behaviors” on the right pane to expand the settings.

  3. Click the “Combine taskbar buttons and hide labels” drop-down list, select “Never” if you want to always show taskbar labels and never combine taskbar icons, or choose “Always” to hide taskbar labels. The “When taskbar is full” option lets you hide taskbar labels only when the taskbar is full of program icons.

Method 2: Show or Hide Taskbar Labels in Windows 11 Using Registry Editor

  1. Open Registry Editor and navigate to: HKEY_CURRENT_USER\Software\Microsoft\Windows\CurrentVersion\Explorer\Advanced. Double-click the DWORD TaskbarGlomLevel on the right panel.

  2. Change the value data to one of the following values, and click OK.
    • 0: Always
    • 1: When taskbar is full
    • 2: Never

  3. Close Registry Editor. You need to restart File Explorer or restart your computer to see the changes.

That’s it!