Author Archive

How to Clear or Flush DNS Cache in Windows 10, 8, 7

October 18th, 2019 by Admin

Have you ever encountered the error DNS_PROBE_FINISHED_NXDOMAIN or ERR_NAME_NOT_RESOLVED when accessing a website? Your browser displays a 404 error or tell you “The site can’t be reached“? These problems usually happen when your DNS cache is corrupted or out of update, so Windows can’t resolve the domain name of the website you’re visiting into IP address correctly. Clearing the DNS cache is the most effective way to resolve DNS related problems. Here’s how you can view, clear / flush DNS cache in Windows 10, 8, 7.

Part 1: View DNS Cache

Open an elevated Command Prompt and run the following command:
ipconfig /displaydns >C:\dnscache.txt

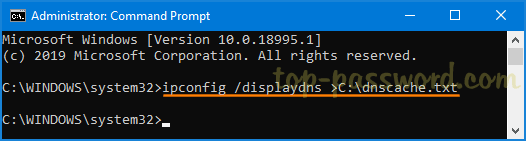
The above command will export the local DNS cache to a text file: C:\dnscache.txt. Just open it with Notepad and you can see the IP addresses for the respective domains or hosts you’ve ever visited.

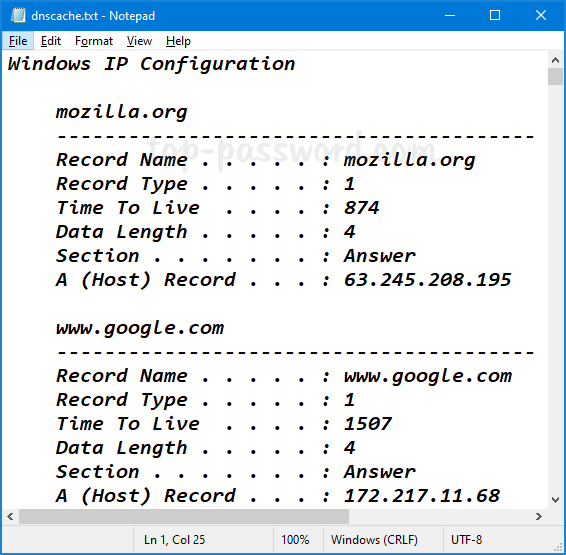
As you can see in the above screenshot, Windows will check the DNS cache and send my request to the IP address 172.217.11.68 when I try to visit google.com.

Part 2: Clear or Flush DNS Cache

When you need to clear or flush DNS cache, just open the Command Prompt as administrator and type this command:
ipconfig /flushdns

Once pressing Enter, the DNS Resolver cache will be cleared immediately. Windows will start creating new and up-to-date DNS records for any websites you visit thereafter.

3 Methods to Check Your Motherboard Model in Windows 10

October 17th, 2019 by Admin

Is there a way to identify the motherboard (mainboard) so I can update my BIOS or upgrade the RAM? How could I find my motherboard model without opening the case? In this tutorial we’ll show you 3 simple ways to check the motherboard model on your Windows 10 computer.

Method 1: Check Motherboard Model Using Command Prompt

Open the Command Prompt and type the following command:
wmic baseboard get product,manufacturer,version,serialnumber

Press Enter and you will get all the basic information about your motherboard, such as manufacturer name, model number, serial number (if available) and version.

Method 2: Check Motherboard Model Using Microsoft’s System Information Tool

Press the Windows key + R keyboard shortcut to open the Run box, then type msinfo32 and hit Enter to launch Microsoft’s System Information Tool.

In the System Summary section, look for the the “BaseBoard” entries and they will give you the manufacturer name, model number and version for the motherboard.

Method 3: Check Motherboard Model Using Third-Party Software

There are also many third-party softwares which can help you check the motherboard model on your Windows PC, one of the best and popular ones is CPU-Z. When launching the program, it will take a while to gather all the details about the hardware of your system. You can click on the “Mainboard” tab to view your motherboard’s model.

That’s it!

3 Ways to Log off Another User in Windows 10

October 14th, 2019 by Admin

How do I sign out other user accounts without restarting the computer? When someone forgets to log out of a public or shared PC, their account still consumes RAM in the background. To free up the resources being used by other logged-in accounts, you can log them off using Task Manager, Command Prompt and PowerShell.

Method 1: Log Off Another User Using Task Manager

Press the Ctrl + Shift + Esc keyboard shortcut to launch Task Manager. Go to the Users tab, it will list all users that are currently signed in to your system. Right-click on the user you want to log off and select the Sign off option.

You will get a warning that says the user’s unsaved data might be lost. Click on Sign out user when you need to proceed.

Method 2: Log Off Another User Using Command Prompt

Open the Command Prompt with administrative rights, run the query session command to see all users currently logged into the computer. Take note of the session ID of the user you want to sign out.

Next, run the following command to log off your desired account by specifying the session ID.
logoff ID

This method doesn’t give you any alert or confirmation that the user you’re signing out will lose unsaved work.

Method 3: Log Off Another User Using PowerShell

Open Windows PowerShell with administrative rights, and type the following commands. Replace “Server01” with your computer’s name and substitute “pcunlocker” with the name of the account you want to log out.
$server = 'Server01'
$username = 'pcunlocker'
$sessionId = ((quser /server:$server | Where-Object { $_ -match $userName }) -split ' +')[2]
logoff $sessionId /server:$server

Once logged off, the user account is no longer listed in Task Manager. Signing a user out this way has the same risk of losing all unsaved data as the above method.

Fix: Windows 10 Keeps Going to Sleep After 2 Minutes

October 12th, 2019 by Admin

Windows 10 keeps going to sleep after approximately 1-2 minutes idle? This problem may happen even if an affected user changes all the display and sleep settings to “Never”.

To fix such sleep mode problem, you have to tweak a hidden system setting in the Power Options called “System unattended sleep timeout”.

How to Fix: Windows 10 Keeps Going to Sleep After 2 Minutes

  1. Press the Windows + R keys together, type regedit in the Run box and hit Enter to open the Registry Editor.

  2. Copy the following registry location and paste it in the address bar of the Registry Editor, and pressing Enter will take you to that location. In the right pane, double-click on the DWORD Attributes.

    HKEY_LOCAL_MACHINE\SYSTEM\CurrentControlSet\Control\Power\PowerSettings\238C9FA8-0AAD-41ED-83F4-97BE242C8F20\7bc4a2f9-d8fc-4469-b07b-33eb785aaca0

  3. Change the value from 1 to 2 and click OK. This will make the “System unattended sleep timeout” setting appear in the Power Options control panel.

  4. Close Registry Editor. Open the advanced settings of your current power plan, the “System unattended sleep timeout” setting should appear under the Sleep option. By default, it’s set to 2 minutes. You can change this to a longer period of time or 0 (Never idle to sleep).

That’s it!

The Easy Way to Disable or Enable Guest Browsing Mode in Chrome

October 8th, 2019 by Admin

Chrome’s guest mode is a nice feature that lets you surf the web without leaving any browsing history or cookies on the computer. You can download files as usual in guest mode, but you cannot add bookmarks or install extensions. In this tutorial we’ll show you how to disable or enable guest browsing mode in Chrome for Windows 10 / 8 / 7.

How to Disable or Enable Guest Browsing Mode in Chrome

  1. Press the Windows key + R keyboard combination to open the Run dialog box. Type in regedit and hit Enter to open Registry Editor.

  2. In the left-hand pane, navigate to HKEY_LOCAL_MACHINE\SOFTWARE\Policies\Google\Chrome. By default, both the “Google” and “Chrome” keys don’t exist. You have to create them manually.
  3. While the “Chrome” key is selected, right-click on the blank area in the right-hand pane, and create a 32-bit DWORD BrowserGuestModeEnabled and leave its value data to 0.

  4. Now, you’ve successfully turned off guest mode in Chrome. Relaunch your Chrome browser and you’ll unable to open a Guest windows any longer.

  5. Whenever you need to force Chrome to always start in guest mode, just open the same registry key and change the value of BrowserGuestModeEnabled to 1.

If you don’t want to manage the guest mode settings later, just delete the DWORD BrowserGuestModeEnabled and you’re done.

2 Ways to Open Chrome in Guest Browsing Mode on Windows 10

October 6th, 2019 by Admin

Chrome browser can be started in guest mode so you don’t leave any traces like cookies, cache or browsing activities on the computer. This is useful when you need to use a public computer for private browsing. In this tutorial we’ll show 2 different ways to launch Chrome in guest browsing mode on Windows 10.

Method 1: Open a Guest Window from within Chrome

Launch the Chrome browser. Click on the Profile icon in the top right corner and then select Open Guest window.

A new window will pop up in guest mode and you can browse privately.

Method 2: Create a Shortcut to Always Start Chrome in Guest Mode

The above method requires so many steps to open a guest window. If you need to use guest mode frequently, it’s a good idea to create a desktop shortcut for launching Chrome in guest mode by default. Follow these steps:

Right-click on the Chrome desktop shortcut and select Properties from the context menu.

Switch to the Shortcut tab. Add “ --guest” at the end of the string present in the Target text box, and then click Apply.

When Chrome asks for administrator permission, click on Continue.

Now, double-click on the Chrome desktop shortcut and it will open a guest window directly.

Easy Ways to Enable Telnet Client in Windows 11 / 10 / 8 / 7

September 29th, 2019 by Admin

Telnet is not recognized as an internal or external command on Windows 10? Starting with Windows 7, telnet is not enabled by default and you have to install it manually. In this tutorial we’ll show you 2 simple ways to enable telnet client in Windows 11 / 10 / 8 / 7.

Method 1: Enable Telnet Client Using Control Panel

  1. Open the Control Panel with Large icons view, and click on Programs and Features.

  2. Click the “Turn Windows features on or off” option in the left pane.

  3. In the Windows Features window, check the checkbox for Telnet Client and click OK.

  4. When complete, you’ll see the “Windows completed the requested changes” message.

  5. Now, you can start using the telnet command from the Command Prompt or PowerShell.

Method 2: Enable Telnet Client Using PowerShell or Command Prompt

  1. Open Windows PowerShell (or Command Prompt) as administrator.
  2. Type the following command and hit Enter. It will take a while to install telnet on your computer.
    dism /online /Enable-Feature /FeatureName:TelnetClient

    Whenever you need to disable or uninstall telnet, run the below command:
    dism /online /Disable-Feature /FeatureName:TelnetClient

That’s it!

How to Fix Secure Boot Violation on UEFI-Based Computer

September 27th, 2019 by Admin

When your computer boots from a Live CD or a installation disk, you may get a red square in the center of a black screen, with the following error message:

“Secure Boot Violation. Invalid signature detected. Check Secure Boot Policy in Setup”

Secure Boot is a feature included on UEFI-based computers, which ensure that only Microsoft-authorized software can be booted. If you try to boot from a trusted but “unauthorized” operating system, you’ll still receive the “Secure Boot Violation” error. To fix this issue, you have to temporarily disable Secure Boot in the UEFI BIOS firmware.

How to Fix Secure Boot Violation on UEFI-Based Computer

  1. When turning on your computer, quickly and repeatedly press a certain key (F2, DEL, F12, ESC, etc.) to enter into UEFI BIOS.
  2. Navigate to the Boot (or Security) tab, select the Secure Boot option and set it to disabled. If the Secure Boot option is greyed out, you may need to enable legacy / CSM support first.

    For ASUS computer’s UEFI BIOS, you have to press F7 to enter Advanced Mode. Go to Boot -> Secure Boot, change OS type from “Windows UEFI mode” to “Other OS”. Secure Boot is enabled when the OS type is set to “Windows UEFI mode” and disabled when it’s set to “Other OS”.

  3. Press F10 to Save the changes and reboot. Your computer should boot up as it is supposed to, without displaying the “Secure Boot Violation” error message.

2 Ways to Uninstall or Install WordPad in Windows 10

September 25th, 2019 by Admin

WordPad has been part of Windows for over decades, but it hasn’t been updated in any real way at all. Starting with Windows 10 build 18963, WordPad has become an optional feature and you can uninstall it with ease. In this tutorial we’ll show you 2 ways to uninstall or install WordPad in Windows 10.

Method 1: Uninstall or Install WordPad Using Settings App

  1. Open the Settings app and click on the Apps category.

  2. On the Apps & features page, click on the Optional features link in the right pane.

  3. When the Optional features page appears, select the WordPad entry in the list and click on Uninstall.

    After restarting Windows 10, you’ll find WordPad has gone.

  4. Whenever you need to install WordPad, open the Optional features page again. Click on the Add a feature button.

  5. Type WordPad and check the WordPad app, click on Install.

    Once that is done, you can use WordPad again.

Method 2: Uninstall or Install WordPad Using Command Prompt

  1. Open the Command Prompt as administrator.

  2. At the Command Prompt, type the following command to uninstall WordPad:
    dism /Online /Remove-Capability /CapabilityName:Microsoft.Windows.WordPad~~~~0.0.1.0

    Or run this command to install WordPad:
    dism /Online /Add-Capability /CapabilityName:Microsoft.Windows.WordPad~~~~0.0.1.0

That’s all!