Author Archive

2 Ways to Export and Import Local Security Policy in Windows 10 / 8 / 7

May 13th, 2019 by Admin

How can I backup local security policy or transfer all policy settings from one system to another? In this tutorial we’ll show 2 simple ways to export and import local security policy in Windows 10 / 8 / 7.

Method 1: Export and Import Local Security Policy with GUI

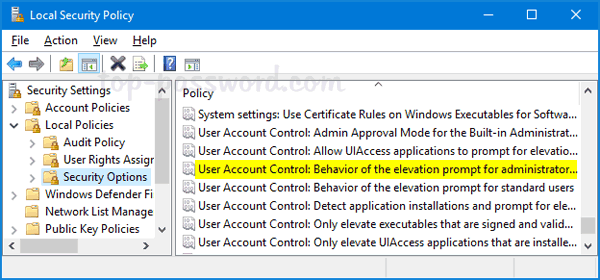
The Local Security Policy Editor comes with the import / export feature, making it much easier to migrate or replicate the same local security policy settings across multiple computers.

Export:

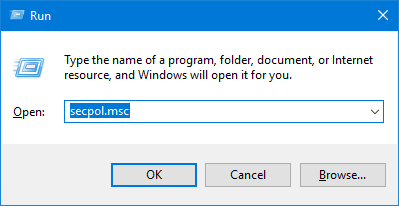
  1. Press the Windows key + R together. When the Run dialog box shows up, type secpol.msc into it and hit Enter to open the Local Security Policy Editor.

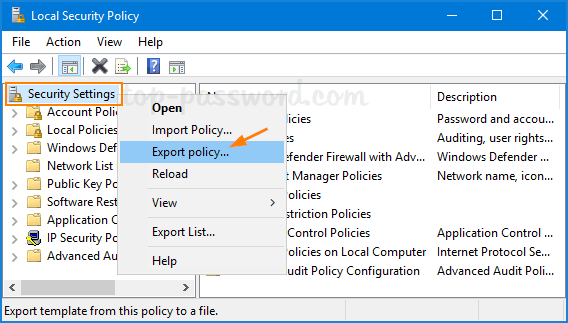
  2. Right-click on Security Settings in the left-side pane, and you can then select “Export policy” from the context menu.

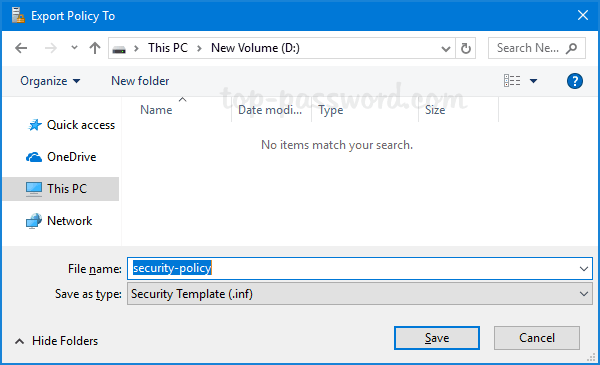
  3. Browse to the location where you want to save the security settings file (.INF), give it a name and click on Save.

  4. Open the .inf file with your text editor. As you can see, it contains all your local security policy, including your account lockout and password policy.

Import:

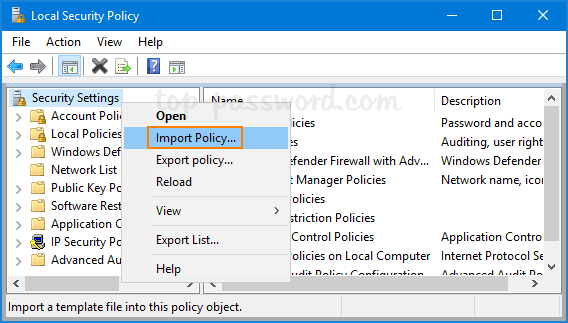
  1. Open the Local Security Policy Editor as before, right-click on Security Settings in the left pane and this time choose “Import policy“.

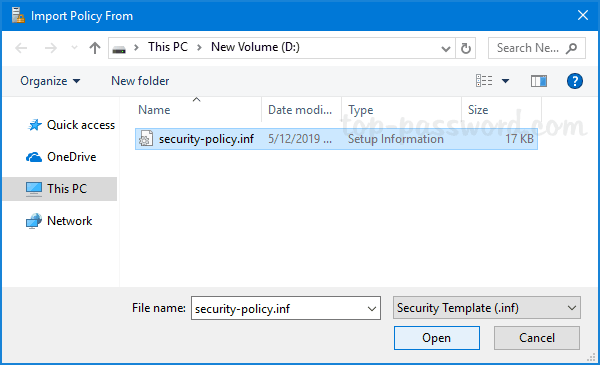
  2. Browse to the location where you saved the security settings file, select the INF file and click on Open.

  3. Reboot your computer to apply the new local security policy.

Method 2: Export and Import Local Security Policy with Command Prompt

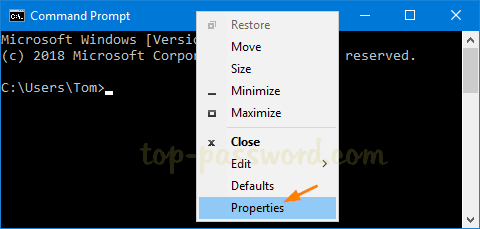
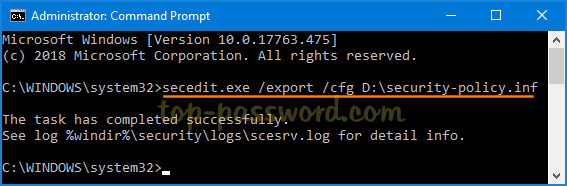
To export the local security policy settings to a file (for example, security-policy.inf), open the Command Prompt as administrator and type the following:
secedit.exe /export /cfg D:\security-policy.inf

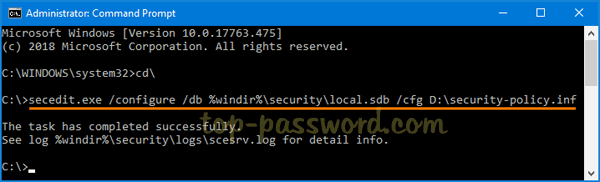
When you need to import the local security policy settings from the .INF file, simply run this command:
secedit.exe /configure /db %windir%\security\local.sdb /cfg D:\security-policy.inf

This method is very useful especially when you’re using the Home edition of Windows which has no Local Security Policy Editor.

How to Hide Wireless Network Password in Windows 10

May 8th, 2019 by Admin

Having Windows remember your WiFi password is a great convenience, but this will also make your wireless password exposed to anyone who has physical access to your computer. Just open the Properties of a WiFi adapter and we can check the “Show characters” option to view the saved wireless network security key/password.

This might inadvertently leak your WiFi password. In this tutorial we’ll show you a simple way to hide wireless password from the WiFi adapter’s properties window in Windows 10.

How to Hide Wireless Network Password in Windows 10

  1. Open the Registry Editor. Copy and paste the below line into the address bar and then hit Enter.
    HKEY_CLASSES_ROOT\AppID\{86F80216-5DD6-4F43-953B-35EF40A35AEE}

  2. Right-click on the subkey named {86F80216-5DD6-4F43-953B-35EF40A35AEE} in the left-side pane and then select Permissions from the context menu.

  3. Click on Advanced button.

  4. By default TrustedInstaller is showing up as the owner, and we need to click the Change link.

  5. Type the name of your Administrators group and then click the “Check Names” button to validate the account name. When that’s done, click OK.

  6. Now, back to the Advanced Security Settings window. Just keep the permission entry for the “System” account and remove all other entries from the list. When done, click OK.

  7. From now on, you should no longer be able to view your wireless password from the WiFi network adapter’s Properties window.

  8. However, this won’t prevent users from recovering your wireless password using third-party password cracking software or other methods described in this article: 3 Ways to Find Saved Wi-Fi Passwords on Windows 10

Whenever you need to get the the “Show characters” option back to work again, just grant your account access to the registry key: HKEY_CLASSES_ROOT\AppID\{86F80216-5DD6-4F43-953B-35EF40A35AEE}. Follow these steps:

  1. Open Registry Editor and navigate to HKEY_CLASSES_ROOT\AppID\{86F80216-5DD6-4F43-953B-35EF40A35AEE}. Right-click on the {86F80216-5DD6-4F43-953B-35EF40A35AEE} subkey and select Permissions.
  2. Click on Add button.

  3. Type Administrators in the “Enter the object names to select” text box, and click on Check Names button. If there is no error found, click OK.

  4. Back at the Permissions window, select the Administrators group and then click the Allow check box next to the “Full Control” permission.

  5. Click OK and close Registry Editor.

3 Ways to Change Screen Buffer Size in Windows Command Prompt

May 6th, 2019 by Admin

How can I increase the screen buffer size of Command Prompt? The screen buffer size of Command Prompt is expressed in terms of a coordinate grid based on character cells:

  • The width is the number of characters that are displayed on a line in the Command Prompt window. The larger the width size, the more characters will show in the same row before wrapping.
  • The height is the number of lines that are stored in the memory.

In this tutorial we’ll show you 3 simple ways to permanently or temporarily change screen buffer size of Command Prompt in Windows 10 / 8 / 7.

Note: Screen buffer size set using Method 2 and Method 3 will only be temporary and as soon as you close the Command Prompt the changes will be lost.

Method 1: Permanently Change Screen Buffer Size of CMD in Properties

  1. Right-click on the title bar of the Command Prompt window, and then select Properties from the context menu.

  2. Go to the Layout tab. Under the “Screen Buffer Size” section you can set the desired width and height. If the screen buffer size is greater than the Window Size, then scroll bars will be displayed as required.

  3. Click OK to apply.

Method 2: Temporarily Change Screen Buffer Size of CMD Using Mode Command

  1. When the Command Prompt window is open, you can temporarily change the screen buffer size by typing this command:
    mode con:cols=Width_Size lines=Height_Size

    Substitute “Width_Size” with the value you want for the screen buffer width size and “Height_Size” with the value you want for the screen buffer height size.

  2. As soon as you hit Enter, the current Command Prompt window will resize to apply your new screen buffer size.

Method 3: Temporarily Change Screen Buffer Size of CMD Using Batch / Script

If you need to change screen buffer size from a Windows batch script, just add the following lines:

@echo off
cmd.exe /k "mode con:cols=100 lines=3000"

This will change screen buffer width to 100, and set the height size to 3000. You can make any adjustment you like for the width and height value.

How to Find AD User Creation Date in Windows Server

April 29th, 2019 by Admin

How can I find out when a user account was created in Active Directory? Is there a way to list all AD users created in the last 30 days? It’s vitally important to monitor user account creations in order to reduce the risk of security breaches. In this tutorial we’ll show you different ways to find when a specific AD user was created, and list all recently created accounts in Active Directory.

Part 1: Find the Creation Date of Specific AD User

  1. In Active Directory Users and Computers snap-in, click on the View menu and select Advanced Features.

  2. Expand the domain and choose Users in the left-hand pane, you’ll see a list of AD users. Right-click on the account for which you want to find out the creation date, and select Properties.

  3. Go to the Object tab and you can view the date and time when the account has been created.

Additionally, you can also find out the user account creation date using PowerShell. Just type the following command and hit Enter.
Get-ADUser your_username -Properties whenCreated

Part 2: List All Recently Created Accounts in Active Directory

When you need to find a list of users created in Active Directory in the last 30 days, just open PowerShell with elevated privileges and execute the below commands:

$DateCutOff = (Get-Date).AddDays(-30)
Get-ADUser -Filter * -Properties whenCreated | where {$_.whenCreated -gt $DateCufOff} | FT Name, whenCreated

The first command uses the AddDays method to minus 30 days from the current date, while the second command pulls only accounts created after a certain date stored in $DateCutOff.

How to Enable Quick Removal Policy for USB Drives in Windows 10 / 8 / 7

April 28th, 2019 by Admin

Do you really need to safely eject a USB drive before pulling it out of your computer? Windows has two different policies you can select for each individual USB drive:

  • Quick removal – This will disable write caching on the USB device, and your data will be written to physical drive in real-time. So you will be able to disconnect your USB drive even without using the “Safely Remove Hardware” option.
  • Better performance – This will cache the write operations to optimize performance and your data will be written to physical drive at a later time. Before unplugging your USB drive, you have to click the “Safely Remove Hardware” icon appears in the system tray to tell Windows to write all the cached data to disk.

If you don’t bother with safely removing USB devices before unplugging them, follow this tutorial to enable Quick Removal policy for USB drives in Windows 10 / 8 / 7.

How to Change Removal Policy for USB Drives in Windows

  1. To get started, you need to open the Disk Management tool. If you’re running Windows 10, just hit the Windows key + X together and you can then select “Disk Management” from the menu.

  2. Find your USB drive in the lower section of the Disk Management window, right-click its name and choose Properties from the pop-up menu.

  3. Switch to the Policies tab and you can change the removal policy to Quick removal. Click OK to save your change. Note that This change only applies to this specific USB device.

  4. That’s it! Whenever the activity light on your USB drive is no longer blinking, you can directly remove the device without bothering to click the Safely Remove Hardware notification icon.

Updates: In earlier versions of Windows the default removal policy applied to USB drives was Better Performance. With the release of Windows 10 version 1809, Microsoft has changed its default policy to Quick Removal.

How to Change Local / Domain Admin Password Using Windows PowerShell

April 25th, 2019 by Admin

Need to write a PowerShell script for changing a local account’s password? We’ve covered various ways of resetting Windows password in the past, but this tutorial will teach you how to change the password of either local account or domain account using Windows PowerShell.

How to Change Local / Domain Admin Password Using PowerShell

  1. Open Windows PowerShell as Administrator.

  2. First, you have to convert your new password to encrypted string by running the following command. Be sure to replace P@ssw0rd with the new password you want to set for your account.

    $NewPassword = ConvertTo-SecureString "P@ssw0rd" -AsPlainText -Force

  3. Next, type the following command to change your local account password. Substitute Tom in the command below with the actual user name of the local account that you want to change the password of.
    Set-LocalUser -Name Tom -Password $NewPassword

    If you need to change domain user password, run the following command instead:
    Set-ADAccountPassword Tom -NewPassword $NewPassword –Reset

  4. After completing the above steps, reboot your computer and you can log in to your local / domain account with the new password.

How to Make Windows Clear Pagefile at Shutdown for Added Security

April 24th, 2019 by Admin

Pagefile is a hidden system file used by Windows to swap data back and forth between RAM and physical drive. When your RAM is insufficient to hold every running program, some of the program’s memory (including sensitive data and passwords) will be moved to the pagefile.

Pagefile is well protected while Windows is running, but the data within it persists after a shutdown. A malicious user who has physical access to your PC can extract sensitive data from the pagefile by booting a Live CD. To prevent such potential security risk, you can configure Windows to automatically clear the paging file on every shutdown.

Method 1: Make Windows Clear Pagefile at Shutdown Using GPO

  1. Press the Windows logo key and the R key simultaneously. Once the Run dialog box is opened, type secpol.msc into it and click OK.

  2. Navigate to Security Settings -> Local Policies -> Security Options. On the right pane, double-click on the “Shutdown: Clear virtual memory pagefile” policy.

  3. Select the Enabled radio option, and then click on Apply and then OK.

  4. Restart your computer to make sure the changes take effect.

Method 2: Make Windows Clear Pagefile at Shutdown Using Registry Editor

  1. Open the Registry Editor and browse to the following key:
    HKEY_LOCAL_MACHINE\SYSTEM\CurrentControlSet\Control\Session Manager\Memory Management

    Next, double-click on a 32-bit DWORD value named ClearPageFileAtShutdown in the right pane.

  2. Change the current default value from 0 to 1. Click OK to save the changes.

  3. Restart Windows to apply your changes. Whenever you shut down your PC, Windows will automatically clear the pagefile for added security.

3 Ways to Cancel Print Jobs in Windows 10

April 23rd, 2019 by Admin

Print jobs are stuck in queue and you need to clear the print spooler? How can I prevent further documents from being printed? In this tutorial we’ll show you 3 simple ways to cancel a stuck or accidental print job from the queue, saving you lots of time and paper.

Method 1: Cancel Print Jobs Using Control Panel

Open the “Devices and Printers” applet in the Control Panel. Right-click on the printer that is being used and select “See what’s printing” from the context menu.

This shows a list of print jobs that are in the queue. In order to cancel printing a document, just right-click it and select Cancel.

Method 2: Cancel Print Jobs Using the Settings App

Open the Settings app and click on Devices.

Go to the Printers & scanners tab. On the right side pane, select your printer and then click on the “Open queue” button appeared beneath the printer name.

Now, you can right-click on any print job and then click Cancel to clear it from the print queue.

Method 3: Cancel Print Jobs Using Command Prompt

Open the Command Prompt as Administrator. Run the following commands to delete all .shd and .spl files from C:\WINDOWS\system32\spool\PRINTERS and restart the Print Spooler service.

net stop spooler
del /F /S /Q %systemroot%\System32\spool\PRINTERS\*
net start spooler

The print queue on your Windows 10 PC should now be cleared. Of course, you can create a batch file to execute the above commands, so you can cancel all your print jobs with just a single mouse click!

Easy Ways to Find BitLocker Recovery Key from Active Directory

April 19th, 2019 by Admin

BitLocker is prompting for a recovery key and you lost it? Applying the GPO to store BitLocker recovery password in Active Directory is a good practice for companies when data security is a concern. In this tutorial we’ll show you different ways to find BitLocker recovery key/password from Active Directory or Azure AD.

Method 1: Find BitLocker Recovery Key in AD Using PowerShell

  1. Press the Windows key + X and then select “Windows PowerShell (Admin)” from the Power User Menu.

  2. Copy and paste the following script into the PowerShell console and hit Enter. Substitute “PCUnlocker” with the name of the computer you want to locate BitLocker recovery key for.

    $objComputer = Get-ADComputer PCUnlocker
    $Bitlocker_Object = Get-ADObject -Filter {objectclass -eq 'msFVE-RecoveryInformation'} -SearchBase $objComputer.DistinguishedName -Properties 'msFVE-RecoveryPassword'
    $Bitlocker_Object

  3. It will retrieve all details from the ‘msFVE-RecoveryInformation‘ objects attached to your target computer. The msFVE-RecoveryPassword item is the BitLocker recovery key you’re looking for.

Method 2: Using BitLocker Recovery Password Viewer Utility

If you’ve enabled the BitLocker Recovery Password Viewer feature in Active Directory, it’s pretty simple to retrieve BitLocker recovery key for any computer in AD. Follow these steps:

  1. After opening the Active Directory Users and Computers snap in, expand your domain and click the Computers container. Right-click on your target computer object and select Properties.

  2. Go to the Bitlocker Recovery tab, you can view all BitLocker recovery keys that were automatically backed up to AD.

If you know the first 8 digits of the Password ID, here’s how to search your BitLocker recovery keys:

  1. Right-click on your domain in the left pane of Active Directory Users and Computers snap in, and then select Find BitLocker recovery password.

  2. Enter the first 8 characters of Password ID and click on Search.

  3. It will locate the matching BitLocker recovery keys that are stored in your Active Directory.

Method 3: Locate BitLocker Recovery Key in Azure AD

Once the BitLocker recovery key is backed up to Azure AD, users can find their own keys in the Profile section after signing into https://account.activedirectory.windowsazure.com/profile/. Administrators can log in to https://account.activedirectory.windowsazure.com/n/#/devices, select the appropriate device, and click View Details to get the BitLocker recovery key.