Author Archive

Use GPO to Automatically Save BitLocker Recovery Key in Active Directory

April 17th, 2019 by Admin

As a system administrator, you may find it’s difficult to keep track of BitLocker recovery keys for all computers in company network, especially when number of machines is more than 100. In this tutorial we’ll show you how to set the group policy to automatically backup BitLocker recovery information to Active Directory, so you can centrally manage the recovery keys/passwords in one place.

How to Configure GPO to Automatically Save BitLocker Recovery Key to AD

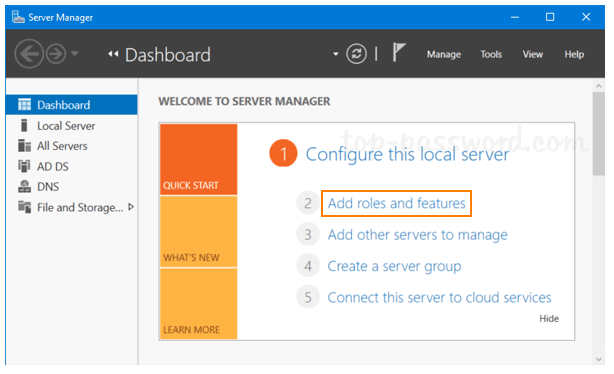
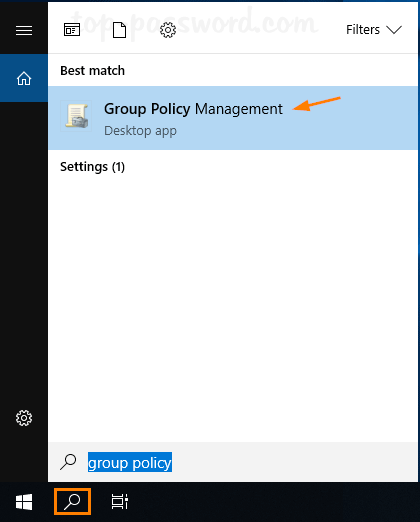
  1. Click the Search icon in the taskbar and type “group policy“. You can then click Group Policy Management to launch it.

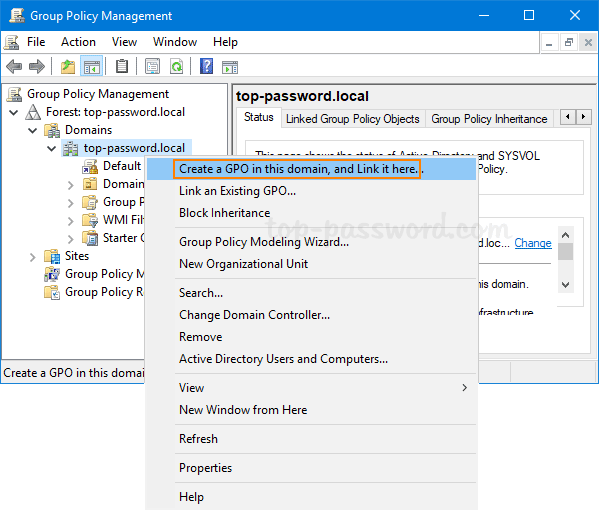
  2. Now in the left pane of Group Policy Management, right-click your AD domain and select “Create a GPO in this domain, and Link it here…” from the menu.

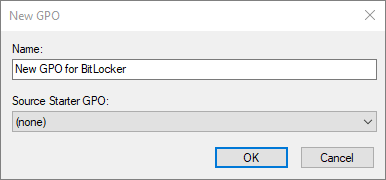
  3. In the New GPO dialog, give the GPO a name and click OK.

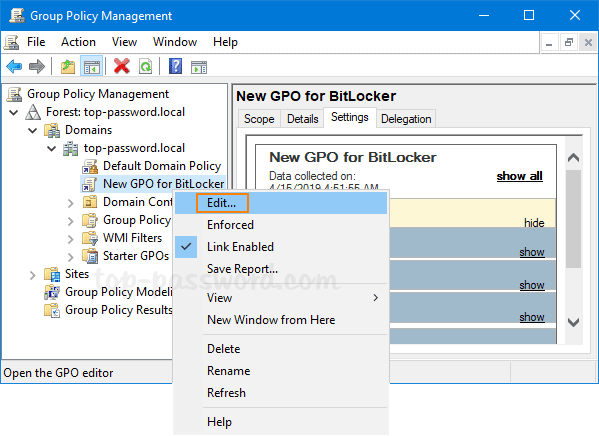
  4. Right-click the newly-created GPO in the left pane, and select Edit.

  5. Browse to Computer Configuration -> Policies -> Administrative Templates -> Windows Components -> BitLocker Drive Encryption, and then double-click the policy “Store BitLocker recovery information in Active Directory Domain Services“.

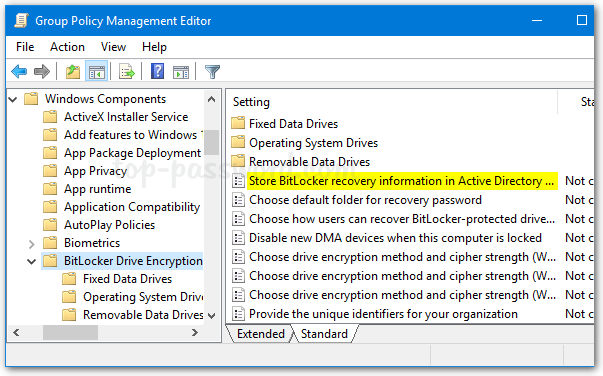
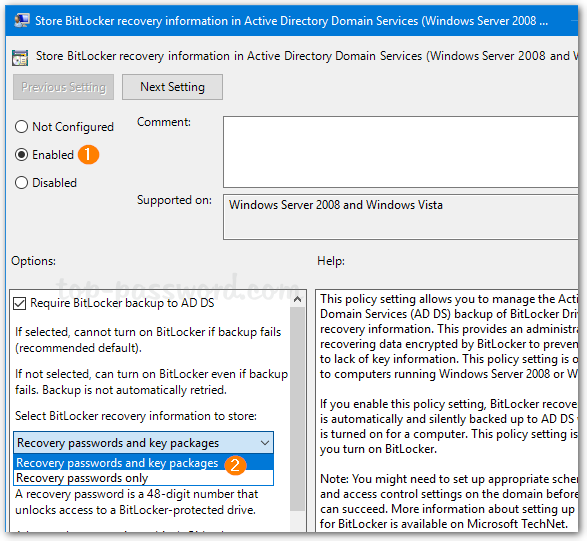
  6. Set the policy to Enabled. Make sure the “Require BitLocker backup to AD DS” option is checked, and select to store both recovery passwords and key packages.

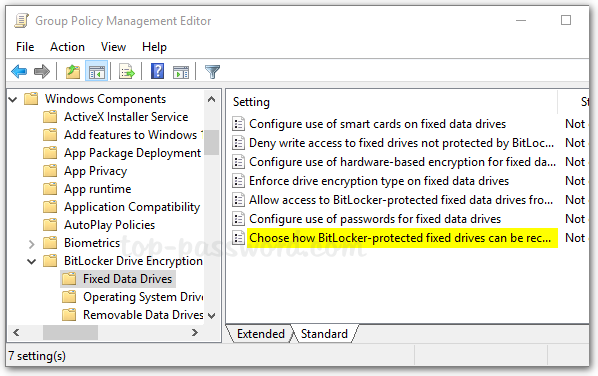
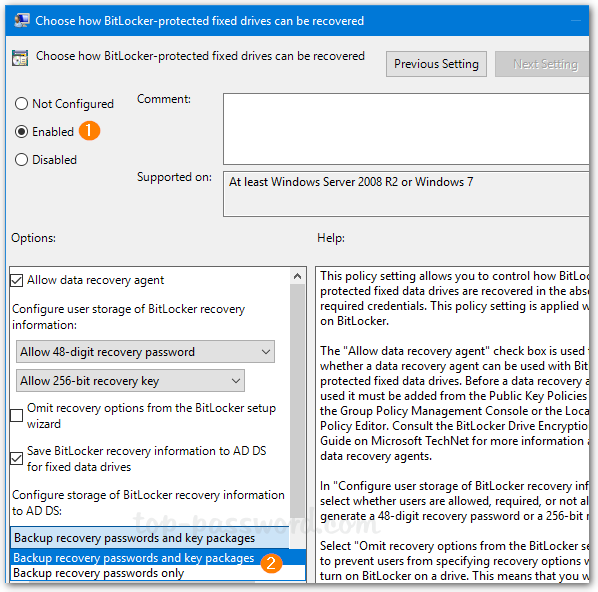
  7. Next, expand BitLocker Drive Encryption in the left pane. You’ll see three nodes: Fixed Data Drives, Operating System Drives, Removable Data Drives. Just select Fixed Data Drives and double-click the policy “Choose how BitLocker-protected fixed drives can be recovered“.

  8. Set it to Enabled. Check the options “Save BitLocker recovery information to AD DS for fixed drives” and then click OK.

  9. Go to the “Operating System Drives” node and turn on the similar policy “Choose how BitLocker-protected operating system drives can be recovered“. Afterwards, go to the “Removable Data Drives” node and enable the policy “Choose how BitLocker-protected removable drives can be recovered“.
  10. When any client PC retrieves the policy changes, BitLocker recovery information will be automatically and silently backed up to AD DS when BitLocker is turned on for fixed drives, OS drives or removable drives.

Manually Backup BitLocker Password to AD with PowerShell

If you have enabled BitLocker prior to configuring the above GPO policy, you can use PowerShell cmdlets to manually upload the BitLocker recovery key to Active Directory. Follow these steps:

  1. When your BitLocker-protected drive is unlocked, open PowerShell as administrator and type this command:
    manage-bde -protectors -get D:

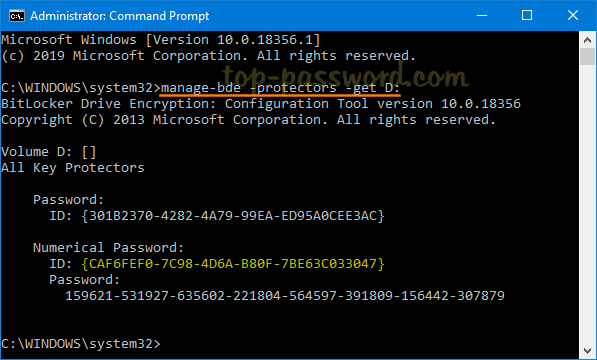
    What you need to take note of is the Numerical Password ID.

  2. Next, type the following command to backup your BitLocker recovery password to Active Directory. Remember you have to use the Numerical Password ID obtained on the previous step.
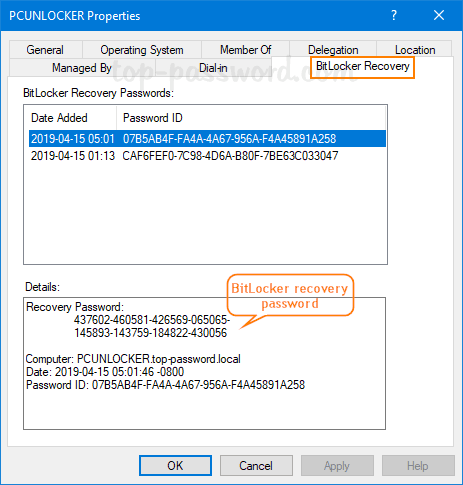
    manage-bde -protectors -adbackup D: -id {CAF6FEF0-7C98-4D6A-B80F-7BE63C033047}

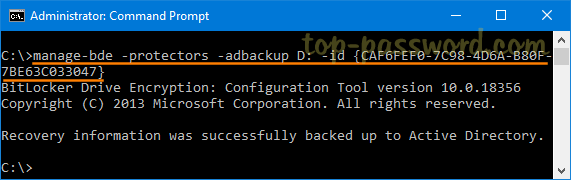
  3. When that completes, you will receive the message “Recovery information was successfully backed up to Active Directory.

2 Methods to Install BitLocker Recovery Password Viewer for Active Directory

April 16th, 2019 by Admin

BitLocker Recovery Password Viewer tool is an optional feature included with Windows Server 2008 – 2019, which lets you store and view BitLocker recovery keys in AD for all client computers. By default, this feature is not installed and BitLocker Recovery tab in ADUC is missing. In this tutorial we’ll show you 2 methods to install BitLocker Recovery Password Viewer for Active Directory in Windows Server 2008/2012/2016/2019.

Method 1: Install BitLocker Recovery Password Viewer Using Server Manager

  1. Open Server Manager and click on “Add roles and features“.

  2. Click Next through the wizard until you get to the Server Roles page. Make sure “Active Directory Domain Services” is checked.

  3. In the Features page, check the “BitLocker Drive Encryption” feature.

    For Windows Server 2008, you need to expand Remote Server Administration Tools –> Feature Administration Tools and check the option for “BitLocker Drive Encryption Administration Utilities

  4. If you’re prompted to confirm adding features that are required for BitLocker Drive Encryption, click on Add Feature button.

  5. Once completing the wizard, take a look at the Computer Properties dialogue box in Active Directory Users And Computers, you’ll see the BitLocker Recovery tab.

Method 2: Install BitLocker Recovery Password Viewer Using PowerShell

If you need to install BitLocker Recovery Password Viewer on a server running Windows Server Core, try this method:

  1. Press the Windows key + X or right-click on the Start button to open the context menu, then select Windows PowerShell (Admin).

  2. Run the following command to add the optional “BitLocker Drive Encryption” feature:
    Install-WindowsFeature BitLocker -IncludeAllSubFeature -IncludeManagementTools

  3. When it’s done, you’ll be prompted to restart your server to finish the installation process.

3 Ways to Clear Clipboard History in Windows 10

April 12th, 2019 by Admin

When you use Ctrl + C to copy text, images or other information in Windows, your data will be stored in the clipboard temporarily so you can then paste it somewhere else. Clipboard works as a temporary repository for data during copy-and-paste operations. In this tutorial we’ll show you different ways to clear clipboard history in Windows 10.

Method 1: Add An Empty Item to Clipboard History

Press the Windows key + R to open the Run box, then type cmd /c “echo off | clip” and hit Enter.

This command will add an empty item to the clipboard history so you then can’t paste anything anywhere. This method could also be used to clear clipboard history in Windows 8, 7, Vista.

Method 2: Clear All Clipboard History Data from Settings App

Open the Settings app and navigate to System -> Clipboard. On the right pane, you can turn off the “Clipboard history” toggle switch to prevent Windows clipboard from saving multiple items. In this case, only the last item you copied into the clipboard will be saved.

When the “Clipboard history” feature is turned on, you can click the “Clear” button to manually clear all history items from the clipboard.

Method 3: Clear Specific Item in Clipboard History

Just press the Windows key + V in any application, a Clipboard panel will appear where you’ll see a list of items (such as text and images) that you have recently copied from different applications.

Click on the three dots icon on the upper-right part of the clipboard item you want to delete. When the pop-up menu appears, you can select Delete to clear it.

That’s it!

Windows 10: Hide or Unhide Folders / Files Using Command Prompt

April 11th, 2019 by Admin

Is there a way to hide important files to prevent accidental deletion? In this tutorial we’ll show you how to hide or unhide folders / files in Windows 10 using Command Prompt.

Hide Folders or Files

When you’re going to hide a specific folder or file, open up the Command Prompt and type:
attrib +h "your_folder_or_file"

This command will assign the “Hidden” attribute to your target folder or file, and make it disappear from the File Explorer view.

If you need to hide all files and subfolders in your target location (for exmaple, D:\demo), run this following command:
attrib +h "d:\demo\*" /s /d

List Hidden Files

If you need to list hidden files and folders while in Command Prompt, use the CD command to change your working directory and then type:

dir /a:h

This will show all hidden folders or files in that location.

Unhide Folders or Files

When you need to unhide a specific folder or file, execute this command:
attrib -s -h "your_hidden_folder_or_file"

In order to unhide all hidden files and subfolders under a location (e.g. D:\demo), type this command:
attrib -s -h "d:\demo\*" /s /d

That’s it! The built-in option to hide folders/files is pretty easy but it’s not secure because anyone can unhide them the easy way. If you need to hide sensitive files from prying eyes, it’s a good idea to use third-party softwares (for instance, Protect My Folders) to hide and lock your folders/files with a password.

How to Fully Shutdown Windows 10 Instead of Hibernating It

April 10th, 2019 by Admin

By default, Windows 10 enables a feature called Fast Startup (Hybrid Shutdown) that can shut down and boot up your PC much faster than Windows 7 or previous versions of Windows. When you shutdown Windows 10, you’re actually performing a partial hibernation.

If you prefer to have your PC completely shut down, you can either turn off Fast Startup feature or use the following methods to fully shutdown Windows 10.

Method 1: Perform a Full Shutdown Using Shift Key

We’ve covered many different ways to shutdown Windows 10 in the past, but you might not realize that Windows 10 is just doing a hybird shutdown by default. If you would like to perform a full shutdown, simply hold down the SHIFT key on your keyboard and then click the “Shut down” option in the Start Menu, or on the sign-in screen.

Method 2: Perform a Full Shutdown Using Command Prompt

Just open an elevated Command Prompt or PowerShell window, type the following command and press Enter:

shutdown /s /f /t 0

This will immediately close any open applications without prompting to save your work, and completely shut down your PC.

Conclusion

The Fast Startup feature can make your computer boot up faster, saving valuable seconds every time you turn on Windows 10. However, if your Windows 10 was installed on a speedy solid-state drive (SSD), Fast Startup don’t actually make any difference and a full shutdown is recommended.

How to Change Other User Password on Mac OS X

March 26th, 2019 by Admin

How can I reset a forgotten Mac password with another admin account? If you have more than one user account on your Mac, try signing in with a different admin account and you can change other user password with ease.

Method 1: Change Other User Password on Mac from Users & Groups

  1. Click the ‘Apple’ logo in the menu bar, and then select System Preferences.

  2. When the System Preferences window opens, click on the Users & Groups icon.

  3. Click the lock icon in the bottom left corner to unlock the settings. Enter your current Mac account password and click Unlock.

  4. From the list of users on the left side, select the account you’ve forgotten the password for and then click on Reset Password button.

  5. Fill in the new password twice and set up a password hint, and then click on Change Password.

  6. Now you can log in to your locked Mac account with the new password.

Method 2: Change Other User Password on Mac Using Terminal

Using the terminal you can change other user password without old password on macOS High Sierra or earlier versions. However, since macOS 10.14 Mojave the terminal still requires you to provide the old password.

  1. Open up the Terminal window and type the following command:
    sudo passwd account_name

  2. Once pressing Enter, you’ll firstly be prompted to enter the password of the current admin account you’re logging into. After that, you need to enter the new password twice for your target account. If you’re running macOS Mojave, the old password is required before you can set a new password.

3 Ways to Open and Mount ISO File on Mac OS X

March 25th, 2019 by Admin

Looking for a way to open an .ISO file on your Mac? ISO files are often used to distribute bootable utilities for DOS, Windows, Linux or other operating systems. In this tutorial we’ll show you 3 easy ways to open and mount ISO file on macOS High Sierra.

Method 1: Open and Mount ISO file on Mac with DiskImageMounter

  1. To start, open a Finder window and navigate to the location of your ISO file, then right-click on it and select “Open With” -> “DiskImageMounter (default)“.

  2. A new drive will now appear on your desktop. You can double-click it to open the drive and view the contents of your ISO image.
  3. When you no longer need to access the mounted drive, just right-click on it and select Eject.

Method 2: Open and Mount ISO file on Mac Using Disk Utility

  1. Click the “Finder” icon in the dock. select Applications in the sidebar, then double-click the Utilities folder and then double-click Disk Utility.

  2. Once Disk Utility is open, click the File tab on the menu bar and then select Open Disk Image.

  3. Next, select any ISO image you want to mount, and click Open.

Method 3: Open and Mount ISO file on Mac Using Terminal

  1. Open up a Terminal window and you can mount an ISO image by executing the following command. Note down the name of the destination mount point (e.g. /Volumes/PCUnlocker) as we need to use it to unmount the disk.
    hdiutil mount ~/PathToYourISO/filename.iso

  2. When you no longer need to work with the ISO, here’s how to unmount it:
    hdiutil unmount /Volumes/mount-point

That’s it!

Create Windows 10 bootable USB from ISO on Mac without BootCamp

March 21st, 2019 by Admin

How can I make a bootable Windows installation USB on Mac OS X? After upgrading to macOS Mojave, you may find that Boot Camp Assistant is no longer supported and thus creating a bootable USB turns out to be a little bit challenging. In this tutorial we’ll show you how to create Windows 10 bootable USB from ISO on Mac, by using the Terminal or third-party software like UNetbottin.

Method 1: Create Windows 10 Bootable USB on Mac Using UNetbottin

UNetbootin is a free, open source utility that allows you to create bootable USB drives on Windows, Linux, and Mac OS X. If you’ve downloaded Windows 10 ISO image, here is how you can create a bootable Windows installer USB on Mac using UNetbootin.

  1. Plug a USB drive into your Mac and open Disk Utility. Select your USB drive from the left panel and click on Info button. Note down the device name since we will need that later.

  2. Next, download and launch the UNetbottin utility. Select the “Diskimage” radio button, click “” to select a bootable ISO image.

  3. After locating your Windows 10 ISO file, click on Open.

  4. Choose Type as USB Drive and select the device name of your USB drive (you probably would’ve noted it down earlier, so refer to that). Click OK to start installing to the USB drive.

  5. This process takes several minutes or longer, depending on the size of your selected ISO image.

Method 2: Create Windows 10 Bootable USB on Mac Using Terminal

Of course, if you prefer not to use third-party software, you can still use the excellent Terminal app, which is a little bit more involved, but no additional software needs to be installed. Follow these steps:

  1. After connecting a USB drive to your Mac, open a Terminal window and type diskutil list to display all the disks attached to your machine. You have to figure out the disk identifier of the USB drive you need to format. In my example, my USB drive is mounted as “disk2” and it’s about 32GB.

  2. Next, run the following command to format your USB drive and name it “WIN10“, where # is a placeholder for the disk identifier of your USB drive.
    diskutil eraseDisk MS-DOS "WIN10" GPT disk#

  3. Now, mount your Windows 10 ISO image with the command below, assuming it’s saved the Downloads folder. In my case, it is mounted as a volume named “ESD-ISO“.
    hdiutil mount ~/Downloads/your_windows_10_image.iso

  4. Finally, run the following command to copy all the files from the mounted ISO to your USB drive.
    cp -rp /Volumes/ESD-ISO/* /Volumes/WIN10/

    This command will take a while, and once it finishes, you can disconnect the mounted ISO with this command:
    hdiutil unmount /Volumes/ESD-ISO

  5. Now you should be able to boot from the USB to install Windows 10 on your Mac or Windows machine.

Conclusion

These should be the easiest ways to create a Windows 10 bootable USB from ISO on Mac, without using Boot Camp Assistant. No matter which method you prefer, be sure that you backup any important data on your USB drive, as the procedure of creating bootable USB will delete everything on it.