Author Archive

Fix: “Network connectivity in Standby” Missing from Power Options in Windows 10

February 20th, 2019 by Admin

Lost network connectivity after your PC enters into standby mode? How can I prevent standby mode from disconnecting WIFI? If you want to take control over network connectivity in standby, just follow this tutorial to add the “Network connectivity in Standby” option to the Power Options in Windows 10.

Method 1: Add “Network connectivity in Standby” to Power Options Using Registry Editor

  1. Open Registry Editor.
  2. Paste the following path into the Registry Editor’s address bar and hit Enter, then double-click the DWORD Attributes on the right side pane to modify.

  3. In order to restore the missing option “Network connectivity in Standby”, you have to change its value from 1 (default) to 2. Click OK.

  4. Close Registry Editor and open the Power Options. If you enable “Network connectivity in Standby” for both “On battery” and “Plugged in“, Windows will keep internet connection active while in sleep mode.

Method 2: Add “Network connectivity in Standby” to Power Options Using Command Prompt

  1. Open the Command Prompt as administrator.
  2. Type the following command and hit Enter. This will add the “Networking connectivity in Standby” in Power Options immediately.
    powercfg -attributes F15576E8-98B7-4186-B944-EAFA664402D9 -ATTRIB_HIDE

    If you want to hide the “Networking connectivity in Standby” option later on, run this command instead:

    powercfg -attributes F15576E8-98B7-4186-B944-EAFA664402D9 +ATTRIB_HIDE

That’s it!

3 Steps to Change Default Font for Mail App in Windows 10

February 14th, 2019 by Admin

The default font in Windows 10 Mail is too small? Starting with Windows 10 version 1903, Microsoft added a new option for the Mail app (v16.0.11231.20082) that lets you customize the font for incoming and outgoing mail. In this tutorial we’ll walk you through the steps to change default font for built-in Mail app in Windows 10.

3 Steps to Change Default Font for Mail App in Windows 10

  1. Open the Mail app by clicking the Start button in the screen’s bottom-left corner and then choosing Mail.

  2. Click the gear icon to open its Settings pane, and then select Default Font.

  3. Select an account from the drop-down box and then customize the font face, font size, and color you wish to set as the default for the Mail app, and click Save.

    If you want to use the same font for all your email accounts, just check the “Apply to all accounts” option. The Reset button will restore the font settings back to the default.

That’s it!

Add User to Remote Desktop Users Group in Windows 10

February 13th, 2019 by Admin

By default, only the administrative users are allowed to remotely connect to your Windows 10 PC through remote desktop connection (RDP). In this tutorial we’ll show you different ways to add non-Administrative user to Remote Desktop Users group in Windows 10 and grant remote desktop access.

Method 1: Add User to Remote Desktop Users Group via Settings App

  1. Open the Settings app and go to System -> Remote Desktop. Click on the Select users that can remotely access this PC link on the right side.

  2. When the Remote Desktop Users dialog opens, click on Add.

  3. Click on Advanced.

  4. Click on Find Now and then select any user account you want to add to the “Remote Desktop Users” group, and click OK.

  5. Click OK and you’re done.

Method 2: Add User to Remote Desktop Users Group via lusrmgr.msc

  1. Press the Windows key + R to open the Run box, then type lusrmgr.msc and hit Enter.

  2. Expand Local Users and Groups -> Groups in the left pane, then double-click the “Remote Desktop Users” group in the right pane.

  3. In the Remote Desktop Users Properties window, click on Add.

  4. Click on Advanced.

  5. Click on the Find Now button, then select a user account you want to add as a member of the Remote Desktop Users group and click OK.

  6. Click OK and you’ve successfully added a non-Administrative user to Remote Desktop Users group.

Method 3: Add User to Remote Desktop Users Group via Command Prompt

  1. Open up the Command Prompt as administrator.
  2. Type the following command and hit Enter. Replace the “UserName” with the actual user account you want to add to Remote Desktop Users group.

    net localgroup "Remote Desktop Users" "UserName" /add

    If you need to remove a user from the Remote Desktop Users group, run this command:

    net localgroup "Remote Desktop Users" "UserName" /delete

Method 4: Add User to Remote Desktop Users Group via PowerShell

  1. Open up the elevated PowerShell.
  2. To grant Remote Desktop access to a user, you can add it to the Remote Desktop Users group by executing this command:

    Add-LocalGroupMember -Group "Remote Desktop Users" -Member "UserName"

    When you want to remove a user from Remote Desktop Users, run the following command:

    Remove-LocalGroupMember -Group "Remote Desktop Users" -Member "UserName"

That’s it!

3 Methods to Suspend or Resume BitLocker Protection in Windows 10

February 11th, 2019 by Admin

If you’ve enabled BitLocker with TPM, performing a firmware (BIOS or UEFI) update will be interpreted as a boot attack and the computer will require you to enter BitLocker recovery key during boot. To get around this issue, you can suspend BitLocker protection before updating BIOS/UEFI. When the update is complete you can resume BitLocker. That way, you won’t have to enter the recovery key at all. In this tutorial we’ll show you 3 ways to suspend or resume BitLocker protection in Windows 10.

Method 1: Suspend or Resume BitLocker Protection from Control Panel

  1. Open the Control Panel and set the View by option to Large icons, then click on BitLocker Drive Encryption.

  2. Click the Suspend protection link next to your desired BitLocker encrypted drive.

  3. Click Yes to confirm.

  4. Now, your drive will now list its status as suspended with a exclamation point inside a yellow triangle over the drive logo. When you need to resume BitLocker protection, right-click on your drive in File Explorer and then select Resume BitLocker protection.

Method 2: Suspend or Resume BitLocker Protection from Command Prompt

  1. To get started, open the Command Prompt as administrator.
  2. In order to suspend BitLocker protection, type the following command and press Enter. Replace C: with the drive letter of your BitLocker drive you want to suspend.

    manage-bde -protectors -disable C:

  3. When you need to resume BitLocker protection, execute the following command and you’re done.

    manage-bde -protectors -enable C:

Method 3: Suspend or Resume BitLocker Protection from PowerShell

  1. Open Windows PowerShell as administrator. Type the command below to suspend BitLocker protection for your desired drive.

    Suspend-BitLocker -MountPoint "C:"

  2. To resume BitLocker protection for your suspended drive, run the following command:

    Resume-BitLocker -MountPoint "C:"

That’s it!

4 Ways to Find Number of Cores in your CPU on Windows 10

January 31st, 2019 by Admin

How to find out how many physical cores and logic cores your CPU has? Need to check the CPU core before you buy a new laptop? In this tutorial we’ll show you 4 simple ways to find number of physical cores and logical cores in your CPU on Windows 10.

Physical Core VS. Logical Core

A physical core is an actual physical processor core in your CPU. Each physical core has its own circuitry and its own L1 (and usually L2) cache can read and execute instructions separately (for the most part) from the other physical cores on the chip. A CPU with two physical cores is called a dual-core processor and four physical cores is called a quad-core processor.

A logical core (also known as logical processors) is more of a programming abstraction than an actual physical entity. Logical cores are the abilities of a single physical core to run multiple tasks or threads simultaneously. For example, if you have a quad core CPU and each of its physical cores can run two threads at a time, then you have 8 logical cores.

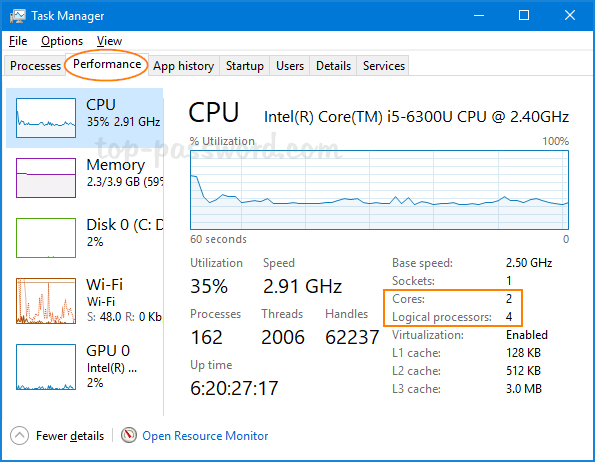
Method 1: Check Number of CPU Cores Using Task Manager

Press the Ctrl + Shift + Esc keys simultaneously to open the Task Manager. Go to the Performance tab and select CPU from the left column. You’ll see the number of physical cores and logical processors on the bottom-right side.

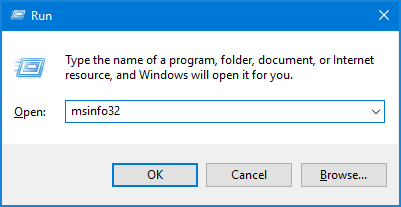
Method 2: Check Number of CPU Cores Using msinfo32 Command

Press the Windows key + R to open the Run command box, then type msinfo32 and hit Enter.

It should open up the System Information app. Select Summary and scroll down until you find Processor. The details will tell you both how many cores and logical processors your CPU has.

Method 3: Check Number of CPU Cores Using Command Prompt or PowerShell

Open the Command Prompt or PowerShell. Type the following command and press Enter:
WMIC CPU Get DeviceID,NumberOfCores,NumberOfLogicalProcessors

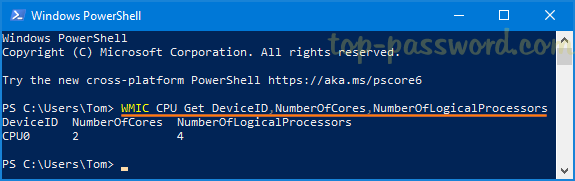
The output of the command tells you how many cores and how many logical processors are found in each CPU on your computer.

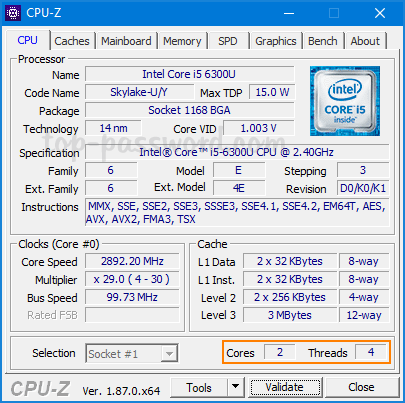
Method 4: Check Number of CPU Cores Using Third-Party Software

If you would like to find out the detail information about your CPU, try the third-party freeware CPU-Z. After running the app, you can see the number of physical cores and threads (logical cores) at the bottom.

That’s it!

VMware: How to Boot a VM from USB Stick

January 27th, 2019 by Admin

How can I USB boot a VM in VMware Workstation 9? Since VMware’s BIOS doesn’t natively support booting from USB stick, you have to do it with the help of Plop Boot Manager. But Plop Boot Manager only works in legacy BIOS mode. In this tutorial we’ll show you another way to boot VMware Workstation / Fusion / ESXi virtual machine from USB stick, by mounting USB stick as virtual hard disk.

How to Boot a VM in VMware from USB Stick

Before getting started, make sure your bootable USB stick is already attached to your host machine.

  1. Open VMware Workstation and go to any existing virtual machine. Click on the VM menu and select Settings.

  2. In the Hardware section, click on the Add button.

  3. Select Hard Disk as the hardware type, and click Next.

  4. I would recommend you select IDE disk type other than the default one.

  5. Choose Use a physical disk (for advanced users) and then click Next.

  6. Select your USB stick (PhysicalDrive1) from the drop-down list and click Next. PhysicalDrive0 is your first physical disk.

  7. Enter the filename and location for the new virtual disk, and click Finish.

  8. Now, your USB stick will appear as an IDE hard drive to the virtual machine. To turn on your machine, click on the VM menu and select Power -> Power On to Firmware.

  9. If your virtual machine uses UEFI firmware, it will boot to the Boot Manager screen. From there you can simply select IDE drive to boot from your USB stick.

    If your virtual machine uses BIOS, it will boot to the BIOS Setup Utility. Go to the Boot tab and select the Hard Drive and press Enter. Use the + key to move the virtual IDE drive to the top position.

    Finally press F10 to save your changes and exit.

  10. Within a few seconds you will be booted into the USB stick.

How to Disable Windows 10 Timeline with Group Policy

January 24th, 2019 by Admin

Timeline is a new feature introduced since Windows 10 April 2018 Update, which will record all your PC activities so that you can resume them later, from where you left off. If you don’t use this feature, here is how to disable Timeline with group policy to stop Windows 10 from collecting your activity history.

Method 1: Disable Timeline in Windows 10 with Group Policy

  1. Open the Local Group Policy Editor and browse to:
    Computer Configuration\Administrative Templates\System\OS Policies

    Next, double-click on the “Enables Activity Feed” policy in the right pane to edit it.

  2. Select Disabled and click OK.

    From now on Windows 10 will no longer collect activities on your device.

Method 2: Disable Timeline in Windows 10 with Registry Editor

  1. Open Registry Editor and navigate to:
    HKEY_LOCAL_MACHINE\SOFTWARE\Policies\Microsoft\Windows\System

    On the right pane, right-click blank area and select New -> DWORD (32-bit) Value.

  2. Name the new entry as EnableActivityFeed, and leave its value data as 0.

  3. Restart Windows 10 and the Timeline feature should now be disabled. If you need to enable Timeline again, just change the value of EnableActivityFeed to 1 and you’re done.

2 Ways to Remove Saved Passwords in Firefox

January 21st, 2019 by Admin

How do I erase my stored user names and passwords in Firefox? Need to clear the old passwords from Firefox that you don’t use any longer? Here are 2 simple ways to remove all saved passwords in Firefox on Windows 10 / 8 / 7, so that you’ll be prompted for new password when you sign into any website.

Method 1: Remove Firefox Saved Passwords Using GUI

  1. When Firefox is running, click on the Menu button (three horizontal lines) in the far right corner of the browser, and then select Options.

  2. Go to the “Privacy & Security” tab. Click Saved Logins under the Logins & Passwords section.

  3. The Saved Logins dialog box displays each site for which you have saved your username and password. To delete all your passwords from the Password Manager, click Remove All.

  4. Click Yes to confirm, all of your stored usernames and passwords will be deleted.

Method 2: Remove Firefox Saved Passwords Using Windows Explorer

If you’ve forgotten the Master password or your Firefox browser is crashed, just delete the password file (logins.json or signons.sqlite) in the Firefox profile location and your saved passwords will be gone.

That’s it!

How to Import Passwords into Chrome from Firefox in Windows 10

January 18th, 2019 by Admin

When you start moving to Chrome as your primary web browser, the first thing to do is to move all your passwords and bookmarks from the old browser to the new one. Since Chrome 66, it makes password importing & exporting much easier for inexperienced users. In this tutorial we’ll walk you through the steps to import passwords into Chrome from Firefox in Windows 10.

How to Import Passwords into Chrome from Firefox in Windows 10

  1. Open Chrome and click the three dots menu button appeared in the upper right corner, then select Bookmarks -> Import bookmarks and settings.

  2. The following pop-up will appear. You can select Mozilla Firefox from the drop-down list and click on Import. Make sure the “Saved passwords” is checked.

  3. After a while, the migration process will be completed.

This method works only if both Chrome and Firefox are installed on the same computer. If you need to export Firefox saved password from an old PC, and then import them into Chrome on a new PC, a third-party software like Password Recovery Bundle can help you keep track of your passwords saved in different web browsers.