Author Archive

Reset Notepad to Default Settings in Windows 10 / 8 / 7

September 2nd, 2017 by Admin

Notepad is a built-in basic text editor that’s been part of Windows for a very long time. You’ve probably customize the default font, font size, window size or word wrap in Notepad, but now you want to reset Notepad to its default settings. Luckily, there is simple registry hack that can reset Notepad completely back to all default settings in Windows 10 / 8 / 7.

How to Reset Notepad to Default Settings in Windows 10 / 8 / 7?

  1. Press the Windows key + R to open the Run command box. Type regedit and press Enter.

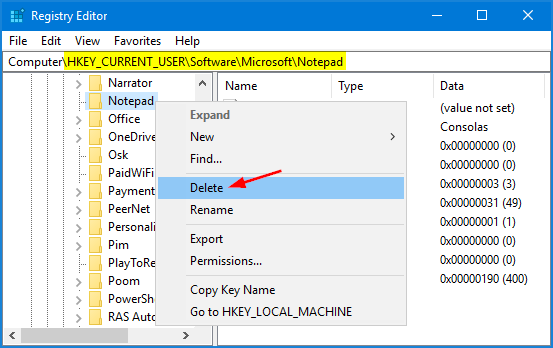
  2. When Registry Editor is launched, navigate to the following key:

    HKEY_CURRENT_USER\Software\Microsoft\Notepad

  3. Right-click on the Notepad key in the left pane, and then select Delete from the pop-up menu.

  4. Click Yes to confirm your operation. All your saved settings in Notepad will be deleted. Your Notepad will be back to the default settings on the next run.

How to View or Clear Update History in Windows 10

August 31st, 2017 by Admin

How can I find out which updates I have installed in Windows 10? When performing a manual or automatic update in Windows 10, the system keeps track of installed and failed updates for your review. In this tutorial we’ll show you how to view or clear update history in Windows 10.

Part 1: View Update History in Windows 10

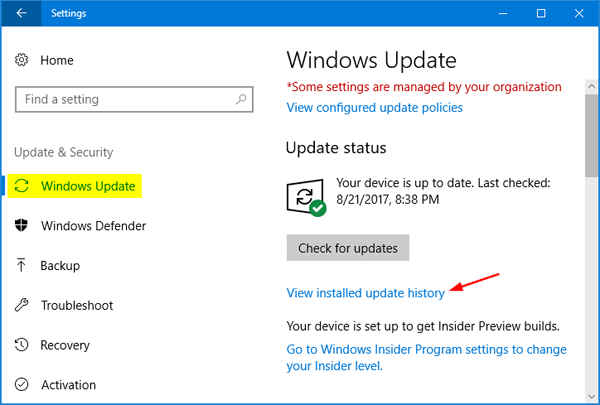
  1. Press the Windows key + I keyboard shortcut to open the Settings app. Click Update & Security.

  2. Click on the “View installed update history” link located under the Windows Update tab.

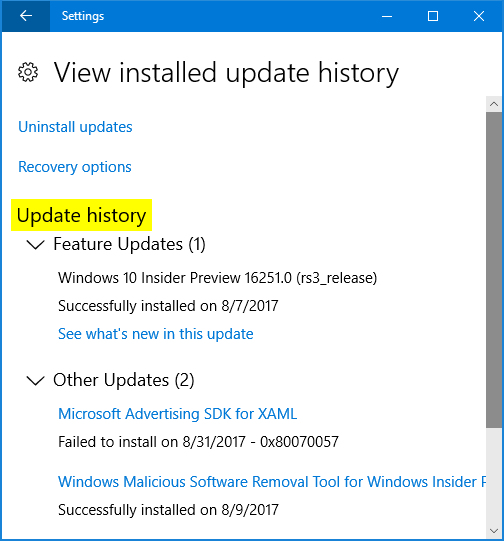
  3. The update history shows the list of updates installed on your PC. You can find out which update was installed successfully or it failed along with date.

Part 2: Clear Update History in Windows 10

If you think the update history is not useful, you can remove it from Windows 10. Note: Clearing update history will only remove your history log, and it won’t uninstall your installed updates.

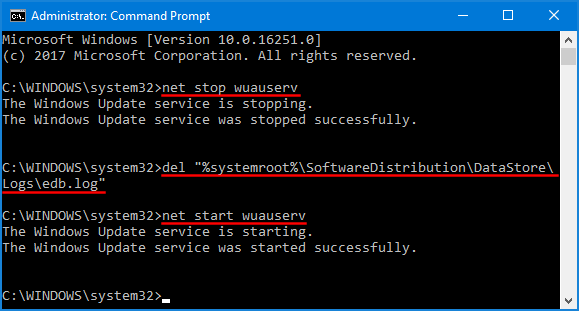
  1. Open the Command Prompt (or PowerShell) as Administrator.
  2. Type net stop wuauserv at the Command Prompt and hit Enter to stop the Windows Update service.
  3. Copy and paste the following command and hit Enter. It will delete the log file that stores your Windows update history.

    del "%systemroot%\SoftwareDistribution\DataStore\Logs\edb.log"

  4. Congratulations! You have cleared your Windows Update history. Type net start wuauserv and press Enter to start the Windows Update service again.

Fix: Windows Couldn’t connect to the Group Policy Client Service

August 29th, 2017 by Admin

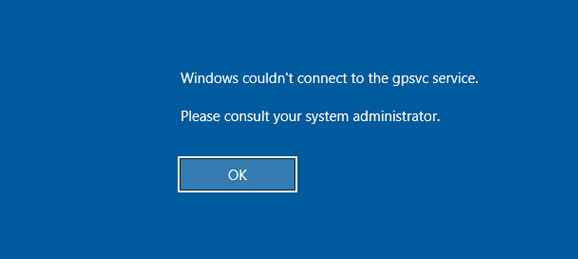
When you try to log into a standard user account, it may come up with a message saying: “Windows couldn’t connect to the Group Policy Client service. Please consult your administrator.

If you’re facing this problem, you have come to the right place! In this tutorial we’ll show you effective ways to fix the error “Windows couldn’t connect to the Group Policy Client service” in Windows 10, 8 and 7.

Method 1: Perform a System Repair

  1. Open the Command Prompt as Administrator.
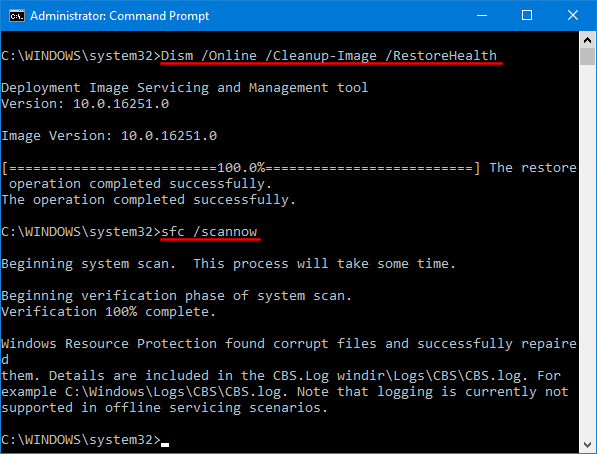
  2. Run the following commands one by one to scan for corrupt system files on your computer and repair them.

    Dism /Online /Cleanup-Image /RestoreHealth
    sfc /scannow

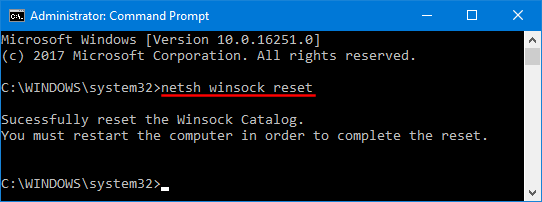
  3. Execute this command to reset winsock catalog back to default setting or clean state.

    netsh winsock reset

  4. You will then be asked to restart your computer, after which the issue is hopefully resolved.

Method 2: Fix the Registry Settings

  1. Press the Win + R keys to open the Run box. Type regedit and hit Enter to open the Registry Editor.
  2. In the left pane of Registry Editor, navigate to following registry key:
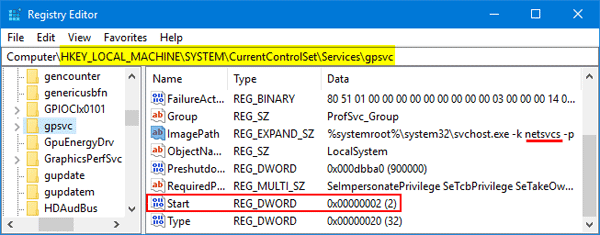
    HKEY_LOCAL_MACHINE\SYSTEM\CurrentControlSet\Services\gpsvc

    You should see a DWORD value named Start in the right pane. Make sure its value is set to 2. If you need to modify its value, you have to take ownership of the registry key gpsvc firstly.

  3. Next, look for the ImagePath string which contains a service name we’ll use later. In my example, the service name is “netsvcs”. You may have a different name like “GPSvcGroup”.
  4. Now, navigate to the following key:
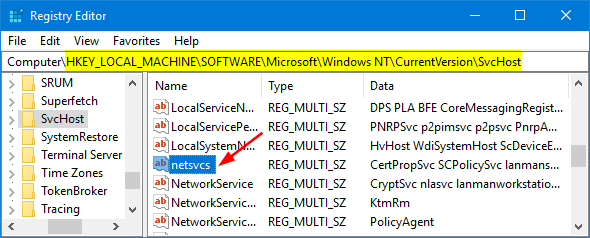
    HKEY_LOCAL_MACHINE\SOFTWARE\Microsoft\Windows NT\CurrentVersion\SvcHost

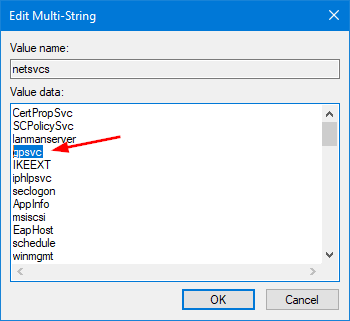
    In the right pane, you should see a Multi-String named “netsvcs” (or “GPSvcGroup”). Double-click on it and make sure that ‘GPSvc’ is added into the list.

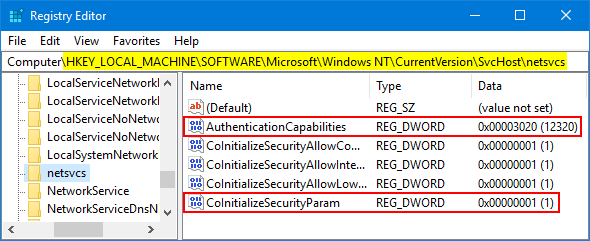
  5. Expand the SvcHost key in the left pane, and then click the “netsvcs” (or “GPSvcGroup”) subkey. Right-click an empty area in the right pane to create a DWORD (32-bit) value named AuthenticationCapabilities, give it a value of 12320 in decimal. Next, create another DWORD value called CoInitializeSecurityParam and set its value to 1.

  6. Once you complete all steps above, reboot the computer and the “Windows Couldn’t connect to the Group Policy Client Service” problem should be fixed.

How to Find Your Printer’s IP Address in Windows

August 27th, 2017 by Admin

How do I find the IP address of a printer on a network? Sometimes you may need to install the printer on a different computer, so you need to obtain your printer’s IP address. In this tutorial we’ll show you 2 simple ways to find out your printer’s IP address in Windows 11, 10, 8 and 7.

Method 1: Find Printer’s IP Address via Configuration Sheet

If you have physical access to the printer, you can usually print the configuration page by pressing and holding a button (Power or Go) on the printer for about 5 to 10 seconds. You must find out the button/or combination of button by reading printer manual.

Some printers have the option to view the IP address directly from the system menu. For example, if you’re using HP Office Jet Pro 8600 printer, just go to the Home Screen -> Setup, then touch Reports and then select Network Configuration to see all of the printer’s network details.

Method 2: Find Printer’s IP Address in Windows

If you’re running Windows 11, here’s how you can find the IP address of the printer installed on your computer.

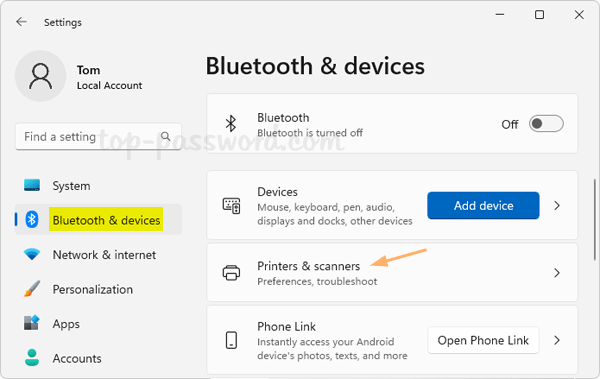
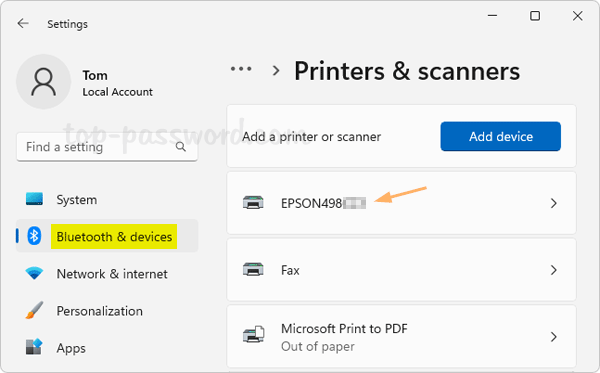
  1. Press the Windows and I keys together on the keyboard to open the Settings app, go to: Bluetooth & devices -> Printers & scanners.

  2. Click on the printer you want to find the IP address of.

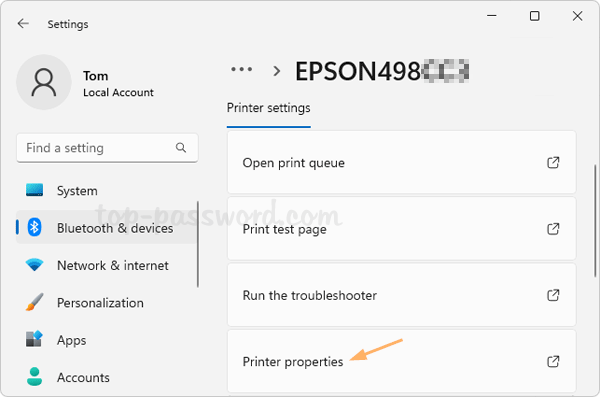
  3. Click the “Printer properties” option.

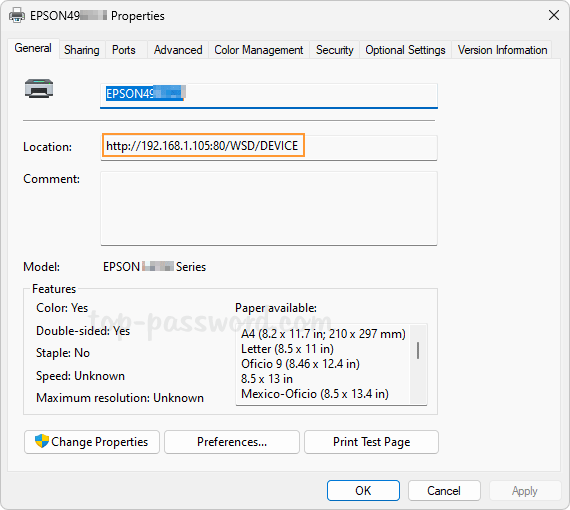
  4. Under the General tab, you will see the IP address of your printer in the Location textbox.

On Windows 10, 8 , 7, you can use the Control Panel to find the printer’s IP address. Follow these steps:

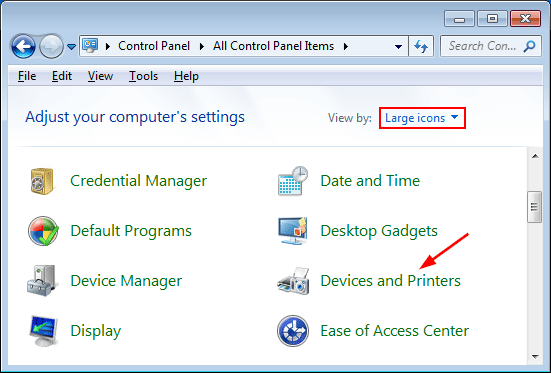
  1. Open the Control Panel and set the View by option to Large icons. Click Devices and Printers.

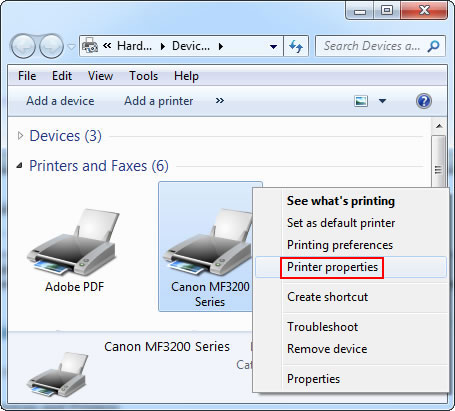
  2. Right-click on the printer installed on your PC, and then select Printer Properties from the menu that appears.

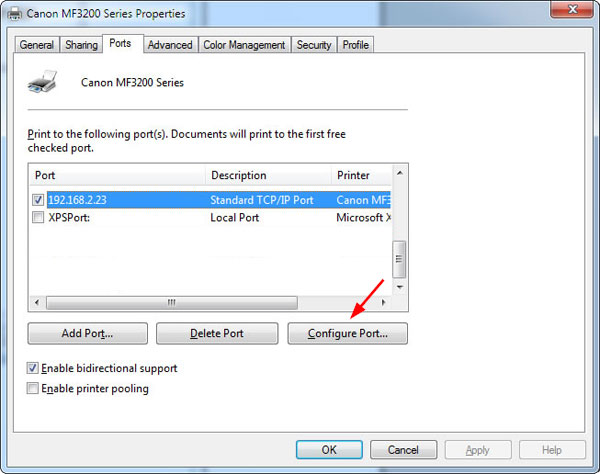
  3. In the Properties window, go to Ports tab. Select the port that has the check mark and click Configure Port.

  4. In the next screen, you should see the IP address in the “Printer Name or IP Address” text box. That’s it!

How to Turn Off Sound in Chrome, Firefox and Edge

August 18th, 2017 by Admin

Can I turn off sound for a website but not the computer? Sick of advertisements blaring sound when you open a new web page? We all have ever encountered situations where audio suddenly starts to play in your web browser, and this could be really annoying. In this tutorial we’ll show you how to turn off sound in Chrome, Firefox and Edge on Windows 10.

Part 1: Disable Sound in Chrome

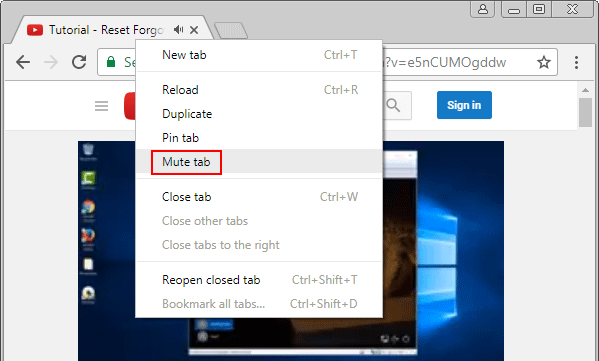
When a Chrome tab is playing sound, you will see a little speaker icon on that tab. Right-click on it, and select the “Mute Tab” option from the pop-up menu.

Part 2: Disable Sound in Firefox

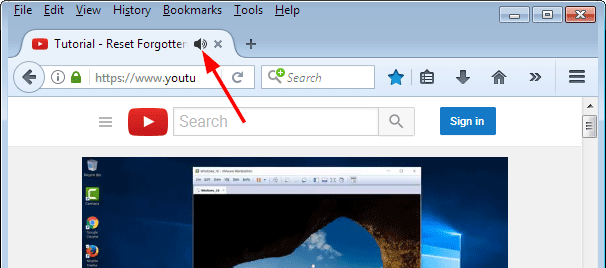
When a web page in Firefox starts to play audio, you can click the speaker icon to toggle the sound for that one tab off, and click it again to toggle the sound back on.

Part 3: Disable Sound in Microsoft Edge

Just like other browsers, Microsoft Edge also uses a speaker icon to indicate which tab is playing sound. However, Edge doesn’t yet provide an option to mute tabs. Luckily, there is an open-source program called EarTrumpet that makes it easier to adjust the volume of specific apps in Windows 10.

Here’s how to use EarTrumpet to turn off sound and prevent all web pages from playing audio in Microsoft Edge:

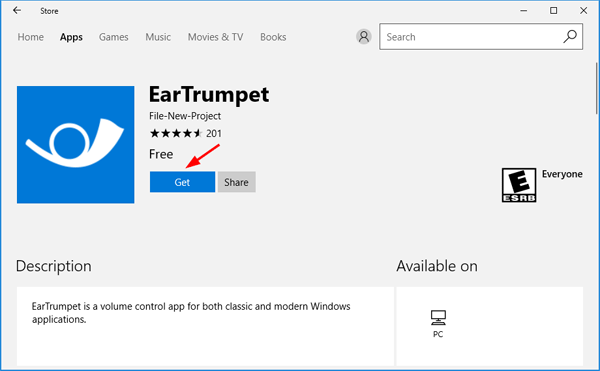
Just open the Windows Store app and search for EarTrumpet, and then click the Get button to download and install it on your local PC.

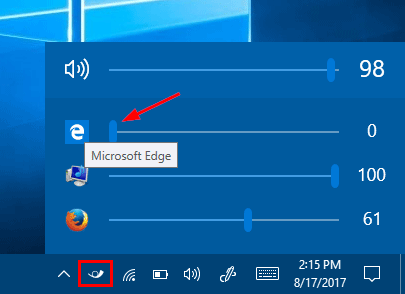
After installing, you’ll see a small trumpet icon in the notification area of Windows 10, near the bottom-right corner of your screen. Click on this icon and you can view and control the volume levels of different apps that are running in Windows 10.

You can turn off sounds for Microsoft Edge by moving the slider to the far left. That’s it!

How to Disable Local Users and Groups (lusrmgr.msc) in Windows 10 / 8 / 7

August 16th, 2017 by Admin

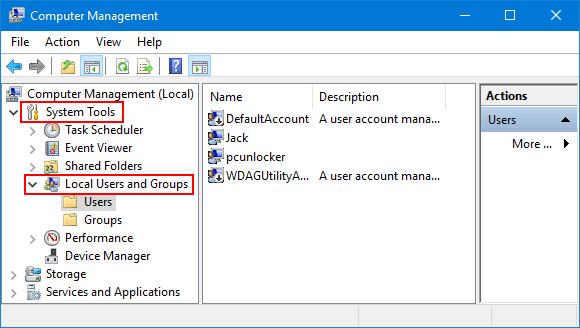
How can I restrict access to Local Users and Groups MMC snap-in? In this tutorial we’ll show you 2 ways to disable Local Users and Groups (lusrmgr.msc) in Windows 10, 8 and 7. After disabling, you’ll find the Local Users and Groups is missing in Computer Management.

Method 1: Disable Local Users and Groups (lusrmgr.msc) Using Group Policy

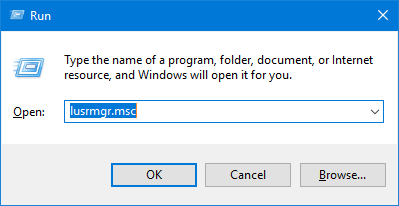
  1. Press the Windows logo key + R to open the Run box. Type gpedit.msc and hit Enter.
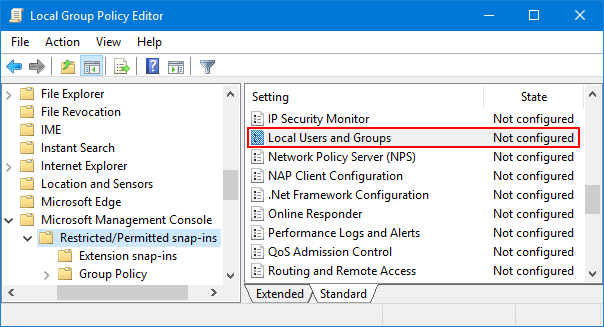
  2. Navigate to the following path on the left side pane of Local Group Policy Editor:

    User Configuration -> Administrative Templates -> Windows Components -> Microsoft Management Console -> Restricted/Permitted snap-ins

  3. Now, on the right side window, double-click on the “Local Users and Groups” setting to modify.

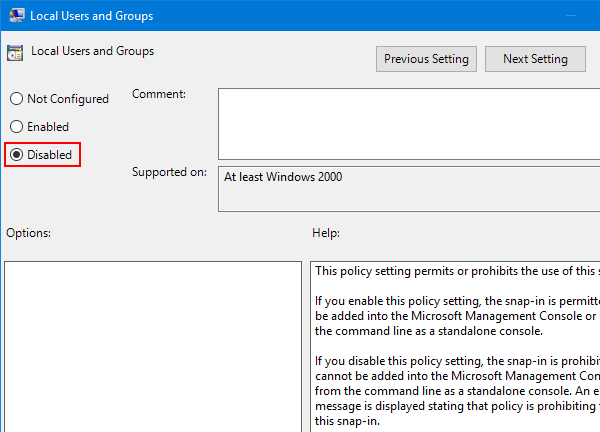
  4. Select the Disabled option. Click Apply and then OK.

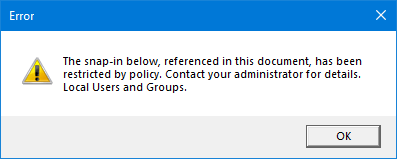
  5. The policy setting will take effect immediately. You’ll find Local Users and Groups not showing in computer management. If you try to open Local Users and Groups by using the lusrmgr.msc command, you’ll get this error message: “The snap-in below, referenced in this document, has been restricted by policy. Contact your administrator for details“.

Method 2: Disable Local Users and Groups (lusrmgr.msc) Using Registry Editor

  1. Press Windows Key + R on your keyboard to launch Run prompt. Enter regedit and hit Enter to open Registry Editor.
  2. Navigate to the following key:
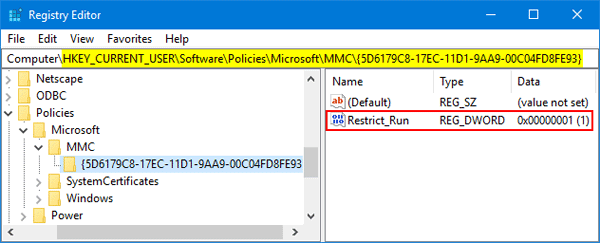
    HKEY_CURRENT_USER\Software\Policies\Microsoft\MMC\{5D6179C8-17EC-11D1-9AA9-00C04FD8FE93}

    If the last two keys (MMC, {5D6179C8-17EC-11D1-9AA9-00C04FD8FE93}) don’t exist, you’ll need to create them manually.

  3. On the right side pane, right-click in the blank area and select New -> DWORD (32-bit) Value. Name it Restrict_Run, and give it a value of 1.

  4. Close Registry Editor and reboot your computer for the policy to take effect. If you want to enable Local Users and Groups snap-in again, just change the registry value of Restrict_Run to 0 and you’re done!

Open Local Users and Groups MMC Snap-in in Windows 10

August 15th, 2017 by Admin

Local Users and Groups is a Microsoft Management Console (MMC) snap-in that lets you manage user accounts or groups, like creation/deletion of user accounts, resetting user password etc. In this post we’ll show you how to open Local Users and Groups MMC snap-in in Windows 10. Note: the Local Users and Groups MMC snap-in is not available in the Home edition of Windows 10.

Method 1: Open Local Users and Groups Snap-in from Computer Management

Right-click on This PC icon from your desktop, and then select Manage from the pop-up menu.

This should open Computer Management window. Expand “System Tools” in the left console tree and you can then access Local Users and Groups MMC snap-in.

Method 2: Open Local Users and Groups Snap-in via Run or Command Prompt

Press the Windows key + R to open the Run dialog box, or open the Command Prompt. Next type lusmgr.msc and hit Enter.

This will open the Local Users and Groups snap-in directly.

Method 3: Open Local Users and Groups Snap-in in User Accounts

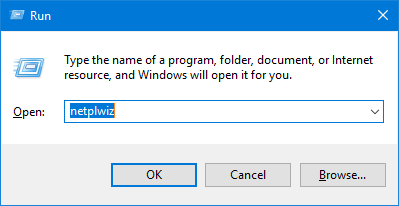
Press the Windows key + R to open the Run dialog box, type netplwiz and hit Enter.

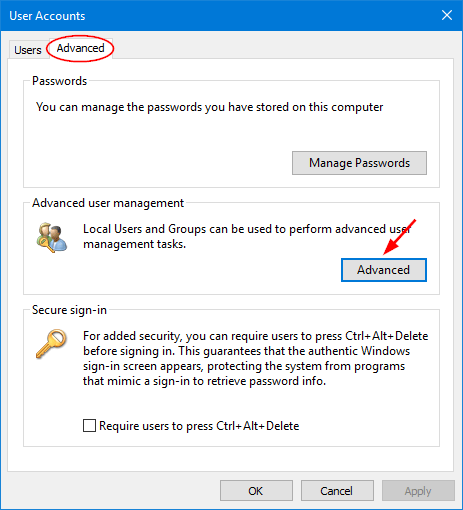
When the User Accounts dialog box opens up, click the Advanced tab and then click the Advanced button. You now have the Local Users and Groups snap-in open.

Method 4: Open Local Users and Groups Snap-in via Cortana

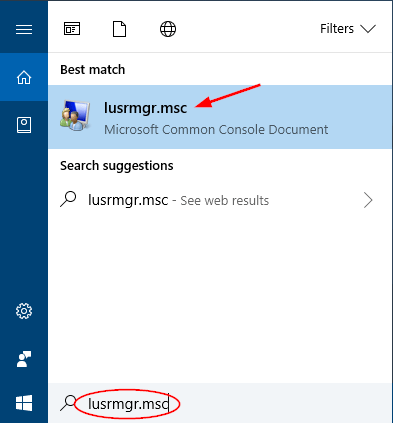
Click the Cortana search box in the lower left of your screen, type lusmgr.msc and click it from the search result.

That’s it!

Set Password to Never Expire for Domain Accounts in Windows Server

August 12th, 2017 by Admin

Can’t change password after domain user password expired? AD password expires while user is away? By default, domain users are required to change their passwords every 42 days, as defined by domain password policy. If you find those password expiry notices annoying, you can set password to never expire for domain accounts in Windows Server 2016, 2012, 2008, 2003.

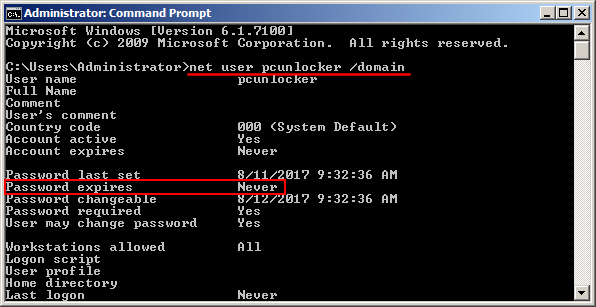
Before getting started, you can check when your domain account password is going to expire. Just open the Command Prompt as administrator, type the following command and press Enter.

net user domain_account_name /domain

This will display your account information, including when you last changed your password, and when it expires.

Method 1: Set Domain Account Password to Never Expire via GUI

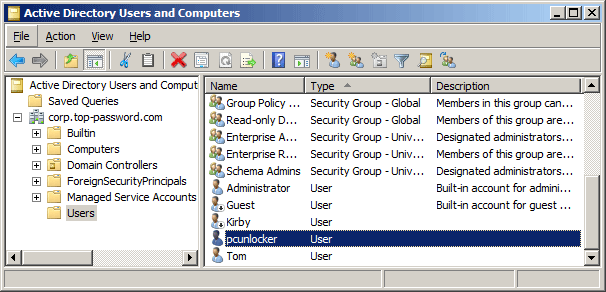
  1. Press the Windows logo key + R, type dsa.msc and press Enter to open Active Directory Users and Computers Snap-in.
  2. Expand your domain and click Users in the left pane, you’ll see a list of domain accounts on your server. Double-click on the user you would like to update.

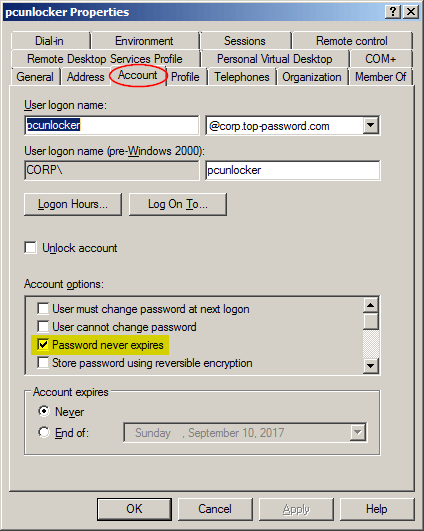
  3. In the Properties dialog, click the Account tab and check “Password never expires” under the Account options section.

  4. Click Apply and then OK. Now you’ve successfully disabled the annoying expiration of passwords!

Method 2: Set Domain Account Password to Never Expire via PowerShell

  1. click Start, click Administrative Tools, and then click Active Directory Module for Windows PowerShell.
  2. After importing Active Directory module in Powershell, you can type the following script to set your domain password to never expire. Replace pcunlocker with the name of your domain account.

    Set-LocalUser -Name "pcunlocker" -PasswordNeverExpires 1

Method 3: Set Domain Account Password to Never Expire via Command Prompt

Open the Command Prompt as Administrator. Type the following command and press Enter. Note: Replace “pcunlocker” with your account name, and adjust the domain name accordingly.

dsmod user "CN=pcunlocker,CN=Users,DC=corp,DC=top-password,DC=com" -pwdneverexpires yes

This would set the password of the domain account “pcunlocker” to never expire.

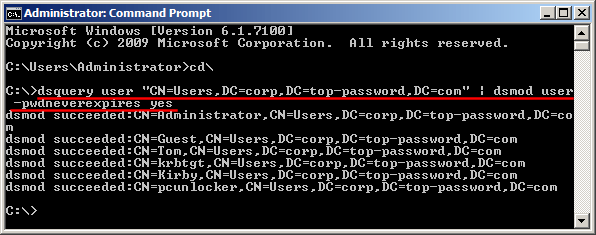
If you want to disable the password expiration for all accounts in Active Directory, type:

dsquery user "CN=Users,DC=corp,DC=top-password,DC=com" | dsmod user -pwdneverexpires yes

Method 4: Set Password to Never Expire for All Accounts Using Domain Group Policy

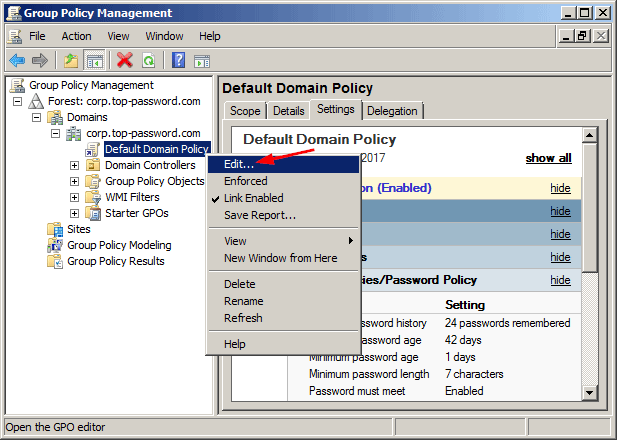
  1. Click the Start button, point to Administrative Tools and then click Group Policy Management.
  2. In the console tree, expand the Forest and then Domains. Select the domain for which the password policies have to be set. Right-click Default Domain Policy and select Edit.

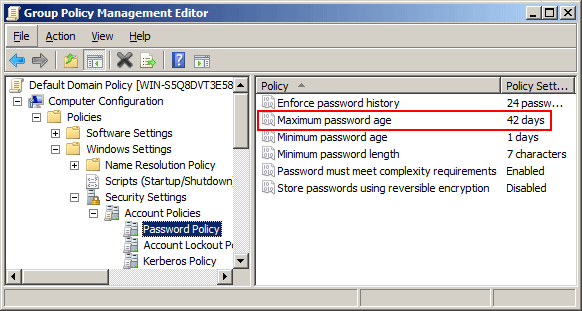
  3. It will open Group Policy Management Editor. Navigate to Computer Configuration -> Policies -> Windows Settings -> Security Settings -> Account Policies -> Password Policy, then double-click the “Maximum password age” setting in the right pane.

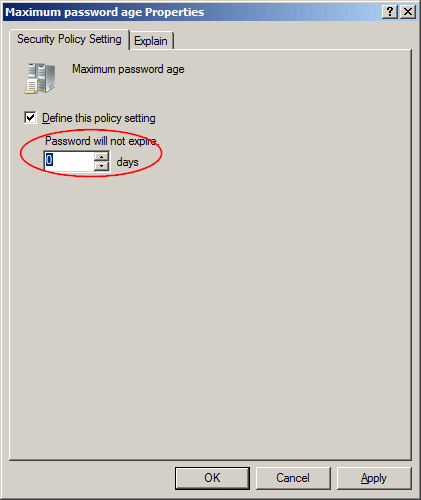
  4. In the Security Policy Setting tab, make sure the “Define this policy setting” option is checked, and specify that passwords never expire by setting the number of days to 0.

  5. Click Apply and then OK.

Actually, there is much simpler way to modify the “Maximum password age” settings for your default domain policy. Just open the Command Prompt as Administrator, and type:

net accounts /maxpwage:unlimited /domain

Now, all the domain accounts won’t be required to change password ever. If you’re locked out of Windows Server and can’t log on with any domain administrator, then you need to use the AD password utility – PCUnlocker. It can help you reset forgotten Active Directory password and unlock a disabled/expired/locked domain account.

5 Ways to Set Password to Never Expire for Windows Local Account

August 10th, 2017 by Admin

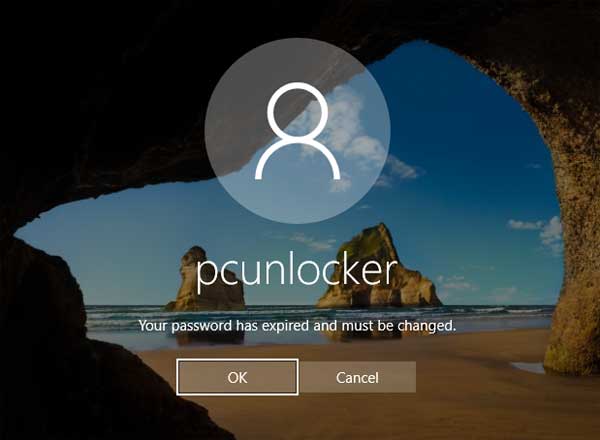
My password has expired and now I am completely locked out of my computer? When you log into Windows, you might receive a message that says “Your password has expired and must be changed“. What to do if you forgot your old password or you get the access denied error when you try to change the password? In this tutorial we’ll show you 5 ways to set password to never expired for Windows local account.
Method 1: Set Windows Password to Never Expire Using Computer Management

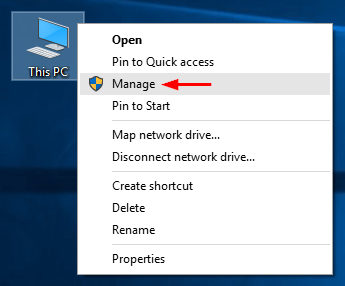
Right-click the My Computer (This PC) icon on your desktop and then select Management from the pop-up menu.
When the Computer Management console launches, go to System Tools -> Local Users and Groups -> Users. Right-click on the user with an expired password in the middle pane and select Properties.
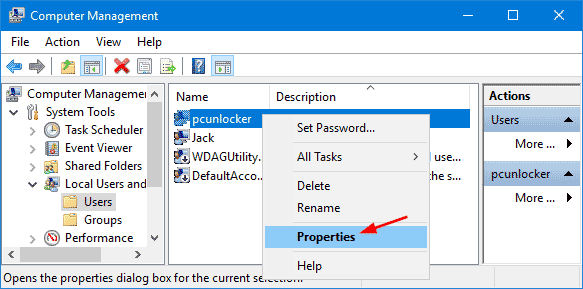
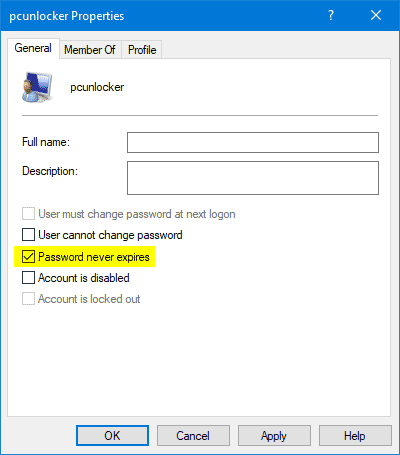
Check the “Password never expires” box and click OK.
When done, close the Computer Management and you can determine when the password of your Windows account will expire. Open a Command Prompt and type:

net user account_name
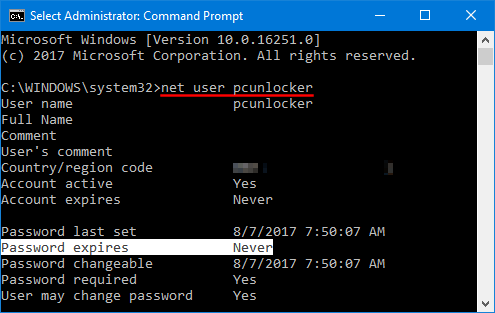
The output of this command will give you a lot of information about account. Just look for the line beginning with “Password expires” and you can see the password expiration date. In our example, it showed that the password of my account “pcunlocker” will never expire.

Method 2: Set Windows Password to Never Expire from Command Line

Open the Command Prompt as Administrator. Type the following command and press Enter. Replace “pcunlocker” with the name of your local account:

wmic useraccount where "Name='pcunlocker'" set PasswordExpires=false
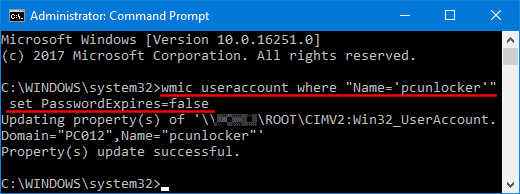
Method 3: Set Windows Password to Never Expire Using PowerShell

Open the PowerShell as Administrator. You can use the Set-LocalUser cmdlet to modify a local user account and set its password to never expire:

Set-LocalUser -Name "pcunlocker" -PasswordNeverExpires 1

Method 4: Set Password to Never Expire for All Accounts Using Group Policy

Press the WIN + R keys to open the Run command box. Type secpol.msc and press Enter to open the Local Security Policy Editor. Go to Account Policies -> Password Policy, ensure the Maximum password age is set to 0, meaning that passwords never expire.
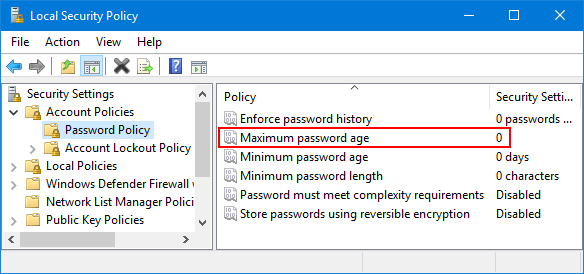
You can also apply the password expiration policy using command line. Follow these steps:
Open the Command Prompt as Administrator. Type the following command and hit Enter.

net accounts /maxpwage:unlimited
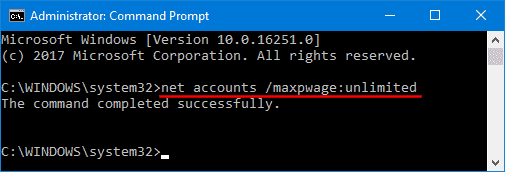
This will set password to never expire for all your Windows local accounts.

Method 5: Set Windows Password to Never Expire Using a Boot CD

If your Windows password is expired and unable to change password on the login screen, you’re completely locked out of your computer and all of the methods above won’t work for your case. Then you have to use a password utility called PCUnlocker, which can reset your forgotten Windows password, as well as setting your password to never expire.

To start, you need to make a PCUnlocker Live CD (or USB drive) from an accessible PC. Next boot your locked computer from the CD. Select the account with an expired password and click on “Reset Password” button. The program will remove your Windows password and disable password expiration for your account.
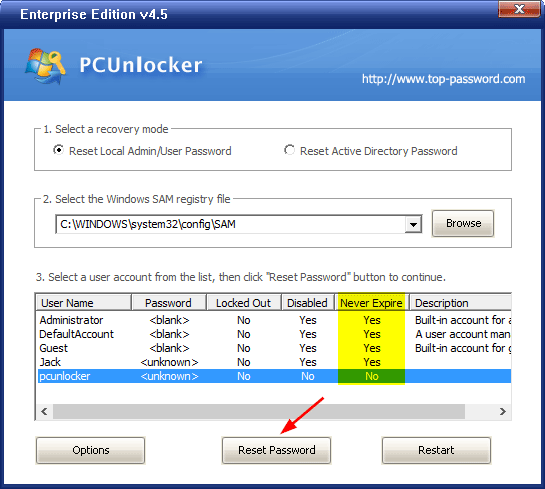
Reboot and eject the CD, you can then log into your Windows account with no warning of user password’s about to expire. That’s it!
How to Customize or Reset Quick Access Toolbar in Windows 10

August 9th, 2017 by Admin

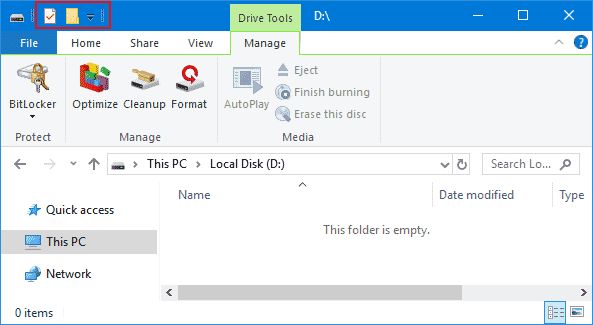
Quick Access Toolbar is part of the Ribbon interface that is located in the title bar of File Explorer. It provides quick access to commands you use most often. In this tutorial we’ll show you how to add or remove any Ribbon command on the Quick Access Toolbar, or reset Quick Access Toolbar to default in Windows 10.

Add Ribbon Commands to Quick Access Toolbar

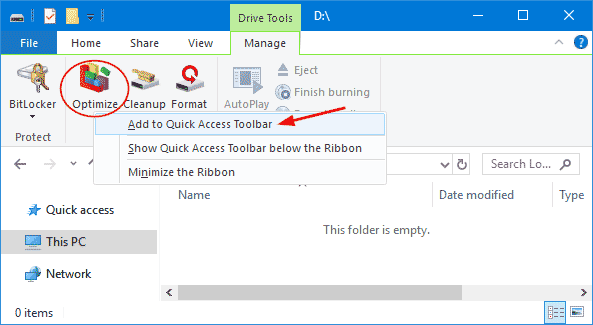
Right-click on any command/button (such as Format, Cleanup or Optimize) in any Ribbon tab and then select “Add to Quick Access Toolbar” from the pop-up menu.

If the “Add to Quick Access Toolbar” menu is grayed out, it means that this command/button has already been added to the Quick Access Toolbar.

Remove Ribbon Commands from Quick Access Toolbar

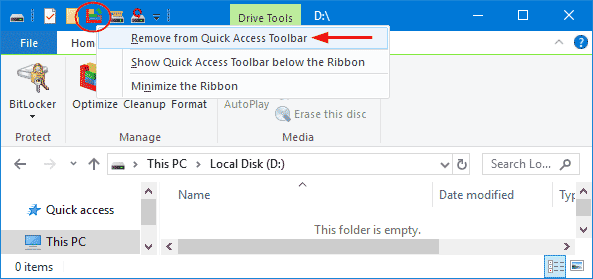
Right-click on any command that is present on the Quick Access Toolbar, and then choose “Remove from Quick Access Toolbar“.

Reset Quick Access Toolbar to Default

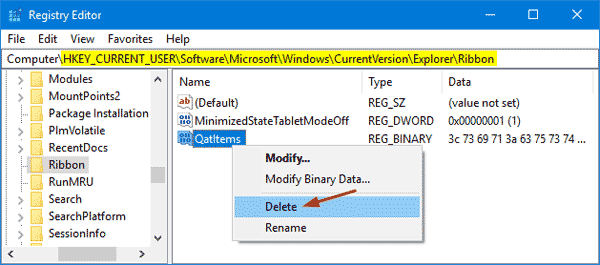
If you have messed up the Quick Access Toolbar, you can reset it to the default state. To do this, open the Registry Editor and go to the following key:
HKEY_CURRENT_USER\Software\Microsoft\Windows\CurrentVersion\Explorer\Ribbon

In the right pane, look for the QatItems value which stores all the settings for the Quick Access Toolbar. Just right-click on QatItems and then select Delete from the pop-up menu.

Restart your computer or sign out of your account. The next time you open File Explorer, the Quick Access Toolbar will contain only three default buttons: one for accessing the properties of the selected file or folder, one for creating new folder, and a down-pointing arrow that opens a menu that you can use to configure the Quick Access Toolbar.

That’s it!