Author Archive

How to Crack Windows 10, 8 and 7 Password with John the Ripper

August 7th, 2017 by Admin

Forgot the password to your Windows admin account? There are a lot of different reasons why one would want to hack a Windows password. This tutorial will show you how to use John the Ripper to crack Windows 10, 8 and 7 password on your own PC.

Step 1: Extract Hashes from Windows

Security Account Manager (SAM) is a database file in Windows 10/8/7/XP that stores user passwords in encrypted form, which could be located in the following directory:
C:\Windows\system32\config

The first thing we need to do is grab the password hashes from the SAM file. Just download the freeware PwDump7 and unzip it on your local PC.

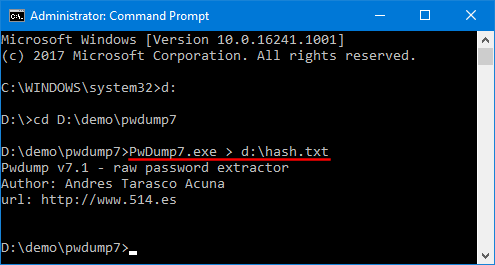
Open a Command Prompt. Navigate to the folder where you extract the PwDump7 app, and then type the following command:
PwDump7.exe > d:\hash.txt

extract-windows-password-hashes

Once you press Enter, PwDump7 will grab the password hashes from your current system and save it into the file d:\hash.txt.

Step 2: Cracking Passwords with John the Ripper

As you can see the password hashes are still unreadable, and we need to crack them using John the Ripper. John the Ripper is one of the most popular password cracking tools available that can run on Windows, Linux and Mac OS X.

Just download the Windows binaries of John the Ripper, and unzip it.

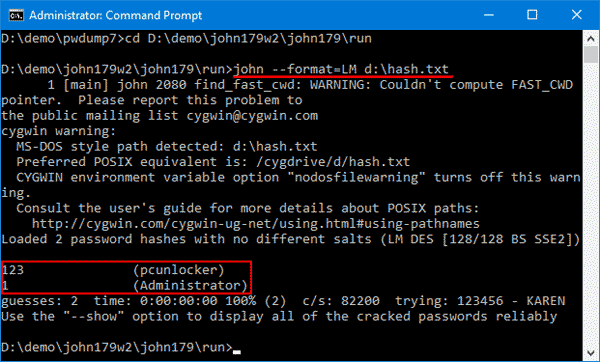
Open a Command Prompt and change into the directory where John the Ripper is located, then type:
john --format=LM d:\hash.txt

crack-password-with-john-the-ripper

It will start cracking your Windows password. In my example, you can clearly see that John the Ripper has cracked the password within matter of seconds.

Final Words

John the Ripper is probably the world’s best known password cracking tool. But its lack of a GUI interface makes a bit more challenging to use. Don’t use it for illegal purposes.

Add / Remove OneDrive Icon from Windows 10 Desktop

August 7th, 2017 by Admin

How can I delete OneDrive icon from the desktop? The OneDrive app is preinstalled and tightly integrated with Windows 10, and Microsoft doesn’t provide an easy way to add or delete OneDrive desktop icon. In this tutorial we’ll show you how to use a registry hack to add or remove OneDrive icon from the desktop in Windows 10.

How to Add / Remove OneDrive Icon from Windows 10 Desktop?

  1. Press the Win + R keys to open the Run box. Type regedit and hit Enter.

    regedit

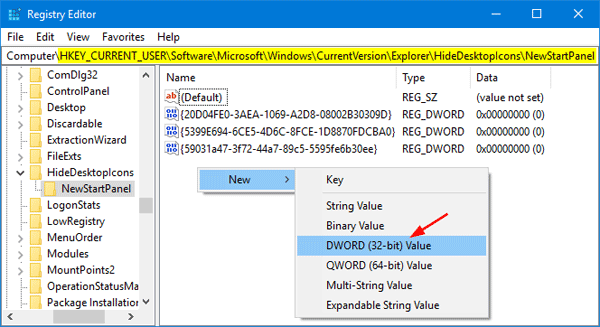
  2. When the Registry Editor app launches, navigate to the following key:
    HKEY_CURRENT_USER\Software\Microsoft\Windows\CurrentVersion\Explorer\HideDesktopIcons\NewStartPanel
  3. On the right pane of the window, right-click on the blank area and select New -> DWORD (32-bit) Value.

    NewStartPanel

  4. Give this newly created DWORD value a name {018D5C66-4533-4307-9B53-224DE2ED1FE6}. Let its value data as 0 if you want to add OneDrive icon to your desktop, or set its data to 1 if you want to remove OneDrive icon from the desktop.

    add-onedrive-icon-to-windows-10-desktop

  5. When you press F5 or right-click on your Windows desktop and select Refresh, the OneDrive icon will be shown or hidden immediately depend on your registry settings.

    onedrive-desktop-icon

    That’s it!

Fix: OneDrive Icon Missing from Windows 10 Taskbar

August 6th, 2017 by Admin

OneDrive icon is missing from the system tray in Windows 10? After upgrading to Windows 10 you find the OneDrive icon disappeared? In this tutorial we’ll show you 2 simple ways to restore the missing OneDrive icon back to your taskbar notification area in Windows 10.

Method 1: Set OneDrive Icon to Appear on the Taskbar

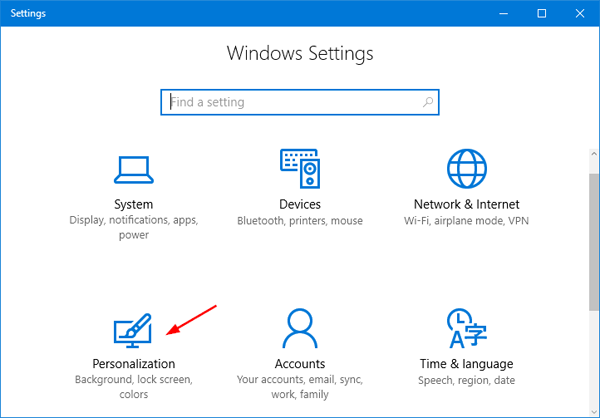
  1. Press the Windows key + I to open the Settings app, and then click on Personalization.

    Personalization

  2. Click on the Taskbar option from the left column. On the right side of the window, click the “Select which icons appear on the taskbar” link.

    select-icon-appear-on-taskbar

  3. As you can see from the screenshot below, all the system icons are listed and you can set the “Microsoft OneDrive” switch to On.

    show-onedrive-icon-on-notification-area

  4. Now you should see the white cloud OneDrive icon in your taskbar notification area.

Method 2: Reinstall OneDrive

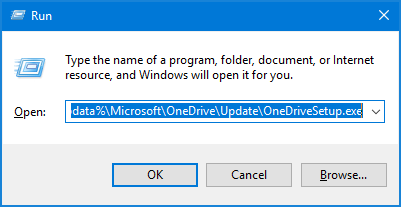
  1. Press the Windows key + R to open the Run box. Copy and paste the following code and press Enter.

    %localappdata%\Microsoft\OneDrive\Update\OneDriveSetup.exe

    OneDriveSetup

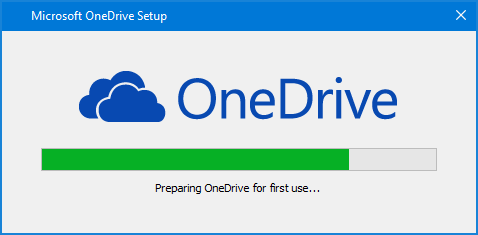
  2. A window of Microsoft OneDrive Setup will appear on the screen and it starts to initialize OneDrive for first use.

    install-onedrive

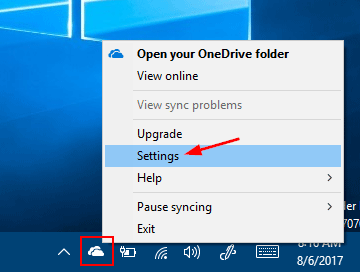
  3. It will ask you to sign in with your Microsoft account. After that OneDrive icon will be available again in the system tray. Right-click on the OneDrive icon and then select Settings.

    onedrive-settings

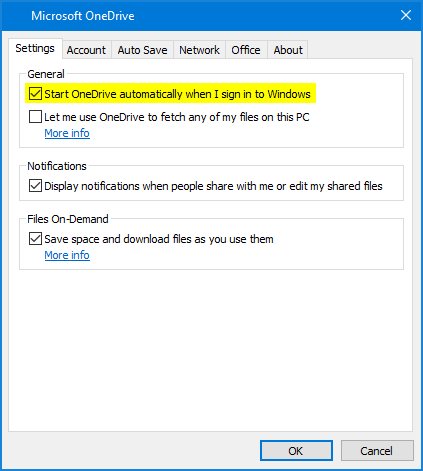
  4. In the Settings tab, check “Start OneDrive automatically when I sign in to Windows” and click OK. Windows 10 will automatically launch OneDrive at startup.

    start-onedrive-automatically

    That’s it!

How To Disable Windows Ink Workspace in Windows 10

July 30th, 2017 by Admin

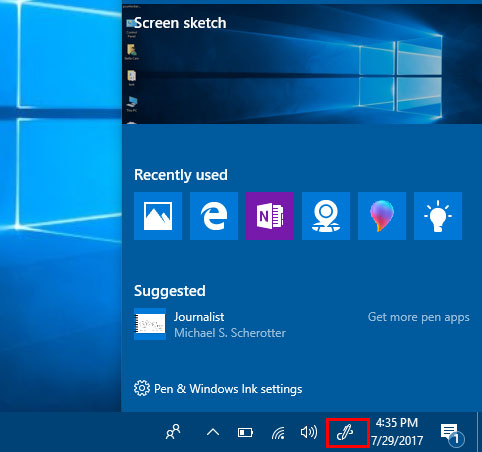
Windows Ink Workspace is a new feature introduced in Windows 10 Anniversary Update, which makes pen input more usable for everyone with a PC. Within Windows Ink Workspace, you can use a digital pen to write sticky notes, doodle in Sketchpad, take a screenshot of your desktop and load it for your sketching.

windows-ink-workspace

If you don’t have a digital pen or you want to remove Windows Ink Workspace icon from your taskbar, here are 2 easy ways to disable Windows Ink Workspace in Windows 10.

Method 1: Disable Windows Ink Workspace in Windows 10 Using Group Policy

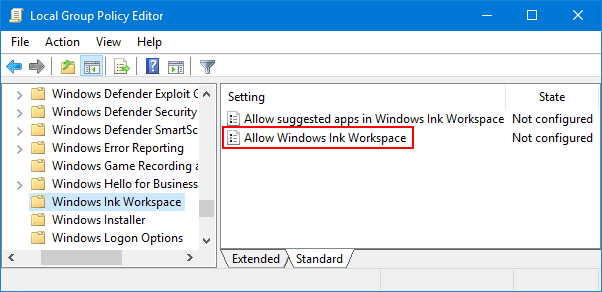
  1. Open the Local Group Policy Editor. Navigate to: Computer Configuration ->Administrative Templates ->Windows Components ->Windows Ink Workspace.
  2. In the right side pane, double-click Allow Windows Ink Workspace to open its properties.

    allow-windows-ink-workspace

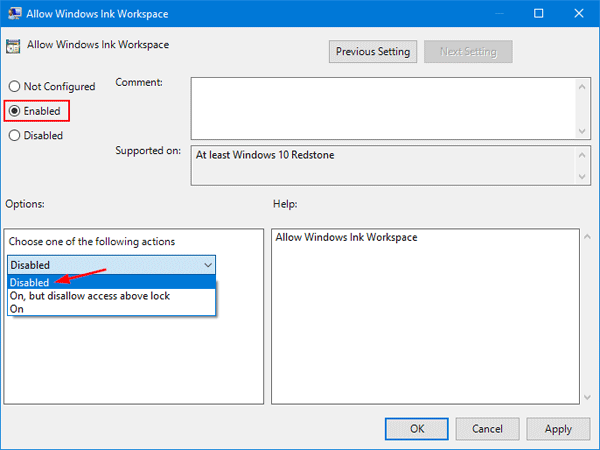
  3. Check the Enabled option. Next, select Disabled from the drop-down menu under Options section.

    disable-windows-ink-workspace

  4. Click on Apply and then OK. Restart your PC to make the changes to take effect.

Method 2: Disable Windows Ink Workspace in Windows 10 Using Registry Tweak

  1. Open the Registry Editor. Navigate to the following key:
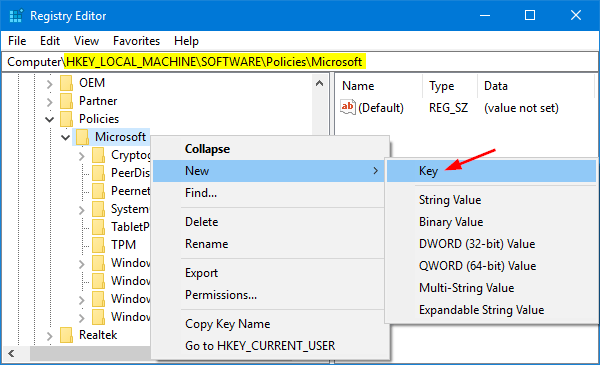
    HKEY_LOCAL_MACHINE\SOFTWARE\Policies\Microsoft
  2. Right-click the Microsoft key in the left pane, and then select New -> Key. Name the Key as WindowsInkWorkspace.

    new-WindowsInkWorkspace-key

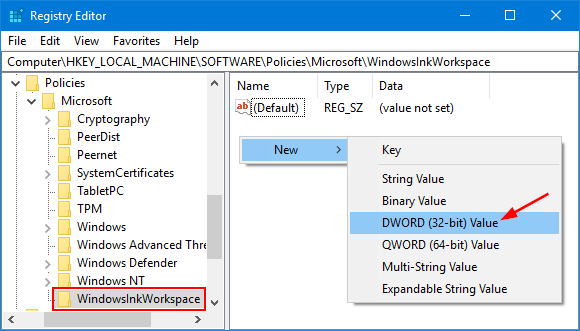
  3. Now, select the WindowsInkWorkspace key. Right-click empty space in the right pane, select New -> DWORD (32-bit) Value.

    new-AllowWindowsInkWorkspace-value

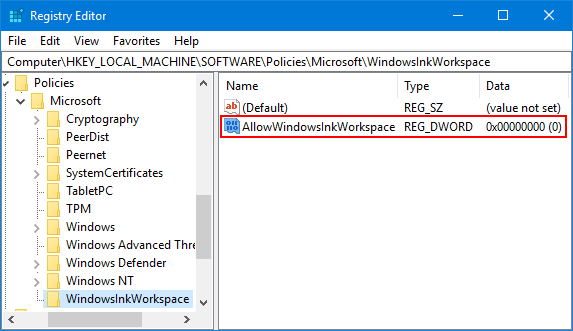
  4. Name the DWORD value as AllowWindowsInkWorkspace. Leave its value data as 0.

    AllowWindowsInkWorkspace

  5. Restart your computer. Once signed back in, you should see Windows Ink Workspace disabled.

If you want to enable Windows Ink Workspace again, just follow the steps above and change the DWORD AllowWindowsInkWorkspace value from 0 to 1, and restart your computer.

Enable / Disable Sharing Tab in Folder Properties on Windows 10

July 29th, 2017 by Admin

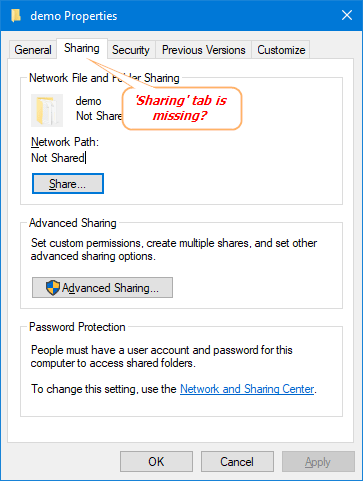
Sharing tab missing in Folder Properties on Windows 10? If you want to share a folder with other users, just right-click on the folder and select Properties, and then go to the Sharing tab in the Folder Properties window. Sometimes you might find the Sharing tab goes missing. In this tutorial we’ll enable or disable Sharing tab in Folder Properties for all users on Windows 10.

sharing-tab-in-folder-properties

Part 1: Disable Sharing Tab in Folder Properties

  1. Press Windows + R keys together, type regedit in the Run dialog box and hit Enter to open Registry Editor.

    regedit

  2. Navigate to the following key:
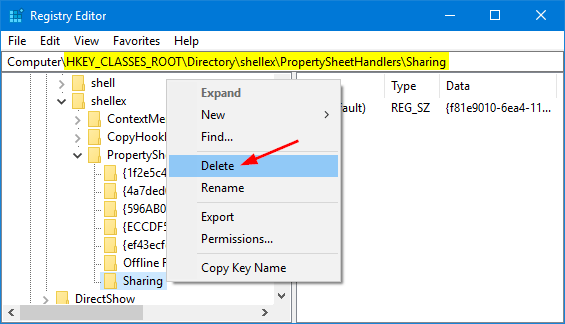
    HKEY_CLASSES_ROOT\Directory\shellex\PropertySheetHandlers\Sharing
  3. Right-click on the Sharing key in the left pane, and then select Delete.

    disable-sharing-tab-in-folder-properties

  4. Now, bring up the Folder Properties dialog and you’ll find the Sharing tab is disappearing.

Part 2: Enable Sharing Tab in Folder Properties

  1. Press Windows + R keys together, type regedit in the Run dialog box and hit Enter to open Registry Editor.
  2. Navigate to the following key:
    HKEY_CLASSES_ROOT\Directory\shellex\PropertySheetHandlers\Sharing

    If the Sharing key doesn’t exist, right-click on the parent key and select New -> Key to create it.

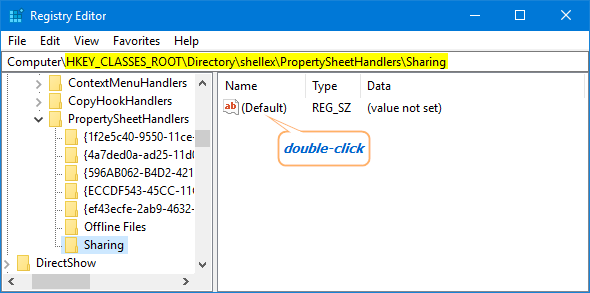
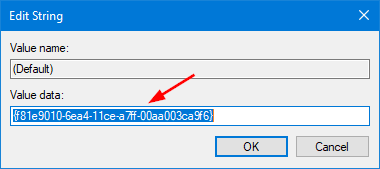
  3. Highlight the Sharing key and go to its right pane. Double-click on Default string with type REG_SZ.

    double-click-default-string

  4. Copy and paste the following value into the Value data box, and click OK.

    {f81e9010-6ea4-11ce-a7ff-00aa003ca9f6}

    change-sharing-value

  5. Close Registry Editor and open the Folder Properties dialog, it should restore the missing Sharing tab.

2 Ways to Hide / Show Navigation Pane in Windows Explorer

July 28th, 2017 by Admin

Navigation pane missing from File Explorer in Windows 10? By default, Windows Explorer will display the navigation pane in the left-hand column, which gives you quick access to the most frequently used items like This PC, Network, Quick access and so on. If you don’t like the navigation pane, it’s very easy to get rid of it. In this tutorial we’ll show you 2 ways to hide / show navigation pane in Windows Explorer (or File Explorer).

navigation-pane-in-windows-explorer

Method 1: Hide / Show Navigation Pane in Windows Explorer Using Ribbon

  1. Press the Windows key + E hotkey to open Windows Explorer.
  2. Click the View tab, and then click the Navigation pane button in the ribbon. In the drop-down menu, you can click to check or uncheck the “Navigation pane” option. When it’s unchecked, the navigation pane will disappear from Windows Explorer.

    show-hide-navigation-pane-in-file-explorer

Method 2: Hide / Show Navigation Pane in Windows Explorer with Registry Tweak

  1. Download one of the following registry files and save it on your desktop.

    hide-navigation-pane-in-explorer.reg

    show-navigation-pane-in-explorer.reg

  2. Next, right-click on the .reg file and select Merge. If prompted by UAC, click on Yes.
  3. Click on Yes to confirm that you want to add the registry keys.

    import-registry-settings

  4. Close all Explorer windows that are currently open, and re-launch Windows Explorer. You’ll see that the navigation pane is shown or hidden in File Explorer as you expected.

How to Check If Your Disk Uses MBR or GPT Partition Style

July 24th, 2017 by Admin

How can I determine if my disk is formatted as GPT or MBR? Since the release of Windows 8, GPT partition style is becoming a popular alternative as newer computers are shipping with UEFI firmware, and Windows 10/8 can only boot from GPT disk on UEFI-based computers. In this tutorial you’ll learn how to find out where your disk uses MBR or GPT partition style in Windows.

Method 1: Check If Your Disk Is MBR or GPT Using Disk Management Tool

  1. Press Windows key + X on your keyboard, and then select Computer Management from the pop-up menu.

    computer-management

  2. Click on Disk Management, which appears in the left-hand side under the heading Storage. Right-click on the hard drive available in the center of the window, then select Properties.

    disk-properties

  3. This will bring up the Device Properties window. Click the Volumes tab and you’ll see if the partition style of your disk is GUID Partition Table (GPT) or Master Boot Record (MBR).

    partition-style

Method 2: Check If Your Disk Is MBR or GPT Using Command Prompt

  1. Open the Command Prompt with administrative rights.
  2. At the Command Prompt, type following commands one by one, pressing Enter after each.
    diskpart
    list disk

    list-disk-cmd

  3. It will list all disks that are connected to your PC. If a disk uses GPT, you’ll see an asterisk character (*) under the Gpt column. As you can see in the screenshot above, disk 0 is a GPT disk while disk 1 is a MBR disk.

That’s it!
4 Ways to Launch Administrative Tools in Windows 10

July 21st, 2017 by Admin

Administrative Tools is the most commonly used Control Panel applet, which gives you access to a variety of advanced tools in Windows, like Computer Management, Services, Event Viewer, Local Security Policy, etc. In this tutorial we’ll show you 4 simple ways to launch Administrative Tools in Windows 10.

Method 1: Access Administrative Tools from Start Menu

Click the Start button in the lower left corner of your screen. When the Start Menu opens, scroll down and expand Windows Administrative Tools, and you can then click on the administrative tool you want to open.

open-administrative-tools-from-start-menu

Method 2: Launch Administrative Tools via Cortana Search

In the Cortana Search box on the taskbar, type “administrative tools” and then click or tap the Administrative Tools search result.

search-administrative-tools

Method 3: Launch Administrative Tools from Run or Command Prompt

Press the Windows key + R to open the Run window. Type control admintools and hit Enter. This will open the Administrative Tools applet immediately.

run-control-admintools

Another method that works in all Windows operating systems is to type control admintools in the Command Prompt.

Method 4: Open Administrative Tools from Control Panel

Open the Control Panel and then choose “Large icons” under the View by option. You can then click Administrative Tools to launch it.

administrative-tools-in-control-panel

That’s it!