Author Archive

How to Disable Specific Windows Key Shortcut in Windows

May 18th, 2017 by Admin

How to disable a certain global shortcut key that conflicts with an application-specific hotkey? Sometimes or even frequently though, you may activate a hotkey accidentally? In this tutorial we’ll show you a simple way to disable specific Windows key shortcut in Windows 10, 8 and 7.

How to Disable Specific Windows Key Shortcut in Windows?

  1. Press the Windows logo key + R combination to open the Run box. Type regedit and hit Enter.

    regedit

  2. When the Registry Editor opens, navigate to the following key:
    HKEY_CURRENT_USER\Software\Microsoft\Windows\CurrentVersion\Explorer\Advanced
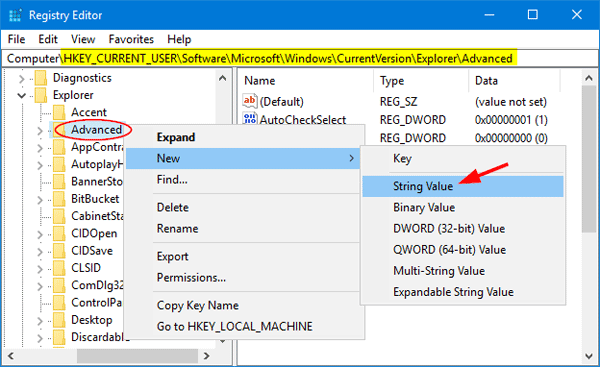
  3. Right-click on the Advanced key in the left pane, and then select New -> String Value from the context menu.

    new-string-value

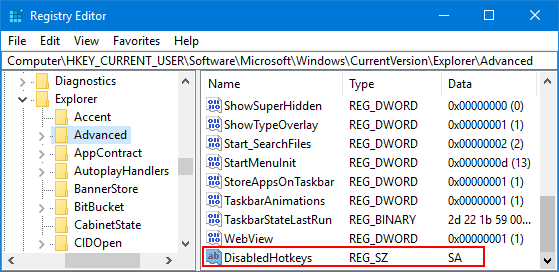
  4. Name it DisabledHotkeys, and set its value data to the characters of hotkeys you want to disable.

    DisabledHotkeys

    For example, set it to S. This will disable Win + S, Win + Shift + S, and other shortcuts that using Windows key and the disabled characters you specified.
    Set it to SA to disable both Win + S and Win + A hotkeys.
    And so on.

  5. Reboot your computer and the hotkeys you specified will become disabled. If you want to restore the original hotkeys to work, just delete the DisabledHotkeys value and you’re done.

2 Ways to Disable Snipping Tool in Windows 10

May 18th, 2017 by Admin

How do you disable the snipping tool and don’t allow it to run? This tutorial will show you how to disable Snipping Tool in Windows 10 using Group Policy or Registry Editor.

Method 1: Disable Snipping Tool in Windows 10 Using Group Policy

  1. Open the Local Group Policy Editor and navigate to:
    Computer Configuration -> Administrative Templates -> Windows Components -> Tablet PC -> Accessories
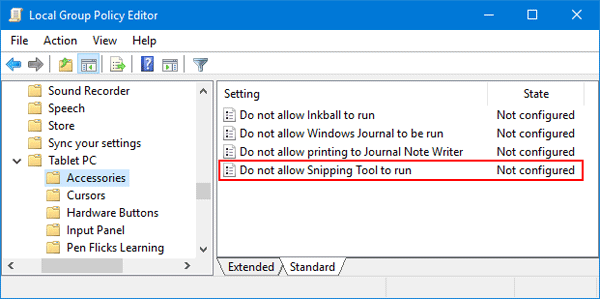
  2. In the right pane, double-click on the policy named Do not allow Snipping Tool to run.

    dont-allow-snipping-tool-to-run

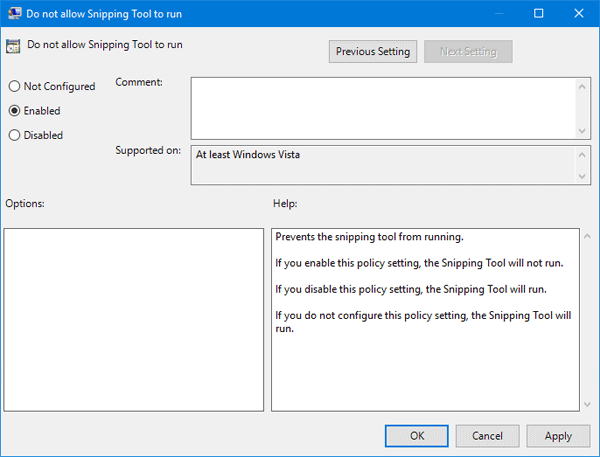
  3. Select Enabled, click OK.

    disable-snipping-tool

    Restart your computer for this policy setting to take effect.

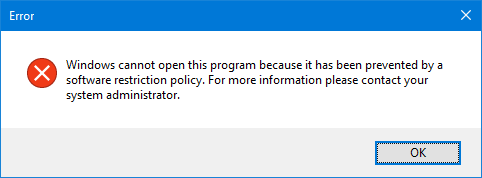
  4. When you try to run the snipping tool or press the Windows logo key+Shift+S hotkey, you’ll receive the following error message:

    “Windows cannot open this program because it has been prevented by a software restriction policy. For more information, open Event Viewer or contact your system administrator.”

    prevented-by-software-restriction-policy

Method 2: Disable Snipping Tool in Windows 10 Using Registry Editor

  1. Press the Windows logo key + R hotkey to open the Run box. Type regedit and press Enter.

    regedit

  2. In the Registry Editor window that opens, navigate to the following key:
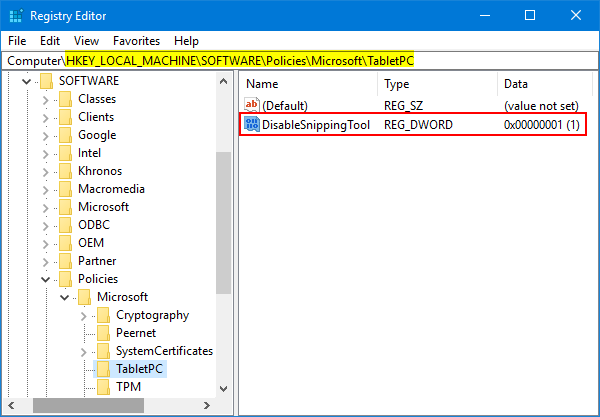
    HKEY_LOCAL_MACHINE\SOFTWARE\Policies\Microsoft\TabletPC

    If the TabletPC key doesn’t exist, you need to create it.

  3. Set the value DisableSnippingTool to 1. If DisableSnippingTool doesn’t exist, right-click on a blank area in the right pane, and select New -> DWORD (32-bit) Value, name it as DisableSnippingTool.

    DisableSnippingTool

  4. Reboot your computer and check the result.

How to Prevent Windows 10 Apps from Running in the Background

May 15th, 2017 by Admin

How to stop Windows 10 from automatically starting apps in the background? Windows 10 comes with many built-in apps that run in the background by default. Those apps can automatically update live tiles , send notification and stay up-to-date, even if you never use them. This will drain some battery power and consume system resources. In this tutorial we’ll show you 2 ways to prevent Windows 10 apps from running in the background.

Method 1: Disable Background Apps in Windows 10 from Settings

  1. Open the Setting app by pressing the Windows logo key + I shortcut.
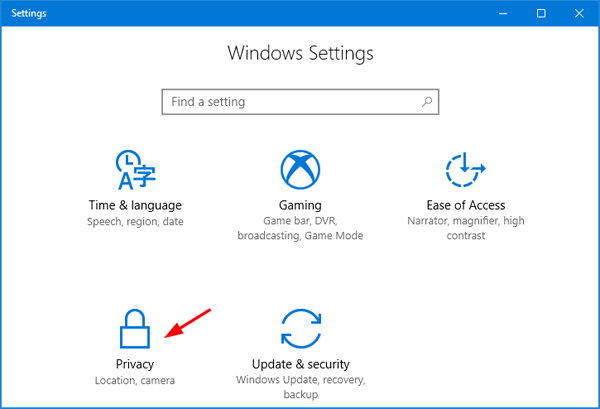
  2. Click the Privacy icon in the Settings window.

    privacy-settings

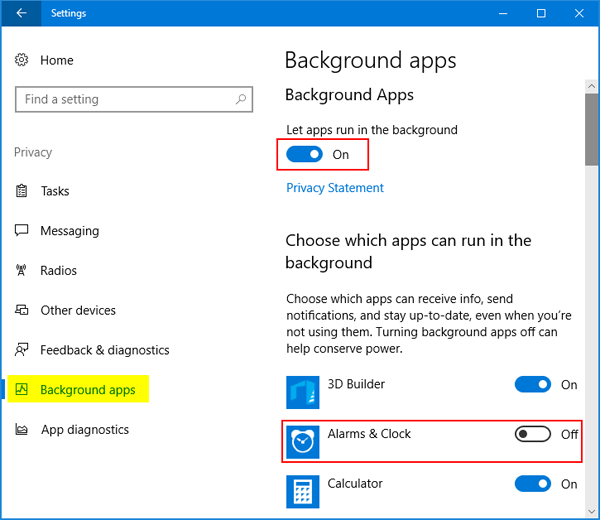
  3. Select Background apps on the left side. On the right pane, you can simply flip the switch to off next to the apps you no longer want running in the background, or prevent all apps from running in the background by switching off “Let apps run in the background“.

    let-apps-run-in-the-background

  4. The changes take effect immediately. Using this method you can also prevent third-party apps from running in the background.

If you change your mind then you can turn on certain background apps any time you want. For example, if you start to use the Mail app to send/receive mails, you need to allow the Mail app to run in the background. Otherwise you won’t get notification of new mails.

Method 2: Disable Background Apps in Windows 10 Using Registry Editor

  1. Press the Windows logo key + R to open the Run dialog box. Type regedit and press Enter.

    regedit

  2. When the Registry Editor appears, navigate to the following key:
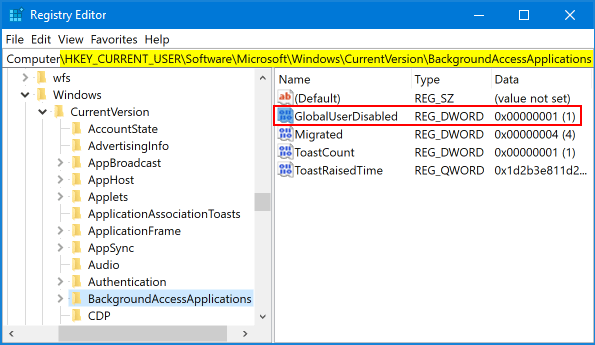
    HKEY_CURRENT_USER\Software\Microsoft\Windows\CurrentVersion\BackgroundAccessApplications
  3. Right-click on the BackgroundAccessApplications key in the left pane, and select New -> DWORD (32-bit) Value. Name it GlobalUserDisabled and set its value to 1. (1: Turn off all background apps, 0: Turn on background apps)

    turn-off-background-apps

  4. Close Registry Editor. Restart your computer for the changes to take effect.

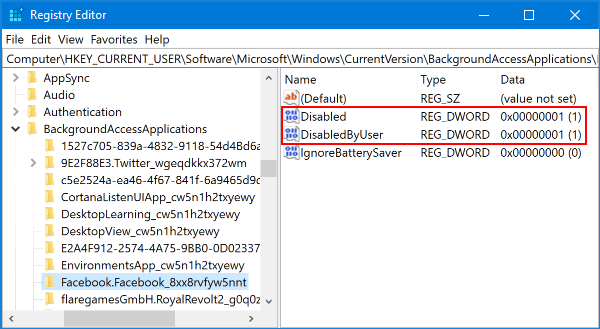
If you want to use Registry Editor to turn off a certain background app only, just set GlobalUserDisabled to 0 and then expand the BackgroundAccessApplications key in the left side of Registry Editor. Locate the subkey for the app that you disallow to run in the background, create two new DWORD values named “Disabled” and “DisalbedByUser” and set the values to 1.

diable-background-app-in-windows-10

That’s it. Now you have disabled background apps in Windows 10.

3 Different Ways to Turn Off Windows 10 / 8 / 7 Password

May 12th, 2017 by Admin

Could I log in to Windows without a password? How can I disable password at login screen? Looking for a way to turn off Windows password because you’ve forgotten it? In this tutorial we’ll show you 3 different ways to turn off Windows 10 / 8 / 7 password.

Option 1: Turn Off Windows Password by Deleting the Password

Right-click on My Computer shortcut on your desktop. If you’re running Windows 10, right-click This PC shortcut in the left navigation pane of File Explorer. Next choose Manage from the context menu.
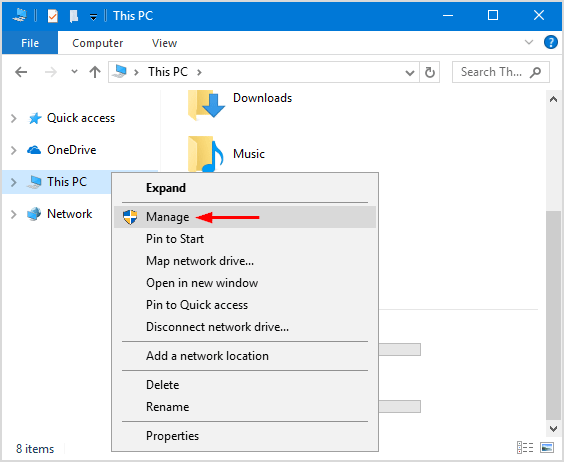
manage-this-pc

When the Computer Management window appears, navigate to Local Users and Groups -> Users. Right-click your local account and select Set Password. When get the warning prompt, click on Proceed to continue.
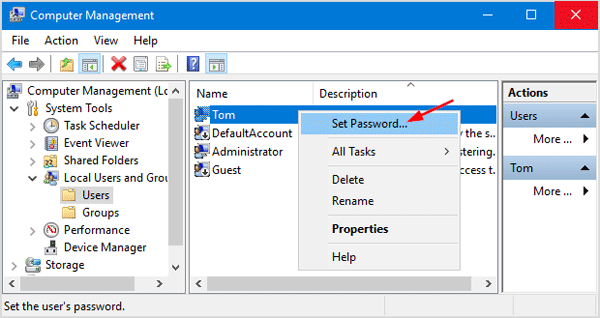
set-windows-password

Type the new password and confirm. Click OK to remove the existing password for your Windows account.
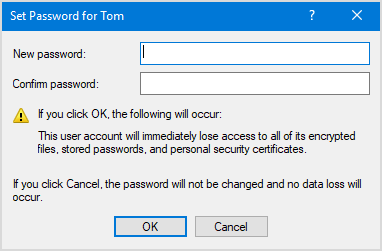
set-password-for-windows-user

Option 2: Turn Off Windows Password by Enabling Automatic Logon

This method allows you to disable Windows login screen without changing or deleting your password. After enabling automatic logon, Windows will automatically sign into your account every time you turn on or restart your computer. Here’s how:

Press the Windows logo key + R to open the Run dialog box. Type netplwiz and press Enter.
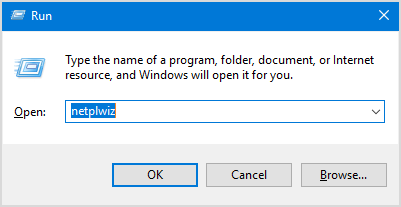
netplwiz

Uncheck the box “Users must enter a user name and password to use this computer“, and then select your Windows account from the list. Click OK.
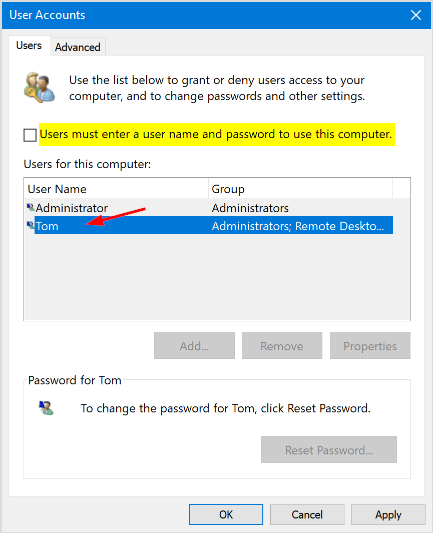
enable-automatic-logon

Type your current password twice and click OK.
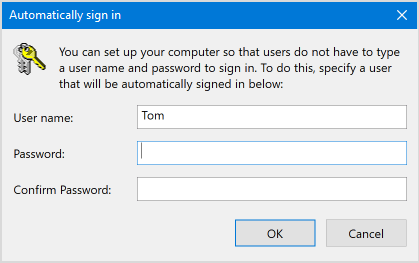
automatically-sign-in-to-windows

From now on, Windows will automatically log into your selected account with the password you provided.

Option 3: Turn Off Windows Password When You’re Locked Out of Computer

If you have physical access to a machine then there is nothing to prevent you from gaining administrative access. When you forgot your Windows administrator password or need to access a locked or disabled account, you can take use of PCUnlocker to log back in to your computer without reinstalling Windows.

To get started, you need to prepare a PCUnlocker Live CD (or USB) on another PC you have access to. Download the ISO image of PCUnlocker and burn it to a blank CD (or USB thumb drive) using ISO2Disc.
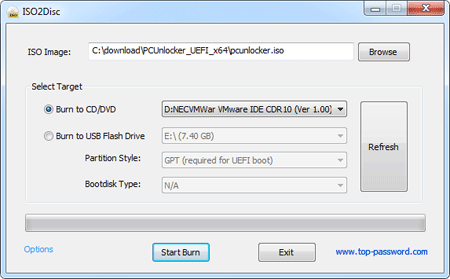
Boot your locked computer from PCUnlocker Live CD (or USB). Once you’re at the PCUnlocker screen, select one of your local accounts and click on Reset Password button.

When the Change Password dialog box opens, just leave the password field empty and click OK. This will turn off Windows password completely.
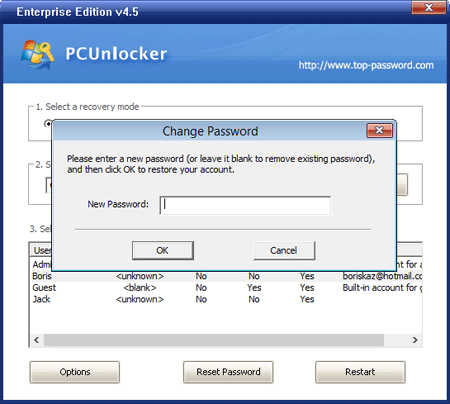
Reboot your computer and you can then sign into Windows account without being prompted for a password.

Restore Control Panel Missing from Win+X Menu in Windows 10

May 8th, 2017 by Admin

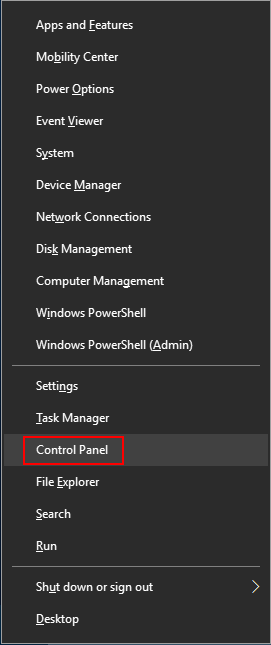
Control Panel disappeared from Windows 10’s Win+X menu? In recent release of Windows 10 Creators Update (build 1703), the Control Panel shortcut in the Win+X menu was replaced with the Settings app. Luckily there is a simple way to restore the missing Control Panel shortcut to Win+X menu in Windows 10.

How to Restore Control Panel Missing from Win+X Menu in Windows 10?

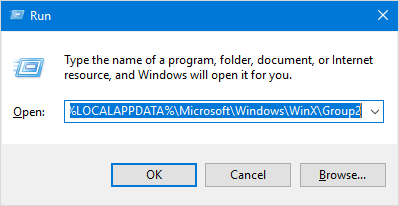
  1. Press the Windows logo key + R to open the Run command box. Copy & paste the following path and press Enter.
    %LOCALAPPDATA%\Microsoft\Windows\WinX\Group2

    run-to-winx-folder

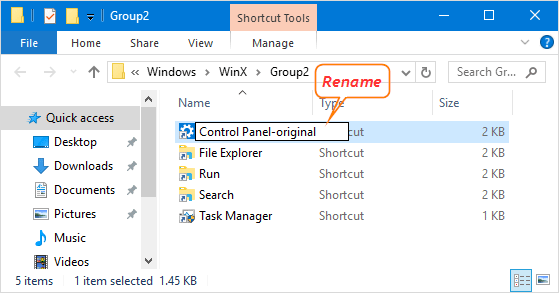
  2. This will open the Group2 folder in File Explorer, which contains a “Control Panel” item, but this appears in the Win+X menu as “Settings“. In order to restore Control Panel back to Win+X menu, you have to rename the existing “Control Panel” item.

    rename-control-panel-shortcut

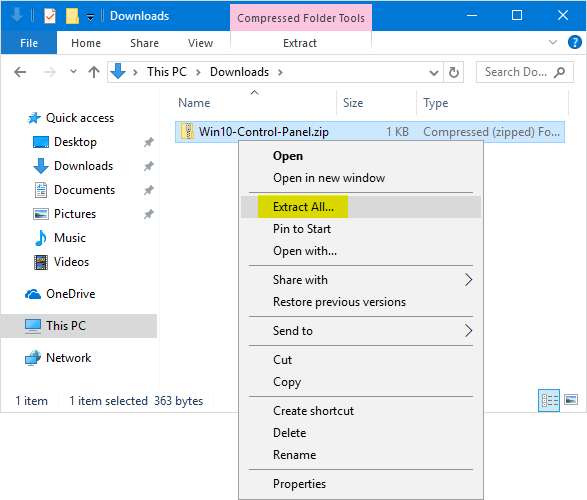
  3. Download the old style Control Panel shortcut from this link: Win10-Control-Panel. After the file downloads, right-click on it and select Extract All.

    extract-shortcut-file

    Note: If you want to use the Control Panel shortcut created by yourself, you have to use the hashlnk program to “patch” the shortcut. Otherwise, your shortcut will not appear on the Win+X menu.

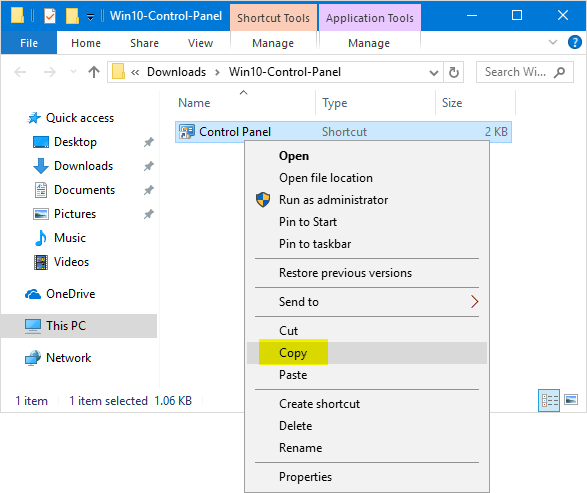
  4. Copy the extracting file and then paste it into the Group2 folder.

    copy-control-panel-shortcut

  5. Restart your computer and Control Panel will appear again in the Win+X menu!

    restore-control-panel-to-winx-menu

    You might notice that the Settings option is still there even if we’ve renamed it. If you want to remove “Settings” from Win+X menu, just delete the original “Control Panel” item from the Group2 folder.

Stop Mouse / Keyboard from Waking Computer in Windows 10

May 7th, 2017 by Admin

By default, moving your mouse or pressing the keyboard will wake up your computer from sleep / hibernation mode. But, the slightest movement of the mouse or even a cat walking on the keyboard can cause Windows to wake up. That could be really annoying. In this tutorial we’ll show you how to stop mouse or keyboard from waking computer in Windows 10.

How to Stop Mouse / Keyboard from Waking Computer in Windows 10?

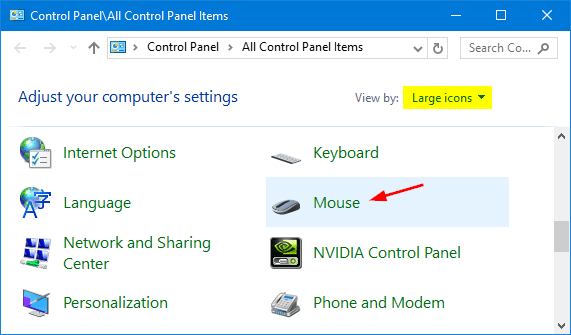
  1. Open the Control Panel in Large icons view, and then click on Mouse. If you want to prevent keyboard from waking computer, click on Keyboard instead.
    mouse-control-panel-app

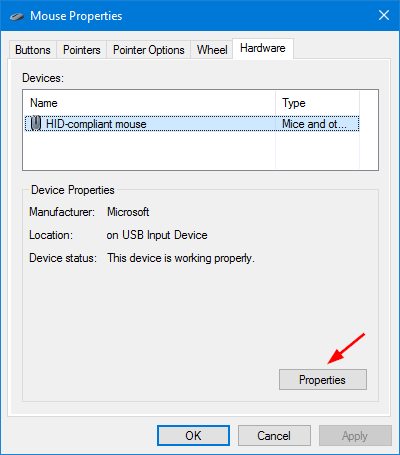
  2. In the Mouse (or Keyboard) Properties window, switch to the Hardware tab. Select the mouse you want to control from the list and then click on Properties.
    mouse-properties

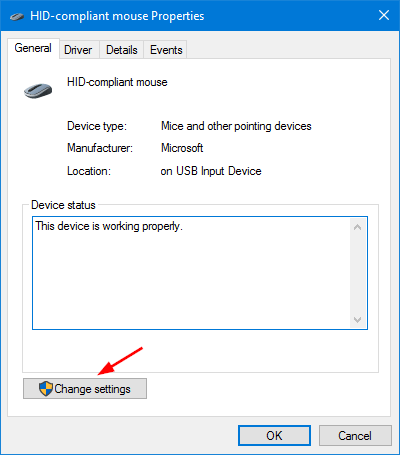
  3. Under the General tab, click the Change settings button.

    change-mouse-settings

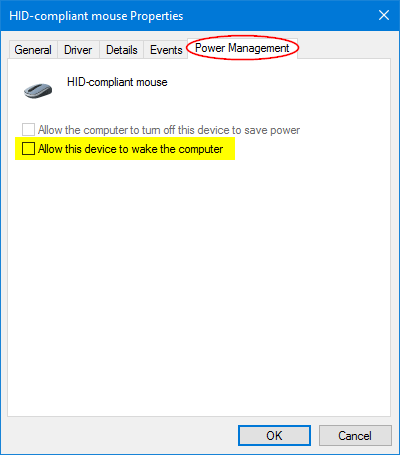
  4. Select the Power Management tab, and uncheck the box next to Allow this device to wake the computer. Click OK.

    allow-this-device-to-wake-pc

  5. That’s it. Now neither your mouse or keyboard will wake your Windows 10 system from sleep mode. You’ll need to press the computer’s Power button to wake it.

2 Ways to Turn On or Off PIN Expiration in Windows 10

May 4th, 2017 by Admin

Just like the local account, Windows 10 also allows you to set up expiration date for PIN login. A PIN usually contains only numbers, and this makes it easier for anyone with physical access to break into your computer. It’s good practice to enable PIN expiration policy to prompt users to change PIN regularly.

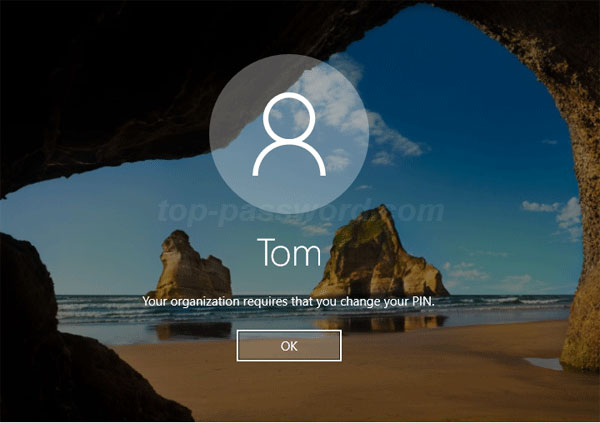
In this tutorial we’ll show you 2 simple ways to turn on or off PIN expiration in Windows 10. When your PIN is expired, you’ll receive the message “Your organization requires that you change your PIN” during login.

windows-10-pin-expired

Method 1: Turn On / Off PIN Expiration in Windows 10 Using Group Policy

  1. Open the Local Group Policy Editor by pressing the Windows key + R keyboard shortcut and then typing gpedit.msc.

    gpedit

  2. Navigate to the following location in the left pane of Local Group Policy Editor:
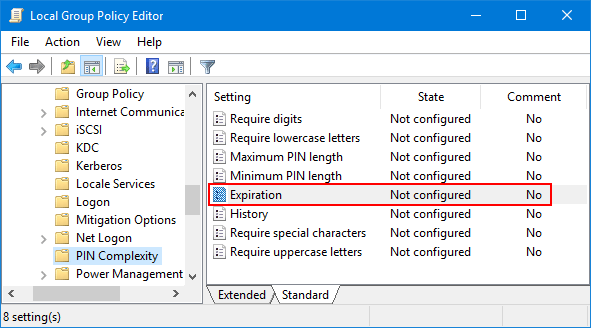
    Computer Configuration\Administrative Templates\System\PIN Complexity

    Next, double-click the Expiration policy in the right pane.

    windows-pin-complexity

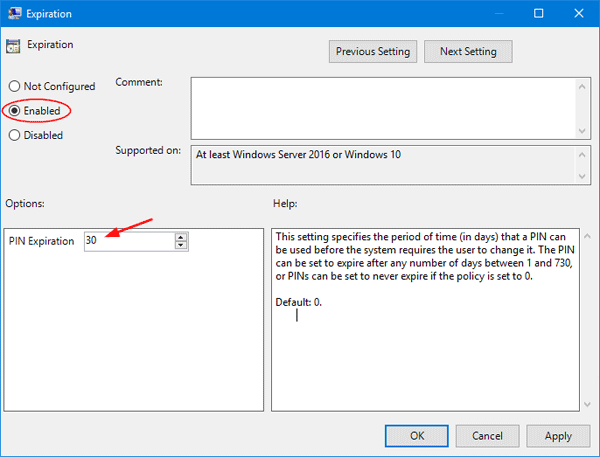
  3. This will open the Expiration window. To enable PIN expiration, select the Enabled option and enter a number between 1 and 730 days for when to expire after. If you use default 0 the PIN will never expire.

    enable-pin-expiration-in-windows-10

    If you want to disable PIN expiration, just select either Disable or Not Configured, and click OK.

  4. Close local Group Policy Editor and restart your computer to apply your changes.

Method 2: Turn On / Off PIN Expiration in Windows 10 Using Registry Editor

  1. Open the Registry Editor by pressing the Windows key + R keyboard shortcut and then typing regedit.

    regedit

  2. Navigate to the following registry key:
    HKEY_LOCAL_MACHINE\SOFTWARE\Policies\Microsoft\PassportForWork\PINComplexity

    The last two keys (PassportForWork, PINComplexity) may not exist on your machine, so you will have to create them (right-click on the previous key and select New->Key in the context menu that appears).

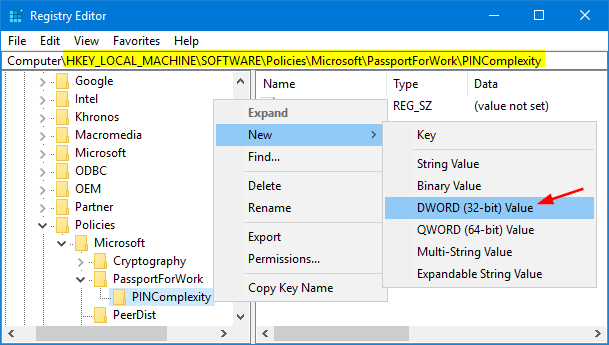
  3. Right-click on the PINComplexity key in the left pane, and then select New -> DWORD (32-bit) Value.

    new-dword-value

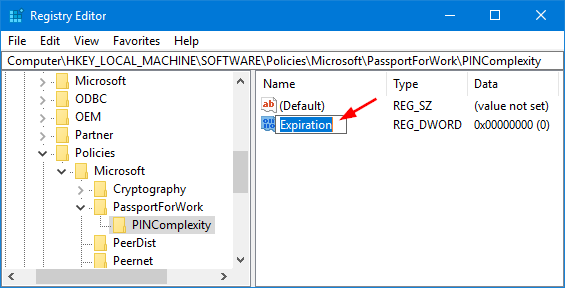
  4. Name the new DWORD value as Expiration, and then double-click on it to modify.

    pin-expiration-registry

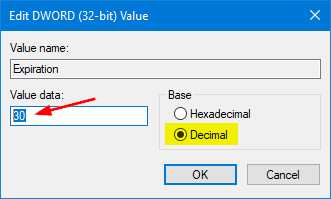
  5. Select the Decimal option, you can enter a number between 1 to 730 days before requiring users to change PIN. Click OK.

    turn-on-pin-expiration-windows-10

    If you want to disable PIN expiration later, just delete the Expiration value itself.

  6. Close Registry Editor and reboot your PC for your changes to take effect.

2 Ways to Move Taskbar Location on Screen in Windows 10

April 28th, 2017 by Admin

“My taskbar decided to go vertical instead of horizontal. How do I move the taskbar back to its horizontal position at the bottom of my screen?”

Is there a way to change taskbar location in Windows 10? By default, the taskbar is at the bottom of the desktop, but you can also move it to any edge of the screen. This tutorial will show you 2 simple ways to move taskbar to different locations (Bottom, Left, Right, Top) of your screen in Windows 10.

windows-10-taskbar-at-top

Method 1: Drag Taskbar and Move it to Any Edge of the Screen

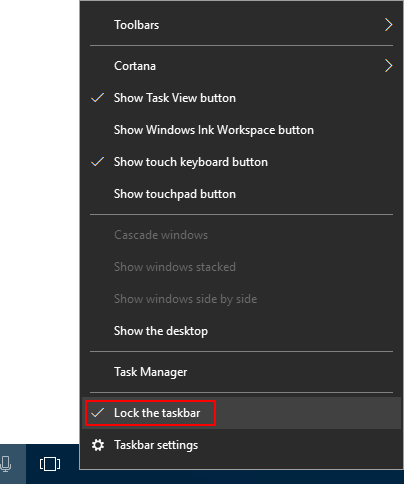
Right-click an empty space on the taskbar. If you see a check mark next to the “Lock the taskbar” option, the taskbar is locked and you’re unable to change its location. You need to click that option again to unlock the taskbar.

unlock-windows-taskbar

Next, click an empty space on the taskbar, and then hold down the mouse button as you drag the taskbar to one of the four edges of the desktop. When the taskbar is where you want it, release the mouse button.

Method 2: Change Taskbar Location from Settings App

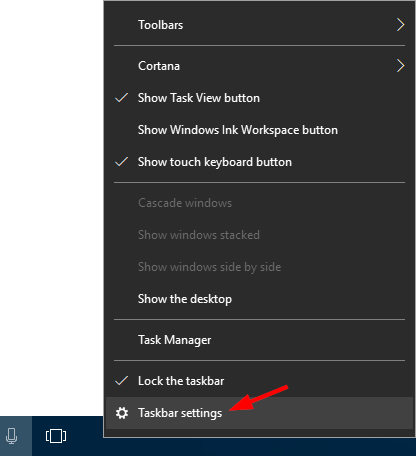
The other way to change the taskbar location is through the Settings app. Right-click an empty space on the taskbar, and then select Taskbar settings from the context menu.

windows-taskbar-settings

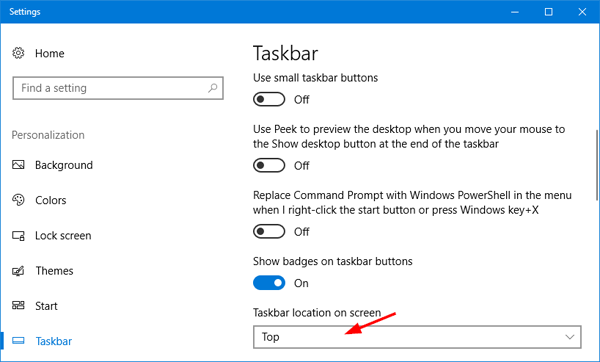
This will open the Taskbar page in the Settings app. Scroll down and find the “Taskbar location on screen” drop-down box. You can choose any of the four sides of the display from the list.

taskbar-location-on-screen

After changing taskbar location, you can lock the taskbar to stop you moving or resizing it accidentally.

3 Ways to Add Run Command to Start Menu & Taskbar in Windows 10

April 26th, 2017 by Admin

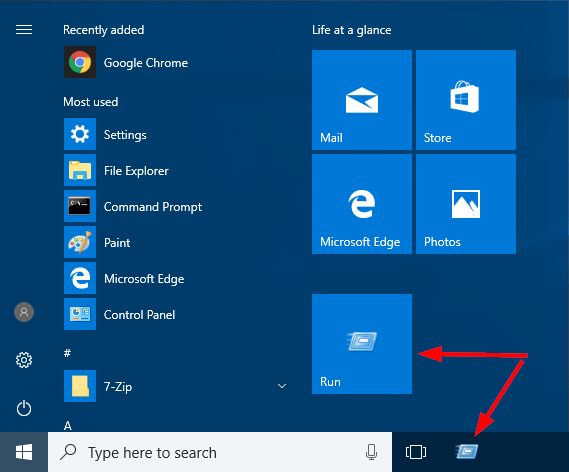
Most users prefer to open the Run command box by pressing the Windows + R key combination. But if you’re using a tablet or a PC without keyboard, the fastest way is to open the Run command by pinning the shortcut to Start Menu or taskbar. In this tutorial we’ll show you 3 ways to add Run command to Start Menu & taskbar in Windows 10, so it can always be seen and launched right away.

open-run-command-in-windows-10

Method 1: Using Cortana Search

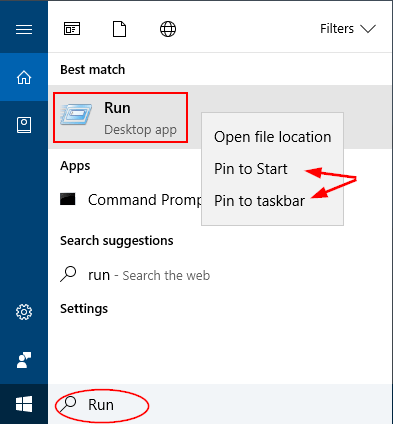
Click the Cortana search box in Windows 10 taskbar and type Run. When you see the Run app showing up in the search result, right-click on it. You will see both Pin to Start and Pin to taskbar options in the context menu.

pin-run-to-start-menu-or-taskbar

Method 2: Using Start Menu

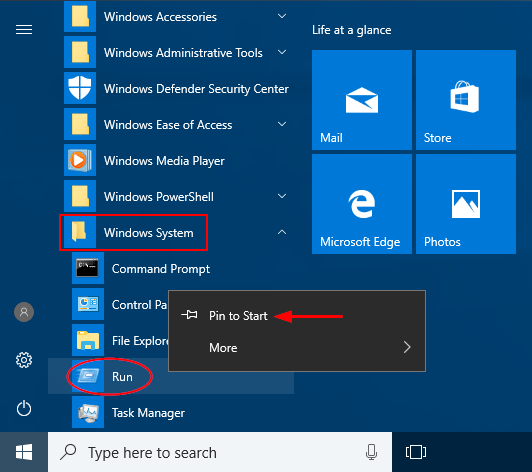
Click the Start button, and then browse to the Windows System folder at the bottom of Start Menu. Expand it and you’ll see the Run command there.

Right-click on the Run command and pick Pin to Start from the context menu.

pin-run-to-start

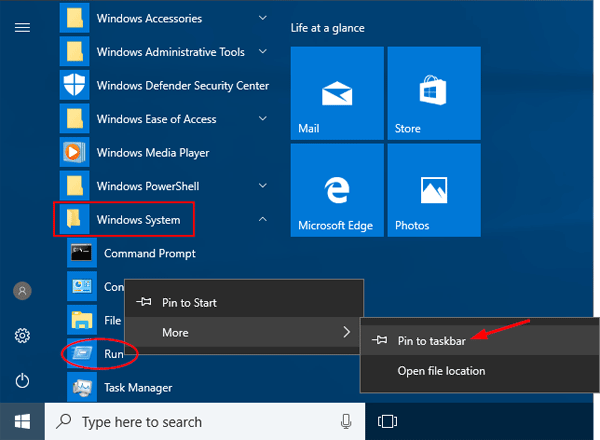
If you want to add Run to Windows 10 taskbar, just select More -> Pin to taskbar from the context menu.

pin-run-to-taskbar

Method 3: Right-click on Run desktop shortcut

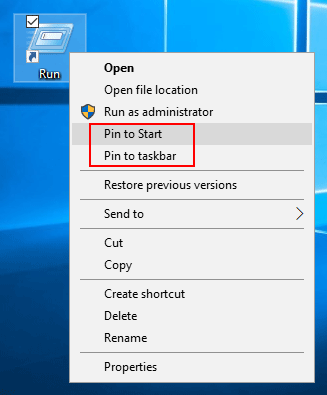
To get started, you need to create a shortcut for the Run command on Windows 10 desktop. When it’s done, right-click on the Run shortcut and you can find the options to pin Run to Start Menu & taskbar.

run-command-dekstop-shortcut