Author Archive

How to Take Ownership (Permission) of Protected Registry Key in Windows 10

September 20th, 2016 by Admin

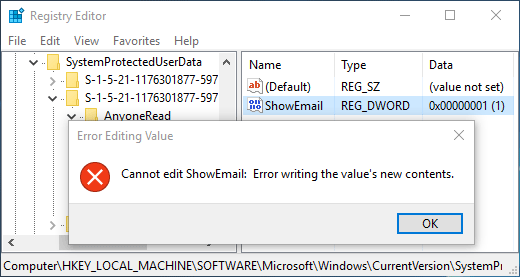
Sometimes you might encounter some registry keys that are protected by Windows. When you try to edit, rename or delete a protected registry key or value, you’ll get one of the following errors:

“Cannot edit {value_name}: Error writing the value’s new contents.”

“The Registry Editor cannot rename {key_name}. Error while renaming key.”

“Unable to delete all specified values.”

“Cannot delete {key_name}: Error while deleting key.”

error-edit-registry-value

Even you’re logged in as Administrator, you might still lack permissions to edit a protected registry key. In such cases, you need to take ownership of that particular key and grant full permissions to your signed-in account. This step-by-step tutorial will guide you how to take full ownership of protected registry key in Windows 10.
How to Take Full Ownership of Protected Registry Key?

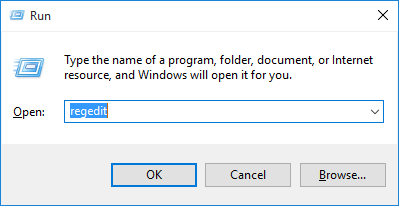
  1. To start, press the Windows logo key + R on your physical keyboard, type regedit and press Enter to open the Windows Registry.

    regedit-via-run

  2. Navigate to the protected key you want to take ownership of. For this example, we chose the following key:

    HKEY_LOCAL_MACHINE\SOFTWARE\Microsoft\Windows\CurrentVersion\SystemProtectedUserData\S-1-5-21-1176301877-597599738-4051979053-1001\AnyoneRead\Logon

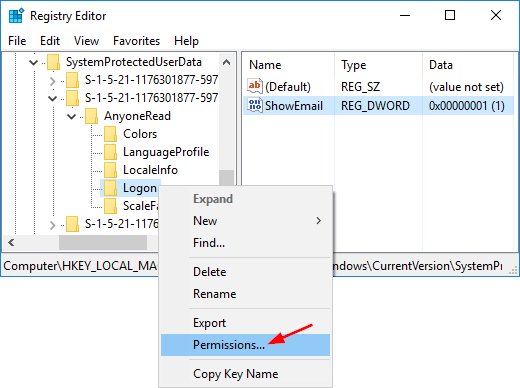
  3. Right-click on the protected key, and select Permissions from the context menu that appears.

    edit-registry-permissions

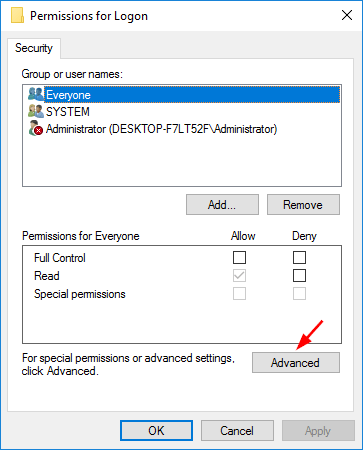
  4. In the Permissions window that appears, Click Advanced.

    registry-key-permissons

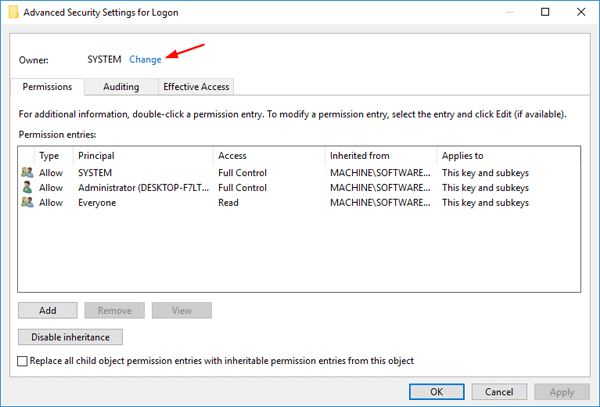
  5. In the Advanced Security Settings dialog, you can see the current owner (SYSTEM or “TrustedInstaller“) of your selected key. Click on Change button.

    change-registry-owner

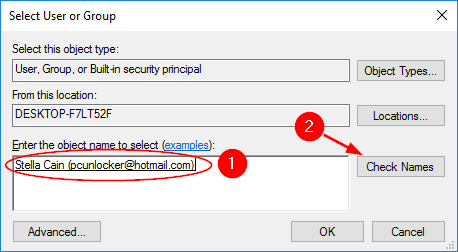
  6. This will open a new dialog box. Now type your user account name, and then click on “Check Names” button to convert the username to correct format. Click OK.

    select-registry-owner

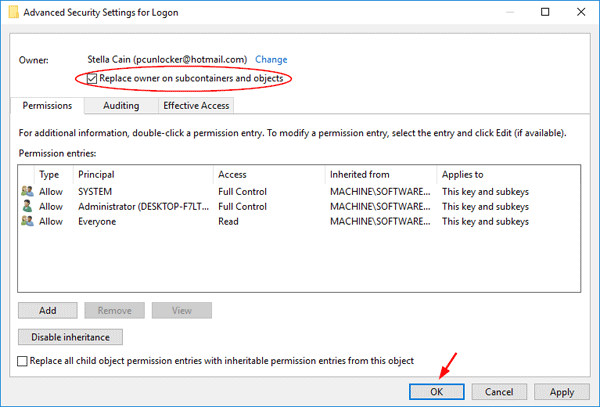
  7. Now you’ll see that your user account is showing up as the owner. Check the “Replace owner on subcontainers and objects” option if you also want to take ownership of the subkeys. Click OK.

    replace-owner-on-subkeys

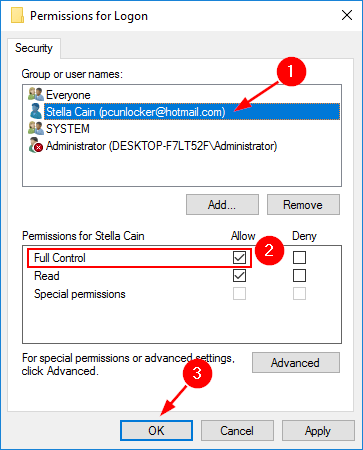
  8. When back to the Permissions window, select the desired user name and then check Allow checkbox under the Full Control row, and click OK.

    modify-registry-permissions

    If your user account is not shown under the Group and user names list, click on Add button.

  9. Close Registry Editor. Now you’ve taken ownership of a protected registry key and grant your account full permissions. That’s it!

8 Ways to Open Computer Management in Windows 10

September 19th, 2016 by Admin

Computer Management is a handy console included in Windows that allows you to view event logs, partition your hard drive, manage the devices and services, etc. In this article we’ll show you 8 ways to open Computer Management in Windows 10.

Option 1: Open Computer Management from Start Menu

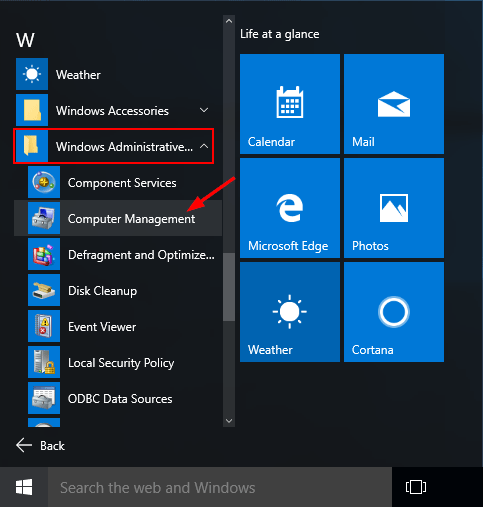
Click the Start button, select All Programs -> Windows Administrative Tools, and then click on the Computer Management shortcut.

open-compmgmt-via-start-menu

Option 2: Open Computer Management by Right-clicking My Computer

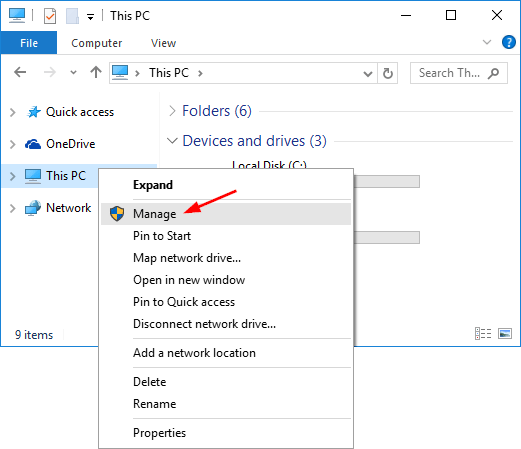
Right-click on This PC icon on your desktop (or on the left pane of File Explorer), select Manage from the context menu. This will launch Computer Management in Windows 10.

right-click-this-pc

Option 3: Open Computer Management from Run

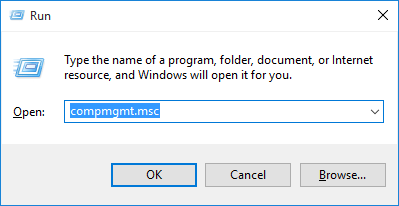
Press the Windows logo key + R to open the Run box. Type compmgmt.msc and press Enter to open the Computer Management console.

compmgmt

Option 4: Open Computer Management by Pressing Win + X Keys

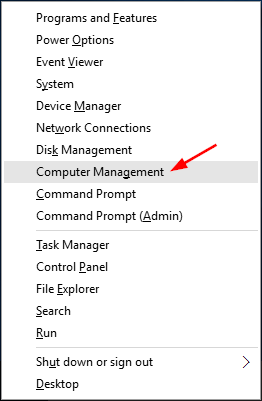
Press the Windows logo key + X to open the power user menu. Then click the Computer Management shortcut.

power-user-menu

Option 5: Open Computer Management from Command Prompt

Open the Command Prompt in Windows 10, type compmgmt.msc and hit Enter.

open-compmgmt-via-cmd

The Computer Management console will start immediately.

Option 6: Open Computer Management Using Cortana Search

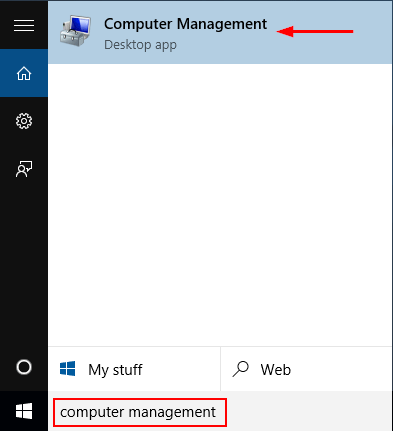
The fastest way to open Computer Management in Windows 10 is to use the Cortana Search. Click on Cortana Search box from the taskbar, enter the words “computer management” and then click the Computer Management shortcut.

search-computer-management

Option 7: Open Computer Management from Control Panel

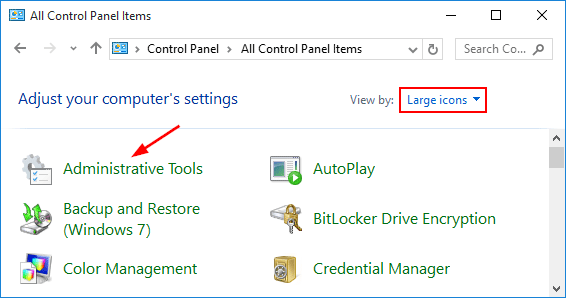
Open Control Panel in Large or Small icons view. Click Administrative Tools.

administrative-tools

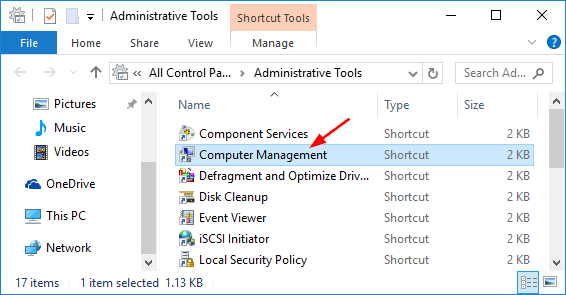
A new window will open. From there you can click on the Computer Management shortcut.

computer-management-shortcut

Option 8: Create a Computer Management shortcut on Your Desktop

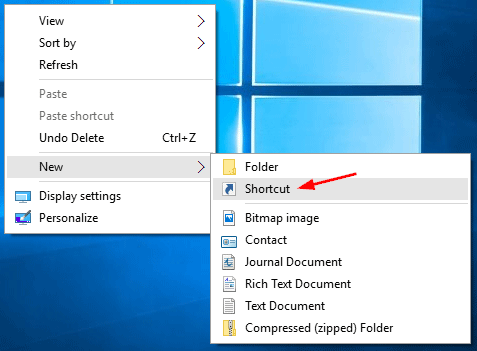
Right-click on any empty space on your Windows 10 desktop. Select New -> Shortcut from the right-click context menu.

new-shortcut

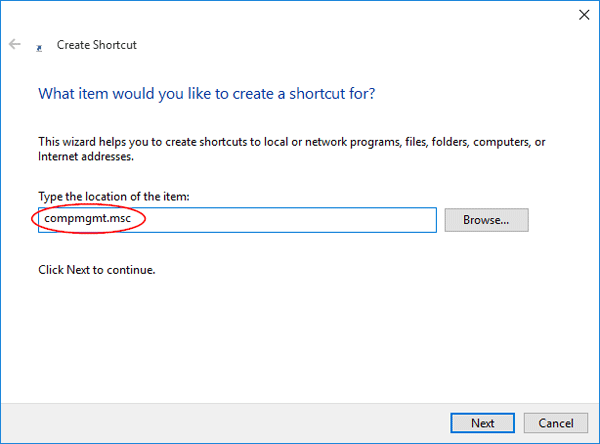
When the Create Shortcut wizard opens, type compmgmt.msc in the shortcut location box and click Next.

shotcut-location

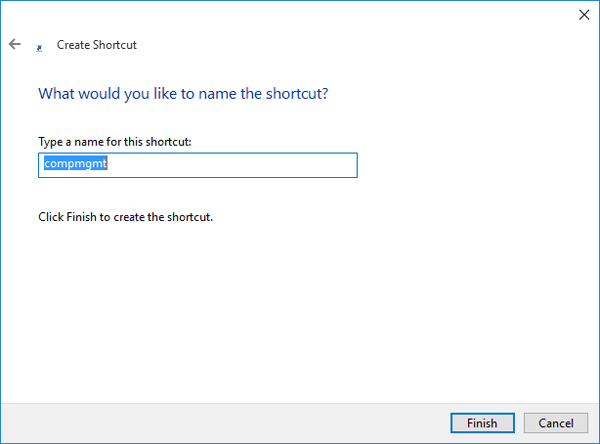
Next just type any name for your created shortcut and click Finish.

name-the-shortcut

You’ll see the Computer Management short on your desktop.

How to Stop Check Disk (Chkdsk) From Running at Startup

September 18th, 2016 by Admin

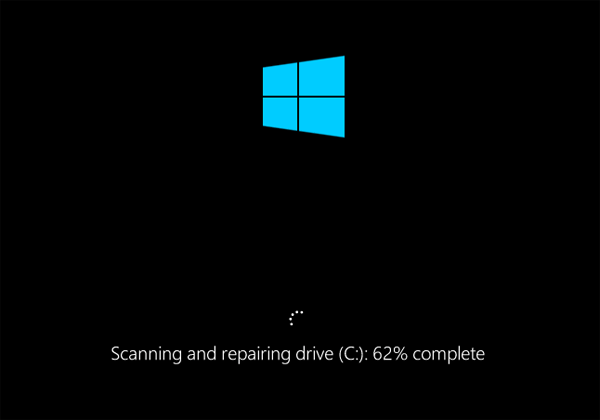
There are some situations where your PC needs to run a check disk at startup or reboot. For instance, if you run the chkdsk command on a system drive that is being used to run the Windows OS, it will schedule a disk check to run at the next reboot. Windows might also force an automatic disk check when your computer shuts down unexpectedly.

disk-checking-at-boot

Checking disk could be a really time-consuming task. If you don’t want Windows to take its time during the next reboot, here is how you can cancel or stop check disk (chkdsk) from running at Startup in Windows 10, 8, 7, Vista and XP.

Part 1: Check if a Manual/Automatic Disk Check is Scheduled

Open a Command Prompt as an administrator in Windows. Type in the following command and press Enter.
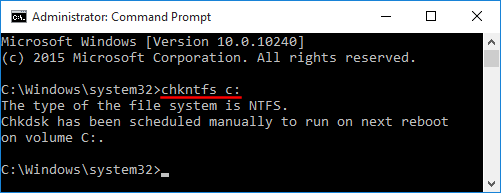
chkntfs C:

If there is a chkdsk task scheduled you will receive a response that is similar to “chkdsk has been scheduled manually to run on next reboot.

disk-check-schedule

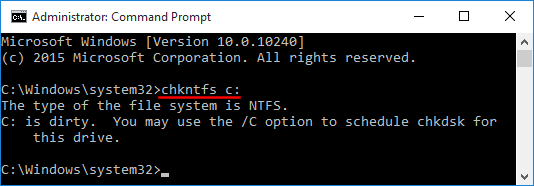
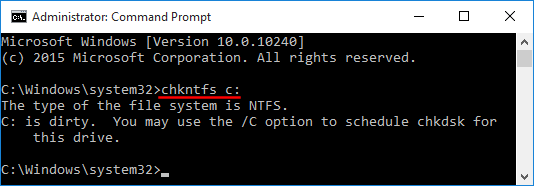
If a dirty flag is set on your drive, the system will force an automatic disk check at the next reboot.

disk-dirty

Part 2: Stop Check Disk from Running at Startup

The methods of stopping check disk varies depend on how it is scheduled.

Option 1: Cancel the Automatic Disk Check

When the computer boots up with the dirty bit enabled on a drive, you will be asked to check the disk for consistency before Windows is loaded. But sometimes Windows might keep running check disk automatically on every reboot and this could be quite annoying. To stop the automatic disk check, you have to clear the dirty bit by following this tutorial: How to Manually Clear or Set Dirty Bit on Windows Volume

Option 2: Cancel the Scheduled Disk Check

It’s much easier to stop the scheduled disk check. You can cancel the scheduled disk check using either Command Prompt or Registry Editor.

Method 1: Using Command Prompt

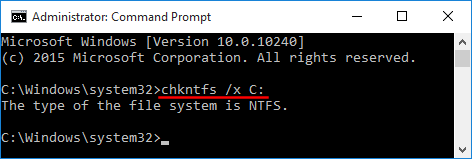
Open a Command Prompt as an administrator. If you want to disable a scheduled disk check on C: drive, type the following command and press Enter.
chkntfs /x C:

cancel-scheduled-diskcheck

Method 2: Using Registry Editor

Open the Registry Editor. Navigate to the following keys:
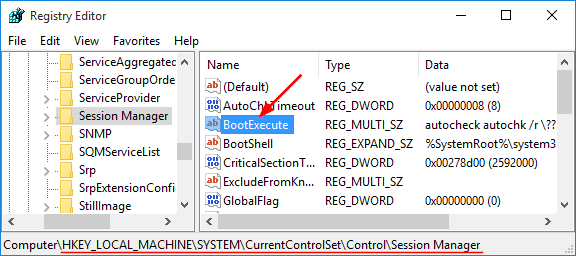
HKEY_LOCAL_MACHINE\SYSTEM\CurrentControlSet\Control\Session Manager

Double-click on the Multi-String value “BootExecute” in the right pane.

boot-execute

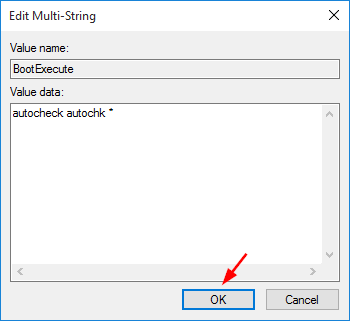
This will open the “Edit Multi-String” window. Click in the Value data box, and then delete all of the lines, except the last one.

cancel-disk-checking

When it’s done, click OK and close Registry Editor.

How to Manually Clear or Set Dirty Bit on Windows Volume

September 17th, 2016 by Admin

When a dirty bit is set on a volume, Windows automatically performs a disk checking the next time the computer is restarted. You can run the chkntfs command at the Command Prompt to check if a volume is dirty, but there is no way to clear the dirty bit unless you let Windows go through disk scanning at boot.

disk-dirty

In this tutorial we’ll show you how to manually clear or set the dirty bit for a NTFS & FAT32 volume in Windows 10, 8, 7, Vista and XP. The procedure requires you to use a disk editor software such as WinHex. If you want to edit the dirty bit for a system volume currently in use, you need to use a WinPE bootable CD to boot off your PC.

How to Manually Clear or Set Dirty Bit on Windows Volume?

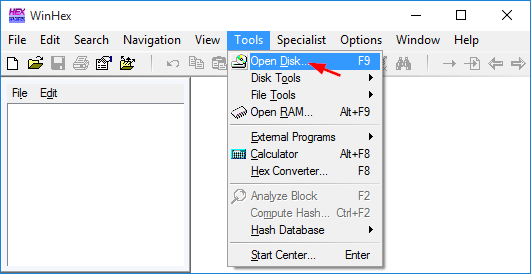
To get started, open WinHex as administrator rights. Click the Tools menu and select Open Disk.

open-disk-with-winhex

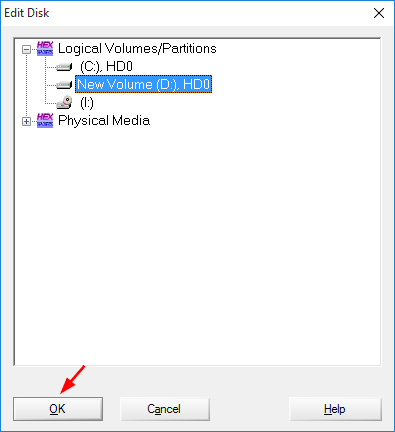
When prompted to select a drive for editing, choose the logical volume you want to edit the dirty bit on, and then click OK.

edit-logical-volume

For FAT32 Volume:

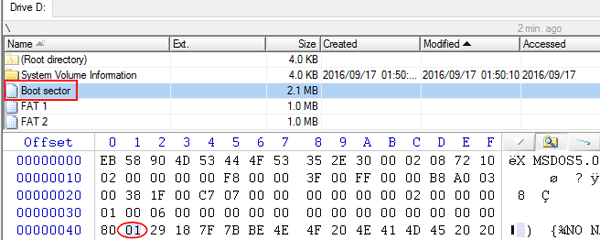
Click on “Boot sector” at the directory browser. The dirty bit for FAT32 volume is located at offset 0x41. If this volume is dirty, the bit should be 01. Just change 01 to 00 and then save your changes back to disk, now you’ve successfully cleared the dirty bit.

fat32-dirty-bit

For NTFS Volume:

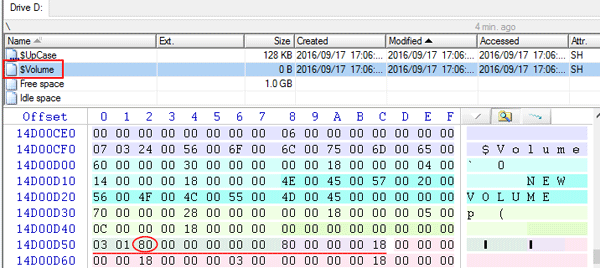
Click on $Volume at the directory browser. The offset location of the dirty bit is slightly different on every NTFS volume. To locate the dirty bit, look for a hex string of 13 bytes, beginning with 03 01, ending with 80 00 00 00 18. You should be able to find a match within the first or second sector.

ntfs-dirty-bit

The dirty bit is the 3th byte of the hex string that I’ve circled with red line. To set a dirty flag on the drive, just change it to 01. Or change it to 00 if you want to clear the dirty flag.

When it’s done, commit the change to the disk.

3 Ways to Run Disk Error Check in Windows 10, 8 and 7

September 17th, 2016 by Admin

All versions of Windows come with a useful disk checking feature which can check the integrity of your hard disk, fix file system errors and scan for bad sectors. In this tutorial we’ll show you 3 ways to run disk error check in Windows 10, 8 and 7.

Method 1: Run Disk Check from Windows Explorer

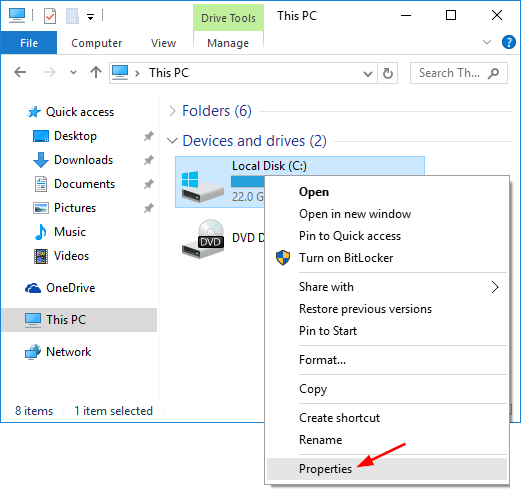
  1. Open Windows Explorer. Right-click on the drive you want to run the disk check on, and choose Properties.

    disk-properties

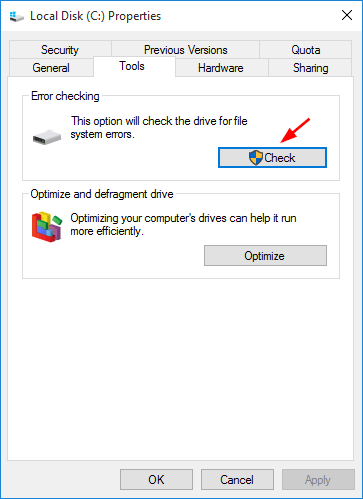
  2. Select the Tools tab. Under the “Error checking” section, click on the Check button.

    disk-error-checking

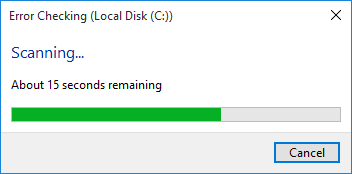
  3. Click on Scan drive button to run the disk check.

    scanning-disk

    If your selected drive is a system partition that is being used, Windows will let you schedule a disk check on the next restart.

Method 2: Run Disk Check Using the Chkdsk Command Line

  1. Open an elevated Command Prompt.

    • In Windows 10/8, simply press the Windows key + X and select “Command Prompt (Admin)“.
    • In Windows 7, click on Start, navigate to Accessories, right-click on Command Prompt and select Run as administrator.
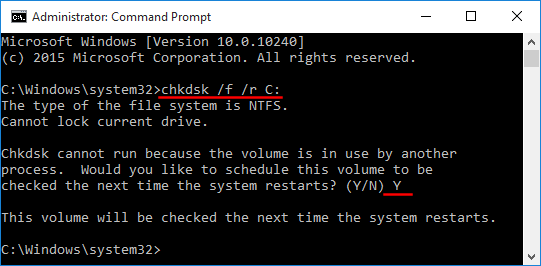
  2. You can run the chkdsk command to run the disk check. Replace C: with the letter of the drive you’d like to run a disk check.

    chkdsk /f /r C:

    chkdsk-cmd

    The /f flag tells windows to fix any issues and the /r flag tells it to do a deep scan. It locates bad sectors and recovers whatever information is readable.

Method 3: Run Disk Check By Setting The Dirty Bit

Sometimes if your PC is not properly shut down or crashed, a dirty flag is set on the disk to force disk check to be run at the next reboot. Here is a simple way to set a dirty bit for your drive manually:

  1. Open an elevated Command Prompt.
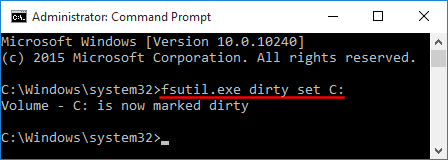
  2. Type the following command and press Enter. Replace C: with the letter of the drive you want to set as dirty.
    fsutil.exe dirty set C:

    mark-disk-dirty

  3. Reboot your computer and Windows will force a disk check on your specified drive.

3 Ways to Reset Windows 10 Computer to Factory Settings

September 13th, 2016 by Admin

If your computer becomes sluggish, or freezes or hangs randomly, you might consider doing a factory reset. This will bring your Windows 10 laptop or desktop to the state when it was first turned on. In this tutorial we’ll show you 3 ways to reset Windows 10 computer to its factory default state, even if your computer is locked out or unbootable.

factory-reset-windows-10-pc

Method 1: Reset Windows 10 PC to Factory Settings After Logging in

After logging in to Windows 10, you can reset your computer to factory default settings using the Settings app. Follow these steps:

  1. To open the Settings app, you can click the Start button and then click Settings, or press Windows key + I keyboard shortcut.
  2. Click on Update & Recovery.

    update-security

  3. Select Recovery in the left-hand menu. Under Reset this PC, click on Get Started.

    get-started-pc-reset

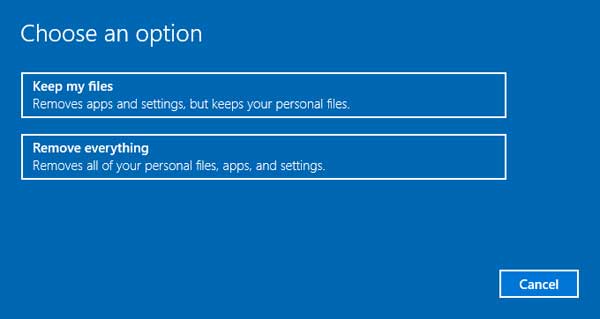
  4. A new window will appear with two options: Keep my files or Remove everything. The former option will keep your personal documents, photos and music files intact. But both options will remove all your apps, programs and settings.

    choose-an-option

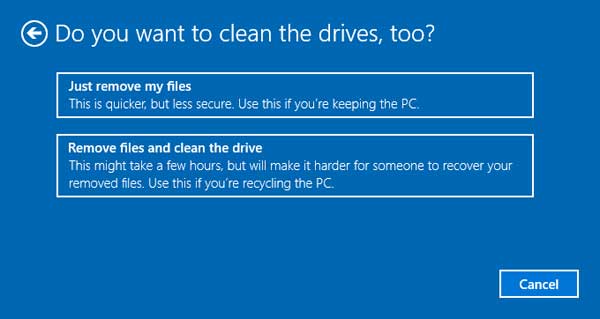
  5. if you chose “Remove everything” in the prior step, you now have the option to “Just remove my files” or “Remove files and clean the drive.” In most cases, select “Just remove my files”. If the computer is going to be recycled or given to someone else, select “Remove files and clean the drive”.

    clean-the-drive

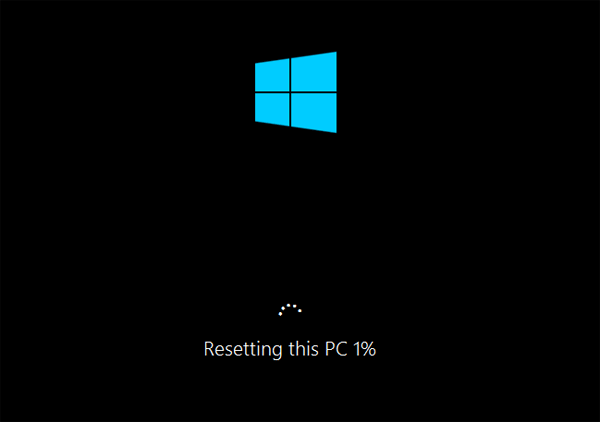
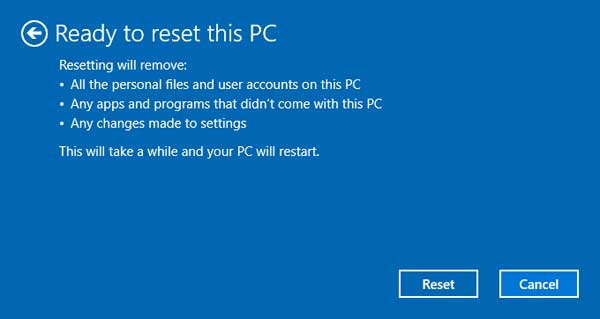
  6. Click on Reset. Your PC will reboot automatically and begin the factory reset process. This might take an hour or more.

    reset-this-pc

Method 2: Reset Windows 10 PC to Factory Settings from The Login Screen

If you forgot Windows 10 password and couldn’t log on to your computer, you can also perform a factory reset from the login screen. Here’s how:

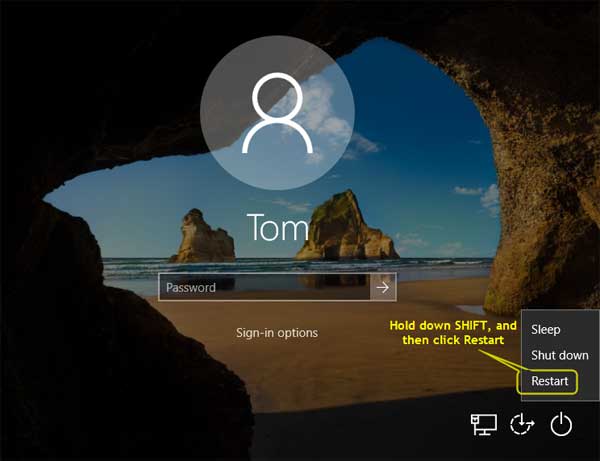
  1. When you’re on the login screen, hold down the SHIFT key, click the Power button in the lower-right corner and select Restart.

    shift-restart

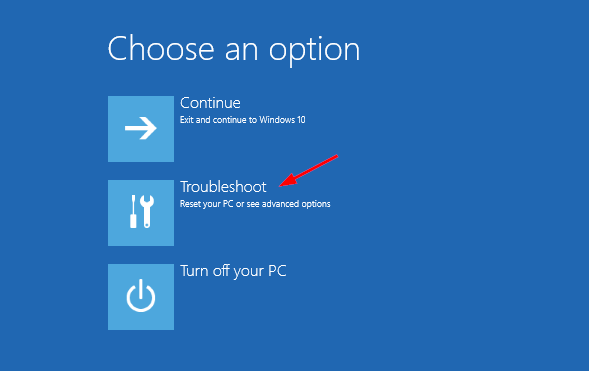
  2. The computer will reboot and take you to the Choose an option screen. Click on Troubleshoot.

    troubleshoot

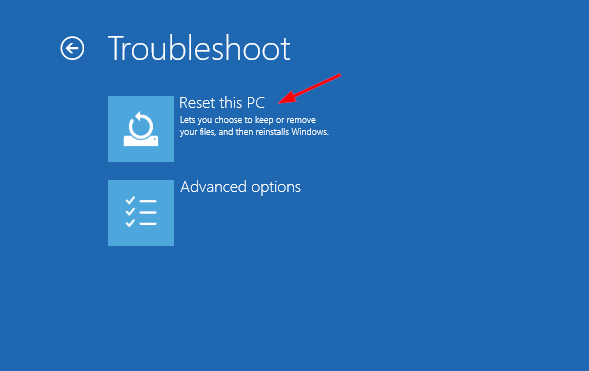
  3. On the next screen, click on Reset this PC.

    reset-this-computer

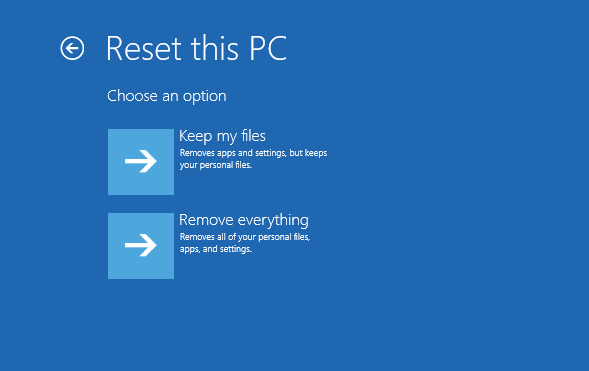
  4. You’ll be presented with two options: Keep my files or Remove everything. If you’re not concerned about your personal files, click on the latter option.

    keep-or-remove-files

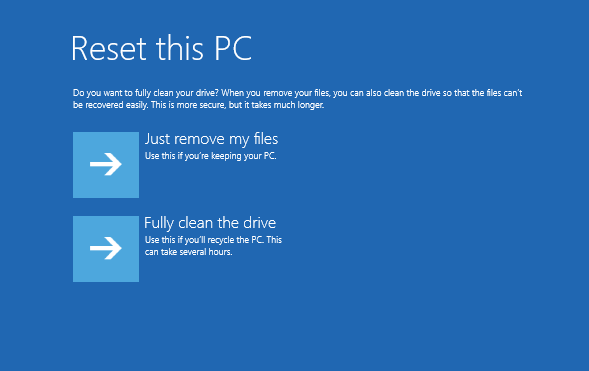
  5. If you choose to remove everything, you’ll also see a new option asking if you want to clean the drive, which means it will not only delete everything, but will try to securely erase everything so that data cannot be recovered.

    fully-clean-drive

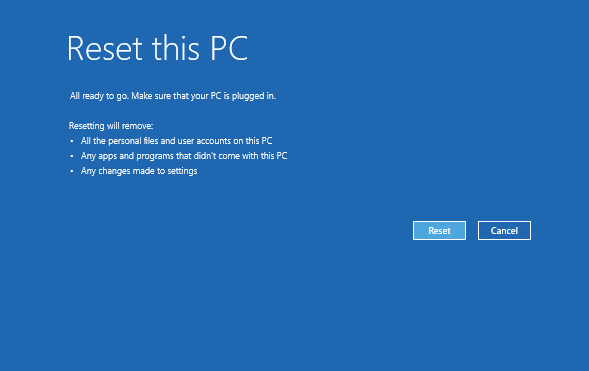
  6. Click on Reset button to start restoring Windows 10 to factory settings.

    reset-windows-10-to-factory

Method 3: Reset Windows 10 PC to Factory Settings Using Install Disc

When your computer becomes crashed or unbootable, then you’re unable to perform a factory reset using the above methods. In this case, you need to use your Windows 10 installation DVD to access the Factory Reset option.

  1. Boot your computer with Windows 10 installation DVD. You may have to change the boot sequence in your BIOS if booting from a CD/DVD is not enabled.
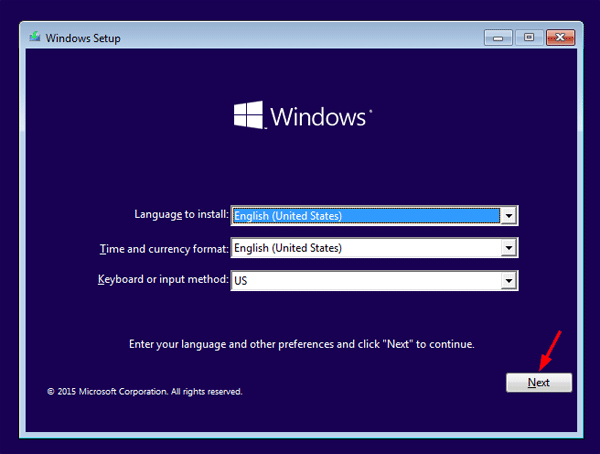
  2. On the Windows Setup screen, select your keyboard layout and language, and then click on Next.

    windows-setup

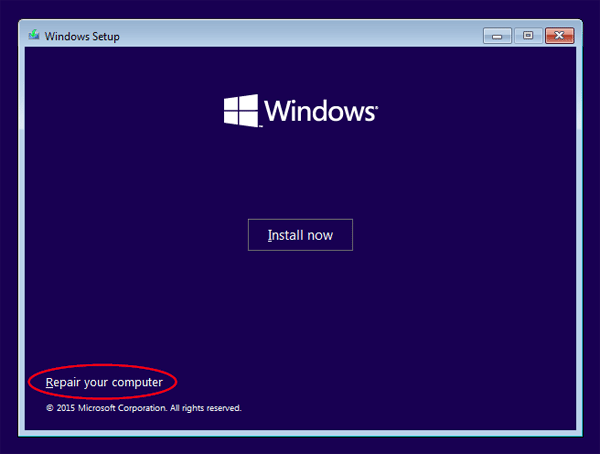
  3. On the next screen, click “Repair your computer“. Do NOT click “Install now“.

    repair-your-computer

  4. When the Choose an option screen appears, click on Troubleshoot.

    troubleshoot

  5. Click on Reset this PC.

    reset-this-computer

  6. Click either “Keep my files” or “Remove everything,” depending on whether you want to keep your personal files untouched.

    keep-or-remove-files

  7. You’ll then be prompted to choose the target operating system.

    choose-target-os

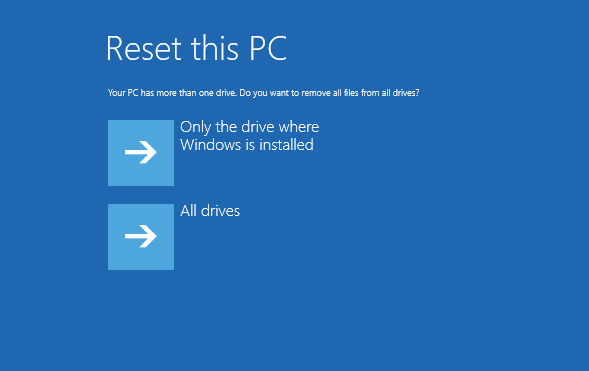
  8. If you want to restore only the drive on which Windows 10 is installed, you should click on “Only the drive where Windows is installed“. If you want to factory reset all the drives on your Windows 10 computer, you should click on “All drives“.

    reset-which-drive

  9. Now you’ll be presented with two options: Just remove my files and Fully clean the drive. If you choose “Fully clean the drive”, it will erase your files and data thoroughly.

    fully-clean-drive

  10. Click Reset and the factory reset process will begin.

    reset-windows-10-to-factory

4 Ways to Reset Domain Admin Password on Windows Server 2008

September 9th, 2016 by Admin

How can I change domain password from command line? Have you forgotten domain administrator password? In this tutorial we’ll show you 4 ways to reset domain admin password on Windows Server 2008 domain controller.

Method 1: Reset Domain Admin Password Using Active Directory Users and Computers snap-in

  1. Click the Start button, and then select All Programs > Administrative Tools > Active Directory Users and Computer.

    active-directory-users-and-computers

  2. When the Active Directory Users and Computers MMC snap-in opens, expand your domain and click Users in the left pane.
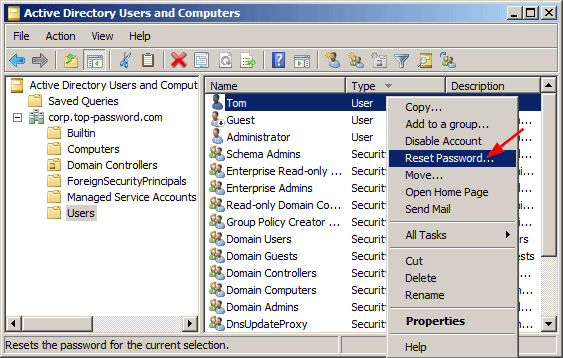
  3. In the right pane, right-click the name of the account, and click Reset Password.

    reset-domain-password

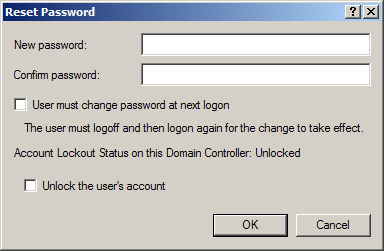
  4. Type and then confirm the new password. Click OK.

    enter-new-domain-password

Method 2: Reset Domain Admin Password from Command Line

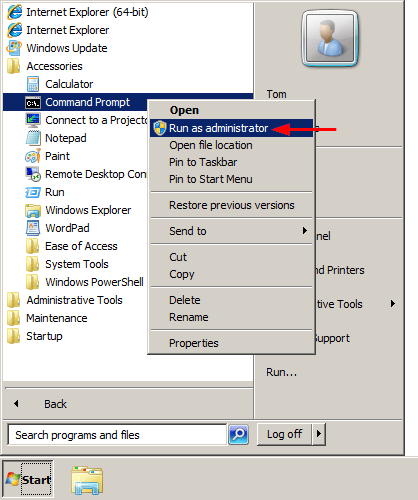
  1. To get started, you need to open an elevated Command Prompt. Click the Start button, and then select All Programs > Accessories. Right-click on Command Prompt and select Run as administrator.

    run-cmd-as-admin

  2. At the Command Prompt, you can run the net user user_name new_password /domain command to change your domain user password. For example, if you wan to change the password of the user Tom to P@ssword123, run the below command:
    net user Tom P@ssword123 /domain

    reset-domain-password-from-command

  3. Now you’ve successfully reset your domain administrator password from command line.

Method 3: Reset Domain Admin Password by Pressing Ctrl+Alt+Del

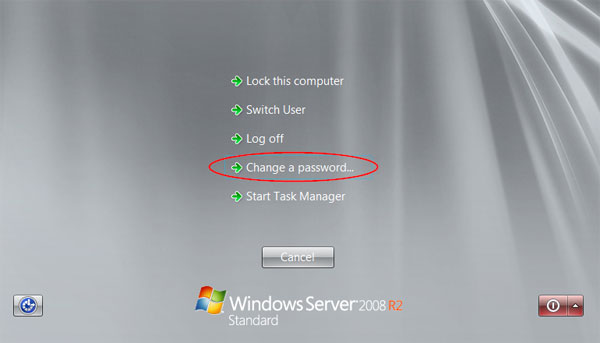
  1. When you’re logged into Windows Server, press the Ctrl+Alt+Del key combination, you will still see this task menu. Click Change a password.

    ctrl-alt-del-screen

  2. Type your old password followed by a new password as indicated, and then type the new password again to confirm it. Press Enter or click on the blue arrow pointing right.

    change-domain-password

  3. You should then receive a message stating that you have successfully changed your password.

Method 4: Reset Domain Admin Password Using PCUnlocker

  1. Download PCUnlocker Enterprise (distributed as .zip format) and save it to your desktop. When the download is complete, right-click on the .zip file to extract it.
  2. After extracting, burn the PCUnlocker ISO file to your USB flash drive using ISO2Disc – an excellent utility that helps to create bootable CD/USB flash drive from ISO file.

  3. Next insert the USB flash drive into your Windows Server machine. Restart the server and enter into BIOS Setup: set the USB as first boot device. After booting from USB, it’ll take you to the PCUnlocker application.
  4. Switch the recovery mode to Reset Active Directory Password. The program will display your domain accounts stored in the Active Directory database. Choose an user and click Reset Password.

    pcunlocker

  5. Click Yes to confirm and your domain user password will be changed to Password123 immediately.

    reset-forgotten-domain-password

    Reboot the server without USB, you can then log in to Windows Server 2008 domain controller successfully. That’s it!