Archive for the ‘Free Software’ category

Problem with Using Chntpw to Reset Password

July 29th, 2015 by Admin

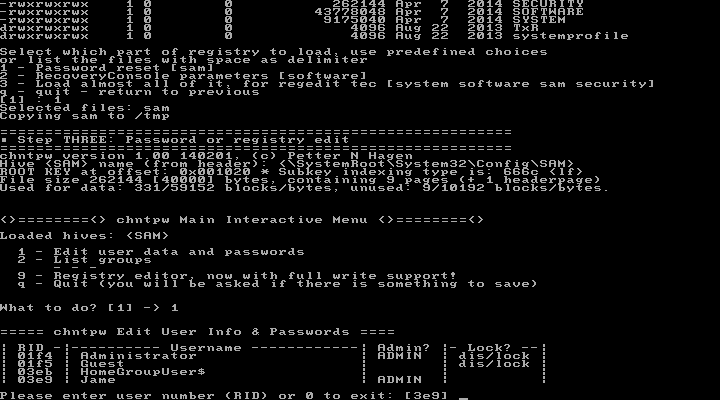
I tried to reset the password of Windows 7 Using chntpw command in Ubuntu. The program appears to work exactly as expected, and doesn’t display any errors, and acts like it’s done everything properly when blanking or changing a password. However, when Windows is loaded, no change has been made – the password has not been blanked or changed.

Chntpw, also known as Offline NT Password & Registry Editor, is a free Linux tool that allows you to reset or edit Windows user passwords stored in the SAM database. Here are a list of problems you might experienced when using chntpw to reset a lost Windows password:

  • Chntpw boots for a short while and ends up in a kernel panic “Kernel panic – not syncing: Attempted to kill init! And then it stops booting.
  • Failed to blank or change password. Chntpw said successfully clear the password. But when you try to login from Windows it does not seem to be changed.
  • Unable to mount the hard drive that that contains the Windows registry hives. Get the mount issue “Windows is hibernated, refused to mount. NTFS: Yes, but hibernated.“, or crash with “VFS: Unable to mount root fs on unknown-block.
  • Chntpw: Unable to open/read a hive, exiting..
  • Chntpw hangs in a loop, or fail to boot even if your computer is configured with UEFI and Secure Boot.

What to do if chntpw doesn’t work on your computer? You can get around all these issues with the third-party Windows password bypass tool – PCUnlocker, or use the following methods:

Reset Windows 8 or 7 Password with the Freeware NTPasswd

July 3rd, 2015 by Admin

“My laptop was installed with Windows 7 with only one account, but no reset disk was created. Now I had forgotten my administrator password and don’t know how to reset it.

Had tried Ophcrack to burn its ISO into a flash drive, but failed to recover my password. Is there any way to reset my password without formatting my whole system disk?”

Fortunately, if you have lost your Windows password, there are several approaches you can take for either recovering or resetting the forgotten password. In this tutorial we’ll show you how to reset Windows 8 or 7 password with the freeware NTPasswd (Offline NT Password & Registry Eidtor). NTPasswd is a small Linux tool that allows you to reset Windows admin/user password on a computer where you forgot your password.

How to Reset Windows 8 or 7 Password with NTPasswd?

  1. First go to the official website of NTPasswd and grab a copy of the bootable CD image. To install NTPasswd onto a blank CD, Right-click on the ISO file and then click “Burn disc image” option. If your system doesn’t have built-in support for burning, you can take use of the free burning tool ISO2Disc.
  2. When the bootable NTPasswd CD is ready, it’s time to reset your lost Windows password. Insert the CD into the optical drive and restart the target computer. You might have to adjust the BIOS to allow booting from the CD.
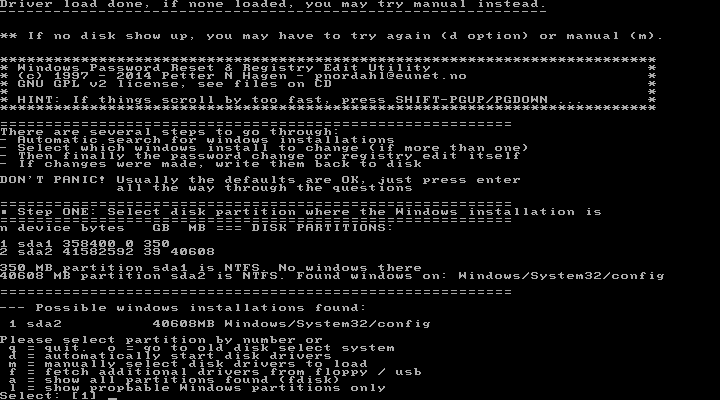
  3. After booting to the NTPasswd tool, you have to select which partition that has Windows installed. In most cases, there will be only one partition so you can just hit Enter to use the default value.

    select-partition

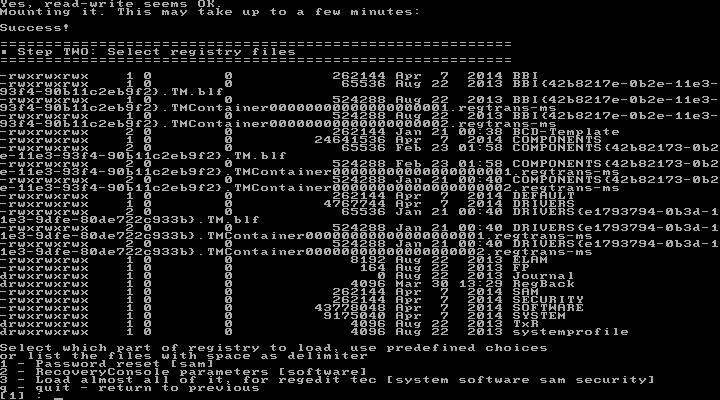
  4. Next, select which part of registry to load, press Enter to leave it as default option which is “Password reset [sam]”.

    load-sam

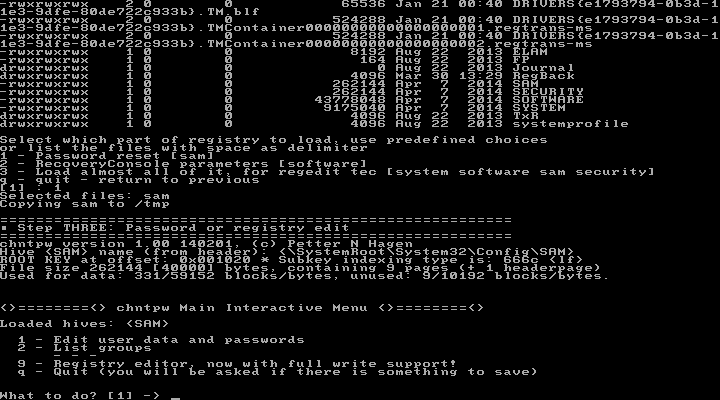
  5. When you see the chntpw Main Interactive Menu, press Enter to select “Edit user data and passwords” option.

    ntpasswd

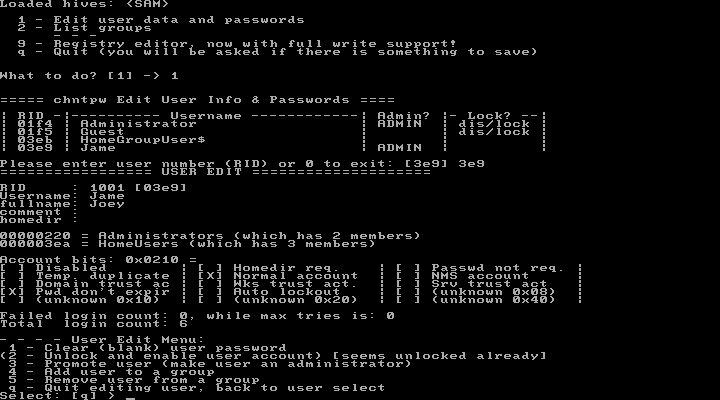
  6. Choose the user account where you want to reset the password. You can find the RID, which you have to enter now, to the left of the username.

    select-account

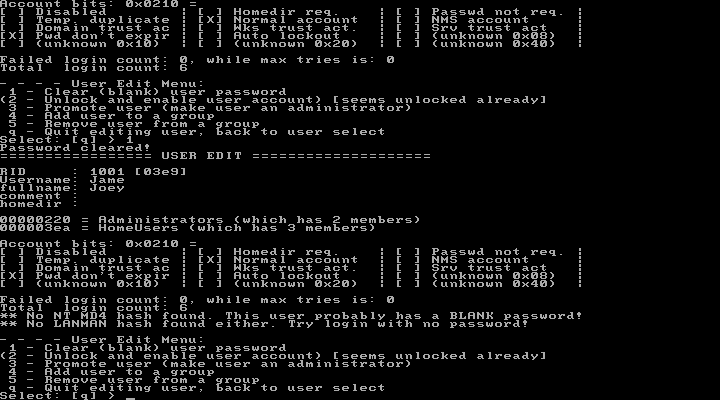
  7. On User Edit Menu, type 1 and press Enter to select “Clear (blank) user password”.

    clear-password

  8. If there is nothing wrong, you should see a message Password cleared!. Then, type q and press Enter to quit editing the user.

    quit-ntpasswd

  9. Next type q to quit the NTPasswd tool and type y to save your password reset changes. Press Ctrl + Alt + Del to restart your computer. You should be able to login to Windows without any problems — remember to change the password to something complex that you can still recall easily.

Note that NTPasswd could be used to reset password for local account only. If you need to bypass Windows 8 Microsoft account, or reset domain user password, you might need to take use of the commercial software PCUnlocker.

3 Free Burning Tools to Create PCUnlocker Live CD

June 23rd, 2015 by Admin

PCUnlocker can be created with almost any program that supports creating a CD from a disc image. Begin with downloading the PCUnlocker program (ZIP file) and unzip that file to extract the pcunlocker.iso image. You can then burn the ISO to a blank CD using one of the three best burning tools: CDBurnerXP, ImgBurn or InfraRecorder.

1. CDBurnerXP

CDBurnerXP is a lightweight and easy-to-use CD/DVD burning software, which can burn data discs (CDs, DVDs and Blu-ray), audio CDs and disc images, as well as creating video DVDs from folders, and there are some small but welcome extras. Here’s how to create a PCUnlocker Live CD with CDBurnXP:

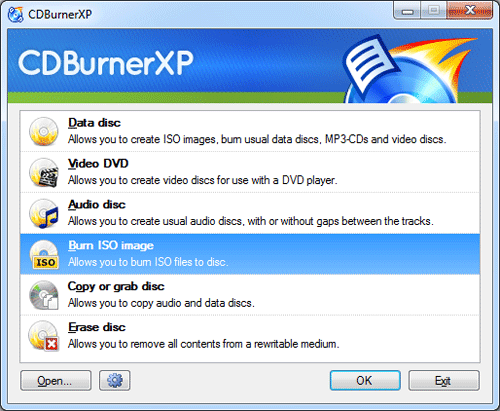
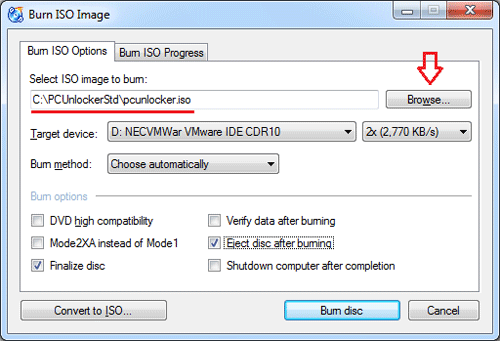
  1. When you first launch CDBurnerXP, you can select a list of actions from the start screen. To make a live CD, pick up the Burn ISO image option and click OK.

    CDBurnerXP

  2. Click on the Browse button to open a window where you can navigate to the pcunlocker.iso file. When you have selected the file, click on the Open button. You will now be at the same screen, but now the ISO you wish to burn will be selected.

    burn-cd-with-CDBurnerXP

  3. Make sure you have a blank DVD/CD media inserted and that your target device is set to the correct drive. Then click on the Burn disc button. CDBurnerXP will now start to create a PCUnlocker Live CD.

2. ImgBurn

ImgBurn is a straightforward disc burning utility that can be used to create, burn and check disc image files with ease. The program supports a wide range of disc image formats include .bin, .cue, .iso and .img and it can be used in a number of ways. Here’s how to make a PCUnlocker Live CD with ImgBurn:

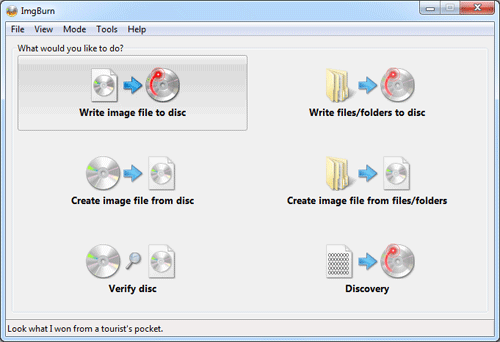
  1. Start the ImgBurn program and select Write image file to disc.

    imgburn

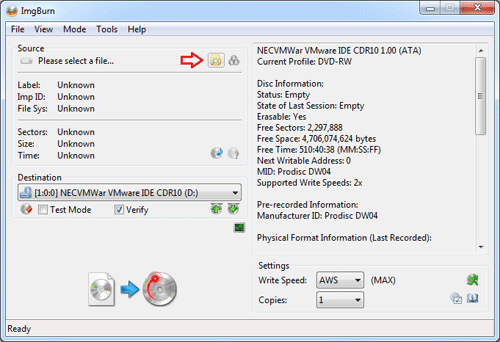
  2. Now select the PCUnlocker ISO file by clicking on folder icon given under “Source”.

    imgburn-select-iso

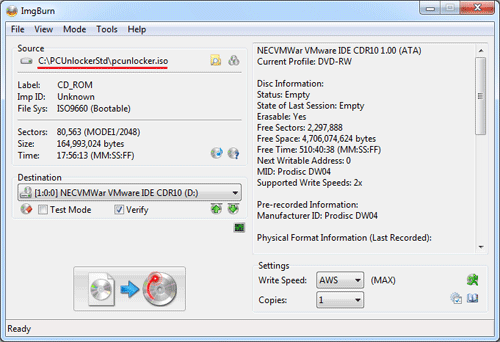
  3. Click on the big button at the bottom-left of the window to kick off the disc writing process. This will write the ISO image to your CD drive.

    burn-cd-with-imgburn

3. InfraRecorder

InfraRecorder covers almost any of your optical needs, including support for burning disc images, copying discs, creating quick audio CDs, writing video DVDs, erasing discs, and more. InfraRecorder is lightweight and decidedly bloat-free, and it’s even available as a portable app you can carry on your thumb drive to satisfy your burning needs no matter where you are. Here’s how to use it to create a PCUnlocker Live CD:

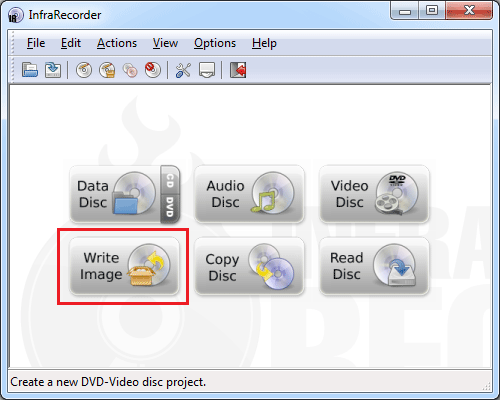
  1. When InfraRecorder opens click the Write Image button.

    InfraRecorder

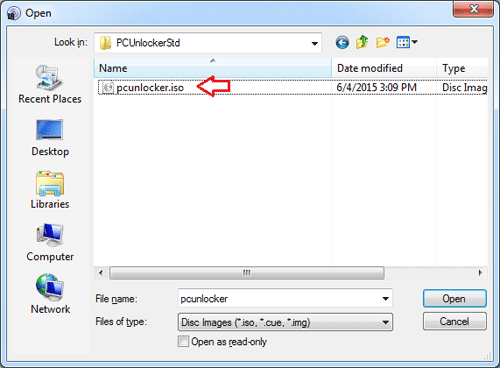
  2. Select the PCUnlocker iso image file and click Open.

    InfraRecorder-select-iso

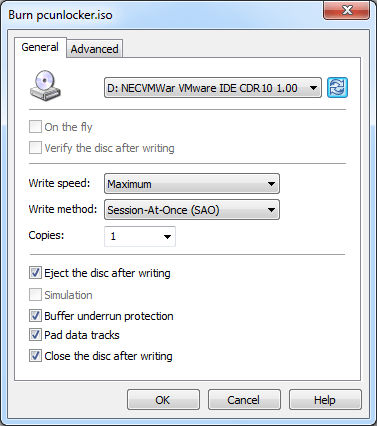
  3. In the dialog box that opened, you may choose the settings for how to burn the disk. If you don’t know what any of the settings mean don’t change them and just click OK to start the disc burning process.

    burn-cd-with-InfraRecorder

How to Create A Windows To Go USB Drive with Freeware

April 27th, 2015 by Admin

Windows To Go is a new feature introduced since Windows 8, which allows you to install and run Windows 8 from a USB drive. It’s officially available only for Enterprise edition of Windows 8, but using the freeware ISO2Disc you can create a Windows To Go USB drive with any edition of Windows 8, 8.1 or 10.

Requirements:

  • A USB thumb drive (USB 3.0 is preferrable) or external USB hard drive with at least 16GB of space.
  • Windows 8, 8.1 or Windows 10 ISO image
  • The free ISO burning tool: ISO2Disc

How to Create A Windows To Go USB Drive?

  1. Click here to download the latest version of ISO2Disc and install it on your computer.
  2. Plug the USB drive into your PC. Note the steps below will wipe out the entire USB drive, including all partitions! If there is important data, backup now before continuing.
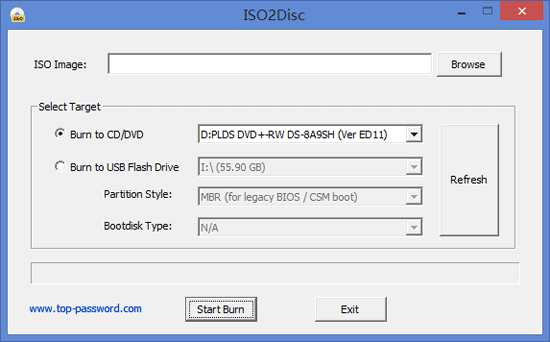
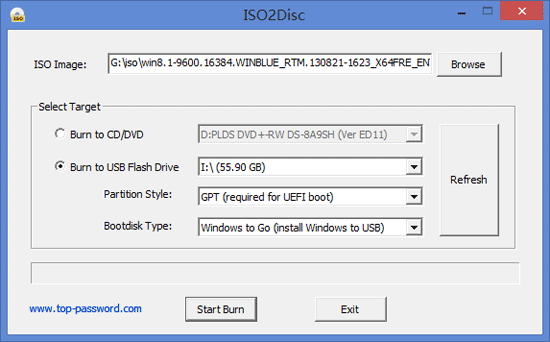
  3. Launch the ISO2Disc application. Click on Browse to select your Windows 8/8.1/10 ISO image.

    iso2disc

  4. Click on Burn to USB Flash Drive and then select your attached USB drive. Make sure the correct USB drive is selected (any content on the USB drive will be wiped during the creation process so this is a vital step).
  5. If you’re going to use the Windows To Go drive with GPT partition scheme, select “GPT (required for UEFI boot)“. MBR partition scheme should be selected if your target PC can boot in Legacy BIOS or CSM mode only.
  6. Under the Bootdisk Type, there are two options: Create Windows installation USB and Windows to Go (install Windows to USB). Select the second option as we need to make a Windows To Go USB drive.

    windows-to-go

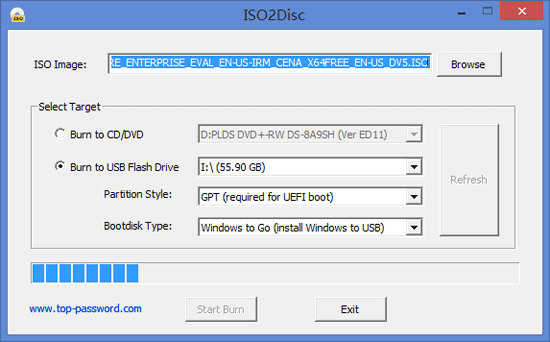
  7. Click on Start Burn, you’ll see “Your USB drive will be erased” warning. Click OK to prepare the Windows To Go USB drive.

    create-windows-to-go-usb

    This is the longest part so be patient. The process only took 15 minutes for me, even though I used an external hard drive with a slower USB 2.0 connection. But it could take more than one hour if a USB 2.0 thumb drive is used.

  8. Once you’ve created a Windows To Go USB drive, you can bring it to boot up any computers. The first time you boot from a Windows To Go USB drive, you’ll have to go through the same first-time setup process you’d see after installing Windows on a computer normally. That’s it!

ISO2Disc 1.08 Release

April 13th, 2015 by Admin

Today we are happy to announce the release of ISO2Disc 1.08 – A lightweight freeware to create a bootable CD/USB from your CD ISO image. We’ve significantly improved this app and it now also supports Linux distributions.

Here is a list of supported Linux-based bootdisks we’ve tested and ISO2Disc works perfectly:

Ubuntu Live CD, Debian, Linux Mint, Puppy Linux, Avira Rescue CD, GParted Live CD, Ultimate Boot CD, Hiren’s Boot CD, Trinity Rescue Kit, System Rescue CD, Offline NT Password & Registry Editor, Ophcrack, PCLoginNow, SystemRescueCd, UBCD4Win, etc.

We highly appreciate all the feedbacks from our users and go out of our way to deliver you the products that meet all your needs.

Thanks everyone who helped us beta-testing and improving ISO2Disc!

How to Delete the Windows.old Folder in Windows 10/8/7

March 23rd, 2015 by Admin

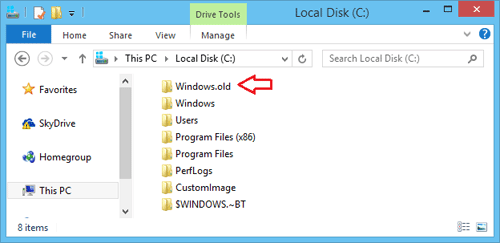
When you perform a custom Windows installation or upgrade Windows to a newer version, the old Windows folder is renamed to Windows.old in case you’d like to revert the upgrade. Windows 8 or 10 users might also have seen the Windows.old folder after performing a PC refresh.

Windows.old contains not only your old Windows installation files, but also your old Documents, Settings and Programs. The folder is usually gigantic in size and can take up considerable space in your system partition. So if you are pretty sure that you no longer need any data from Windows.old then it would be a wise decision to delete it.

windows.old-folder

Unfortunately, you can’t remove the Windows.old folder by simply pressing the Delete key because your user account doesn’t have ownership of the folder. Here’s how to take ownership all files and subfolders in Windows.old, so you can then delete the whole folder to reclaim some space.

How to Delete the Windows.old Folder?

  1. Download and install the freeware TakeOwnershipPro on your local computer.
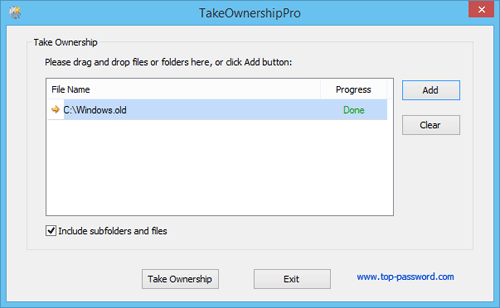
  2. Start the TakeOwnershipPro program and drag the C:\Windows.old folder to the program. Tick the “Include subfolders and files” box.

    take-ownership-pro

  3. Click Take Ownership. The program will begin to take ownership of all files and subfolders in the Windows.old folder. It could take you one or two minutes, depending on number of files and folders it contains.
  4. Once it is done, you can then delete the Windows.old folder without any permission issue.

It’s that simple. Deleting the Windows.old folder can save you quite a large amount of hard disk space and it will not affect the present state of the new OS.

How to Convert DMG Image to ISO format in Windows

February 8th, 2015 by Admin

Most software on Mac OS X is distributed as a DMG image format. The Mac users can open .dmg files on Mac OS X without using third-party software. But if you are a Windows user, you will be in trouble, since Windows can not recognize dmg format by default. In this article we’ll show you how to convert DMG files to ISO format in Windows using the freeware dmg2img.

How to Convert DMG Image to ISO format in Windows?

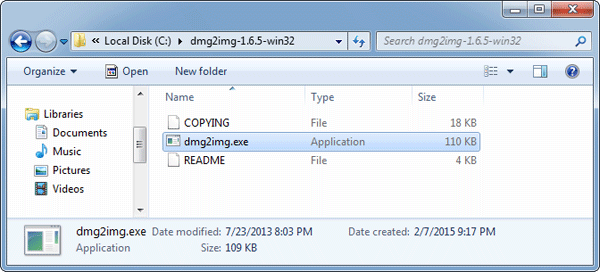
  1. First head over to this website and grab yourself a copy of dmg2img by clicking on the win32 binary link. Extract the contents of the downloaded dmg2img-1.6.5-win32.zip file to a new folder.

    dmg2img

  2. Open a Command Prompt and then use the cd command to navigate to the folder where you extracted the dmg2img file.
  3. Now use the following command syntax to convert your DMG file:

    dmg2img.exe {source file.dmg} {destination file.iso}

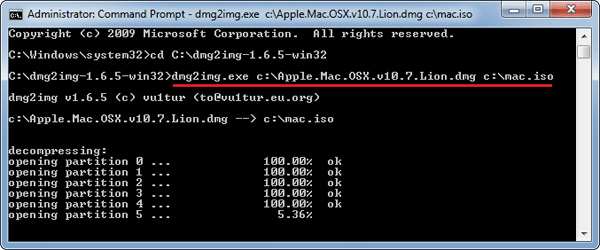
    In my example I want to convert a Mac installer image called Apple.Mac.OSX.v10.7.Lion.dmg, and save the converted ISO as mac.iso, so my command would be:

    dmg2img.exe c:\Apple.Mac.OSX.v10.7.Lion.dmg c:\mac.iso

    convert-dmg-to-iso

  4. After a few minutes of processing, your DMG will be converted to ISO format. You can then burn the ISO image to your disc or mount it to CD drive for your own purpose in Windows.

Repair Your Corrupted Outlook Personal Folders (PST) File

January 30th, 2015 by Admin

PST (also known as Personal Folders File, or Outlook Data File) is a file where Microsoft Outlook stores your mail messages, calendar events, contacts, tasks and other. If you can’t open your .pst file, or you supect the data file is damaged or corrupted, you can use the Inbox Repair tool (scanpst.exe) to diagnose and repair your pst file for any problems.

Scanpst.exe is a built-in tool in Outlook. The location of scanpst.exe depends on your version of Outlook and whether or not you are using a 64-bit version of Windows.

Outlook 2013
32-bit Windows: C:\Program Files\Microsoft Office\Office15\
64-bit Windows: C:\Program Files (x86)\Microsoft Office\Office15\

Office 365 / Outlook 2013
any Windows: C:\Program Files\Microsoft Office 15\root\office15\

Outlook 2010
32-bit Windows: C:\Program Files\Microsoft Office\Office14\
64-bit Windows: C:\Program Files (x86)\Microsoft Office\Office14\

Outlook 2007
32-bit Windows: C:\Program Files\Microsoft Office\Office12\
64-bit Windows: C:\Program Files (x86)\Microsoft Office\Office12\

How to Repair A Corrupted Outlook Personal Folders (PST) File?

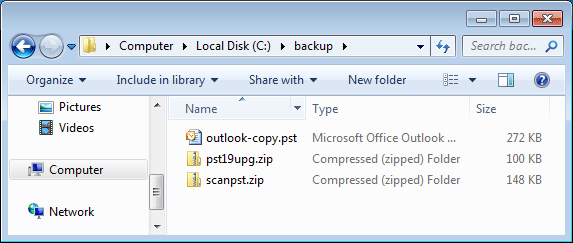
Before you start the repair process, make sure you have a backup of your pst file.

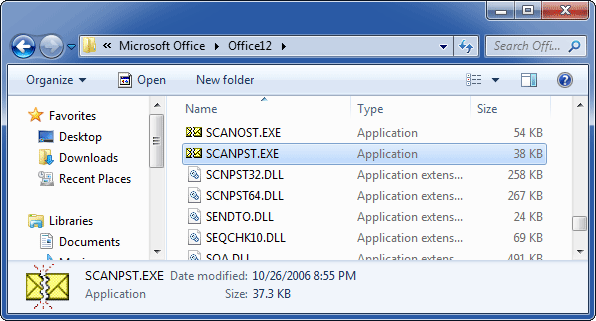
  1. Open up Windows Explorer and then locate the scanpst.exe file. In my example, it is located in this folder C:\Program Files (x86)\Microsoft Office\Office12\.

    scanpst

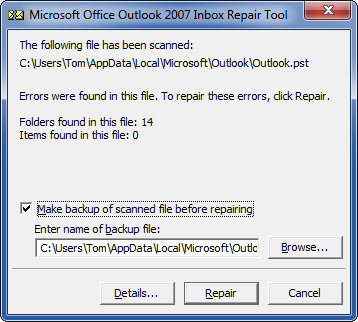
  2. Once you open up the scanpst.exe utility, you’ll have to find the location of your damaged PST file by clicking the Browse button. If you can’t figure out the location, please check out this article: Introduction to Outlook Personal Folders File (.pst).

    inbox-repair-tool

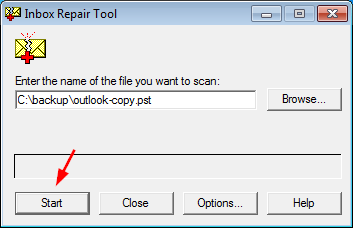
  3. Click on the Start button to scan. At this point, nothing will happen to your pst file yet. Scanpst will do an analysis first. This analysis consists out of 8 phases of which some can take quite a bit longer to complete than others depending on the size and level of corruption of the file.

    repair-pst

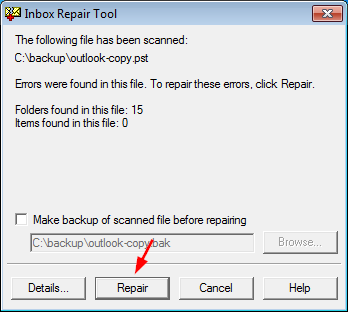
  4. After the analysis scan has completed, it will present you with a scanning report and options for the next step. You can press the Details button for more information about the type of corruption.

    outlook-pst-repair

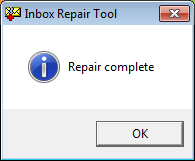
  5. Click on the Repair button, and after a while you’ll finally get the “Repair complete” message. Assuming that all succeeds, you can now re-open Outlook and hopefully the errors will have been resolved.

How to Boot An Existing VirtualBox VM from USB Drive

January 23rd, 2015 by Admin

How can I get a VirtualBox virtual machine to boot from a physical USB drive? The problem is that the GUI of Oracle VirtualBox does not have an option to set boot from USB. Luckily there is a workaround to boot a VirtualBox virtual machine from USB drive.

Just create a new virtual hard disk (VMDK) file and use it as a raw disk that VirtualBox maps to your USB drive. When you boot your virtual machine from the newly-created virtual hard drive, it will load the operating system on your USB stick. Here’s how.

How to Boot An Existing VirtualBox VM from USB Drive?

  1. Before doing anything, make sure you’ve created a bootable USB drive and plugged it into your computer. Now we need to find the disk number of your physical USB drive.
  2. Press Windows Key + R to bring up the Run box, type diskmgmt.msc and press Enter to open the Disk Management window. Locate your USB drive and note its disk number. In my case, the USB drive is listed as “Disk 1“, so the disk number is 1.

    disk-management

  3. Once you have the disk number, open up the Command Prompt as administrator. Use the cd command to navigate to VirtualBox’s installation directory. If you have installed VirtualBox in any other directory or drive, then change the command accordingly.

    cd %programfiles%\Oracle\VirtualBox

  4. Enter the following command while replacing # with the actual disk number you found above.

    VBoxManage internalcommands createrawvmdk -filename C:\exusb.vmdk -rawdisk \\.\PhysicalDrive#

    create-virtual-hard-drive

    You can replace C:\extusb.vmdk with any file path you want. This command creates a virtual machine disk (VMDK) file that points to the physical USB drive.

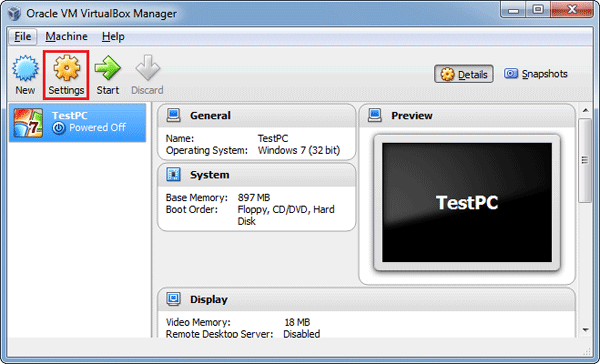
  5. Now open up the VirtualBox with administrative rights. If not, VirtualBox will fail to boot from the USB drive. In the VirtualBox main window, select your target virtual machine and click Settings.

    virtualbox-manager

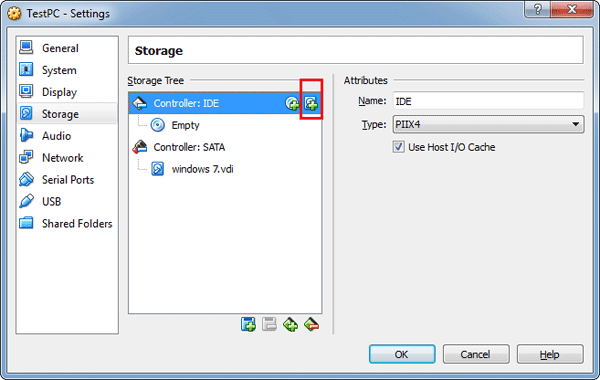
  6. Click on the Storage tab. Under the Storage Tree section, highlight Controller:IDE and then click on the “Add Hard Disk” icon to the right.

    virtualbox-settings

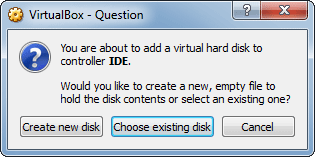
  7. In the popup box, click Choose existing disk and then choose the VDMK file (C:\exusb.vdmk in the example) you created in step 4. When this is done, click OK to save your changes.

    add-virtual-hard-drive

  8. Now starts Virtual machine and you’ll see that it starts booting from your physical USB drive. As you can see from the image below, I’ve successfully booted into my PCUnlocker Live USB drive.

    pcunlocker

With this method you can install the operating system from the USB stick, or boot your existing VirtualBox virtual machine from other third-party rescure & recovery USB drives.

Bypass Windows Password with Freeware UBCD4Win

January 20th, 2015 by Admin

Locked out of a computer but need to be able to log in as a local admin? What you need to do is set up a UBCD4Win (also known as Ultimate Boot CD for Windows) live CD, boot up the computer with it and run the NTPWEdit tool to clear forgotten Windows password.

UBCD4Win is based on BartPE, and it requires the Windows XP CD (with SP1 or SP2). This article we’ll walk through the steps required to create a UBCD4Win bootable CD and then use it to bypass Windows administrator password.

Note: UBCD4Win is a freeware so don’t expect it to work with domain controllers. If you want to find a more powerful yet easy-to-use password recovery software, try the PCUnlocker Live CD.

Part 1: Create A UBCD4Win Bootable CD

  1. Download the freeware UBCD4Win from its official website. The download is pretty big (about 269Mb), so expect to wait a while if your network connection is slow.
  2. After installing, start the UBCD4Win (UBCD4WinBuilder.exe) program. Point the “Source” path to your Windows XP setup CD or Windows 2003 installation CD. However, Vista is not yet supported as a source.

    UBCD4Win-PE-Builder

  3. Insert a blank CD, select “Burn to CD/DVD” and click Build. The whole process will take a little while.

Part 2: Bypass Windows Admin Password

  1. Once the CD has been created, go to the BIOS and make sure your CD-ROM is set as the first boot device. Start up the computer with UBCD4Win in the CD-ROM and you will have some boot options. Choose the “Launch The Ultimate Boot CD for Windows” option.

    ubcd4win-boot-menu

  2. It will take a few minutes to load fully, but when it does you should see a Windows XP like interface. Once there, go to Start > Programs > Password Tools > NTPWEdit.

    ubcd4win

  3. Once the utility is open, you need to click the (Re)open button to open up the SAM file which should show you the list of local system accounts for your Windows installation. Select the Administrator account and click on Change Password.

    nwpwedit

  4. Type your new password twice, or leave the password fields blank if you want to clear the password. Click OK.

    change-admin-password

  5. Restart the computer, remove the UBCD4Win Live CD from the drive, and you should be able to log into Windows administrator account with the new password you’ve set.