Archive for the ‘Others’ category

How to Reset Lost Admin Password for Windows Server Core

July 8th, 2013 by Admin

Windows Server Core does not include the traditional full graphical user interface (GUI), which provides you with the minimum set of tools to run Windows. You are provided with only a command prompt to manage the server. Once you have configured the server, you may don’t need to log on the server core for a long time. But what if you forgot the administrator password? How to recover or reset the password without rebuilding your server core from scratch?

It seems like a quite difficult task. But if you have a powerful Windows password recovery software, you can reset lost Windows Server Core password in minutes. PCUnlocker is a simple yet effective Live CD that could be used to reset lost admin password for Windows Server 2012 / 2008 / 2003 Core.

How to Reset Lost Admin Password for Windows Server Core?

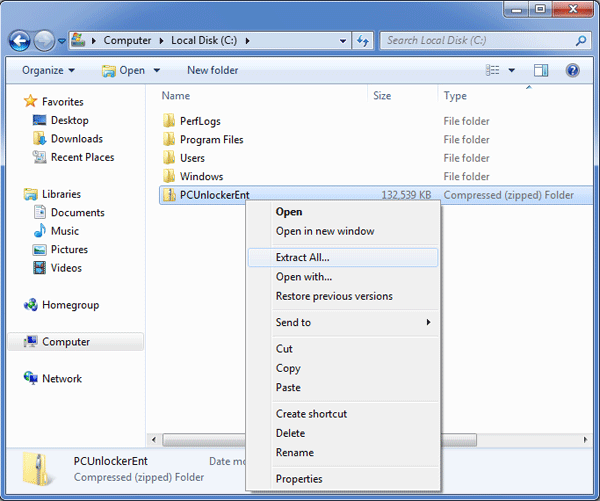
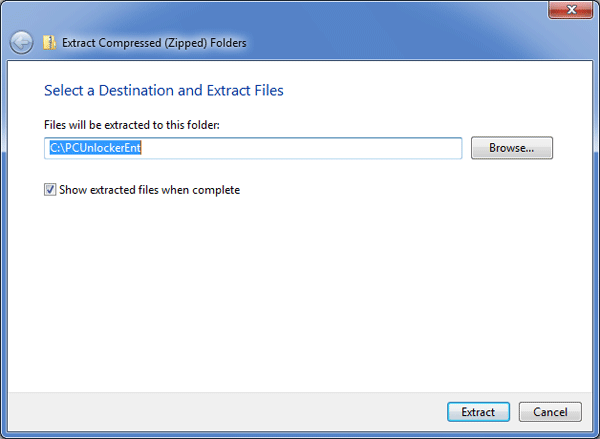
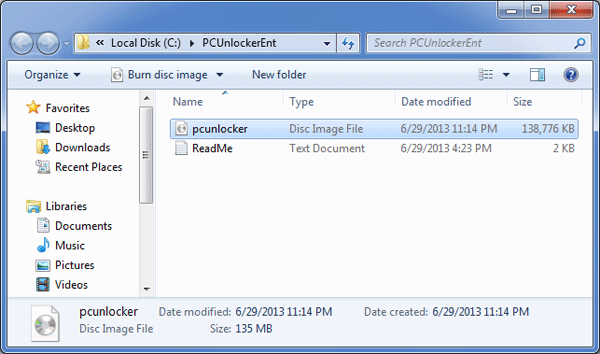
  1. Download the zipped ISO image of PCUnlocker and save it on another PC you can log on. After the download is complete, extract the pcunlocker.iso file from the ZIP archive.
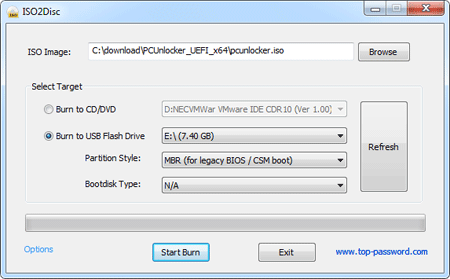
  2. Burn the ISO image file to a blank CD using any disc burning software, such as BurnCDCC, ImgBurn etc. If you don’t have a blank CD or CD burner at your hand, you can opt to burn the ISO image to a USB flash drive using ISO2Disc program.
  3. Pop the Live CD in the CD drive of your Windows Server Core machine that you want to reset lost admin password for. When the computer is booting, you will need to press the correct key to get into the Boot Menu. It is usually F12 or Del key. Once in the Boot Menu, select the CD/DVD Drive that you just created and press Enter.
  4. The computer will load the WinPE operating system from the Live CD. After a while, you’ll see the PCUnlocker program. It will read the Security Accounts Manager (SAM) files in Windows Server Core and show you a list of local user accounts. If your server is a domain controller, you can click on Reset Active Directory Password option to view the Active Directory user accounts on your machine.

  5. Choose your administrator account and click on Reset Password. The program will reset your lost admin password immediately, as well as unlocking your administrator account if it is already disabled, locked out or expired.
  6. Click on Restart button and remove the Live CD. The computer will then boot normally to the Windows login screen. Just leave the password box as blank and you can log back into Windows Server Core immediately.

Forgot Windows Password for Windows Server VM in Microsoft Hyper-V

July 8th, 2013 by Admin

I installed Windows Server 2008 R2 with Hyper-V. I left the machine standing for a couple of days. After a week I got back to the machine I couldn’t remember the password. Is there a way to recover or reset the administrator password on a Hyper-V virtualized 2008 AD server?

Forgot Windows password for Hyper-V virtualized server? How to reset local / domain administrator password on a virtual machine running in Microsoft Hyper-V? There is a simple way to reset your lost Hyper-V server password without data loss. Just boot your Hyper-V virtual machine from PCUnlocker ISO image which contains a password reset utility, and it enables you to reset both local administrator password and domain administrator password easily!

How to Reset Windows Password for Hyper-V Server?

  1. Download the zipped ISO image of PCUnlocker and save it on your host operating system. Unzipped the download file and you’ll find a bootable ISO image file: pcunlocker.iso.
  2. Open your virtual machine from Hyper-V Manager. Click on the File menu and select Settings….

    hyper-v-vm

  3. In the Settings of the VM, select the DVD Drive under IDE Controller 1 tab. In the right panel, specify the DVD drive to use the ISO image file (pcunlocker.iso) you just downloaded.

  4. Go to the BIOS tab in the left panel, move CD to the top of all available boot devices.

  5. Click Apply to save your changes.
  6. Power on your virtual machine. This time it will boot from the PCUnlocker ISO image.
  7. After a while, you’ll see the PCUnlocker program which displays a list of local user accounts existing on your Hyper-V server. If you need to reset domain admin/user password, you need to click on the Reset Active Directory Password option. It will then display Active Directory user accounts.

  8. Choose a user account and click on Reset Password button. The program will unlock/reset your Windows password in no time.

Now you’ve successfully reset your lost Windows password for Hyper-V server. Unmount the PCUnlocker ISO image from the virtual machine’s DVD drive and restart the virtual machine. You can then log back into your Hyper-V server without a password! This method works with all versions of Windows virtual machine running in Microsoft Hyper-V, including Windows 8/7/Vista/XP and Windows Server 2012/2008/2003/2000.

Can’t Remember Password to Login Windows XP on Old Laptop

July 5th, 2013 by Admin

I have an old Windows XP laptop that’s not been used for 5 years, problem is I had a password set up on it and can’t remember what it was, I’ve tried many different passwords that it could possibly be without any luck, is there anyway I can reset or bypass the login password? I have some important documents and pictures on there that I really don’t want to lose with a brand new Windows install.

Forgot Windows XP password on your old laptop? Is there any way to unlock a password protected laptop without data loss? Fortunately, with the help of PCUnlocker Live CD, you can reset lost Windows XP password for your user account, allowing you access back into the operating system.

PCUnlocker Live CD boots up before Windows does, thus allowing it to access the SAM database of your Windows XP installation and reset your lost admin/user password. This makes sense because without your password you are completely locked out of your old computer. Follow this tutorial and you can reset Windows XP password easily!

How to Reset Windows XP Password on Your Old Laptop?

  1. First download the zipped ISO image of PCUnlocker Live CD. After you’ve downloaded it, decompress the ZIP archive and you’ll have a bootable ISO image file: pcunlocker. Burn it on to a blank CD using ISO2Disc, ImgBurn or other CD burning program.
  2. Insert the boot CD into your old Windows XP laptop and restart the computer. Go into the boot menu when the computer starts up (press the F12, Esc, or other key to enter the boot menu) and choose to boot from the CD.
  3. Just one or two minutes later you’ll see the PCUnlocker program. It displays a list of Windows local accounts of your old Windows XP laptop.
  4. Select the user account whose password you want to reset and click on Reset Password button. The program will remove your forgotten Windows XP password and unlock the user account when it is disabled, locked out or expired.
  5. Click on Restart button and remove the boot CD. The laptop will restart and it will automatically login to your Windows XP system without requiring you to enter a password.

Can’t remember Windows XP password for your old laptop? Using PCUnlocker Live CD you can get past Windows XP login screen easily. Quickly unlock your old laptop by resetting your lost or forgotten Windows XP password.

How to Unlock HP Pavilion g7 Laptop After Forgetting Windows 8 Password

July 4th, 2013 by Admin

I have purchased a HP Pavilion g7 laptop which comes with Windows 8 pre-installed. I changed the administrator password a week ago and now have totally forgotten the password. Now I can’t access anything from my computer. Is there a way to bypass the password screen or reset the password?

Forgot Windows 8 password on your HP Pavilion g7 laptop? How can I unlock your HP laptop without restoring it to factory settings? Well you have come to the right place! In this tutorial we’ll walk you through how to unlock HP Pavilion g7 laptop using a PCUnlocker boot CD, in case your Windows 8 password is lost or forgotten. With PCUnlocker boot CD you can reset your Windows 8 password and get right into your HP laptop.

How to Unlock HP Pavilion g7 Laptop After Forgetting Windows 8 Password?

Because you’ve been locked out of your HP Pavilion g7 laptop, you can’t install any software on it. To reset your lost password, you need to create a PCUnlocker boot CD on another PC you have access to. Next you have to turn off the Secure Boot option in BIOS in order to get your HP Pavilion g7 to boot from the CD. After booting from the CD it enables you to reset lost Windows 8 admin/user password easily! This guide can be divided into 3 steps:

Part 1: Create A PCUnlocker Boot CD

Download the zipped ISO image of PCUnlocker on your computer. After you’ve downloaded it, unzipped it and you’ll find the pcunlocker.iso file. Burn this ISO image to a blank CD (or USB flash drive) using ISO2Disc.

Part 2: Turn Off the Secure Boot Option in BIOS

Secure Boot is enabled by default on computers that were manufactured with Windows 8. In order to boot from a CD/DVD, you need to disable the Secure Boot option. Follow these steps to disable Secure Boot on HP Pavilion g7 laptop:

  1. Turn on your HP laptop. Immediately press the Esc key repeatedly, about once every second, until the Startup Menu opens.

    hp-startup-menu

  2. Press F10 to enter BIOS Setup. Next use the right arrow key to choose the System Configuration menu, use the down arrow key to select Boot Options, then press Enter.

    hp-bios

  3. Use the down arrow key to select Secure Boot and press Enter key, then use the down arrow key to modify the setting to Disabled. Save your changes and exit.

    hp-secure-boot

Part 3: Unlock HP Windows 8 Password

  1. Insert the PCUnlocker boot CD into your HP Pavilion g7 laptop. Turn on the laptop and press Esc key to bring up the Startup Menu again. This time you need to press F9 to select Boot Device Options. On the next screen, choose the Internal CD/DVD-ROM Drive in order to boot from CD. If you use a PCUnlocker USB drive, you need to choose the “Patriot Memory” option instead.
  2. After booting from the CD, you’ll see the PCUnlocker program after a while. PCUnlocker will automatically analyze your Windows 8 SAM registry hive and then display a list of local user accounts on your HP Pavilion g7 laptop.

  3. Choose a user account and then click on Reset Password button. The program will reset its password and unlock the user account if it is already disabled, locked out or expired. Click on Restart to reboot the machine and take out the PCUnlocker boot CD. After that you can log back into your Windows 8 system without a password!

Conclusion

Using PCUnlocker boot CD you can also reset lost Windows 8 password on other models of HP laptop, desktop and tablet PCs, including HP ENVY Sleekbook, HP Spectre XT Ultrabook and HP ElitePad 900 G1 Tablet.

How to Know If Your Computer Supports UEFI

July 1st, 2013 by Admin

One of the largest underlying changes to Windows 8 is the long-overdue shift from BIOS to UEFI. Secure Boot is one of the new features introduced by UEFI and it has received by far the most attention, as it prevents Linux distributions from being installed on Windows 8 machines. In this article we’re going to tell you a few methods to know if your computer supports UEFI.

The simple way to tell if you have UEFI boot mode or not is to watch Windows starting up. If you see the Windows logo when it boots, you are in old fashioned BIOS boot mode. However if you see your manufacturer or custom BIOS logo remaining whilst Windows starts you are in UEFI mode! In my Windows 8 Dell computer which comes with UEFI BIOS, every time I turn on the machine, it will display a Dell logo with the looping circles at the bottom.

dell-boot-screen

Another method is to use the MSInfo command. Press Windows + R key combination to bring up the Run box in Windows 8. Type the “MSInfo” command and press Enter. It will display all your system information and hardware configuration in detail. From the System Information window, you’ll see BIOS Mode listed as UEFI if your computer supports UEFI.

msinfo

If you’re still uncertain if your computer comes with UEFI BIOS, you can check out the Secure Boot option by booting your computer into BIOS. Try to go through all your BIOS settings to look for an option such as “Secure Boot”, “Secure Boot Control”, “Attempt Secure Boot”, etc. If you can find that option, your computer is using the latest UEFI BIOS.

How to Know If Your UEFI is 32-bit or 64-bit?

If your UEFI computer comes with Windows 8 64-bit pre-installed, it uses 64-bit UEFI firmware. If your UEFI computer comes with Windows 8 32-bit pre-installed, it uses 32-bit UEFI firmware.

While in UEFI mode, the Windows version must match the PC architecture. A 64-bit UEFI PC can only boot 64-bit versions of Windows. A 32-bit PC can only boot 32-bit versions of Windows. If you want to run a 32-bit Windows on a 64-bit UEFI PC, you need to change the boot mode from UEFI to Legacy/CSM and disable the Secure Boot option in BIOS. However, not all UEFI computers provide with the compatibility support module (CSM) that enables UEFI firmware to emulate a legacy BIOS.

2 Options to Change Windows 8 Password without Knowing Current Password

July 1st, 2013 by Admin

Lost or forgot Windows 8 password and wonder how to change the password without logging in? How can I change Windows 8 password using the command prompt if the existing password isn’t known, but I have admin rights? In this article we’ll show you 2 options to change Windows 8 password without knowing the current password.

Option 1: Change Windows 8 Password Using Command Prompt

As long as you can log into Windows 8 with administrator privileges, you can then change Windows 8 password simply by following the steps:

  1. Press Windows + X key combination to bring up the Power User menu, and then click/tap on Command Prompt (Admin) option. It will open up the Command Prompt immediately.
  2. Using the following command you can change the current password to a new one.
    net user {username} {password}
    Replace {username} with the name of the account you want to change and {password} with the new password.

Option 2: Change Windows 8 Password with PCUnlocker Live CD

How to change Windows 8 password when I am completely locked out the computer? This method is almost as easy as the one above. As long as you have a PCUnlocker Live CD, you can boot your Windows 8 computer from this CD and it enables you to change Windows 8 password immediately.

Here we will guide you through step-by-step procedure of creating a PCUnlocker Live CD and using it to change Windows 8 password without knowing the existing password.

  1. Download the zipped ISO image of PCUnlocker. When the download is complete, unzip it and you’ll get a bootable ISO image file. Burn it to an empty CD using ISO2Disc, BurnCDCC, ImgBurn or other CD recording software.
  2. After you’ve created a PCUnlocker Live CD, insert it into your Windows 8 computer. When the computer is turning on, go to the boot menu (usually by pressing F8 on most computers, F12 on my Dell laptop). When inside the boot menu, select the CD/DVD-ROM Drive and press Enter.
  3. The computer will boot up the WinPE operating system that is in the Live CD. After a while you’ll see the PCUnlocker program which displays a list of Windows 8 user accounts. Choose a user account and click on “Reset Password” button, it will remove your forgotten Windows 8 password instantly.

Conclusion

Using the methods above you can change Windows 8 password easily, without knowing the current password. These methods also work on Windows 7, Vista and XP.

Windows 8 Tablet Password Recovery

June 29th, 2013 by Admin

Lost your Windows 8 tablet password? Unable to login after changing the Microsoft account password? In this article we’ll show you a quick way to recover access to your Windows 8 tablet easily after you’ve lost or forgotten the password to your administrator account or Microsoft account. This method will work with all brands of Windows 8 tablet PCs, including the tablets with UEFI Secure Boot turned on.

How to Recover Windows 8 Tablet Password?

To get started, you need to make a bootable password recovery USB drive. Download the zipped ISO image of PCUnlocker on an alternate PC you have access to. Unzipping the download file and you’ll find a bootable ISO image file: pcunlocker.iso, which needs to be burned on a CD or USB drive. Obviously, USB drive is a better option for tablet PCs without CD drive.

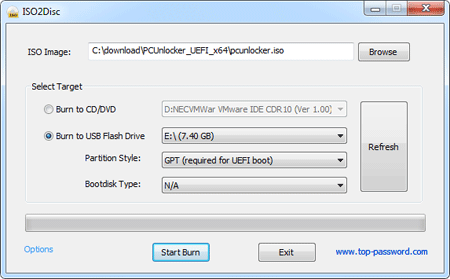
Download and install ISO2Disc on your computer, and then start ISO2Disc program. Click on Browse button to select the ISO image file of PCUnlocker, then choose your USB drive and select GPT from the partition style drop-down box. Click on Burn. The program will create a bootable password recovery USB drive which can boot in either UEFI mode or legacy BIOS mode.

After creating a bootable USB drive, you can use it to recover your Windows 8 tablet password. Plug the USB drive into your Windows 8 tablet and get the machine to boot from USB drive.

The computer will load the WinPE operating system inside the USB drive. After a while, you’ll see the PCUnlocker program open up, which shows you a list of local user accounts existing on your Windows 8 tablet.

Select a user account and then click on Reset Password button. It will remove/reset your lost Windows 8 tablet password and also unlock/enable your user account in no time. If you’re using a Microsoft account on your Windows 8 tablet, you need to choose the local user account which is linked to your Microsoft account, the program will reset the cached password on your machine.

After that, unplug the USB drive and restart your Windows 8 tablet, you can then log back into Windows 8 without a password! It’s that easy!

How to Create A Bootable UEFI/GPT-Based Windows 8 Installation USB Drive

June 28th, 2013 by Admin

In order to perform a clean install of Windows 8 on my computer, I’ve made a bootable Windows 8 installation USB drive using Microsoft’s Windows USB/DVD download tool. However, the USB drive never showed as UEFI bootable in the Boot Menu. After some Google searching I discovered that this is because UEFI boot only recognizes FAT32 and will not show up NTFS devices during boot selection. What’s more, the USB drive must also be partitioned with GPT (GUID Partition Table) instead of traditional MBR.

So here I’m going to walk you through how to create a bootable UEFI/GPT-based Windows 8 installation USB drive. It’s very useful in case your computer doesn’t have optical drive, especially if you’re using a tablet such as Microsoft Surface Pro. To make the job easier, we’ll use a free ISO burning software – ISO2Disc, which provides you a super easy way to make a bootable UEFI/GPT-based USB drive from an ISO image.

How to Create A Bootable UEFI/GPT-Based Windows 8 Installation USB Drive?

Step #1: First download and install ISO2Disc utility on your computer.

Step #2: Launch ISO2Disc program. Click on the Browse button to specify a 64-bit Windows 8 ISO image file. Remember that only x64 versions of Windows 8 and Windows Server 2012 support UEFI Secure Boot.

Step #3: Click on the Burn to USB Flash Drive option, then select your USB drive from the list. Choose the GPT from the partition style. This allows you to partition your USB drive with a GUID Partition Table.

Step #4: Next click on Burn. The program will begin creating a UEFI/GPT-based Windows 8 installation USB drive.

Step #5: When the burning procedure is complete, unplug the USB drive and you can then use it to boot off any UEFI-based computers and perform Windows 8 installation from your USB drive. It’s that simple!