Archive for the ‘Others’ category

How to Create A Bootable USB Drive for UEFI Computers

June 25th, 2013 by Admin

Nowadays, most of the new Windows 8 laptops, desktops or tablets use the UEFI replacement for the traditional BIOS, such as Surface Pro, Samsung Slate or other UEFI systems. The problem with UEFI-based computers is that they can’t boot from bootdisk with NTFS partition. UEFI system requires that your bootdisk resides on FAT32 partition.

Most USB burning programs will format your USB drive as NTFS, which includes the Microsoft Store Windows USB/DVD download tool. Luckily there is a free ISO burning software that lets you create a bootable USB with FAT32 file system only. It’s called ISO2Disc. But here I’m going to show you how to use the Command Prompt to create a bootable USB drive for UEFI computers.

How to Create A Bootable USB Drive for UEFI Computers?

  1. Open the Command Prompt with administrator privileges, then start the diskpart utility:
    diskpart.exe
  2. List all the disks and identify your USB drive:
    list disk
  3. Select the disk number that is your USB drive.
    select disk 1
  4. Remove all existing partitions:
    clean
  5. Convert the partition table from MBR to GPT:
    convert gpt
  6. Create a new partition, make it active and format as FAT32, then assign a drive letter:
    create partition primary
    select partition 1
    active
    format quick fs=fat32
    assign
  7. Type “exit” and press Enter to quit diskpart utility.

The final step is to copy all the files from your physical boot CD to the USB drive. For example, you can copy all files from either your Windows 8 installation DVD or ISO image to your USB drive. After that, you can use the USB drive to boot your UEFI computer and perform system repairing or installation for your own purpose.

If you still are unable to boot your UEFI computer from the USB drive, you may need to disable the Secure Boot option in the BIOS. In my Samsung Slate tablet PC, I have to disable the Secure Boot by following these steps:

  1. Press and hold Volume-Up and Volume-Down, then power up or reboot the slate. It should go into BIOS setup.
  2. In “Advanced Configuration”, change “Attempt Secure Boot” to Disabled.
  3. Press Volume-Up and Volume-Down to exit, then “Save Changes and Reset”.
  4. Power off the machine.
  5. Plugin USB drive to slate. Press and Hold Volume-Up button, then power up the machine. It should boot into USB drive now.

How to Reset Forgotten Windows 8 Password on Dell Latitude Tablet

June 24th, 2013 by Admin

I am using a Latitude 10 tablet with the Dell factory release of Windows 8 pre-installed. I have forgotten the administrator password and don’t have a password reset disk. Is there a way to delete/reset the password so I can get into my computer?

Forgot Windows 8 password on your Dell Latitude tablet? How to reset lost Windows 8 password without performing a factory reset? Windows is getting more secure with every release but unfortunately a new feature of UEFI Secure Boot makes old password cracking methods to common problems obsolete. So here I’m going to walk you through how to reset forgotten Windows 8 password on Dell Latitude tablet.

How to Reset Forgotten Windows 8 Password on Dell Latitude Tablet?

Download the zipped ISO image of PCUnlocker on another PC you can access. Unzip the download file and burn the ISO image on a USB flash drive using ISO2Disc program.

After you have created a PCUnlocker Live USB drive, connect it to your Dell Latitude tablet which requires a password reset. Turn on the tablet PC and hit F2 from keyboard dock or volume- rocker at startup. In the BIOS, navigate to the System Configuration > USB Configuration and enable the Boot Support option, then go to Secure Boot > Secure Boot and disable the Secure Boot option. Apply settings and Exit.

dell-latitude-secure-boot

Hit F2 from keyboard dock or hold down volume+ rocker at power-on. Choose your PCUnlocker Live USB drive and press Enter. Your tablet will load the WinPE operating system from your USB drive. After a while, you’ll see the PCUnlcoker program. The program displays a list of Windows 8 user accounts existing in your Dell Latitude tablet.

Choose a user account and click on Reset Password button. The program will reset your lost Windows 8 password and also unlock/enable your user account when it’s necessary. Now click on Restart button to reboot the computer and remove the PCUnlocker Live USB drive.

After booting to the Windows 8 login screen, just leave the password box empty and you can log back into your Windows 8 user account immediately. It’s so easy to reset a forgotten Windows 8 password on Dell Latitude tablet PC.

How to Find Windows Administrator Password without Resetting It

June 22nd, 2013 by Admin

How can I find out Windows administrator password without changing or resetting it? That’s where Ophcrack comes in. Ophcrack is one of the more effective password cracking software that runs on a Live CD, and it can be used to find your original Windows password.

Since you obviously can’t get into your computer right now because you’ve forgotten the administrator password, we need to make a Ophcrack Live CD on another computer that you have access to. Then you can use it to boot off your computer and it enables you to find Windows administrator password without resetting it.

How to Find Windows Administrator Password without Resetting It?

  1. Put the Ophcrack Live CD in the CD drive of the computer you want to find the Windows administrator of.
  2. Have the computer to boot from Ophcrack Live CD. This shouldn’t be to hard. Depending on computer, enter the bios settings and change the boot settings to boot from a disc drive on first boot device.
  3. After the initial startup of your computer is complete, the Ophcrack Live CD menu should display. Select the Ophcrack Graphic mode option and press Enter.

    ophcrack

  4. The next screen is the Ophcrack Live CD software itself. Ophcrack will attempt to find the passwords for all of the Windows user accounts that it can find on your computer. This password cracking process is completely automated.

    ophcrack-program

  5. After Ophcrack recovers your password, write it down, remove the Ophcrack Live CD from your optical drive and restart your computer. You can then get to log on to Windows with your discovered password!

Ophcrack won’t find every password – some are too long and some are far too complicated. If Ophcrack didn’t do the trick just try some Windows password reset software. One of the most powerful software is PCUnlocker, which can help you reset lost Windows administrator password instantly. It always works no matter how long or complicated your administrator password is.

Learn the Basics of Directory Services Restore Mode

June 20th, 2013 by Admin

Directory Services Restore Mode (DSRM) is a special boot option similar to Safe Mode in Windows. But this mode is only applicable to Windows Server domain controllers and it is used to restore or repair an Active Directory database. If there is a need to repair or restore Active Directory database, DSRM has to be used. Restarting in Directory Services Restore Mode takes the domain controller offline, meaning it functions as a regular server, not as a domain controller.

Boot into Directory Services Restore Mode

If you have physical access to a domain controller, you can access the Directory Services Restore Mode easily. Simply turn on or restart the computer and press F8 prior to the machine booting into Windows, the system will display the Advanced Boot Options.

dsrm

Choose the Directory Services Restore Mode from the menu and press Enter. The server will then boot into Directory Services Restore Mode.

Directory Services Restore Mode Password

Generally when you run the DCPROMO command to promote an individual server to a domain controller, the install wizard will prompt you to set a Directory Services Restore Mode password. This password is actually for the built-in local administrator account. In order to boot into Directory Services Restore Mode, you need to use the local administrator account along with the DSRM password to get past the Windows logon screen.

It is very important to know what the DSRM password is. The DSRM password provides the administrator with a back door to boot into Directory Services Restore Mode for performing maintenance and recovery tasks. This account is often forgotten by most AD administrators, which results in a significant security risk. If exploited, this security risk can cause high impact.

The DSRM password should be changed on a regular basis. Because the DSRM password can be used to log on in Directory Services Restore Mode, and in this mode the tasks that can be performed are significant, an exploit of the DSRM account can be extremely detrimental to your AD DS forest.

But what to do if you forgot the DSRM password? In the event a DSRM password is forgotten, you can change or reset it easily by using the tricks described in this article: How to Change or Reset DSRM Administrator Password.

How to Create a Windows Live CD Using PE Builder

June 19th, 2013 by Admin

A Live CD is a bootable media that contains an operating system, along with software used for repairing, restoring, or diagnosing computer problems. It can save you a lot of trouble in case of a computer crash or malware infection on your PC. By using a Live CD, you can easily access these files on your unbootable computer and backup them to an external storage device. You can also use a Live CD to clean severe malware infections.

In previous post we’ve introduced 7 free system rescue discs. But most of them are based on Linux and many Windows users find they are very difficult to use. Here today we are going to show you how to create a Windows Live CD using PE Builder.

Requirements:

  • Windows XP installation disc
  • PE Builder
  • A blank CD and CD/DVD burner

How to Create a Windows Live CD Using PE Builder?

Download the latest version of PE Builder self-installing package from Bart’s site and run it. It extracts all the files to a folder (e.g. C:\pebuilder3110a) and creates a desktop shortcut to launch the PE Builder.

Double-click the PE Builder desktop shortcut. PE Builder will ask to search for windows installation files. Click No and specify the source path to your Windows XP installation disc.

pebuilder

Click the Plugins button, you’ll see a list of plugins that will be integrated into the Live CD. Plug-ins are nothing but a way to add additional software to your Windows Live CD. You can visit the Bart PE plug-in repository and add more software to your Live CD.

bartpe-plugins

After configuring your plugins, click on Close to return to the main interface. In the Media output section, select “Burn to CD/DVD” and then click the Build button.

If the build process completes without any errors, you have made yourself a Live CD. You can then use it to boot up your computer.

BARTPE

Congratulations. You have created a Windows Live CD, far more useful than the system repair disc created by Windows. With this Live CD, you can rescue files from your crashed computer, defragment the hard disk and even surf the Internet without leaving any traces!

7 Free System Rescue Discs to Make Your Life Easier

June 18th, 2013 by Admin

What to do if your computer is infected with malware such as a virus, or won’t boot because Windows files are corrupt? There are lots of errors that can render your PC unbootable and your data inaccessible. A great way to fix computer problems is to boot from a system rescue disc. I would like to share with you 7 free system rescue discs that can be used to recover, rescue and repair your computer.

1. Ultimate Boot CD for Windows

Ultimate Boot CD is designed to troubleshoot Windows and Linux systems, and comes with a wealth of hardware testing, hard drive management, and partition troubleshooting and repair tools. With network support, the ability to modify NTFS volumes, recover deleted files, create new NTFS volumes, scan hard drives for viruses, etc. this software includes almost everything you need to repair your system problems.
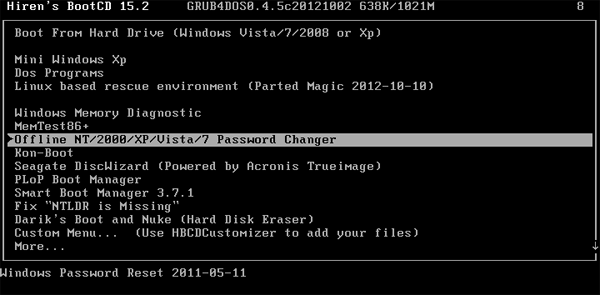
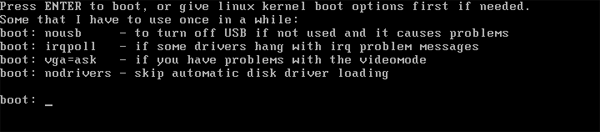
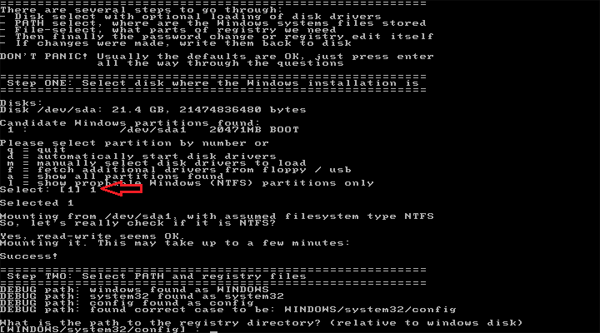
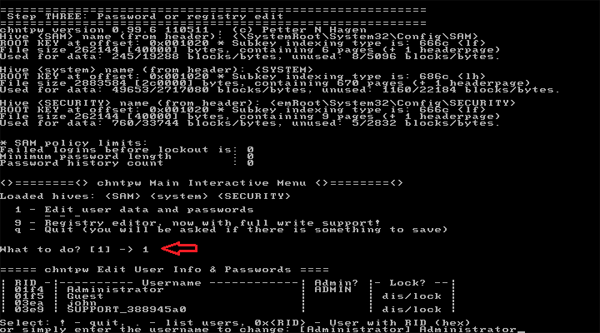
2. Hiren’s Boot CD

Hiren’s Boot CD is aimed at repairing Windows systems, and includes a wealth of tools to that effect, including antivirus tools to scan your hard drive, anti-malware utilities to clean out spyware and adware, even rootkit detection tools. Hiren’s BootCD can also help you repair, adjust, or re-flash your system’s BIOS or wipe your CMOS, clean out temporary files and folders, securely erase files, back up your data to another hard drive or to the network, update and back up hardware drivers, scan your system for hardware failures, repair lost or damaged partitions, and much much more.

3. Trinity Rescue Kit

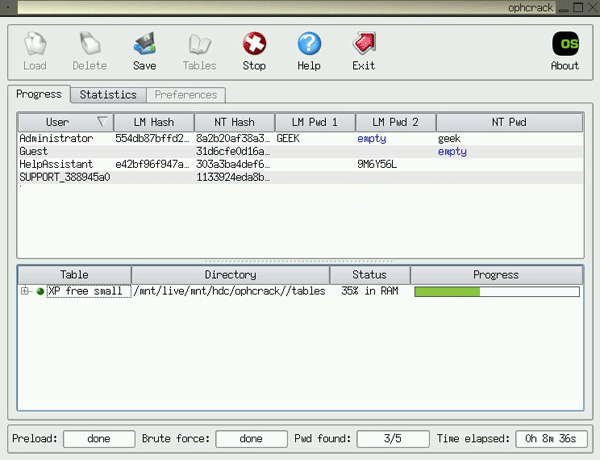
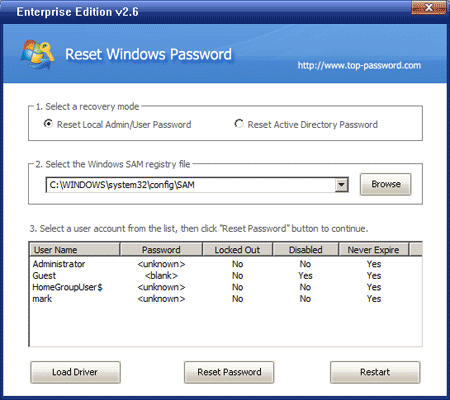
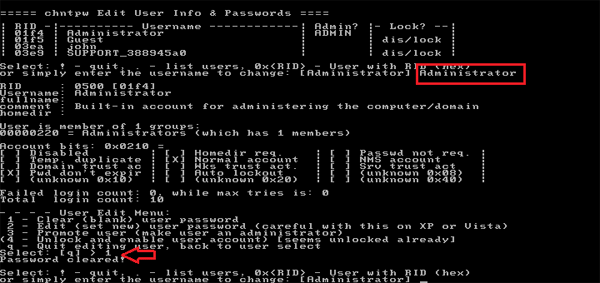
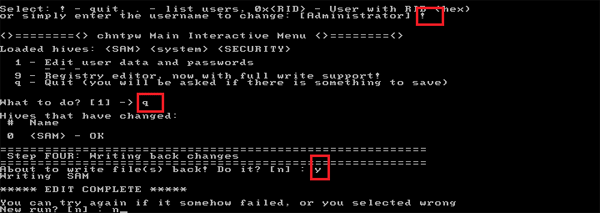
Trinity Rescue Kit is a free command-line Live CD Linux distribution created especially for rescuing Windows PCs. It can run on a CD (or a USB stick if you prefer) and once booted gives you tools to reset lost Windows password, scan hard drives for viruses and malware, clone drives, recover lost partitions, even open up the drives as network shares so you can get files off of them and to other computers on your network.

4. Emergency Boot CD

Emergency Boot CD is a self-contained bootable OS on live CD, intended for system recovery in the case of software or hardware faults. It is able to create backup copies of normally working system and restore system to saved state. You can use also use it to restore access to your PC when you forgot Windows password, fix various boot related problems, create/format/delete and wipe partitions.

5. Ubuntu

Ubuntu can be an extremely effective tool for repairing and working on computers. It gives you access to your computer and back up all of your files in ways Windows can’t – or when Windows is completely broken. Ubuntu Live CD also comes with GParted, which is a pretty amazing drive partitioning program. If you’re looking to re-size your Windows partition, or turn some empty space into a secondary partition, this is the tool you’re looking for.
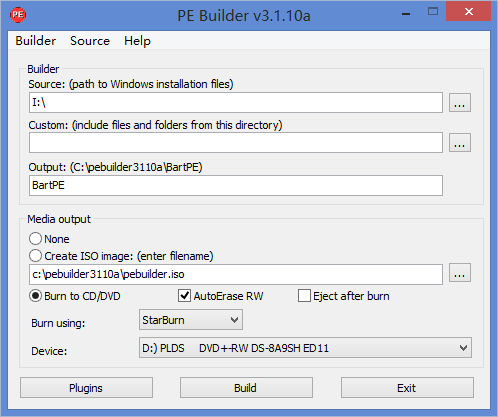
6. BartPE

Bart’s PE Builder helps you build a BartPE (Bart Preinstalled Environment) bootable Windows CD-Rom or DVD from the original Windows XP installation/setup CD, very suitable for PC maintenance tasks.

It will give you a complete Win32 environment with network support, a graphical user interface and FAT/NTFS/CDFS filesystem support. Very handy for burn-in testing systems with no OS, rescuing files to a network share, virus scan and so on.

7. Knoppix

Knoppix is a Debian-based Linux distribution and one of the first Linux live CDs that was available. It lets you restore your boot loader to your master boot record, back up hard drives, and repair file systems. It even works as a great Windows recovery CD, as you can read and write to all the major Windows file systems, including FAT, FAT32, and NTFS. It can restore corrupted system files, back up documents and settings, scan the system for viruses, and even edit the Windows Registry.

Forgot Windows 7 Password to Your Acer Aspire Laptop

June 17th, 2013 by Admin

I had not used my Acer Aspire computer in a couple of years and had this computer as a backup computer. I set a password for the administrator account and can not remember it. Can I somehow get into the computer to reset it?

Forgot Windows 7 password on your Acer Aspire laptop? Or your friend changed the Acer login password without telling you what it is? If so, then this is the stuff you are looking for. Windows passwords are set and used to keep the laptop or PC secure, but can sometimes prove disastrous. In this tutorial we’ll show you how to reset forgotten Windows 7 password on an Acer Aspire laptop using a boot CD or USB drive.

Forgot Windows 7 Password to Your Acer Aspire Laptop? How to Reset it?

Firstly, you need to create a password cracking boot CD/USB drive on an alternate PC. Download the ZIP archive of Reset Windows Password utility. Unzip the download file and you’ll find the ResetWindowsPwd.iso file which needs to be burned onto a CD or USB drive using ISO2Disc program.

Once you’ve created a password cracking boot CD/USB drive. Power on your locked Acer Aspire laptop. Press the F12 key while the system is performing the power-on self-test (POST). When you see the Boot Menu, choose the CD/DVD-ROM Drive or Removable Drive to let your PC to boot from your password cracking CD/USB drive.

After the booting procedure is complete, you’ll see the Reset Windows Password program appears. The program automatically searches your Windows 7 SAM registry file and displays user accounts available on your Acer laptop.

Choose a user account and then click on “Reset Password” button. The program quickly removes the existing password and unlock your user account. Restart your Acer laptop and remove the boot CD/USB drive. You can then log into your Windows 7 user account without a password.

Conclusion

There are lots of ways to unlock or reset Windows 7 password, but this method should be the easiest way for you to reset lost or forgotten Windows 7 password for your Acer Aspire laptop.

How to Reset Lost Windows Password with Hiren’s BootCD

June 14th, 2013 by Admin

If you forgot your Windows password you will not be able to log in to Windows. So what to do in this case? Is there a free password cracking software to reset lost Windows password? Answer is yes. In this tutorial we’ll guide you through step-by-step procedure of resetting lost Windows password using a free Linux-based boot utility – Hiren’s BootCD.

Hiren’s BootCD is an ultimate solution to almost all your computer problems. It comes loaded with hell lot of tools. Each of them is powerful and can be really very helpful if used with caution. You can solve nearly all your PC problems like virus infection, hdd failure, data recovery, Hard disk partitioning, password recovery using this CD.

Note: Hiren’s BootCD a customized Linux distribution that you need to go through so many steps on Command Prompt to reset your forgotten Windows password. If you aren’t tech savvy, I recommend you use the Reset Windows Password utility which comes with GUI graphical interface.

How to Reset Lost Windows Password with Hiren’s BootCD?

To get started, download Hiren’s BootCD from here. Once the download is complete, unzip the download file and you’ll find two useful files: Hiren’s.BootCD.15.2.iso and BurnCDCC.exe. Simply burn the ISO image of Hiren’s BootCD to an empty CD using BurnCDCC program.

Boot your locked PC using Hiren’s BootCD that you’ve created. Make sure you have your BIOS set to boot from CD/DVD. Once you boot from the Hiren’s BootCD, you’ll see a list of powerful system repair and maintenance tools. Choose the Offline NT/2000/XP/Vista/7 Password Changer and press Enter.

offline-nt-password-changer

The screen will display a list of Linux Kernel Boot options. Simply press Enter to continue.

boot-options

Now the step to choose the correct drive where the Windows is installed. If you have more than one operating system then choose the correct drive and hit Enter. Here I will type “1” and press Enter, because the /dev/sda1 is the system partition on my hard drive. Next press Enter to confirm that your registry directory is WINDOWS/system32/config.

select-partition

When it asks you which part of registry to load, type “1” and press Enter. When the “chntpw Main Interactive Menu” is shown, type “1” and press Enter to choose the “Edit user data and passwords” option.

edit-user-passwords

Now the screen will display a list of local user accounts existing on your registry file. For example, if you want to edit Windows administrator password, type “Administrator” and press Enter.

clear-windows-password

The program will display a list of account properties for your user account. To clear or blank your user account password, type “1” and press Enter. You’ll receive a message that says “Password cleared!”

After successfully resetting your forgotten Windows password, type “!” to close the User Editor Tool.

Now type “q” and hit Enter to close the Offline Password Editor and Registry tool.

Now type “y” and hit Enter to confirm the password change.

Now it will ask you whether you want to use it again or not. Just type “n” and hit Enter.

exit-boot-cd

Remove your Hiren’s BootCD and press ALT + Ctrl + Del to restart your system. You can then log on your computer with a blank/empty Windows password.

How to Override Lost windows 7/Vista/XP Password with USB Drive

June 13th, 2013 by Admin

Locked out of Windows after forgetting the administrator password? Just bought a used laptop but it is password protected and you are unable to get into it? Is there any way to override a lost Windows password and regain control of your computer without wiping any data? Here is a very easy method using a USB drive to override lost Windows 7/Vista/XP password quickly.

How to Override Lost windows 7/Vista/XP Password with USB Drive?

Firstly, you need to prepare a bootable password removal USB drive on another PC which you can log on. Download the .zip archive of Reset Windows Password utility onto your desktop. Open the ZIP file and extract it to a folder on your desktop. Within that folder, you’ll find a file called ResetWindowsPwd.iso. Simply burn the ISO image file to a USB drive using ISO2Disc program.

Plug the USB drive into your locked PC which needs to override a lost Windows password. Turn on the computer and get it to boot from the USB drive. Make sure you have your BIOS set to boot from removable device. Once you boot from the USB drive, the computer will start loading the WinPE operating system and open up the Reset Windows Password program.

On the main interface of Reset Windows Password program, you can see all user accounts for your Windows installation. Choose a user account and click on Reset Password button. The program will unlock your user account and override the lost Windows password.

Unplug the USB drive and restart your computer. Now you should be able to log back into Windows system with a blank/empty password. It’s that easy!

Conclusion

So this is how can you override lost Windows 7/Vista/XP password easily. Instantly regain access to your password protected computer when you lost or forgot Windows password. No need to reinstall Windows.

How to Boot Windows 8 or 10 into Safe Mode

June 12th, 2013 by Admin

Couldn’t find a way to boot Windows 8/10 into Safe Mode? In the previous version of Windows, we can boot into Safe Mode by simply pressing F8 key while Windows starts. However, this all changes since Windows 8 and the F8 key doesn’t work anymore. Booting into Safe Mode when using Windows 8 or 10 is not as simple as with previous versions of Windows – but it is possible. Here is how to boot into Safe Mode in Windows 8 and Windows 10.

How to Boot Windows 8/10 into Safe Mode?

Turn on your computer and wait until it boots into the Windows 8/10 login screen. If the computer logs on to your user account automatically, you need to manually log off in order to bring up the login screen.

windows-8-login-screen

Hold down the SHIFT key and click on the Power icon visible on the bottom right of Windows 8/10 login screen, then click Restart option. In a moment you’ll see the recovery screen. click on the Troubleshoot option.

recovery-mode

Now select Advanced Options.

troubleshoot

In a moment you’ll see the Advanced options screen, as shown below. Select the Startup Settings option.

advanced-options

Next hit the Restart button.

startup-settings

Wait while your computer restarts. You don’t need to do anything here or hit any keys. After a while, you should see the Startup Settings menu. You’ll see a number of advanced ways to start Windows 8/10, all aimed at assisting you in solving a Windows startup problem.

enable-safe-mode

Press F4 key on your keyboard to enter into Safe Mode. There’s nothing to do here but wait. Next up will be the login screen you normally see when your computer starts. Log on as administrator and now Windows 8/10 is running in Safe Mode.

Note: If you forgot the administrator password and can’t log into Safe Mode, you can easily reset the lost password using a Windows Password Reset boot CD/USB drive.