Archive for the ‘Others’ category

How to Remove PDF Owner Password When You Forgot It

February 17th, 2013 by Admin

A PDF owner password is the password used to set document restrictions on PDF files. In Adobe Acrobat, the PDF owner password is called the change permissions password. If you forgot PDF owner password, you can’t print, copy or edit the content of your protected PDF file. In such a situation, you might want to use a PDF password remover application that can help you to remove forgotten PDF owner password. And PDF Password Recovery program does exactly that.

How to Remove PDF Owner Password When You Forgot It?

  1. Download and install PDF Password Recovery software on your computer.
  2. Run PDF Password Recovery program, then click the  button to select your password-protected PDF document (*.pdf), then choose the Remove Owner Password option.
    PDF Password Recovery
  3. Click the Next button.
  4. Immediately the tool will decrypt the owner password and remove the security restrictions imposed on it, and a new non-protected copy will be created. You will then be allowed to print, copy, modify the decrypted PDF document without even knowing the password.
    Remove PDF Owner Password

There is no need to worry about forgetting PDF owner password. Just follow the steps above and you can remove PDF owner password quickly and easily!

Outlook Express Password Recovery

February 6th, 2013 by Admin

Setting up email accounts in Outlook Express is quite easy and convenient. Once the accounts have been setup we do not need any attendance or maintenance at all. But most of the time we forgot the password soon, then read this post how to recover Outlook Express password with ease.

Outlook Express Password Recovery is a program that helps you to retrieve all types of Outlook Express saved passwords: SMTP, POP3, IMAP, NNTP, HTTPMAIL, LDAP, Identity passwords. Just a single mouse click, the program will reveal the server names, email logins and passwords for all the email accounts stored by Outlook Express.

How to Recover Outlook Express Password?

  1. Install Outlook Express Password Recovery program on your computer.
  2. Start Outlook Express Password Recovery program and then click on Start Recovery button.

  3. The program will recover Outlook Express Identity passwords and email account logins and passwords which are stored in Outlook Express.

Forgot Outlook Express password? Prepare to reinstall or upgrade Windows? It’s advisable to retrieve all email account passwords in Outlook Express and backup them in a safe place.

Outlook 2007 Password Recovery – Easy Tutorial

February 4th, 2013 by Admin

I seem to have forgotten my email password – its been on “remember” on Outlook 2007 for so long, so I have rarely actually used it. Does anyone know of any programs I can use to recover the password from Outlook (crack or decrypt it or whatever). I am going to have to format my computer eventually – and I do not want to lost my email account. Thanks for the help!

Lost or forgot Outlook 2007 password? How to crack or decrypt the email passwords saved in MS Outlook? Most computer users will realize that they have forgotten Outlook password when they are going to re-install Windows or transfer Outlook account to a new computer, this can be very frustrating. But there’s no need to panic, now you can easily recover Outlook 2007 password using some Outlook password cracker tools.

How to Recover Outlook 2007 Password?

When it comes to an Outlook password cracker, I highly recommend Password Recovery Bundle 2013, a password cracking program designed to help you break you forgotten emails passwords in Microsoft Outlook 2010/2007/2003/2000. You can find back your password of Outlook in a short term with this magic software. Get and install it on your computer right now, and follow the steps below to perform an Outlook password cracking.

  1. Download and install Password Recovery Bundle on your computer.
  2. Launch Password Recovery Bundle program, and then click on Start Recovery button.
  3. Select the “Email Password” -> “Outlook Password” option from the pop-up menu list.
  4. In a short moment, your email passwords saved in MS Outlook will be decrypted and recovered. Write it down and keep it safe.

Note: It’s illegal to recover others’ Outlook passwords without permission. This tool is designed to recover only the email account passwords saved by MS Outlook application.

How to Retrieve Firefox Passwords from Crashed Computer

January 18th, 2013 by Admin

My old computer crashed and it had all my old passwords on it! I was wondering if it were possible to somehow retrieve them. I can access data from the computer, but I can’t open the Firefox application due to the virus. I was running it on Vista with the newest version of Firefox as of April 2011. I’d really appreciate the help – I cant remember all of my passwords.

In case you ever find yourself in a situation where your computer crashes or you can’t start Windows anymore, you can retrieve Firefox passwords easily from your hard drive. Just add the hard drive to your current computer as a slave drive, Firefox Password Recovery program allows you to decrypt and recover the passwords saved in Firefox password file in just a few mouse clicks. Let’s proceed.

How to Retrieve Firefox Passwords from Crashed Computer?

  1. Connect your crashed hard drive to a working computer as a slave drive
  2. Download Firefox Password Recovery software and install it on your computer.
  3. Launch Firefox Password Recovery program and click on Recover From File button.

  4. On the next window, choose your Firefox installation directory and profile path.

  5. Click OK. It will retrieve the Firefox passwords quickly from the external hard drive.

Firefox Password Recovery also allows you to retrieve Firefox passwords for your current working computer. It’s helpful for you to export/backup Firefox passwords before re-installing Windows or formatting your hard drive.

How to Fix the Problem “Windows Won’t Accept My Password”

January 18th, 2013 by Admin

I have been using Windows 7 Ultimate for some time using the same password. I have not, repeat not, forgotten my password, but now it won’t accept it. Why has this happened, and more importantly, how do I get back in? I haven’t got a pre-made disk which will allow me to reset the password.

Windows won’t accept your password even if you’ve typed in a correct password? If your account are not locked out or disabled, it’s likely that you have turned on the NumLock feature that many laptops have. After enabling the NumLock feature, you’ll find a strange problem and you can’t type normal anymore. For example, when you type in “hey, how’s it going”, your computer would type “123456… etc.”. If you later try to type something else it will continue in sequence from before, eg: “7890123… etc”

The NumLock feature is used to convert part of the main keyboard to act as a (slightly skewed) numeric keypad rather than letters. NumLock is rarely used for its original purpose, and ends up confusing the user if it has for some reason been activated without the user being aware of this. This can be more of an issue on most laptop computers, since activating the NumLock function typically requires use of the Fn key and if a user accidentally switches it on they may have no idea how to switch it off.

How to Turn Off NumLock Feature?

Find the NumLock key and press it to reverse things and set it back to normal. On my Dell it’s Fn + F4, on my Compaq it’s Fn + ScrLk. It’s different on every make and model. Based on your keyboard you can get original settings of your keyboard in following ways.

  • Fn + F11
  • Shift + Num Lock
  • Fn + Num Lock
  • Fn + F11 + Scroll lock
  • Fn + F8 (on HP laptop)
  • Ctrl + F11
  • Fn + Shift + Num Lock

Some keyboards have and don’t have the Num Lock key. If there is then just press the Num Lock or NmLk key. Sometimes you have to hold the Fn button with the Num Lock key. If there is no Num Lock key on your keyboard then just follow these steps: START -> ALL PROGRAMS -> ACCESSORIES -> ACCESSIBILITY -> ON-SCREEN KEYBOARD -> NLK.

Find the correct key combination on your laptop and your problem should be solved. If you still can’t log in to Windows, you can use the Reset Windows Password utility to remove your administrator/user password so you can then log on your computer without typing a password. After getting into Windows, you can turn off NumLock feature easier.

How to Burn a Windows Bootable Disk on a Mac

January 4th, 2013 by Admin

I have got a Windows 7 laptop that has crashed and needs to be rebuilt. I no longer have the installation CD, but have downloaded the ISO. As my happy and friendly reliable Macbook is working I thought it would be a simple case of creating a bootable Windows installation disc. Unfortunately I can’t find a Mac app that will let me create a bootable disk. Please help!!!

All Mac computers running the OS X operating system come with the Disk Utility application by default. Disk Utility allows you to manage your computer’s hard drive and removable media, including CD and DVD. If you want to make a copy of a Windows bootable disk, like an installation CD, you can use Disk Utility on a Mac to burn a Windows bootable disk easily.

How to Burn a Windows Bootable Disk on a Mac?

  1. Insert a blank writable DVD into your Mac’s SuperDrive.
  2. Right-click your Windows installation ISO image file and select Open With, then Disk Utility.
  3. This should add the image file to the list on the left side of the Disk Utility window.

  4. Right-click the Windows image and select Burn.
  5. The computer will begin burning the image file onto the DVD, and when the process finishes, the DVD can be used as a bootable disk in Windows.

Note: The disc will only be bootable if the image is set up that way. Not all images translate to a bootable DVD, so check to make sure you have the right type of image file first.

This is a great way to reinstall Windows on a machine with a broken or missing optical drive, or which has suffered some catastrophic nightmare. If you forgot the administrator password for your Windows PC and can’t login, you can also create a bootable Windows password reset disk on a Mac, and then take the disk to reset your forgotten Windows password.

How to Export Passwords from Google Chrome

December 30th, 2012 by Admin

Is there any program, or any way to export passwords from Google Chrome? I need this fast, as I am going to reformat, so I don’t want to lose all my passwords.

Google Chrome browser allows you import bookmarks, browsing history, and other settings from Internet Explorer or Firefox browser in a jiffy. But the only problem is it doesn’t have an option to export or backup stored passwords. In this tutorial we’ll show you how to export passwords from Google Chrome using Password Recovery Bundle.

How to Export Passwords from Google Chrome?

1. Download and install Password Recovery Bundle on your computer.

2. Run Password Recovery Bundle, then click on the Start Recovery button. It will bring up a drop-down menu that shows all supported password recovery options.

3. Select the Chrome Password option.

4. The Chrome saved logins and passwords will be revealed instantly.

Now you can copy the recovered login details to the clipboard and save them to a text file. Password Recovery Bundle can be used to export passwords from Google Chrome on any Windows platform including Windows XP, 2003, Vista, Windows 7, 8.

3 Options to Access UEFI BIOS Setup in Windows 8 / 10

December 30th, 2012 by Admin

On Windows 10 or 8 operating systems that came pre-installed on the computer from the factory, the legacy BIOS has been replaced by UEFI (Unified Extensible Firmware Interface). This will cause the problem that bootable media from previous versions of Windows may not be recognized in Windows 10 / 8 computer. To resolve this problem, you need to switch your BIOS mode from UEFI BIOS to Legacy BIOS. No doing so would prevent the installation of Linux, Windows 7, or any other OS.

In this tutorial we’ll show you 3 ways to access UEFI BIOS Setup, even if you couldn’t login to Windows 10 or 8.

Option 1: Access UEFI BIOS Setup After Logging in to Windows 10/8

In previous post, we’ve covered how to set Windows 8 PC to boot with legacy BIOS mode instead of UEFI mode. Here we’ll show you another option to access UEFI BIOS Setup so long as you can log into Windows 10 / 8. Here are the steps:

  1. In Windows 8/8.1, press the Windows key + C, or swipe in from the right edge of the screen to open your Charms. Click Settings -> Change PC Settings. In PC Settings, select General.

    If you’re running Windows 10, press the Windows key + I to open the Settings app. Click Update & Security. Select the Recovery tab on the left pane.

    update-security

  2. Under Advanced startup, click Restart now. The system will restart and show the boot menu.
  3. In the boot menu, select Troubleshoot.

  4. In the Troubleshoot menu, select Advanced options.

  5. In the Advanced options menu, select UEFI Firmware Settings.

  6. Click Restart button to boot into UEFI BIOS Setup screen.

  7. When the computer restarts, the UEFI setup screen will be displayed. You can then disable UEFI BIOS and Secure Boot options, and enable legacy BIOS mode.

Option 2: Access UEFI BIOS Setup without Logging in to Windows 10/8

What to do if you forgot Windows user password and can’t login? Here is how you can access the UEFI BIOS Setup from Windows 10/8 login screen:

  1. From the login screen, click the Power icon in the lower right corner of the screen. While holding the Shift key, select Restart.

  2. The system will not actually restart but go into the boot options. click Troubleshoot.

  3. Afterwards, click Advanced options -> UEFI Firmware Settings -> Restart.
  4. The computer will reboot and take you into the UEFI BIOS setup.

Option 3: Access UEFI BIOS Setup from Command Prompt

You can also boot your computer into UEFI BIOS Setup by executing a simple command at the Command Prompt. Follow these steps:

  1. Open the elevated Command Prompt, then run the following command:
    shutdown /r /fw

  2. You’ll get a popup that says Windows is about to sign you out. Click Close.

  3. Your PC will now restart directly to UEFI settings.

How to Set Windows 10 / 8 PC to Boot with Legacy BIOS Mode Instead of UEFI Mode

December 29th, 2012 by Admin

Just got a new DELL laptop with Windows 8 pre-installed but it refused to boot from Ubuntu Live CD or even Windows 7 installation DVD? If you’re in similar situation, you should see the error message “Reboot and Select proper Boot device” or “No bootable device found” on the screen during boot. In order to fix this issue, all you need to do is to disable the UEFI mode and turn off the Secure Boot option in BIOS, which allows the EFI-based PC to operate in a legacy BIOS mode. Fortunately, nearly all modern EFI-based computers include a feature known as the Compatibility Support Module (CSM) that enables them to boot with legacy BIOS mode.

One of Microsoft’s new rules for Windows 10/8 is that any manufacturer that ships a windows 10/8 computer must enable UEFI secure boot by default. The UEFI BIOS is created for Windows 10/8 and if you need to use other system like Windows 7, Linux or any other OS, you have to disable the UEFI mode and Secure Boot options.

How to Set Windows 10 / 8 PC to Boot with Legacy BIOS Mode Instead of UEFI Mode?

When your computer is powered on, check the boot-screen for setup key (i.e. DELETE key, F8 key, F2 key) to enter BIOS Setup Utility. If you don’t know how to access your BIOS (UEFI) Setup, please check out this article: How to Set Your Computer to Boot from CD or USB Drive.

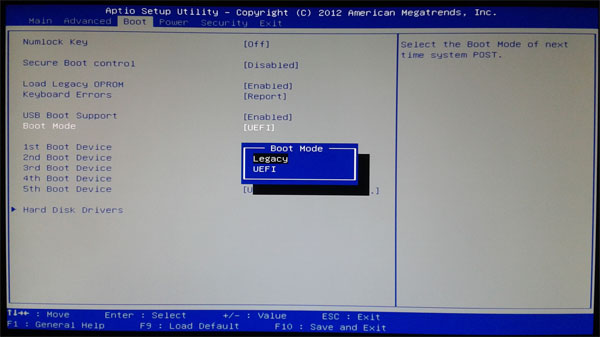
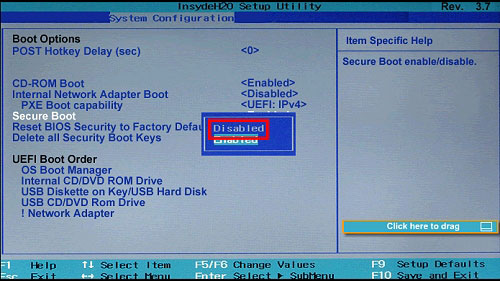
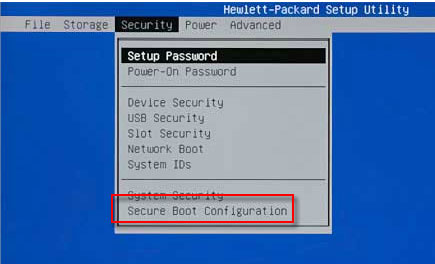
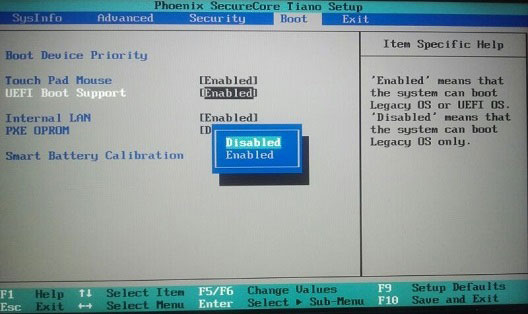
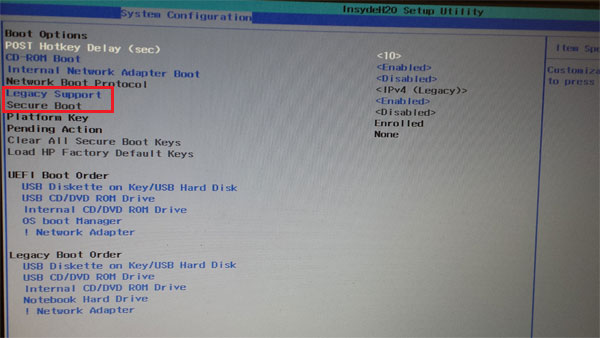
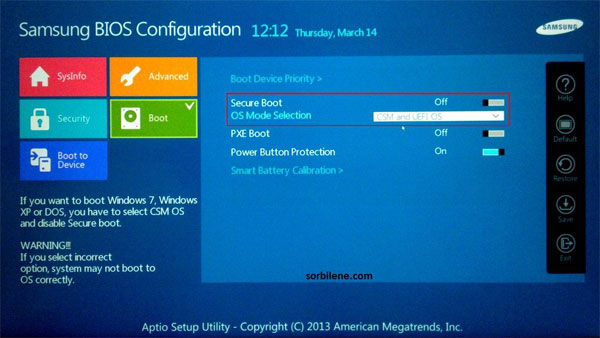
In the BIOS Setup Utility, change the boot mode from UEFI mode to legacy BIOS mode (or CSM boot mode), and disable the Secure Boot option. Here are steps of disabling UEFI secure boot in Toshiba laptop:

  1. Power on the system and while the “TOSHIBA” logo appears, press F2 key to enter the BIOS Setup Menu.
  2. Select Security tab and set the Secure Boot to Disabled.
  3. Select Advanced tab and go to System Configuration.
  4. Set the Boot Mode to CSM Boot.
  5. Press F10 key to save and exit.
  6. Press F12 key at “TOSHIBA” logo screen to toggle between the bootable devices and choose the medium which you want to boot from.

Note: Once you are finished and you want to return back to normal operation you need to revert the BIOS settings. The installed Windows 10/8 OS will not boot up, if you do not revert the BIOS settings!

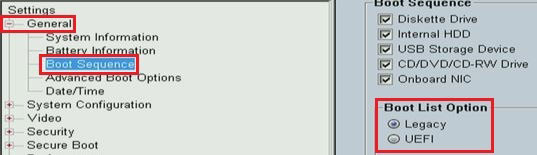
The exact menu option in your motherboard’s BIOS may differ but look for phrases like “Boot Mode”, “Boot List Option”, “UEFI/Legacy Boot Priority”, “UEFI Boot”, etc. For example, in ASUS desktop or laptop computers, you need to enable the “Launch CSM” option and disable the “Secure Boot Control” or “Fast Boot” option.

hp-secure-boot

dell-latitude-uefi

hp-envy-uefi

samsung-uefi-secure-boot

How to Run an Application as Administrator in Windows 8

December 26th, 2012 by Admin

In the previous post, we’ve covered several methods to run a program with administrator rights on Windows 7/Vista/XP. The methods still work on Windows 8. This tutorial will show you some other options to run an application as administrator with full unrestricted elevated rights and privileges in Windows 8.

Option 1: Run an Application as Administrator from Start Screen

  1. Move the mouse cursor to the bottom right corner of the screen, click the Search icon.
  2. Type the program’s name that you want to run as administrator in the Search box.
  3. Right-click on your desired application on the top-left of the search result page. A tick sign appears on the icon.
  4. Click on the Run as Administrator icon from the bottom options.

Option 2: Run an Application as Administrator from Task Manager

  1. Simply hit Ctrl + Shift + Esc on your keyboard (that starts the Task Manager) and then click on File -> New Task.
  2. A new dialog box will open. Type the name of your desired program, check the Create this task with administrative privileges box, and click OK.

Note: If you forgot the password for your administrator account in Windows 8, you can use the Reset Windows Password bootdisk to remove your password quickly and easily.