Archive for the ‘Others’ category

How to Fix ‘Access Denied’ Error When Delete A File

September 27th, 2012 by Admin

Have you ever tried to delete a file and you receive the “Access Denied” error message? This error is quite common and you’re not alone. The problem can occur due to many different reasons, maybe the file is being used by some other programs, you do not have administrator privileges, or maybe you are trying to delete a file on a write-protected disk.

You know how frustrating such error message can be. Fortunately, there is a small freeware that can help to fix the access denied error so you can delete your files without any hassle – Unlocker. This software lets you see which process is holding the lock on the file/folder and then helps you unlock it. After Installing this software you can simply right click the file/folder that is giving “Access is Denied” or “File May Be In Use” errors and then click on Unlocker.

A new window will now pop-up showing the processes as shown below. Now you can either unlock all of the processes or kill the process.

On the left of the ‘Kill Process’ button there is a drop-down menu where you can select Copy, Move, Rename, or Delete functions for a locked file.

This program is useful for the following types of errors:

  • Cannot delete file: Access is denied
  • There has been a sharing violation.
  • The source or destination file may be in use.
  • The file is in use by another program or user.
  • Make sure the disk is not full or write-protected and that the file is not currently in use.

Download Unlocker Now!

How to Disable Hibernation in Windows 10, 8, 7, Vista and XP

September 26th, 2012 by Admin

Hibernation is a great way to cut down on the computer’s power consumption when it’s not in use. It also helps save battery on the laptops. When the computer is in hibernate it lets you save all the data in RAM to hard drive persistently and switch off the computer. Then you can switch on the computer with exact same settings and opened applications.

When you enable hibernation, it creates a file: hiberfil.sys, located on your root system partition which saved the state of all open documents and files. The file size of hiberfil.sys is about the size of your physical memory. So it would consume lots of hard disk space.

If you never plan to put your computer into hibernation then it’s probably a good idea to disable hibernation and gain all the disk space back. Here we’ll show you how to disable hibernation using Command Prompt in Windows 10, 8, 7, Vista and XP.

How to Disable Hibernation in Windows 10, 8, 7, Vista and XP?

  1. Go to Start Menu -> All Programs -> Accessories -> Command Prompt, right-click on it and select Run as Administrator. In Windows 8/10, press Windows + X to open WinX menu, then select Command Prompt (Admin).
  2. Type the command: powercfg –h OFF

  3. Press Enter key, this will disable the hibernate feature.
  4. Now restart the computer, you won’t be able to see hibernate.sys file in your system drive. If you can still see it, simply delete it.
  5. Now you have successfully disabled hibernate and free the hard disk space.

If you want to enable hibernation again, you can use the same method above to open an elevated Command Prompt with administrator rights, then type the command: powercfg –h ON to enable the hibernation.

How to View or Show Password Hidden Behind Asterisk Characters

September 20th, 2012 by Admin

Almost all web browsers, instant messengers, email applications, FTP clients and many other software offer the capability of remembering usernames and passwords, which makes it convenient to automatically login to your user account. If you launch the application, you can see that the password field is protected and masked with some asterisk characters. This is good security measure. However, in some scenarios, there may be a need to view or show the actual password hidden behind asterisk characters, especially if you forgot the saved password.

In this guide we’ll show you an easy way to view and show the hidden password behind asterisk characters. With Asterisk Password Recovery utility you can reveal and view the masked password hidden under the asterisks on password field on web pages and program’s user interface.

How to View or Show Password Hidden Behind Asterisk Characters?

  1. Launch the Asterisk Password Recovery program.

    Asterisk Password Recovery

  2. Open up the application you wish to recover a password from. In my case it was MS Outlook. Once the program is open, bring up the account properties dialog of your email account.

    Reveal Outlook Password

  3. Click on the icon 
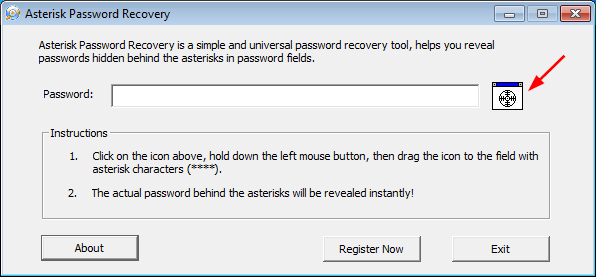
, drag the icon to the password field with asterisk characters.
  4. The hidden password will be showed and you can view the actual password of your email account.

Note that the asterisk password recovery tool is meant for password recovery purpose. They won’t be able to decrypt and show Windows logon password (and password in User Account Manager in Control Panel). If you forgot Windows logon password, you can choose to remove the forgotten password with Reset Windows Password bootdisk.

How to Disable USB Storage Drive Access in Windows

September 15th, 2012 by Admin

Disabling USB storage drive access to your computer is essential if you must share your computer with others who you don’t trust.  To prevent others from using USB flash drive or mass storage device to copy and transfer your data and files, you can simply disable USB ports in computer BIOS. However, disabling USB ports will also block other USB based devices such as USB keyboard, USB mouse, printer,etc.

As a workaround, you can use the following registry trick to disable only USB storage drive access while you can still use USB keyboard and mouse normally.  With this trick you can prevent others from taking out data from your personal computer without permission or spreading viruses through the use of USB storage drive.

How to Disable USB Storage Drive Access in Windows?

Open Windows registry editor quickly from Run box by pressing Win+R key. Now type regedit and hit OK. When it opens, browse to the following key address.

HKEY_LOCAL_MACHINE\SYSTEM\CurrentControlSet\services\USBSTOR

You will see an item list in the right part of the window. Now, Double click on the name Start. A new small box will appear.

In the box you will find the value data set to 3. Change that value to 4 and select Hexadecimal in the Base group. Now click OK.

But, it may not work till your next restart.

To enable access to USB storage drive again, just change the Start key value back to 3. Done.

This trick allows you to disable any USB mass storage device such as USB flash drive, USB key and portable hard disk from been used in your Windows PC, while still allowing hardware components to work properly via USB connection. It works in most Windows operating system such as Windows 8, 7, Vista, XP, Windows Server 2008, 2003 and 2000.

8 Useful Windows Keyboard Shortcuts

September 14th, 2012 by Admin

Taking your hands of the keyboard to use the mouse can be annoying. Luckily, Windows has a number of keyboard shortcuts that can speed you along. Use these Windows keyboard shortcuts to perform tasks, such as cutting and pasting text, quickly and easily.

Check out the selection of shortcuts below and see if there aren’t a couple you didn’t know about that could be saving you some real time.

1. Win + F

Use this key combination to open Windows Search. If you got something quick to search for, though, you can go ahead and use the top right corner of any Explorer window. With Windows Search you can search your entire computer for something that you’ve been looking for. It will scan every volume you have installed on your computer. Don’t underestimate its power!

2. Win + E

This will open up an Explorer window. This is very useful if you want a quick way to get to My Computer.

3. Win + L

Here is an extremely interesting one. This will lock down Windows. If you have it set up to where you have to enter a password to open Windows, you will have to enter your password when it is locked. Otherwise, just hit OK and you will return to Windows. This tip could be especially useful for laptop users. Say you are leaving your laptop for a moment. If you use this shortcut, you can feel safe that nobody is going to mess with anything while you are gone.

4. Win + D

This will minimize every window you have open. I use this constantly because I tend to have about ten windows open at the same time. To move the windows back to normal you can hit the Windows Shortcut Key + D again and all the windows will be restored.

5. Win + R

This opens up the Run command. I’m not really a big fan of the Run command except to use it to speed up my startup. But if you constantly use the run command this will save you some time.

6. Ctrl + Esc

This will bring up the Start Menu. In Windows 8, the Start button is removed so you can’t access the Start Menu as convenient as before. But you can still press Ctrl + Esc to access the Start Menu quickly.

7. Ctrl + Alt + Del

The Ctrl + Alt + Del key combination is used to access the Task Manager, so that you can close the application by killing its process.

8. Shift + Del

Right-click on the files or folders you want to delete, and then press Shift+Del, it will delete the files directly without sending them to the recycle bin.

These are eight really simple time-saving keyboard shortcuts that might actually save you some day from ever thinking of what you could have done to cherish every moment in your life. Time is something precious, more so if you approach a ripe old age or own a business. Now, for your next goal: putting your saved time to good use!

How to Crack Outlook Password

September 12th, 2012 by Admin

I forgot my password for Outlook 2007 in my PC. However, I can still access my Gmail account. How do I retrieve or crack my Outlook password?

If you forgot your Outlook password, there’s no need to worry much. With Outlook password cracker utility, you can crack Outlook password quickly and easily. It is important that the Outlook password you are trying to crack is stored on your computer (i.e. you are recovering your own password and not trying to crack someone’s passwords).

When it comes to Outlook password cracker utility, I highly recommend Outlook Password Recovery, a powerful password cracking software to recover forgotten email account passwords stored in Microsoft Outlook 2010, 2007, 2003, XP, 2000. Get this software and install it on your computer, just one click and you can find out your Outlook password in a short time. Follow the steps below to see how can you crack Outlook password easily.

How to Crack Outlook Password?

  1. Download and install Outlook Password Recovery program on your computer.
  2. Launch Outlook Password Recovery, then click on the Start Recovery button.

  3. The program will automatically search Microsoft Outlook profiles and crack Outlook passwords save in Outlook application.
  4. In a short time, it will display the recovered login details: email account, username, password, account type (IMAP, POP3, SMTP,LDAP, HTTP) and server name.

This program is not a hacker tool. To crack Outlook password, you must have physical access to your computer.

How to Set Your Computer to Boot from CD or USB Drive

September 11th, 2012 by Admin

Computers normally boot from the hard drive, which makes sense as this is where Windows operating system is stored. However, in some cases you will need to boot from CD or USB drive instead – e.g. if you need to install/reinstall Windows, or boot from a rescue CD/USB to backup your files, diagnose and repair a faulty Windows installation, or reset forgotten Windows password, etc. So in this tutorial we’re going to show you how to set your computer to boot from CD or USB drive.

Generally, there are two options to make your computer boot from CD or USB drive. When you power on your computer, check the boot-screen for setup key or boot menu key.

Option 1: By pressing the boot menu key, the screen will show a list of devices that your computer can boot from. Just use the arrow key to select your desired device (CD, USB or Hard Drive) and then press Enter. Your computer will directly boot from a specific device. This is the simplest way to set your computer to boot from CD/USB drive without changing computer BIOS settings. But the boot menu key is not available on some computers, then you need to turn to Option 2 instead.

Option 2: By pressing the setup key, it will bring up the BIOS Setup Utility. Once in the BIOS, navigate to the option that controls the boot order (this may be under “Boot” or “System Configuration” or “Storage”). There should be a list for “Boot Priority”. Place the CD/DVD or USB drive at the top of this list. Save your changes. Now restart the computer, it will try to boot from CD/DVD or USB drive before hard drive.

Usually, when you turn on your PC, there is a very short period, when the BIOS entrance command appears on the screen, but if you miss the moment, you will have to start all over again. If you know, what the keys combination you should use is, you need to press it immediately upon computer reboot, and sometimes you need to try pressing the key repeatedly as soon as the computer starts up.

The BIOS setup keys and boot menu keys are different as per computer manufacturer and even as per computer model. For you convenience, I am listing the BIOS setup keys and boot menu keys for the most popular computer models.

Brand Destination Hotkey
Dell BIOS Key
F2
Boot Menu F12
HP BIOS Key
F10 Note: Pressing ESC will bring up a menu with all hotkey options
Boot Menu F9
Lenovo BIOS Key
F2 or blue “Thinkpad” button
Boot Menu F12 or “Novo” button
Toshiba BIOS Key
F2
Boot Menu F12
Acer BIOS Key
Notebook: F2 Desktop: DEL
Boot Menu F12
Sony BIOS Key
Press F2, select the 2nd option
Boot Menu F10 or “Assist” button
Samsung BIOS Key
F2
Boot Menu F10 (Not always implemented)
Asus BIOS Key
DEL or F2
Boot Menu ESC
Gateway BIOS Key
F1 or F2
Boot Menu ESC, F10 or F12

 
For Windows 10 or 8 computers, there are also another two ways to access the BIOS(UEFI) Setup:
2 Options to Access UEFI BIOS Setup in Windows 8 / 10

How to Bypass the Parental Control Time Limits in Windows 7/Vista/XP

September 7th, 2012 by Admin

Windows parental controls have the capacity to control when a user, such as your child, may use the computer. The time limits feature, when set up properly, will prevent your child from using the computer at the times you specify. If the child attempts to log on before the set time, Windows will prevent him from logging on. If he remains on the computer after the set time ends, the system will log off his account.

However, your children can still find their ways to bypass the parent control time limits. Here we’ll show you one method that kids use to bypass the parental control time limits in Windows 7/Vista/XP.

How to Bypass the Parental Control Time Limits?

To get started, you need to find another computer that you can log on as administrator, and create a password reset disk on a CD or USB stick. So you can then boot the computer with parental controls enabled from the CD/USB and it enables you to bypass Windows time limits immediately.

  1. Download the self-extracting Zip file of Reset Windows Password package.
  2. Unzip the download file, there is a CD ISO image: ResetWindowsPwd.iso. Burn it onto a blank CD/DVD or USB stick using ISO2Disc or any CD/DVD burning software you like.
  3. Boot the computer with parental controls enabled from the Windows password reset disk.
  4. Wait until the boot process is complete. When a window pops up with all your Windows accounts, select your limited user account and then click the Reset Password button.

    Reset Windows Password

  5. It will blank your user password and also remove the time limits that is set up on your user account.
  6. Take out the CD/USB and restart the computer, you can then log in to your account and use the computer without time limit.

When children use this technique, you may never know that they have bypassed the time limits settings. To block this method of bypassing the parental control time limits, the only option is to disable the USB and CD-ROM in computer BIOS and set a BIOS supervisor password to prevent your kids from modifying your BIOS settings again.

Can’t Copy Text from a PDF File?

September 2nd, 2012 by Admin

I am using foxit PDF reader to view my text book. I would like to copy the text from the pdf file into a word document but it won’t let me. I can select the text fine but the option to copy text is not available. I can copy text from other documents but not some. Is there a way to get around this protection in Windows?

Can’t copy text from a PDF file? The reason why you can’t copy and paste is most likely due to the fact that the PDF file has had the copy and paste permission disabled by the creator. You can view the security settings by opening PDF file in Acrobat, click Document Property on File menu, then click Security tab. As you can seen in the screen below, you can protect PDF file from printing, copying or editing.

So how to remove PDF security settings? Without the permission password (also known as Owner Password) you are not allowed to modify, print, copy or extract text and graphics from the PDF file. If you have legal rights or are genuine owner to the PDF document, but forget the password, here is an easy way to help you remove PDF security settings without knowing the original password.

How to Remove PDF Security Settings?

  1. Download and install PDF Password Recovery software on your computer.
  2. Run PDF Password Recovery program, then click the button to select your password-protected PDF document (*.pdf), then choose the Remove Owner Password option.

    PDF Password Recovery

  3. Click the Next button.
  4. Immediately the tool will decrypt the owner password and remove the security restrictions imposed on it, and a new non-protected copy will be created. You will then be allowed to print, copy, modify the decrypted PDF document without even knowing the password.Remove PDF Owner Password

Once you’ve removed the security settings, you are then allowed you copy text from the PDF file. Can’t copy text from a PDF file? PDF Password Recovery can do the job of removing PDF security restrictions efficiently. It saved you a lot of time though not having to manually type all that text. Hopefully, this will help you copy the text you need from a PDF document.

How to Lock Your Computer with Syskey

August 31st, 2012 by Admin

Windows user passwords can easily be compromised by any geek who has physical access to the PC. There are lot of tools to crack, reset, unlock windows accounts and password such as Ophcrack, Reset Windows Password and more. To enhance login security, Windows has a hidden security feature called syskey which gives us an extra layer of security to log in to the PC. This method of security is not easy to crack easily like user account. But there are something you need to consider before doing this.

  • If you forgot the password the only way to reset is formatting the Windows.
  • You need to enter the syskey before log into user accounts. If your PC is used by multiple users, everyone should know the password.

Syskey is also known as Startup Key. You can store the syskey in Windows locally or on a USB flash drive. If you set syskey to be stored locally, you will have to enter the syskey whenever you boot up the computer. This tutorial will show you how to lock your Windows 10/8/7/Vista/XP computer with syskey.

How to Lock Your Computer with Syskey?

  1. Press the Windows key + R to open the Run box, type syskey and press Enter.
  2. If prompted by UAC, then click on Continue.
  3. Click on Update.

    sam-lock-tool

  4. Click on Password Startup, then enter your password for syskey.

    syskey-startup-password

  5. Click OK. Now it’s done.
  6. Next time, you would need to enter syskey to login to your computer.

    startup-password-prompt

Windows will now require you to enter syskey at startup when you boot your computer.  If your Windows account is password protected, then you are still required to enter your Windows account password in order to get into Windows.