Archive for the ‘Others’ category

How to Show Computer Icon on Windows 8 Desktop

July 31st, 2012 by Admin

When you perform a clean install of Windows 7 or Windows 8, Windows doesn’t show Computer icon on the desktop by default. Users need to manually add the icon to the desktop.

In Windows 7 and previous Windows versions, adding the Computer icon to the desktop is a simple task. Open the Start menu, right-click on Computer, and click Show on desktop option to show Computer icon on the desktop. But how to place the Computer icon on desktop in Windows 8? As you know, Start menu doesn’t exist in Windows 8 and has been replaced with Metro-style Start screen. So, users can’t add Computer icon from the Start menu.

Windows 8 users who would like to see Computer icon on the desktop can follow the given below steps.

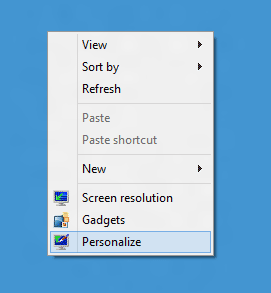
Step 1: Right-click on desktop and select Personalize to open Personalization window.
Step 2: In the left-pane of Personalization window, click on Change desktop icons. This will open Desktop Icon Settings.

Step 3: Here, under Desktop icons section, tick Computer checkbox and then click Apply button to show the Computer icon on the desktop. You can also show/hide Recycle Bin, Network, and Control Panel icons on the desktop from here. You are done!

The default icons Computer, Network, Recycle Bin and Control Panel can be replaced with a custom one by selecting the icon and then clicking on Change Icon button.
Transfer Files and Settings from Windows 7 to Windows 8

July 27th, 2012 by Admin

Whether you plan to upgrade your Windows 7 machine to Windows 8 or buy a new PC with Windows 8 pre-installed, you can use Windows Easy Transfer to copy all your files and settings from your old machine or old version of Windows to your new machine running Windows 8. In this article, I’ll walk you through the steps of using Windows Easy Transfer and an external USB drive to easily complete the task.

Before we get started, let me clarify exactly what you can transfer using Windows Easy Transfer:

  • User accounts
  • Documents
  • Music
  • Pictures
  • E-mail (including contacts and e-mail settings)
  • Internet Favorites
  • Videos
  • And more

Part 1: Save Windows 7 Files and Settings to USB Drive

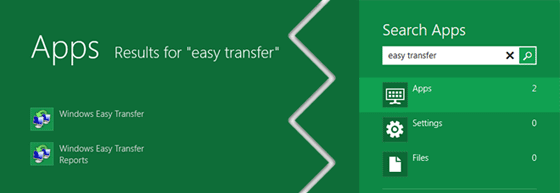
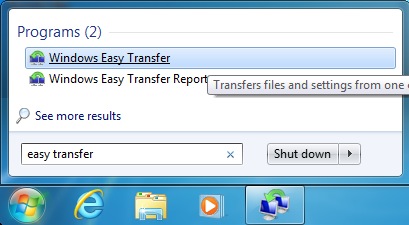
  1. To get started, you need to open Windows Easy Transfer on your old PC. In Windows 7, just search for Easy Transfer and you’ll see it show up:
  2. Click on Windows Easy Transfer from the list of programs.
  3. You’ll be presented with the Welcome to Windows Easy Transfer screen, which gives you an overview of what items you can transfer. Click Next to start.
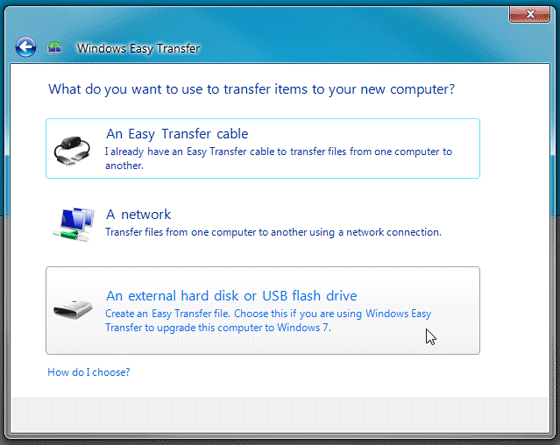
  4. Select An external hard disk or USB flash drive.
  5. Now, select This is my old computer option to transfer files and setting from current PC.
  6. In this step, it shows currently logged-in User Profile and Shared Items options. You can customize the default folder and file section by hitting Customize. The Customize link present in User Profile section lets you pick Documents, Music, Pictures, Videos, Program Settings and Windows Settings, whereas the Shared Items section’s Customize link will open a Shared Items menu, allowing you to choose the shared items that are to be moved.
  7. Once you’ve selected the files, it will ask you to enter the password to secure the transfer process. Clicking Save will prompt you to specify the USB drive where your files and settings are to be copied.
  8. When the destination folder is selected, it will start copying the settings and selected folders. The time it takes to complete the copying process depends upon the volume of selected data.
  9. Window 7 Easy Transfer wizard saves all the settings, user folders, and files from Windows 7 in a MIG file. Now, eject the USB drive, and move to PC running Windows 8.

Part 2: Restore Files and Settings from USB Drive to Windows 8

  1. To get started, open Windows Search from Windows 8 Start hover menu, enter easy transfer in search bar, and then click Apps. Now, launch Windows Easy Transfer utility from main window.
  2. In Windows Easy Transfer wizard, select An external hard disk or USB flash drive option to restore data and settings saved in MIG file.
  3. In next step, choose This is my new computer option.
  4. It will now ask you to plug-in the USB drive where the MIG file is saved. Plug-in the USB drive and select Yes to specify the Windows Easy Transfer file.
  5. On selecting the MIG file, it will ask you to specify the password. Enter the password to restore the data, and click Next.
  6. Once access is granted, it will ask you to choose what to transfer from old PC. At this point, you can select the files and settings that are to be transferred to your new PC. Click Customize under User Profile and Shared Items sections to select the folders.
  7. Once you’ve selected the settings and folders, hit Transfer to begin the settings and data migration process.
  8. After this has finished you will get a message telling you the transfer is complete. You can also see a list of what files and programs were transferred, or choose close to exit the wizard. Now you have the best of both worlds – all your important old files saved onto your new computer.

Windows Easy Transfer provides 3 options to transfer your files and settings: An Easy Transfer cable, A network and A external hard disk or USB flash drive. The first two options require connecting your new PC to old PC in order to send the files and settings. However, if you’re planning to upgrade your PC to Windows 8, select the third option that moves your system settings along with files to external hard drive.

Protect Website Passwords Saved in Your Browser

July 25th, 2012 by Admin

One of the most convenient tools browsers offer is the ability to save and automatically prefill your website login details and passwords. Because so many sites require accounts and it is well known (or should be at least) that using a shared password is a big no-no, a password manager is almost essential and also a handy feature. But what happens if someone is wandering by and decides to start poking around with your browser and vulnerable internet sites?
To protect your website passwords saved in your browser, it’s essential to learn more about the security features built into Firefox, Internet Explorer and Chrome.

It doesn’t matter how secure your passwords are if you’ve allowed a browser to store them with no protection. You’re left doubly unprotected by having no Windows password, as an unattended PC will force the user to log back in but without a password, an intruder is straight in.

Firefox offers good protection in that it can store an encrypted password file on your hard drive, if you ask it nicely. This protects all the log-in user names and passwords with a master password. So if someone happens to be on your computer and fires up the browser, they’ll have to enter your master password before the browser starts to automatically fill in all of your bank details without you.

For Internet Explorer there’s no such direct replacement. There is a Content Advisor that’s designed to block inappropriate content rather than block access to the browser and stored passwords. If you open Internet Options > Content and under Content Advisor click Enable, you’ll be prompted to enter a password and hint.

Initially this is massively annoying as it’ll prompt you for every website. We suggest you set a homepage, so when the browser is first opened the password will be required and you can allow all the other sites. The alternative is to set up blocks just on sites that require passwords.

When it comes to Chrome, security is even more lax: there isn’t any way to password protect access to the browser within Chrome itself. There is an extension called Secure Profile that goes some way to address this. It forces a password to be entered before access to the browser is allowed. However, as it’s an extension it can be disabled by knowledgeable people and due to limits on Java it displays the password being entered. But it does block access and is better than nothing.

Note: If you already forgot website passwords saved in your browser and want to recover them, Password Recovery Bundle is the software that can help you easily recover website logins and passwords stored in Internet Explorer, Firefox, Chrome, Safari, etc. But if your website passwords are protected with a master password, it’s unrecoverable unless you know the master password.

Use WinPE to Recover Data from Unbootable System

July 23rd, 2012 by Admin

I’m in a big pinch right now. My computer (32-bit Vista Home Premium sp2) refuses to boot up (it keeps crashing with an error code 0x7b). I don’t care about the computer right now but I need to backup the data inside it. How do we transfer the data from a computer into an external drive when Windows doesn’t even boot up?

How to recover from a crashed system and safely carry out all the important data from a crashed computer? If your PC just won’t boot, or you can’t get into it because it is overrun with viruses, you can use a Windows PE boot CD as a quick way to get access to your files and copy them to another PC, or external drive. The process is simple enough.

How to Recover Data from Unbootable System:

  1. To get data back from any crashed and unbootable system, we need a bootable CD to access all the available partitions on the system. Click the following link to create a Windows PE bootdisk on any accessible computer.
  2. How to Create a Bootable Windows PE CD or USB Flash Drive

  3. Set your crashed or unbootable computer to boot from CD by going to the Computer BIOS.
  4. Once the computer boots off the CD,  it will load the operating system inside the CD. After logging into Windows PE system, you’ll be able to see all the data and files on the hard drive of your crashed or unbootable computer.
  5. Attach an USB or any external storage drive to the system and you can copy and backup all your important files to it.

Personally, I have used this CD on numerous occasions and in most cases, I successfully recovered my files like my Mp3 collections, software and documents files. With a non-booting system, our primary aim is to recover all the data first before trying out any solution since a wrong solution can wipe out all the available data from the hard drive.

How to Reset Forgotten Ubuntu Password

July 17th, 2012 by Admin

Forgot your Ubuntu password? How to reset it? There are many reasons you might need to reset your forgotten Ubuntu password:

  • Someone gave you a computer with Ubuntu installed on it but not the password for the user account.
  • You just installed Ubuntu and forgot what password you selected during the installation process.
  • You have too many passwords in your life and can’t keep track of them all.

Well, this tutorial will help you reset your Ubuntu login password, regardless of what reason you have forgotten your password.

How to Reset Forgotten Ubuntu Password:

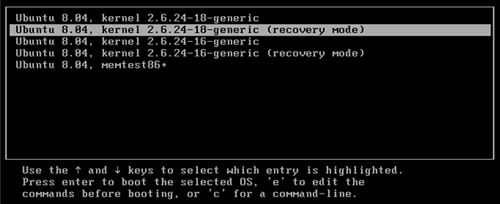
  1. Reboot your computer, and then as soon as you see the GRUB Loading screen, make sure to hit the ESC key so that you can get to the menu.

  2. Use the Up /Down arrow keys to select “Recovery Mode”, which is usually the second boot option.

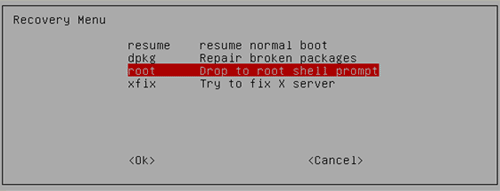
  3. Wait for all the boot-up processes to finish, you’ll be presented with a few options. In this case, you want the “Drop to root shell prompt” option so press the Down arrow to get to that option, and then press Enter to select it.

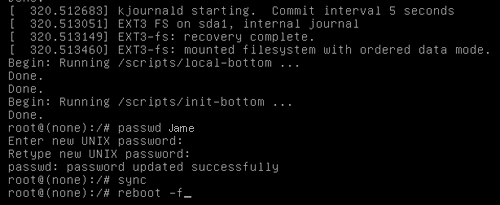
  4. Use the following command to reset your forgotten Ubuntu password.

    passwd <username>

  5. After changing your password, use the following commands to reboot your system. (The sync command makes sure to write out data to the disk before rebooting)

After it finishes booting, just enter the password that you reset it to, and you are in! Forgot your Ubuntu password? it’s incredibly easy to reset your password with this trick.

Log on to Windows 8 with Windows Live ID

July 15th, 2012 by Admin

One of the new features in Windows 8 that I’m particularly intrigued by is the ability to log on to the PC with a Windows Live ID instead of a more traditional local user account. On the Building Windows 8 Blog, Microsoft group program manager Katie Frigon tackles this new feature and provides some interesting context.

“In Windows 8, we have set out to ensure that each PC user has a truly personal experience that seamlessly bridges their online and offline tasks, is simpler to set up and use, and persists across their set of Windows 8 PCs,” she writes in the blog post.” To do this, we’ve introduced the ability to log in to Windows (optionally) with a Windows Live ID that works across devices, apps, and services, allowing you a uniquely personal experience with Windows.”

Using a Windows Live ID style logon is optional and is in fact not available during Setup if your PC isn’t connected to the Internet. In this article we’ll show you how to set up a Windows Live ID logon option so you can log on to Windows 8 with Windows Live ID.

How to Set Up Windows Live ID Logon in Windows 8:

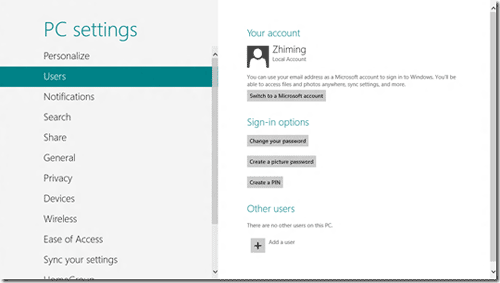
  1. From the Metro UI, click or swipe the upper right corner of the screen to show the Charms menu. Click or tap on the More PC settings link.

  2. Select Users. Then click/tap on “Switch to a Microsoft account”.

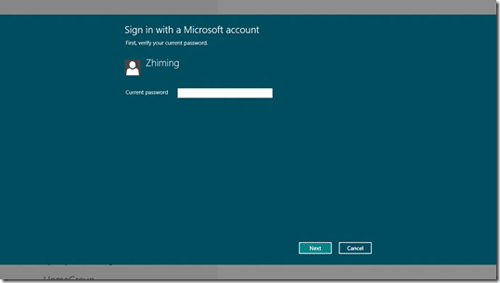
  3. Type in your local account password.

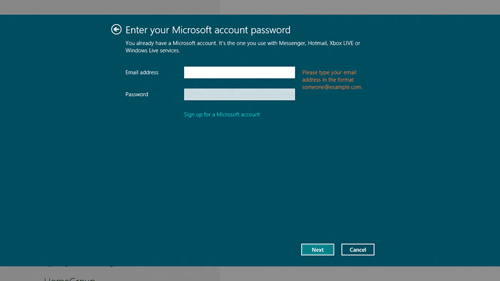
  4. And then enter your Live ID or your Hotmail account. If you don’t have one already, you can create one by clicking the link “Sign up for a new email address”.

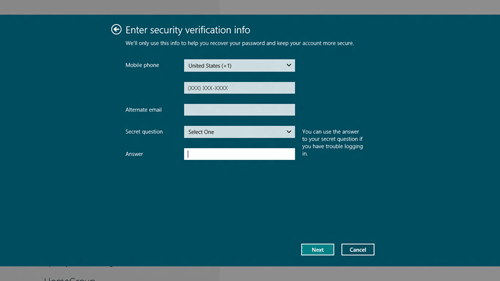
  5. Answer the security question to confirm your identity. You may receive an SMS message from your mobile phone that shows “Security info was added for xxx”.

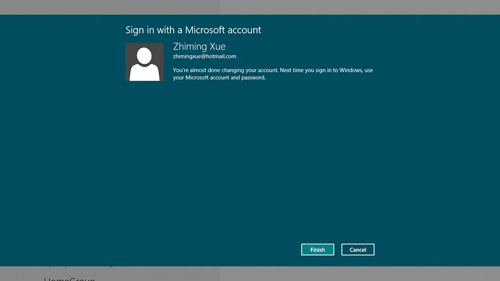
  6. Click on Finish. You’ve completed the setup procedure.

Next time you start your computer, you can log on to Windows 8 with Windows Live ID. After logging in, some of your Metro apps will show data e.g. email, photos, and documents associated with your Windows Live ID account.

2 Ways to Reset Lost iPhone Password

July 10th, 2012 by Admin

Setting a password on your iPhone is an effective method for protecting your personal data. However, if your password is lost it can be a real problem. The conventional method of bypass iPhone password is to restore your phone to factory default using iTunes. This will reset the lost password but will also delete all of your data. Is there a way to reset iPhone password without losing your data?

In this article I’ll show you 2 easy ways to reset lost iPhone password. Each of them has its own advantages and disadvantages.

Method 1: Reset iPhone Password by Restoring to Factory State

  1. Plug your iPhone into your computer using the bundled USB cable. iTunes will launch automatically.
  2. Select your iPhone from the “Devices” menu in iTunes. Select the “Summary” tab and click “Restore”.
  3. Click “Don’t Back Up” when prompted to back up your data, as this will not work without your password. Click “Restore”.
  4. Wait while your iPhone is reset. It will display “iPhone is activated” when complete.
  5. Click “Restore from the backup of” and select “iPhone” from the drop-down list. This will only work if you’ve previously backed up your data. Click “Continue”. Your data will be restored.
  6. Set up password protection on your iPhone once again if desired.

Method 2: Reset iPhone Password without Losing Data

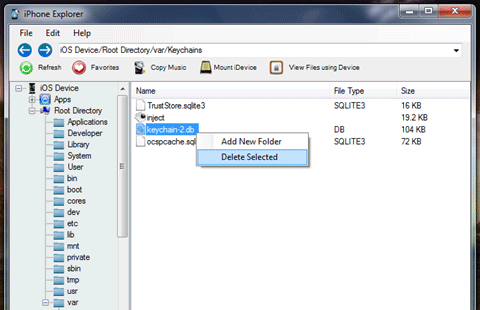
For jailbroken devices, the root access that comes along with a jailbreak can also be very useful in the case the user forgot the iPhone password. The process involves gaining access to the var/KeyChains root directory and deleting the keychain that holds the password information.

To achieve this, you’ll need a method of gaining root access into your device, either via wireless SSH or a free program like iExplorer. Please note that this method will require your device to be already jailbroken and OpenSSH installed if you plan on using wireless SSH. This method may also fail if your device was jailbroken using limera1n and you haven’t reinstalled the afc2add service.

The following steps utilize iExplorer (download here) to remove the password on your iPhone or iPod Touch without losing data, for both Windows and Mac.

  1. Connect your powered-on device to the PC/Mac using USB cable.
  2. Launch iExplorer and select Root Directory from the left hand pane.
  3. Navigate to var > Keychains.
  4. Within Keychains, locate the one titled keychain-2.db. Right-click on it and Delete Selected.
  5. Disconnect your iPhone from the computer, power it off and power back on. The password would be removed without affecting your personal data or settings.

How to Recover Email Password from Outlook 2010/2007/2003

July 10th, 2012 by Admin

I have Outlook 2010 configured on my home PC and I want to configure it on my laptop, however, I cannot remember the password. How to recover email password from Outlook?

MS Outlook is a really good email, contact and calendar management tool which allows you to add and access an unlimited amount of POP3/IMAP/HTTP accounts. But what if you forgot the passwords of email accounts you have setup in Outlook? How to recover and backup email password from Outlook 2010/2007/2003 in case you have to reinstall Windows or Outlook application?

Forgot Outlook password? You can still see your Outlook email account settings except the password. For security reason, Outlook application intelligently hides the password using stars (asterisks or dots). In this article I’ll show you how to recover email password from MS Outlook 2010/2007/2003 if you forgot Outlook password.

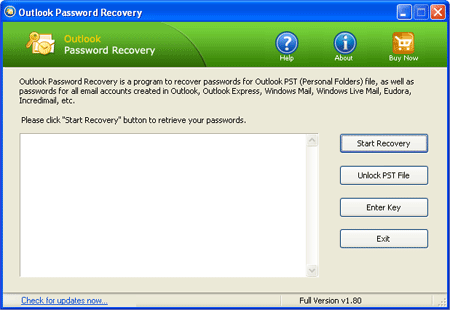
What you should do first is to download and install Outlook password recovery program on your computer, then follow the steps below to recover your forgotten Outlook email password.

How to Recover Email Password from Outlook:

  1. Launch Outlook Password Recovery program.

  2. Click the Start Recovery button.
  3. The program will instantly recover all types of MS Outlook passwords: SMTP, POP3, IMAP, HTTPMAIL, LDAP.

The recovery steps are so easy that even kids can do it. Just one click and Outlook Password Recovery program will automatically search your Outlook profiles and recover Outlook password instantly.

How to Change SATA Hard Disk Mode from AHCI / RAID to IDE in BIOS

July 7th, 2012 by Admin

When you install Windows XP on a SSD or SATA hard disk, Windows installer may give you a blue screen on boot. There is also a problem when we’re going to boot a crashed computer from Windows PE bootdisk to repair your computer, the Windows PE bootdisk may can’t recognize your SATA hard drive. What’s the root cause of these problems? Let me uncover the real truth and offer an easy way to get around this issue.

Windows XP is incompatible with SATA?

SATA is a new type of interface that connects hard drives to computers’ mainboard (motherboard) and replaces the older IDE standard. As of 2009, SATA has replaced IDE in most desktop and laptop computers. The difference between a SATA hard drive and the old IDE drives, among other things, is that SATA can provide for a faster data rate and speed.

This should not affect you unless you just bought a new computer with SATA hard drive and then decided that you want to install your old version of Windows XP on that instead of the new Microsoft Windows 7 operating system that it comes with.

Well the problem is that your good old Windows XP installation CD, when it was made, never knew about SATA drives so obviously, it doesn’t include the driver. When you try to install your operating system, you will notice that the installation procedure fails and usually a blue screen is displayed declaring a missing driver for the hard drive.

Solution to fix the compatibility issue:

No reason to worry. There is a very easy solution that will make the SATA hard drive act as if it were an IDE one. By following the simple steps below, you can put your computer into SATA Compatibility mode and once again be able to use your Windows XP operating system.

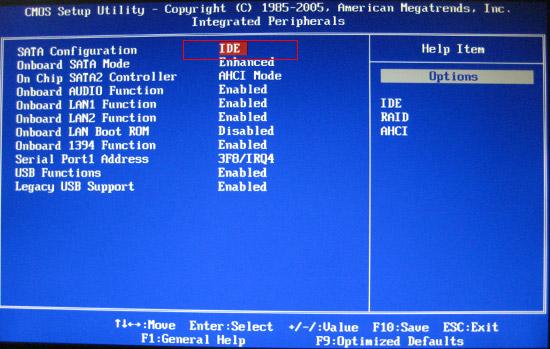
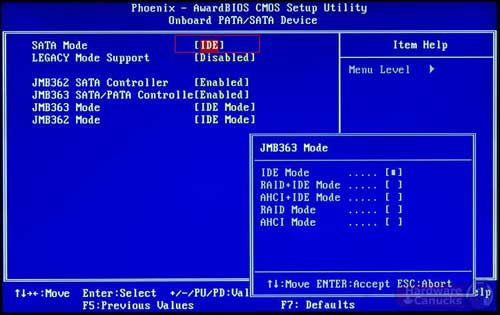
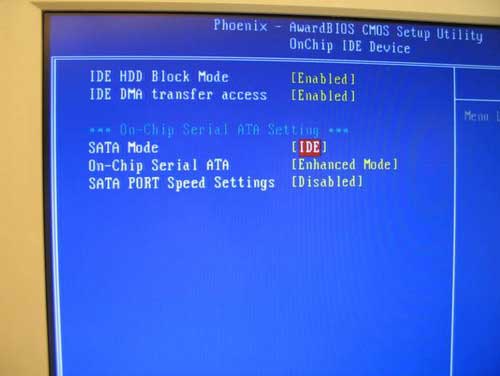
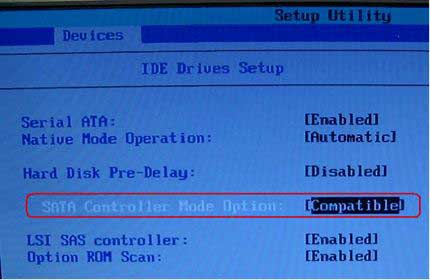
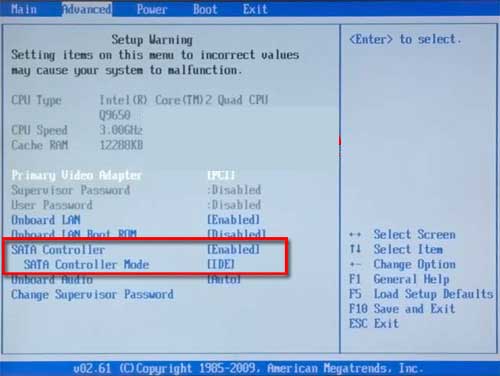
  1. Turn on your computer. While the computer starts keep pressing and releasing the F2 button to enter the BIOS setup utility.  (Some computers may use a different key to load BIOS such as Del, F1, F12, Esc, etc. )
  2. When you enter BIOS, navigate to the Advance menu and under that section choose SATA Controller Mode.
  3. Change SATA controller Mode to [Compatibility].
  4. Save the new settings and exit BIOS. Let your computer start up.

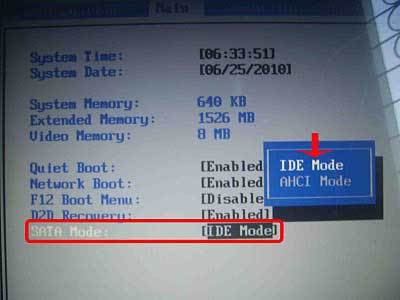
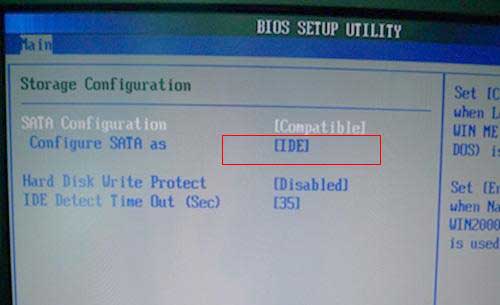
The exact menu option in your motherboard’s BIOS may differ but look for phrases like “SATA Configuration”, “SATA Mode”, “SATA Controller Mode”, “SATA Operation”, “Configure SATA as”, etc. Change SATA mode from AHCI / RAID to IDE compatible mode.

Restart your computer. The SATA drive will be emulated as an IDE drive. Everything should be working again.

PS: Take a look at the following pictures, you should be able to find out how to change SATA mode in different BIOS: