Archive for the ‘Others’ category

Ultimate Guide to Make Windows 7 Run Faster

July 6th, 2012 by Admin

After the debacle of Windows Vista on different performance issues, Microsoft was under a deep pressure and stress to get into the league of repeating the success that it made with Windows XP.

Windows 7 was engineered to answer all shots of questions that Windows Vista raised during its time period. The factor on which Windows 7 in cashes the market as compared to its predecessors is Speed. Special attention was paid by Microsoft team for making Windows 7 run faster than the previous operating systems (Windows XP, Windows Vista).

Although Windows 7 is much faster than Vista but still a lot of users tend to find the OS not convincing enough to accept that fact, there are different reasons that come into play if you are experiencing a slow windows 7 performance. A lot of users have upgraded Windows 7 on their Old PC’s. Installing Windows 7 on a old PC can not give you that soothing and satisfactory experience as compare to having Windows XP on them in past. The possible reasons for that is the enhanced hardware requirements that Windows 7 demands.

If you are having a slow Windows 7, there are some tweaks with the help of which we can optimize Windows 7 to the maximum possible extent. So, for all those who are looking forward to tweak their Windows 7 here is a top 5 steps that we are going to discuss.

So lets start the ultimate guide to make Windows 7 run faster.

Step 1 : Disable the Search Indexing feature of Windows 7

The Search Indexing service in Windows 7 index’s to keeps track of the files so that they can be found quickly when asked at some other time. This feature is useful only if you perform frequent searches on your system. Most of the Windows 7 users do less searches in there system.

For occasional file searchers the Search Indexing service in Windows 7 is a total resource hog. It unknowingly eats up your system resources. What you need from windows 7 is maximum performance from it then I would certainly recommend you to disable this resource hogging Windows 7 Search Indexing Feature.

  • Right Click the “Computer” Icon in the desktop and select “Manage”.
  • Click “Services and Applications” in the “Computer Management” window.
  • Click on “Services”.
  • You can see a lot of services listed there. Look for “Windows Search” in that.
  • Right Click on “Windows Search” from the list and choose “Properties”.
  • The “Windows Search Properties Window” will open up. From “Startup type” click on the drop down menu and choose “Disabled”.
  •  Click “Apply” then “OK” and that’s it. The Windows 7 Search Indexing Feature is now disabled.

Step 2 : Disable the Aero Theme to make Windows 7 faster

The aero user interface certainly adds some “Eyecandy” to Windows 7 but certainly is a resource hog especially when, what you expect from windows 7 is more performance juice. Aero user interface squeezes your graphics or video card to its maximum. Disabling the aero theme alone in Windows 7 will really speed things up.

  • Right Click on your Desktop and select “Personalize” click the Window Color Tab.
  • Uncheck the Box saying “Enable Transparency” and then click on “Open classic appearance properties for more color options”.
  • Then a window will open up. Apply a Standard or Basic theme from it. The Standard Windows 7 theme is more preferred.

Step 3: Disable the unwanted Visual Effects to make Windows 7 run faster

There are many unwanted visual effects that can be safely disabled to speed up windows 7.

  • For this right click on “Computer” and select “Properties” from the right click menu.
  • Click on “Advanced System Settings” from the left pane to open up the “System Properties” window.
  • Select the “Advanced” tab from it. Then Under “Performance” click “Settings”. Choose “Custom” options from it.
  • Now untick all the options and select only the last four options (actually three only needed; you can untick the second option from the last four). See the screen shot if you have any doubt.
  • Now just logoff your system and turn logon.

Step 4: Disable the unwanted services to make Windows 7 run faster

There are many services in windows 7 that we don’t require for our daily use. There are some exceptional cases though. Services such as “print spooler” is only needed when we use a printer. If we use a printer only occasionally we can safely turn off that service in Windows 7 and turn it on only when we need to take a print.

Step 5 : Disable the User Account Control (UAC) feature in Windows 7

The User account control (UAC) feature in Windows 7 is very annoying though it says it can protect your computer from harmful virus activity etc. But if you are a daily user of your computer this windows 7 feature will be a total nuisance to you.

  • From the Control Panel open the “User Accounts and Family Safety” > User Account.
  • Click the User Account Control settings link.
  • Now just Drag the Slider towards “Never Notify”.
  • Click “OK” and Reboot your system.

How to Reset Mac OS X Password with a Installation CD

July 5th, 2012 by Admin

If you cannot remember your Mac administrator password, you may need to recover or reset your password to log onto your system. Although you can change passwords within Mac OS X, resetting a forgotten password requires that you use a Mac OS X installation disc. The installation disc allows you to create a new password for the administrator account so that you can gain access to your system again.

Let’s say you totally forgot the password to log on to your Mac. Or maybe you purchased a used Mac from someone else and they’ve got it locked down. Follow the steps below you can reset Mac OS X password easily with a installation CD.

Step 1

Insert your Mac OS X CD into your computer’s optical drive and reboot the computer. Hold down the “C” key as the computer starts to boot the computer using the CD.

Step 2

Click to select your language when prompted and click the right arrow icon. Click “Utilities” on the toolbar and select “Password Reset”. Select your system hard drive and choose the original administrator account name from the drop-down menu. Type a new password for the account and reenter the password to confirm. Type a password hint if you wish.

Step 3

Click “Save” to change the password and click the red icon on the top of the window to exit. Click “Mac OS X Installer” on the toolbar and select “Quit Mac OS X Installer”. Restart your computer when prompted.

Note:

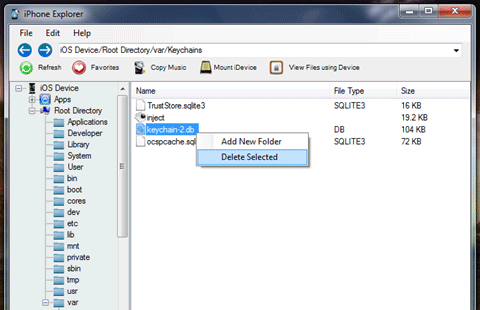
If Mac OS X prompts you for the new password each time you log in, you can change this setting from the “Keychain Access” utility. Click “Edit” and select “Keychain List”. Select your previous administrator key chain and select “Delete”. You can add your new password in the key chain at the next login.

How to Remove Excel Workbook Password for Free

July 3rd, 2012 by Admin

How many times have you forgotten password of a Microsoft Excel workbook/sheet and then had a sinking face?

Microsoft Excel has a protection feature that allows users to lock a workbook or sheet with a password. When the Excel workbook/sheet is protected with a password, any user attempt to edit data shows an error message as follow.

Here comes an handy Excel plug-in called Excel Password Remover utility which can remove the password protection from Excel workbooks and spreadsheets. You can install the plug in by downloading it from here. Once installed, it adds options Unprotect workbook and Unprotect sheet to Excel’s Tools menu, and choosing these options does what they are meant to.

Download Excel Password Remover

Note:

To install the plugin you should set security level of Macros to medium by following the menu Tools->Macros->Security in Microsoft Excel.

Excel Password Remover can’t be used to remove password set to open a spreadsheet. If you are unable to open the file because it asks you for a password, this program won’t help you. Then you need to get this Excel Password Recovery program to crack the file open password.

How to Repair Windows 7 Installation

July 3rd, 2012 by Admin

Every operating system needs an occasional repair job, and Windows 7 is no exception. Whether the source of the problem is corrupt data, a particularly brutal piece of malware, or some other serious issue, you’ll occasionally have to reinstall your copy of Windows.

Wiping your hard drive and performing a fresh installation can be a huge headache; but fortunately there’s a way to repair a corrupt Windows 7 installation while keeping all your programs, personal data, and user accounts intact. This article will show you how to do a repair install to fix Windows 7 issues.

Step 1

Put the Windows 7 installation disc in the CD drive and Click on Setup.

Step 2:

Then Click on “Install Now“.

Step 3:

Now click on “Go Online and get the latest updates for Installation“, then it might take few minutes to download the critical updates and apply them depending upon your Internet speed.

Step 4:

Then Accept the Terms and Conditions and Click Next.


Step 5

Now click on “Upgrade” to begin the Repair.

Step 6:

Once the Repair is complete the setup will reboot your computer.

Step 7:

You need to activate your Windows 7 and do the initial setup like setting up date time etc.

Step 8:

In case your missing any user setting copy them from C:\Windows.old folder or under C:\$INPLACE.~TR and C:\WINDOWS.~Q backup folders ( Thanks to Shawn Brink, MVP for the Tip).

Make sure you enable Hidden Files folder. Once you confirmed everything run the Windows Disk Cleanup to remove the old installation files.

select “Files discarded by Windows Upgrade“.

Congratulations, you’ve successfully brought your Windows 7 PC back from the brink of corruption! Make sure to keep this guide handy, in case you ever need to repair a corrupted copy of Windows 7 again.

Note: If the Upgrade option is unavailable for some reason, you can still perform a repair by using a simple workaround: Right-click the Setup.exe file before you run it, and select the Properties menu. From there, navigate to the Compatibility tab, and check Run this program in compatibility mode for:. Then select Windows Vista (Service Pack 2) from the drop-down menu. Be sure to also check the box at the bottom labeled Run this program as an administrator; then click OK. Run the Setup utility again, and the upgrade installation option should be available.

How to Disable Windows 8 Metro UI

July 1st, 2012 by Admin

Microsoft did a huge change in upcoming Windows 8 and added so called Metro User Interface (UI) which is very good familiar to Windows mobile users. However not all of us like it or navigate through it very easily so that’s why many of you will want to restore the classic Start menu and desktop view. In this tutorial I will show what change you need to perform inside Windows registry and disable Windows 8 Metro UI.

To get started follow steps below:

Step 1: From your Windows 8 Metro Interface type regedit.

Step 2: As soon as you start typing a Search Apps filed will appear on right side with search results on right side.

Step 3: From right side click regedit icon and if User Account Control dialog window appear click Yes.

Step 4: Now the registry window will open. Follow this path HKEY_CURRENT_USER\Software\Microsoft\Windows\CurrentVersion\Explorer.

Step 5: Now double click on RPEnabled.

Step 6: Inside Edit DWORD (32-bit) Value window, under Value data filed change value 1 into 0 and click OK to save changes.

Step 7: Now close all windows and restart your computer.

Next time when you go back to Windows 8 there won’t be Metro style anymore. You can also re-enable the Metro UI by change the RPEnabled value back to 1.

How to Recover Windows Product Key

June 28th, 2012 by Admin

I’ve got a virus on my machine and have to reinstall windows 7. I bought a copy from software for students so it was downloaded. I can’t really remember but I assume I must have also downloaded the product key. I usually keep all my product keys backed up but I can’t find it anywhere. My Question is, is there any way to recover Windows product key from my laptop?

Need to reinstall the OS of your computer but have misplaced the product key? The product key sticker in the bottom of your notebook is scratched? Reinstalling Windows requires you to have the original product key. If you’ve lost your product key, it could become a real nightmare until you can retrieve them back.

It doesn’t have to be this way, though. If you install Product Key Finder now, then it will scan your PC, and recover Windows product key and all the serial numbers for the applications installed. Print out the product keys or save them to disc and you’ll always have your keys to hand.

How to Recover Windows Product Key:

  1. Download and install Product Key Finder on your computer.
  2. Launch Product Key Finder and click the Start Recovery button. It will bring up a drop-down menu that provides three recovery mode: From current system, From non-booting system and From remote computer.
  3. To recover product keys from your current Windows installation, choose the first recovery mode.
  4. The program will scan your Windows registry and recover product keys for Windows, Office and many other software you’ve activated.

If by any chance, you’ve lost your Windows 7/Vista/XP/2008/2003/2000 product key, no need to worry, Product Key Finder can recover it for you. Additionally, Product Key Finder can also recover CD keys for many other applications such as Microsoft Office, SQL Server, VMware, Adobe Reader, etc. It’s very useful when you are going to reinstall or repair your Windows or Office setup but find you’ve lost the keys.

Recover Twitter Password from All Browsers

June 27th, 2012 by Admin

Twitter becomes most popular choice to connect with peoples right after Facebook. It has grown up to very large community and most of us have been using it everyday. Today I’ll show you an easy way to recover Twitter account password saved inside not only Firefox but also from Google Chrome, Opera, Apple Safari and Internet Explorer.

Most of us will be using the  remember me option during logging in Twitter and other websites. This saves the username, password and required email address to login afterwards automatically filling those fields. While this features is useful, this could make havoc in some situations. Password saved inside browsers is open to all people accessing your computer. This means anyone can log in your account without your intervention.

Password Recovery Bundle is a complete all-in-one password recovery toolkit which can recover Twitter account password saved inside web browser. While it would be unethical to access and uncover other peoples password, and this application does this without any hassle, this password recovery software could to put to good job to test security. Yes, Password Recovery Bundle is a good application to check if your own twitter password is saved inside any browser. Even saved by mistake, it would make wired results if it falls in wrong hands. And this software will uncover password saved in any browser so you can easily clear its history to erase username and password.

How to Recover Twitter Password from All Browsers:

  1. Download and install Password Recovery Bundle.
  2. Run Password Recovery Bundle, then click the Start Recovery button. It will bring up a drop-down menu that shows all supported password types.
  3. Under the drop-down menu, you can find the password recovery options for IE, Firefox, Opera, Chrome and Safari. For example, if you want to recover Twitter passwords saved in Firefox, you can select the Firefox Password option.
  4. Once you have chosen the recovery option, your Twitter username/email and password will be recovered immediately.

Apart form recovering Twitter password saved in all of those browsers, Password Recovery Bundle can also reset lost or forgotten Windows login password on Windows 8/7/Vista/XP and Windows Server 2008/2003/2000, even if you forgot Windows password and can’t log on to your computer.

Recover TrueCrypt Password With Header Backup

June 27th, 2012 by Admin

TrueCrypt is one of the best and Encryption utility used by thousands. It offers good level of security. It is almost impossible to Brute Force its password without killer processing power. The situation can’t be imagined where you locked most important documents and forgot the password. If you are not able to guess it no way it can be recovered back. You will need to say good bye to all data. Of course you need to use strong which is difficult to guess, which also makes it difficult to remember. The best way to be prepared for this type of situation is to make backup of TrueCrypt volume header, which can reset the password if you ever forgot.

TrueCrypt is the best utility to encrypt.But what if you can’t remember lot of passwords. Then just backup header of the volume, and your data is secured even from your own mind.

There is also a case like someone forgot main password and went to restore header, but also forgot its password. So first use easy to remember password and take header backup. Go to Tools and select Backup Volume Header. Save the backup into safe location. Avoid to store into same computer, try to store in any offsite location. Then change the password to a very difficult and powerful one.

Don’t be under impression that the data is 100% safe. If someone gets access to header file with its password, he can compromise it. Change the name of file in such a way that it’s impossible to identify it as header file.

Password Protect Your USB Flash Drive with Bitlocker

June 26th, 2012 by Admin

Data security on USB flash drives is a growing concern. USB flash drives, with the size no more than a pack of chewing gums, is always prone to theft or loss. Hence the security of data through USB data encryption is highly important.

There are many USB data encryption tools available, some are free and some are paid. However, did you know that starting from Windows Vista, Microsoft has added a free data encryption tool within the operating system. It is known as Bitlocker. In Windows Vista, it was only available for Business and Ultimate editions.

Bitlocker in Windows Vista was able to encrypt only the hard disks. But in Windows 7, Microsoft has extended the data encryption facility to USB flash drives also and rightly so, the encryption utility has been renamed as BitLocker To Go.

To use Microsoft BitLock to password protect your USB flash drive, please follow the steps below:

1. Right click on your USB flash drive.

2. Click on Turn on BitLocker….

3. Now the BitLocker feature starts encrypt the USB flash drive and its content.

4. Now we will be prompted to set a password or smart card protection for our USB flash drive.

5. Here you need to enter your password which need to to unlock the USB flash drive to continue. After enabling BitLocker feature you need this password to access data stored in the flash drive.

How to Block a Website without Using Any Software

June 23rd, 2012 by Admin

Internet is so vast that any information you need is just a mouse click away. Yet the technology that helps us explore and use the web also makes it easy to expose our personal information to others. Hackers and spammers often use this phenomenon to their advantage, creating malicious websites, that when visited, can track your browsing habits, steal your passwords and credit card information, or can infect your computer with malicious softwares such as Viruses, Worms and Trojans.

The easiest way to protect ourselves or our family members from accessing such dangerous websites is to block them altogether. There are actually many softwares available on the internet which are pretty good in blocking websites on your computer, but they cost money and are sometimes difficult to operate.

In this article I will show you how to block unsafe websites on your Windows PC without investing in any additional software.

Note : Blocking harmful websites is not a complete security solution. It is still recommended that you run anti-virus software on your computer and be careful of the websites you visit.

How to Block A Website without Using Any Software:

1. Run Notepad as Administrator : For this go to Start  > All Programs > Accessories, right-click Notepad and select Run as administrator.

Note : If you are prompted for an administrator password or for a confirmation, type the password, or click Allow or Yes.

2. Within Notepad go to File > Open and select  All Files from the drop-down menu present near the bottom right corner of the window (check the screenshot).

3. Now type the following text in the File name field and click Open:

C:\Windows\System32\drivers\etc\hosts

5.  The hosts file will open up. Go to the last line of the file and press the Enter key. Type 127.0.0.1 followed by the address of the website that you wish to block. For example, to block facebook.com, type :

Never add http:// at the start of the URL. Doing so will make the entry invalid. Also note that writing www is optional.

6. To block more websites, type 127.0.0.1 followed by the website address in every new line. You can block as many websites as you like.

7. Save and close the file.

Thats it! Now try to access the offending site(s) from your Web Browser. You’ll see that those specific website(s) will no longer be accessible.

In case you wish to undo the changes, follow Step 1-3 and delete the lines you had typed. You will again be able to open those sites.