Archive for the ‘Others’ category

PDF Password Remover

June 16th, 2012 by Admin

Part 1: Knowledge Base about the Security of PDF files

An obvious trend is that PDF, as the most popular document format, have become more and more important day by day. In our daily work, we need to deal with PDF files frequently, like contracts, study materials and so on. In consideration of the security, some PDF files have been protected with PDF password. And in these cases, even if we have the legal rights to use them, but failed, for the reason that we don’t know how to remove security from PDF files.

The secured PDF files always have been protected with two kinds of PDF password:

  • User Password – Also known as open password, because we would be asked to input password when clicking to open them.
  • Owner Password – We can read the contents of owner password protected PDF files, but could not copy or print it. Click “Document”-“Security”-“Show Security Properties” to check out the Document Restrictions Summary.

Part 2: How to Remove Security from PDF files

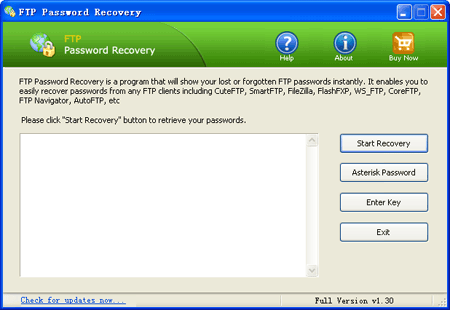
Are you looking for a PDF Password Remover tool to remove PDF restrictions, so that you can copy, edit and print your PDF files? If so, you have come to the right place. PDF Password Recovery is designed to remove the password and restrictions of PDF files. This best PDF Password Remover can remove restrictions from encrypted PDF files instantly and it is a standalone software, that means no Adobe Reader needed.

Follow the steps below to remove PDF password:

  1. Download and install PDF Password Recovery software.
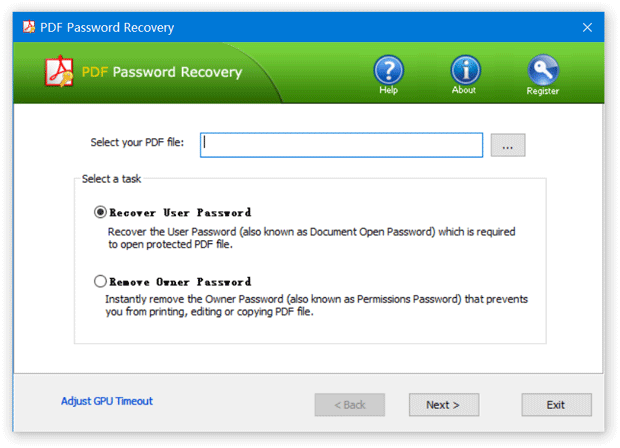
  2. Run PDF Password Recovery program, then click the button to select your password-protected PDF document (*.pdf), then choose the Remove Owner Password option.PDF Password Recovery
  3. Click the Next button.
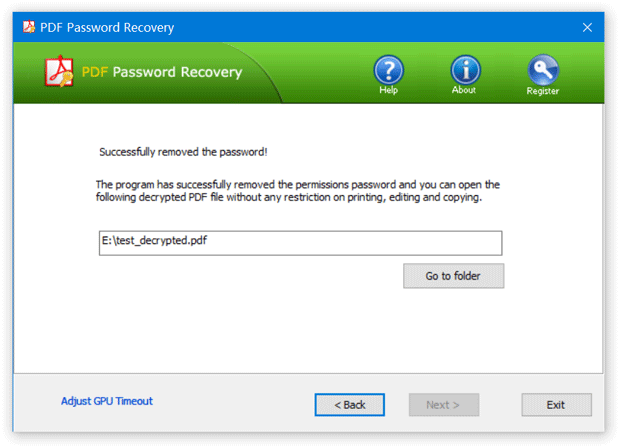
  4. The program will instantly decrypt your PDF file and save the decrypted file to the same folder with the original file. “_decrypted” ending is added to the decrypted file.Remove PDF Owner Password

Now you can open the decrypted PDF file without any restriction. It’s so easy to remove PDF password.

Forgot Windows XP Password? How to Reset it with Sticky Key

June 15th, 2012 by Admin

Forgot Windows XP password? There are many ways to unlock your Windows installation if you forgot Windows password and can’t log on your computer. Today I’ll show you another procedure to reset Windows XP password with Sticky key. The main advantage of this password reset method is that you don’t need third-party software,  but it requires that you have a Windows PE bootdisk, or create one if you don’t have.

Note: For average computer users, we recommend you to use this password reset utility to reset your forgotten Windows XP password – Reset Windows Password.  The software also works with Windows 8/7/Vista and Windows Server 2008/2003/2000.

Supposed you have created a Windows PE bootdisk, then follow these steps below to reset Windows XP administrator password:

  1. Boot from Windows PE and access the command prompt.
  2. Find the drive letter of the partition where Windows XP is installed. It is usually C:. To find the drive letter, type C: (or D:, respectively) and search for the Windows folder. Note that Windows PE usually resides on X:.
  3. Type the following command (replace “c:” with the correct drive letter if Windows is not located on C:):
    copy c:\windows\system32\sethc.exe c:\
    This creates a copy of sethc.exe to restore later.
  4. Type this command to replace sethc.exe with cmd.exe:
    copy /y c:\windows\system32\cmd.exe c:\windows\system32\sethc.exe
    Reboot your computer and start the Windows installation where you forgot the administrator password.
  5. After you see the logon screen, press the SHIFT key five times.
  6. You should see a command prompt where you can enter the following command to reset the Windows password:
    net user administrator new_password
    If you want to reset other account password, replace administrator with your desired account.
  7. You can now log on with the new password.

I recommend that you replace sethc.exe with the copy you stored in the root folder of your system drive in step 3. For this, you have to boot up again with Windows PE because you can’t replace system files while the Windows installation is online. Then you have to enter this command:

copy /y c:\sethc.exe c:\windows\system32\sethc.exe

Now you are done! The sticky key trick takes advantage of the security holes in all current available Windows system. So I can’t assure if it will also work with Windows 8 or later operating system.

How to Password Protect Your Running Programs

June 13th, 2012 by Admin

You might have faced a situation where you have to leave your work in front of somebody and move away from them. You only have the choice to leave the system and can’t logoff Windows. Think of such a situation. Yes it can happen some times. So how can we protect your running programs from being seen by somebody else?

Here’s where LockThis! comes into your rescue. LockThis! is a tiny Windows utility that makes it possible to password protect almost any programs or documents that’s currently running/open. This tool is perfect for people who often lend their PC to others, because with this tool they can keep the content of some programs or documents from other people eyes without need to close them first. Huge time saver if you really often lend your PC.

It’s very easy to apply the protection. Mostly it only involves pressing keyboard Ctrl button when minimizing the window of the program/document and supply the password in the dialog that follows (or you might had chosen to use a predefined common password, which in this case you won’t be asked for password). Now the content is save because the window can not be restored or maximized without supplying correct password. Whenever the window is about to restore or maximize a dialog asking for password will pop up. If the correct password is not supplied, the restore or maximize request will be ignored and the window stays minimized.

Pros: A great freeware app that assure you more privacy and you can safely give your laptop with opened windows to any body without the fear of them seeing it.

Cons: LockThis doesn’t work with Internet Explorer 8/9, it can’t be used to protect 64-bit applications , so if you want to hide the open windows contents from them, think of it before giving your laptop or pc to any body else.

Download LockThis!

3 Best Free Password Managers

June 12th, 2012 by Admin

Most of us end up having so many different passwords for different websites, that sometimes it becomes really hard to remember them. Writing them anywhere would defeat the whole purpose of having a password. A very simple solution is a Password Manager. Password Manager is a software that securely stores all your passwords, and you are provided with one master password to access all your passwords. This means that you need to remember just one password.

We have reviewed many free password managers. Here is a list of the best 3 free password managers that we have come across. All of these are extremely easy to use, very secure, and completely free. Some have more features than others. So, go through the list, and see which one fits your needs.

Note:  Almost all available password manger utilities use some kinds of irreversible encryption algorithms to secure your password. So if you forgot the password to log in to your password manager software, it’s unable to recover all logins and passwords saved by the application. But you can still give a try with Password Recovery Bundle, it can help you reset forgotten Windows login password, unlock MS Office / PDF document, recover passwords from email clients and instant messengers, etc.

1. KeePass

KeppPass Password Manager is my favorite Password Manager. It is extremely secure, and uses advanced algorithms for encrypting your information. Apart from passwords, it stores website URL, login name, and password. So, if you want to open a website, and add login information to that, just double click on that in KeePass Safe, and it will take care of that for you. This makes it extremely useful. Apart from that, you can carry it in your Flash drive so you can use it on any system. It works on almost all OS, including, Windows, Mac OS X, Linux, and FreeBSD.

2. iPassMan

iPassMan is another useful password manager. It works a lot like KeePass. You can store name of website, and the corresponding login information. You can also add some notes for your login information. To run a website, you can directly click on it in iPassMan, and it will open the website for you, and also fill in the login information. It works only on Windows.

3. MyPadlock

MyPadlock Password Manager is a secure and simple password manager that allows the user to keep all the password under “lock and key” on their PC and is only accessible if they know a master password that is created by the user on initial configuration. This master password will be the only password which needs to be created.

MyPadlock has using 128-bit AES encryption to encrypt all the password into an encrypted file and keep into hard drive. The file is also encrypted with password and will automatically logged off in a few minutes to ensure that the users don’t leave the password open to anyone while they were away from their desk.

So which password manager is right for you? Ultimately, it’s up to you to decide what features you want. If these free password manager utilities can’t meet your needs, you can also consider purchasing commercial software such as LastPass, RoboForm, 1Password, etc.

Create a Windows System Repair Disc for Emergency Use

June 11th, 2012 by Admin

When faced with a computer that won’t start most people tend to panic, worried that all the data on their PC is gone forever. There are many reasons why a computer won’t boot up, it may be due to a blue screen, virus infect or some critical system files are missing or damaged. I don’t know when you are going to have your next computer disaster but I’m sure you are going to have one. So it is always a good idea to prepare a Windows System Repair Disc for emergency use.

Windows System Repair Disc allows users to boot the computer and load Windows Recovery Environment. Windows Recovery Environment offers users a set of recovery tools to help diagnose the problems, recover serious technical errors and restore the computer from a system image. Users can create this repair disc and bring along with their computer/laptop for any emergency use.

Let’s go through the steps you need to do to create a system repair disc that you can use to repair your system.

Part 1: Creating A System Repair Disc

Before you proceed, insert a blank CD/DVD into your CDROM in order to create a system repair disk.

Press Windows + R key combination to bring up the Run box. Type recdisc and press Enter. Another option is to click Start > All Programs > Maintenance > Create a System Repair Disc.

The dialog box opens where you select the right drive and click Create disc.

Windows system will start to prepare the necessary files.

And proceed to create the disc.

After a while, a System Repair Disc will be fine. It only takes up 142MB of space.

Part 2: How To Use A System Repair Disc

If you are having problems with your machine  or the system is failed to boot, just pop in the System Repair Disc and boot from it and enter into Windows Setup [EMS Enabled].

 After it boots up you can access recovery tools or restore the computer back to a system image.

Now you can choose from different recovery options to help you get your machine back up and running.

You never know when an operating system disaster might occur, but having a System Repair Disc is advisable in case it does. Even though this repair disc doesn’t allow users to reinstall the whole Windows OS, it can be a pretty useful tool to boot up Windows and allow users to backup some important data without much delay.

How to Change SA Password in SQL Server 2005

June 11th, 2012 by Admin

Forgot SQL Server password and unable to login using the SA account? If you happen to forget your SQL Server password for sa account, then here’s a simple query to help you reset it:

GO
ALTER LOGIN sa WITH DEFAULT_DATABASE=master
GO
USE master
GO
ALTER LOGIN sa WITH PASSWORD=N'MyNewPassword' MUST_CHANGE
GO

In case you remember your old password and want to change the sa password, use this query:

ALTER LOGIN sa WITH PASSWORD = N'MyNewPassword' OLD_PASSWORD = 'MyOldPassword';
GO

You aslo can get a third-party tool to change SQL password. SQL Server Password Changer is one of the best MS SQL password reset tools which can help you change SQL Server password in a few seconds. It allows you to change SQL sa password on SQL Server and Express 2000/2005/2008.

How to Recover MDB Password of MS Access Database

June 10th, 2012 by Admin

MS Access MDB files are used to save data in database form. We can protect MS Access database with password for the security reasons. Sometimes you may forget the password of those files. In some cases we have to search for sample databases or project source databases on the internet or copying from friend’s computer. After the downloading, the Ms Access files encrypt with password by provider. If there is no hint or password from the uploader, what will you do? There is always a way to recover or unlock MDB password of MS Access database.

Access Password Recovery
is a small yet powerful software to recover MDB password from protected MS Access database.  Instantly unlock MS Access database, if you don’t know the original password. This software recovers the password-protected MDB files created with Microsoft Access 95/97/2000/Xp/2003.

How to Recover MDB Password of MS Access Database?

  1. Launch the Access Password Recovery program.
  2. Click the Start Recovery button, the File Open dialog box will appear. Select your password-protected MS Access database, then click the Openbutton.Access Password Recovery
  3. The program will decrypt and recover your MS Access password instantly.Access Password Recovery

MS Access uses a very weak encryption algorithm to encode the password, so you can recover MDB file password easily and quickly, no matter how strong the password is set.

Cisco Router Password Recovery Tutorial

June 7th, 2012 by Admin

If you work with Cisco routers I guarantee you will at some stage attempt to login to a router only to discover you can’t remember the password. When this happens you will be forced to execute the Cisco router password recovery process. Please note this specific process is primarily for Cisco 3600 and 3800 routers although may work on other models. Please check the Cisco website for more details.

1. Connect a standard rollover cable (console cable) to the router using the console port. Open a terminal emulation application (such as Hyper Terminal on Windows) and connect with the following settings:

  • 9600 baud rate
  • No parity
  • 8 data bits
  • 1 stop bit
  • No flow control

2. Power on the router and execute the break sequence in the first 90 seconds. Each terminal emulation application has its own break sequence, for example in Hyper Terminal on Windows simply click the “Break” key.

3. The router will now enter ROMMON. Enter “config-register 0x2142” and press return. This step bypasses the startup configuration where the existing passwords are stored. Next type “reset”, which reboots the router but ignores the saved configuration.

4. Once the router has rebooted answer “No” to all the initial setup procedure questions. Next enter enable mode by typing “en” and copy the start-up configuration to the running configuration by typing “copy startup-config running-config”.

5. Type “conf t” and then “enable secret <password>” in order to change the enable password.

6. Finally type “config-register 0x2102” and “write mem” to save the running-configuration to the startup configuration.

When the router re-boots, you will be able to access it using the new password you previously configured.

How to Change Directory Service Restore Mode (DSRM) Password

June 7th, 2012 by Admin

Directory Service Restore Mode (DSRM) password is set during the installation of Active Directory on a server. This password will be required when you boot up your domain controller in Directory Service Restore Mode by pressing F8. DSRM is required to restore the Active Directory database. Since, DSRM is used very rarely, there are chances that administrators might forget the password. This post explains an easy method to reset your DSRM password without knowing the old one.

Resetting DSRM password is possible on Windows Server 2003 or Windows Server 2008 domain controller using NTDSUTIL command.

Follow below simple steps to reset DSRM passoword:

  1. Open the command prompt in administrative mode.
  2. Type NTDSUTIL and hit enter
  3. Type SET DSRM PASSWORD and hit enter
  4. Type RESET PASSWORD ON SERVER NULL and hit enter
  5. Now you type the password that you wish to configure and hit enter
  6. Retype the password and again hit enter
  7. Type QUIT and exit NTDSUTIL

Here NULL denotes the server that you are logged in. If you want reset DSRM password on a remote computer, type the computer name instead of NULL.

If you forgot DSRM password or domain administrator password, you can always reset the password using Reset Windows Password – A professional password recovery software which enables you to create a Windows password reset disk and reset lost local administrator, domain administrator and DSRM passwords easily.