Archive for the ‘Others’ category

Password Protect Folders in Windows Without Any Software

March 27th, 2012 by Admin

Most of us have private data. Not all of us have a private computer to keep that data. So, we just end up with other people viewing that data. Although password protecting software do work, it is almost useless to hide private data with these software (because we are always questioned as to what it is that we are hiding with the help of these software).

Hidden folders do not work as they can be easily searched with Windows Search. So, we need an alternative way to create hidden password-protected folders which only we can access. And that is exactly what we will learn in this post.

With this trick, you can create a secure password-protected folder in Windows which no one except you can access. To use this trick, please click here to download a self-extracting file and save it to your desktop or other location. Uncompress the .zip file, you’ll see the batch file: protectfolder.bat.

How to Lock Your Folder with Password:
1) Double-click on the batch file. A new folder will be created.
2) Copy your personal data or secret files into that folder. Again, double-click on the batch file. Type Y and press Enter. The folder will be hidden from view.

How to Unlock Your Folder:
1) To re-view your folder, double-click on the batch file.
2) Enter password as “www.top-password.com” without quotes and press Enter key. This is also the default password. Your folder will be visible again.

The overall usability of this trick can be improved by deleting the batch file after hiding your folder and re-creating it when you wish to access your folder again. If you face any problem using this trick, you can write a comment and I will do my best to help you.

Note: This works on Windows 7, Windows XP and Vista. First try this on useless data to be sure and then only hide your personal data. If you need a more secure and reliable method to protect your private data, please refer to our product – Protect My Folders.

How to Recover Lost Product Keys on Windows 7

March 25th, 2012 by Admin

Lost your product key somewhere but now you have to reformat Windows 7 system and you cant find the box that contain the key. How to recover lost product keys on Windows 7? The product keys of installed Windows programs will lost after reinstalling the operating system or in the event of a system crash. So you’ll know the importance of performing regular backups to save your product keys in case of a system failure.

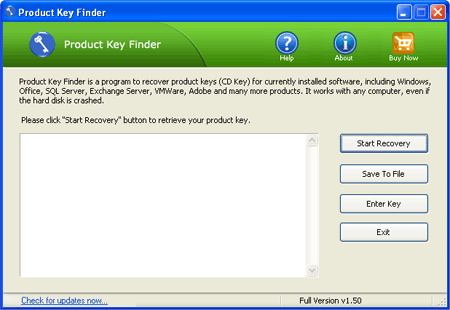
In this article, we’ll provide a way to quickly and easily recover and backup the product keys for most commercial software installed on your local computer. To get started you need to download and install the latest version of Product Key Finder. Then follow these steps:

How to Recover Lost Product Keys on Windows 7

  1. Launch the Product Key Finder program.

  2. Click the Start Recovery button, it will bring up a drop-down menu that provides three recovery mode: From current system,From non-booting system and From remote computer.
  3. Select the From current system mode from the drop-down menu. This program will automatically scan your Windows 7 system for product keys. Quickly recover and display product keys for Windows 7, Office, Adobe Photoshop, Adobe Reader, SQL Server, VMware Workstation, MS Exchange and and many other software products installed in your Windows 7 system.
  4. Click the Save To File button to backup all of the recovered product keys to a safe place, or even print it out so all of your Windows 7 product keys are available on one sheet of paper.

2 Methods to Recover Forgotten iTunes Password

March 21st, 2012 by Admin

iTunes is a great piece of software for anyone that likes music. Even if you don’t have an iPod, it is very useful for organizing your music library and adding to your library by buying new songs at low prices. Of course, you need to have the appropriate account for the iTunes store. If you have an Apple account that you use with iTunes, then you will have to remember your account username and password. The username should just be your email address, but the password has to be created by you.

If you forgot your iTunes password, then you will need to go through a short and fairly painless procedure to get it back. In this article we’ll show you two methods to recover lost or forgotten iTunes password.

Solution 1: Online iTunes Password Reset

If you forgot your iTunes password, then don’t panic. Just launch the iTunes program, click on your username in the top right corner (or the sign in tab if it doesn’t remember you) and then try to sign in. There’s a button to the right of the password field that is labeled “Forgot Password?”. Click on this button to bring up the next screen.
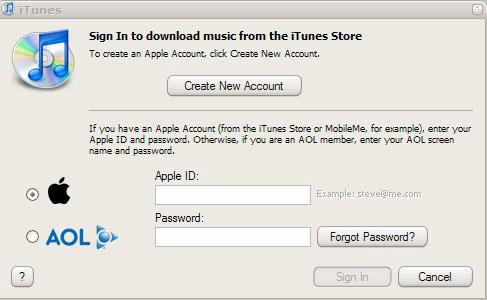
This one needs you to enter the username for the related account. As I said, this should just be the relevant email address. Type it in to pull up the next screen that’s specific for your account. You have two options for recovery at this stage.

Option 1: If you still have access to the email account, then you can have it just reset the password. iTunes will send a new link to your email address. If you click on the link, it will just reset your password to something new. Use this new password to log into your iTunes account and then bring up your account information again. Change the password to something that you’ll remember and then call it a day.

Option 2: If you don’t have access to the email or don’t want to go through the email reset process, you can have it ask you your secret question. It will first ask you to confirm a piece of account information, like your birthday, and then it will give you the secret question that you used when you signed up for the iTunes account. You just have to answer it to get your account back. Hopefully you can remember you secret question. If not, then you’ll need to use the iTunes.

Solution 2: Recover iTunes Password with Password Recovery Tool

Nearly most Web browsers have a pretty nifty password manager, including Internet Explorer, Firefox, Chrome, Safari, Opera. When you log into iTune account from the iTunes Store, the Web browser offers to save your user name and password. The next time you visit that page, user name and password fields are auto completed for you. A real time-saver.

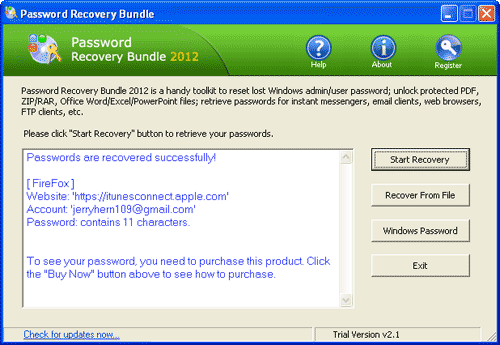
But have you ever forgotten your iTune password and need to recover the password saved in your browser? Once you have let your web browser remembers your password, it’s quite easy to recover the password with Password Recovery Bundle. Let’s take the example of Firefox browser.

1) Download and install Password Recovery Bundle.
2) Run Password Recovery Bundle, then click the Start Recovery button. It will bring up a drop-down menu that shows all supported password types.
3) Select the Firefox Password option.
4) The program will instantly decrypt the passwords saved in Firefox’s password manager, then display the logins and passwords to all your iTune accounts.
If neither of these works, then you will have to call iTunes support to try and find a human who can help you. If you have some other account details, then they might be able to help.

Hopefully these instructions should help anyone who forgot their iTunes password get their account back in order.
How to Reset LenovoThinkPad BIOS Password

March 10th, 2012 by Admin

An Lenovo ThinkPad laptop can have the following passwords set:

1. Power ON Password
RT/CMOS RAM has 8 bytes reserved for the power-on password. The 8 bytes are initialized to hex 00. The microprocessor can access these bytes only during POST. After POST is completed the password bytes are locked and cant be accessed.

During installation, this password (1 to 7 characters) is stored in the security space.

The program Easy-Setup’s built-in system has the function of installing the password. After the power-on password has been installed, it can be changed or removed only during POST.

2. Hard Disk Password
The hard-disk password (HDP) protects your removable hard disk drive’s data from being accessed by anyone who is unauthorized.

3. Supervisor Password
The supervisor password protects the system information in Easy-Setup from being changed without permission.

Use software to Reset an IBM ThinkPad’s Power On Password
Boot the IBM ThinkPad, and KeyMaker will recover the BIOS password.

Use hardware to Reset an IBM ThinkPad Power On Password
If you cannot boot the ThinkPad and only the power-on password is set, do the following:

• Power off the computer
• Remove the DIMM cover on the bottom side of the computer.
• Short-circuit the two password pads or put a jumper on the contacts to short the circuit.
• Under the short-circuit condition, power on the computer and wait until the POST ends. After the POST ends, the password prompt does not appear. The power-on password is removed.
• Reinstall the DIMM cover.

If both the power-on password and the supervisor password are set, do the following:

• Power on the computer by pressing and holding F1.
• Enter the supervisor password. The Easy-Setup menu appears.
• Click on the Password icon.
• Click on the Power on icon.
• Enter the supervisor password and press the Space bar.
• Press Enter twice.
• Click on Exit; then click on Restart.

If you forgot the Windows login password for your Lenovo ThinkPad laptop or desktop PC, then you can easily reset the password using our Reset Windows Password software.

4 Ways on How to Hack Facebook Password

March 10th, 2012 by Admin

Are you curious about hacking Facebook password well then this post is just for you, most people ask me to tell us the easiest way to hack Facebook password, so here are some ways to hack Facebook password:

1. Facebook Phishing
2. Keylogging
3. Social engineering
4. Primary email address hack

Facebook Phishing:

I have taken this method first because I think this is the most popular method/way of hacking Facebook. I studied various Facebook surveys taken on web about hacking Facebook. The results of these surveys show “Phishing” as the most used method to hack facebook and to note… “Phishing is favorite method of Facebook hackers”. So, friends.. beware of Facebook Phishing. Facebook staff is working hard to avoid these Facebook phishers. Phishing not only allows you to hack Facebook but also almost any email account. You have to only get the trick used to make a phisher, which I think is very easy. I learnt it without any difficulty. But, remember, this is only for educational purpose. I will not extend this topic over here.

Keylogging:

This is my second favorite, as only thing you have to do is remotely install a keylogger application (if you don’t have any physical access to victim computer). Keylogging becomes more easy if you have physical access to victim computer as only thing you have to do is install a keylogger and direct it to your destination so that it will send all recorded keystrokes to pointed destination. What a keylogger does is it records the keystrokes into a log file and then you can use these logs to get required Facebook password and thus can hack facebook password.

Primary Email Address Hack:

If Facebook hacker, by some means, hacks your gmail or yahoo account which you are using as primary email address, then this Facebook hacker can easily hack your Facebook password using “Forgot password” trick. He will simply ask Facebook to send password reset email to your primary email address- which is already hacked. Thus, your Facebook account password will be reset and it will be hacked !!!

So, always remember to protect your Facebook primary email address and try to keep unknown or useless mail id as your primary email address So far, i found these Facebook hacking methods as best and working ways to hack Facebook account passwords. I never encourage hacking Facebook or any email account, I just wanna make you aware about Facebook dangers online. I will appreciate your effort if you mention any other Facebook hacking method.

Facebook Cookie Stealing:

I am updating this post with a new method which is being used to hack Facebook accounts, which I think is very effective, Facebook cookie stealing is becoming popular day by day.The cookie which Facebook uses to authenticate it’s users is called “Datr”, If an attacker can get hold of your authentication cookies, All he needs to do is to inject those cookies in his browser and he will gain access to your account.

If you’re looking for practical guide on how to hack Facebook password, please refer to this article:
http://www.top-password.com/knowledge/forgot-facebook-password.html

Install Mac OS X Snow Leopard on a PC using VMware

February 29th, 2012 by Admin

The following step by step guide will help you in installing Mac OS X 10.6 Snow Leopard as a guest virtual machine in Windows 7. You’ll need to have a system with an Intel processor which supports hardware virtualization, original OS X Snow Leopard retail disk, VMware Workstation 7 and Windows 7, Vista or XP installed as host operating system. If you meet all these requirements, you can then install OS X Snow Leopard in VMware under Windows and can enjoy the best of both worlds.


Note: We don’t in anyway encourage downloading Apple software via file-sharing / torrent sites and run it in an virtualized environment under Windows. This guide is for informational purposes only. If you like OS X Snow Leopard, Get a Mac.

Step 1: Download and install VMware Workstation 7.

Step 2: Click here to download pre-made modified version of Snow Leopard.vmdk and darwin_snow.iso files required to get this thing to work.

Step 3: Start VMware Workstation and open up “Mac OS X Server 10.6 (experimental).vmx” file which you downloaded in Step 2.

Step 4: Click on “Edit virtual machine settings”, select CD/DVD (IDE) option from left hand side and then and select “Use ISO image file” option. Point it to “darwin_snow.iso” which you downloaded in Step 2.

Step 5: Now power on the virtual machine and hit “F8” key. You should now have a screen similar to the one shown below.

Step 6: Now you’ll have to point your virtual machine to OS X Snow Leopard retail DVD instead of “darwin_snow.iso”. To do this, right click on CD/DVD option found in lower right most corner of your VMware window and select settings.

Insert OS X Snow Leopard retail DVD in your DVD drive and select the “Use physical drive” option.

Step 7: Now go back and select “c” option (Boot DVD) from the prompt which you got in Step 5 to boot from the OS X retail DVD. OS X boot screen with Apple logo should now appear. If the boot screen doesn’t appear for you, try booting it in verbose mode by pressing “F8” key after selecting “c” option, and then enter “-v” (without quotes). This will enable the system to boot OS X DVD using verbose mode.

Step 8: Wait for a couple of minutes for the Installation Setup screen to show up. From here on, simply follow the onscreen setup instructions to install OS X Snow Leopard. Make sure you format your virtual hard drive in “Mac OS Extended (Journaled)” format using Disk Utility. Customize your installation with minimum set of printer drivers and language options for a lightweight trouble free installation experience.

Step 9: Once the installation is completed. System will automatically reboot. At this point, close your guest virtual machine and change your CD/DVD option again like you did in Step 2 to point it to “darwin_snow.iso”.

Step 10: Start the virtual machine again. Press “F8” key and select “h” option to “Boot first hard disk”. Voila! Snow Leopard should now be running live under Windows 7!

How to Reset Forgotten Root Password for Linux?

February 21st, 2012 by Admin

It happens sometime that you can’t remember root password. On Linux, resetting root password can be done by booting Linux under a specific mode: single user mode. This tutorial will show how to boot Linux in single user mode when using GRUB or LILO and finally how to change forgotten root password.

If your boot loader is GRUB, follow the procedure below to reset your lost root password:

  1. Select the kernel.
  2. Press the e key to edit the entry.
  3. Select second line (the line starting with the word kernel).
  4. Press the e key to edit kernel entry so that you can append single user mode.
  5. Append the letter S (or word Single) to the end of the (kernel) line.
  6. Press ENTER key.
  7. Now press the b key to boot the Linux kernel into single user mode.
  8. At prompt type passwd command to reset password.

You need to mount at least / and other partitions:
# mount -t proc proc /proc
# mount -o remount,rw /

Change the root password, enter:
# passwd

Finally reboot system:
# sync
# reboot

If your boot loader is LILO:
At LILO boot loader type linux single and press [ENTER] key:
Boot: linux single

When you get the # prompt you will need to type passwd root to reset password:
# passwd

Reboot system:
# sync
# reboot

If you need to reset forgotten Windows admin/user password, please refer to this software: Reset Windows Password.

Forgot Mac Password? 2 Methods to Reset Your Mac Password Easily

February 21st, 2012 by Admin

So you forgot your Mac password… uh oh. Don’t worry, it happens and you aren’t out of luck. You’ll need to reset the forgotten password and there’s several ways to do this, we’ll focus on the two best methods; one does not require a Mac OS X installer CD and is a great hack, and the other is much more simple if you happen to have a Mac OS X DVD laying around.

Method 1: Reset Mac Password without a CD

Using a pretty nifty trick you can reset a forgotten Mac password without a Mac OS X installer CD/DVD. The steps may seem a little intimidating at first but I assure you it’s easy if you follow them exactly, here is exactly how to do this in three stages:

Step 1) Boot into Single User Mode and remove a setup file

  1. Restart the Mac holding down the Command+S keys, this will take you into Single User Mode and it’s Terminal interface
    You’ll need to check the filesystem first:
    fsck -fy
  2. Next, you must mount the root drive as writeable so that changes will save:
    mount -uw /
  3. Now, type the following command exactly, followed by the enter key:
    rm /var/db/.applesetupdone
  4. After removing the applesetupdone file, you need to reboot, type ‘reboot’ and hit enter.

Step 2) Create a New User Account upon System Boot
You aren’t finished, but the hard part is now over – no more command lines, you’ll now be in the familiar Mac OS X GUI to finish the password reset process. In this step we just create a new user account as if you just got a new Mac:

  1. Upon reboot, you will be presented with the traditional “Welcome Wizard” startup screen just like when you first get a Mac.
  2. Follow the welcome wizard and create a new user account – making the account name different from the account whose password you want to recover.
  3. Continue on and boot into Mac OS X with this newly created user account, this new user account is an Administrator and has administrative access.

Step 3) Reset the Forgot Password via System Preferences
You are almost done, now you just need to reset the forgotten user account password using the Accounts control panel:

  1. Once you are booted into Mac OS X, click on the Apple logo and then navigate down to “System Preferences”.
  2. Click on the “Accounts” icon in System Preferences.
  3. Click on the Lock icon in the lower left corner of the “Accounts” preference window and enter the newly created user credentials, this enables you to change other user accounts and reset other users passwords.
  4. On the left side user panel, select the user account containing the forgotten password.
    With the user of the forgotten password account selected, click on the “Reset Password” button.
  5. Enter a new password for that user, be sure to include a meaningful hint so you don’t forget it again!
  6. Close System Preferences and reboot the Mac.
  7. You can now login to the previously inaccessible user account using the newly reset password! All user files and settings are maintained as before the password was forgotten.

Optional: If you’d like, you can delete the temporary account you created to reset the users password. This is wise for security purposes.

Here’s how this works: by deleting the .applesetupdone file, you are telling Mac OS X to re-run the setup wizard, which by default creates a new user account with Administrative abilities, which can then reset the forgotten password of any other user on the Mac. This is a great trick and excellent troubleshooting technique if you don’t have a Mac OS X installer CD/DVD laying around, which is pretty much the norm as many people tend to lose or misplace the installer disks that come with their computers. I have used this exact method multiple times to restore various Macs with forgotten/lost passwords.

Method 2: Reset Mac Password with the installer CD/DVD

Resetting a forgotten Mac password is easier if you have an installer disk handy, we have covered this tip before on it’s own:

  1. Boot from the Mac OS X installer disk by inserting it into the Mac and holding down the “C” key on boot.
  2. Select your language preferences and then under the “Utilities” menu select “Password Reset” (it may say “Reset Password” instead, depends on the version of Mac OS X).
  3. Select the hard disk that the forgotten password is on, then select the username of the forgotten password, you’ll then be asked to select a new password.
  4. Reboot as usual from the hard drive, using your newly reset password as the login!

This is obviously an easier method but it’s of no help if you own a MacBook Air with no DVD drive, or if you just don’t have the installer Mac OS CD laying around. If you’re in that situation, the best alternative is to use the above method that does not require a CD to reset the password.

If you have forgotten Windows admin/user password, you can take advantage of the Reset Windows Password utility to remove your lost password easily and quickly! Learn more at http://www.top-password.com/reset-windows-password.html

How to Boot from USB Flash Drive on VMWare Workstation?

January 14th, 2012 by Admin

If you are using VMWare Workstation, you will notice that you can’t boot from USB Flash Drive. There isn’t any USB option in BIOS boot menu. But sometimes, you need to boot from USB Flash Drive, such as to test installation of pre-configured system, to boot your favorite operating system which comes in USB edition, etc. At this time, VMWare Workstation 7 isn’t officially support booting from USB Flash Drive yet, but there is a workaround which can help you boot from USB Flash Drive by using Plop Boot Manager.

  1. Download Plop Boot Manager from Plop – Boot Manager. Navigate to Downloads. Click on plpbt-5.0.15.zip to download. At this time, the latest version is 5.0.15 which doesn’t support UEFI boot yet.
  2. Once the download is finished, extract the downloaded file. You see the image file: plpbt.iso, which will be used in next few steps. This is the image file that will allow us to boot from USB Flash Drive.
  3. Attach the Plop boot manager image (plpbt.iso) to the virtual CD drive.

  4. To configure boot order in BIOS of your virtual machine. Click the VM menu, then select Power -> Power On to Firmware. The virtual machine will directly go to the BIOS Setup Utility.

  5. Select Boot tab. Next, move the CD-ROM Drive to the top. Press F10 to save your changes. The virtual machine will then boot into Plop.

  6. Attach your USB device to the virtual machine. On Plop’s boot menu, select USB and press Enter.

  7. Plop begins loading from the USB flash drive.

Restrict Logon Hours for Any Windows Account

January 11th, 2012 by Admin

One of my friends complained that his child spends too much time on his computer. He was very worried for his kid’s health. He tried to talk with the child but you know how stubborn they are. It was almost impossible to convince a six-year-old kid that spending too many hours in front of the computer can have a bad influence upon his health condition. I am a person who sustains children should learn how to use computers but I am against excessive use.

Regarding my friend’s problem, I advised him to try software applications that restrict access to computer for a defined time interval. He was reticent about this idea asking me if there was a costless solution. He didn’t want to use software trying to avoid his child getting suspicious. He just wanted a trick to restrict access in Windows without additional software and at no cost.

I immediately thought that the net user command would be perfect for this issue. Follow the steps outlined below to easily limit the user’s logon hours:

  1. Open an elevated Command Prompt.

  2. Enter the appropriate net user /time command for the user(s) you wish to restrict access for.

Example 1:
Limits the user john to logon Monday- Friday between 8am and 5pm:
net user john /time:M-F,08:00-17:00

Example 2:
The same thing can also be expressed as above using the 12 hour clock :
net user john /time:M-F,8am-5pm

Example 3:
This shows the easiest way of setting limits that differ on multiple days.
net user john /time:M,8am-5pm;T,1pm-3pm;W-F,8:00-17:00

Example 4:
To remove time restrictions:
net user john /time:all

Note: The system limits time to one-hour increments, which means you can only restrict the user on the hour (e.g., 13:00 or 1pm, not 13:30 or 1:30pm). You can use the abbreviation for the day (i.e., M,T,W,Th,F,Sa,Su).

Windows accounts can be restricted from logging on to the computer at specific hours or days. You can only restrict when a user can log on to the system, but you cannot force a user to log off when their hours expire.

The next time when you try to log onto the same account, the operating system will check the time restrictions you set to determine if you are allowed to log into the  account. For restricted time periods, the system will required you to enter your password, even if you haven’t set any password on that account. Furthermore, it will always reject you regardless if you enter a valid or invalid password.