Archive for the ‘Others’ category

2 Ways to Backup or Export EFS Certificate in Windows 10 / 8 / 7

October 16th, 2017 by Admin

When you encrypts a folder or file with EFS, Windows will create a EFS certificate and store it locally, so you can transparently access encrypted files without being prompted for certificate / password. In the event of a system failure or your EFS certificate is corrupted or lost, you’ll be unable to access EFS encrypted files any more. So it is very important to backup or export EFS certificate in Windows 10 / 8 / 7.

Method 1: Backup or Export EFS Certificate Using Certificates Manager

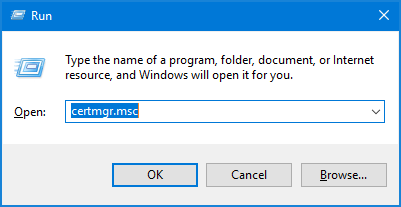
  1. Press the Windows key + R together to open the Run box. Type certmgr.msc and click OK to open Certificates Manager.

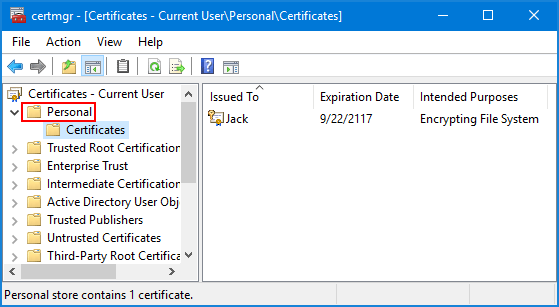
  2. In the left pane of the Certificates console, expand the Personal node and then click on Certificates.

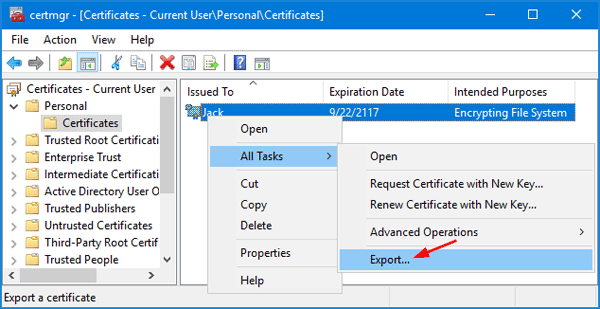
  3. In the right pane, right-click the certificate that lists Encrypting File System under Intended Purposes, and then select All Tasks -> Export.

  4. When the Certificate Export Wizard opens, click Next.

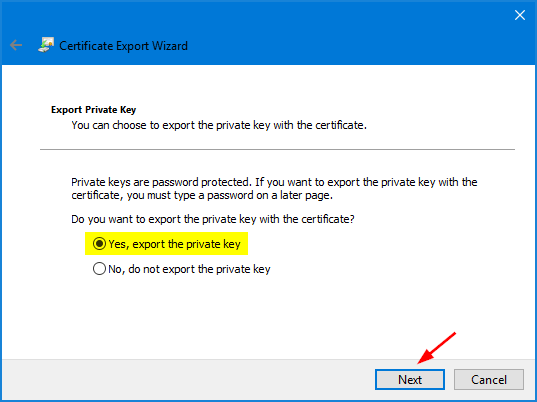
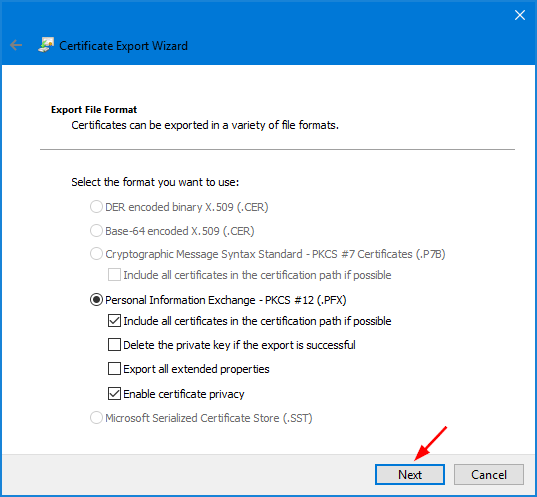
  5. Choose “Yes, export the private key” and click Next.

  6. Click the checkbox next to “Include all certificates in the certification path if possible” and click Next.

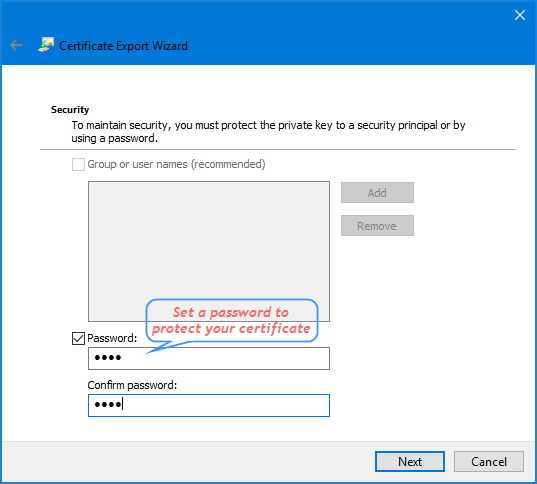
  7. Enter a password that will be used to protect your exported EFS certificate. Confirm it and click Next.

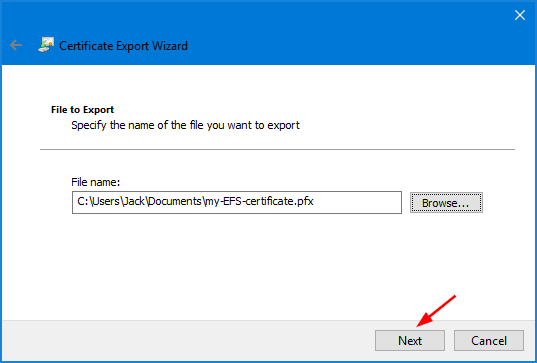
  8. Click the Browse button to find a location to save your exported EFS certificate (.pfx). Type in a name such as “my-EFS-certificate.pfx” and then click Next.
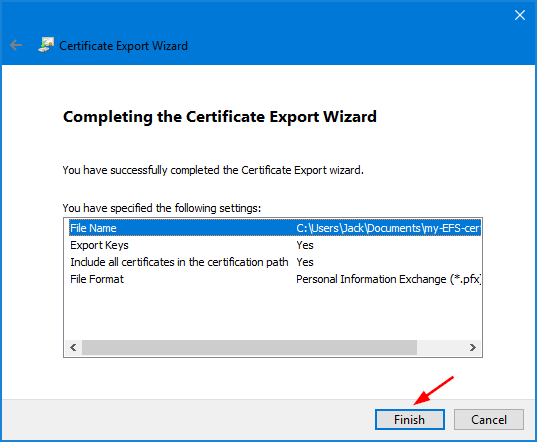
  9. Click Finish.

    You can then backup the exported EFS certificate in a safe place!

Method 2: Backup or Export EFS Certificate Using Command Prompt

  1. Open the Command Prompt as administrator.
  2. In order to export EFS certificate stored in Certificates Manager, type the following command:

    cipher /x d:\my-EFS-certificate

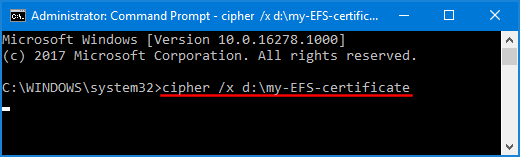
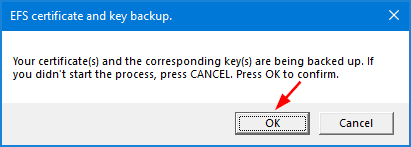
  3. Once you press Enter, you’ll be prompted to confirm backing up EFS certificate. Click OK to continue.

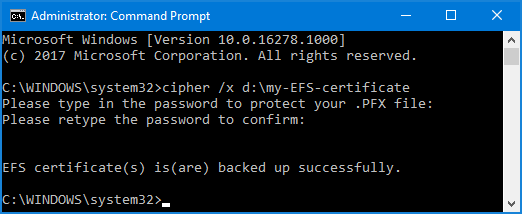
  4. Type a password used for protecting your EFS certificate, then confirm the password.

  5. The .pfx file containing the EFS private key certificate is now saved to the location d:\my-EFS-certificate.

    That’s it!

How to Format Hard Drive Using PowerShell

October 9th, 2017 by Admin

Is there a simple PowerShell script to format a USB disk? If you have a brand new hard drive, or you want to erase all the data from a disk, you have to format it. In this tutorial we’ll explain how to format a hard drive using PowerShell commands in Windows 10.

How to Format Hard Drive Using PowerShell?

  1. To open Powershell as admin in Windows 10, press the Windows key + X together and then select “Windows PowerShell (Admin)“.

  2. Type the following command to find the hard drive you want to format.

    Get-Disk

  3. To clear all partitions and volumes from your disk, type the following command. Replace 1 with the disk number of the drive you want to format.

    Clear-Disk -Number 1 -RemoveData

  4. Next, create a new partition on your blank disk, and assign a drive letter:

    New-Partition -DiskNumber 1 -UseMaximumSize -IsActive -DriveLetter E

  5. To format the newly-created partition with the NTFS file system, type the following command and press Enter. Replace ‘USB’ with the volume label you want to use.

    Format-Volume -DriveLetter E -FileSystem FAT32 -NewFileSystemLabel USB

  6. Once you’ve completed the steps, you can now access the new partition in Windows Explorer.

5 Simple Ways to Start Firefox in Safe Mode

September 28th, 2017 by Admin

Firefox keeps crashing at startup? Firefox uses too much memory and it starts to become sluggish? Do you suspect an add-on is causing Firefox to be slow? If the issue is not present in Firefox Safe Mode, your problem is probably caused by an extension. In this tutorial we’ll show you 4 simple ways to start Firefox in Safe Mode.

Method 1: Start Firefox in Safe Mode from Help Menu

Click the three-line icon in the upper right corner of your Firefox window, and then click the Help icon (question mark) at the bottom.

Select the “Restart with Add-ons Disabled” option from the help menu.

Click the Start in Safe Mode button in the pop-up window that appears. Firefox will restart into safe mode with all add-ons disabled.

Method 2: Start Firefox in Safe Mode from Run

Press the Windows key + R shortcut to open the Run box. Type firefox -safe-mode and press Enter.

In the Firefox Safe Mode window that appears, click on the Start in Safe Mode button.

Method 3: Start Firefox in Safe Mode by Holding SHIFT

Hold down the SHIFT key, and then double-click the Firefox shortcut on your desktop.

When the Firefox Safe Mode window opens, click on the Start in Safe Mode option.

Method 4: Start Firefox in Safe Mode from Command Line

Open the Command Prompt. Type the following command and press Enter.
start firefox -safe-mode

This will open Firefox Safe Mode pop-up and you can select the Start in Safe Mode button.

Method 5: Create Shortcut to Start Firefox in Safe Mode

If you need to start Firefox in safe mode frequently, right-click the Firefox shortcut in desktop and select Properties. Click the Shortcut tab. At the end of the Target field, add this outside of the quotes:
-safe-mode

Click Apply. Whenever you double-click the Firefox shortcut, you will see the Firefox Safe Mode popup and select the Start in Safe Mode button.

How to Turn On / Off File and Printer Sharing in Windows 10 / 8 / 7

September 27th, 2017 by Admin

File and Printer Sharing is a network feature that allows Windows users to share local files and printer with other computers on a network. This is really useful on home network but it can be a security concern on public network. In this tutorial we’ll show you 3 easy ways to turn on or off file and printer sharing in Windows 10 / 8 / 7.

Method 1: Turn On / Off File and Printer Sharing through Control Panel

  1. Open Control Panel. Click the View by option at the top right, and set it to Large icons. Next, click Network and Sharing Center.

  2. Click on the Change advanced sharing settings link on the left side.

  3. Expand the network profile you’re using, select either Turn on file and printer sharing or Turn off file and printer sharing. Click on Save changes when done.

You can configure Windows to turn on file and printer sharing on private network, while choosing to turn off file and printer sharing when your network is set to Guest or Public.

Method 2: Turn On / Off File and Printer Sharing Using Command Prompt

Open the Command Prompt as administrator. Copy and paste the following command and hit Enter. This will turn on file and printer sharing for all network profiles.

netsh advfirewall firewall set rule group="File and Printer Sharing" new enable=Yes

If you want to turn off file and printer sharing for all network profiles, type this command instead:

netsh advfirewall firewall set rule group="File and Printer Sharing" new enable=No

Method 3: Turn On / Off File and Printer Sharing Using PowerShell

Open Windows PowerShell as administrator. Copy and paste the command below to enable file and printer sharing for all network profiles:

Set-NetFirewallRule -DisplayGroup "File And Printer Sharing" -Enabled True

Or disable file and printer sharing:
Set-NetFirewallRule -DisplayGroup "File And Printer Sharing" -Enabled False

How to Remove or Enable Security Tab in Folder Properties

September 25th, 2017 by Admin

Trying to change the permissions or ownership of a folder, but the Security tab is missing? How can I disable or restore the Security tab in Windows 10? In this tutorial we’ll show you 2 simple ways to remove or enable the Security tab from folder properties in Windows 10.

Method 1: Remove or Enable Security Tab in Folder Properties Using Group Policy

  1. Press the Win + R keyboard combination to bring up a run box then type gpedit.msc and press Enter.
  2. When the Local Group Policy Editor opens, navigate to:
    User Configuration -> Administrative Templates -> Windows Components -> File Explorer
  3. On the right hand side, double-click the “Remove Security tab” setting.

  4. If you want to remove Security tab, select Enabled and click Apply.

    If you want to restore the missing Security tab, select Disabled instead.

  5. The policy setting will take effect immediately.

Method 2: Remove or Enable Security Tab in Folder Properties Using Registry Editor

  1. Press the Win + R keyboard combination to bring up a run box then type regedit and press Enter.
  2. After Registry Editor opens, navigate to the following key:
    HKEY_CURRENT_USER\Software\Microsoft\Windows\CurrentVersion\Policies\Explorer
  3. On the right-side pane, create a new DWORD (32-bit) NoSecurityTab and set its value to 1. This will hide the Security tab from folder properties.

    If you want to re-enable the Security tab, simply change the value of NoSecurityTab to 0.

  4. Close Registry Editor and re-open the folder properties, the Security tab will be hide from everyone or magically appear.

2 Ways to Access Emoji in Windows 10

September 21st, 2017 by Admin

How can I use emoji on a Windows PC? Using emoji to express emotions is really fun and interesting. Start with Anniversary Update, Windows 10 adds native support for emoji and you can use them with your keyboard or touch screen. In this tutorial we’ll show you 2 simple ways to access emoji in Windows 10.

Method 1: Access Emoji in Windows 10 Using On-Screen Keyboard

  1. Right-click on the taskbar and select “Show touch keyboard button” from the context menu.

  2. This will add a keyboard icon to the system tray. Just click that icon to open the touch keyboard.

  3. Click the emoji button next to the space bar, and the alphabetical keys will convert into emoji keyboard.

  4. Select whichever emoji you’d like to use and it’ll be inserted where you left your cursor.

Method 2: Access Emoji in Windows 10 Using Keyboard Shortcut

  1. Put the cursor in any text field you’d like to insert an emoji. This could be Microsoft Word, Chrome, or Notepad app.
  2. Press the WIN + . (full stop) keyboard shortcut, or else the WIN + ; (semicolon). Either will open an emoji picker over the text field.
  3. Emoji are divided into several categories: smiley faces and animals, people, celebrations and objects, food and plants, transportation and places, symbols.

  4. You can pick a category from the bottom row and click any emoji to insert it.

How to View or Reset Network Data Usage in Windows 10

September 19th, 2017 by Admin

If you’re using Windows 10 with a limited data plan, it’s advisable to monitor your network data usage and stop unnecessary applications from consuming your data. In this tutorial we’ll show you how to view how much network data you used in the last 30 days, and reset your data usage in Windows 10.

How to View or Reset Network Data Usage in Windows 10

  1. Press the Windows + I keys together to open Settings. Click Network & Internet.

  2. Select the Data usage option from the left side of the panel. From there, you can see the network data you used in the last 30 days on your Windows 10 PC.

  3. Click on the View usage details link. In the next window, yo can see which apps consumed how much data on WiFi or Ethernet.

  4. If you want to reset or clear the data usage, Click on the Reset usage stats button.

  5. Click the Reset button to confirm that you’re deleting all of network data usage stats for your selected connection.

  6. After a moment, the data usage for your selected network is reset to 0, as shown in the below screenshot.

Note that the option of resetting data usage stats is only available in Windows 10 build 16199 or higher. If you’re running an earlier build of Windows 10, open an elevated command prompt and run these commands to clear network data usage:

net stop DPS
DEL /F /S /Q /A "%windir%\System32\sru\*"
net start DPS

That’s it!

2 Ways to Disable Run Command (WIN + R) in Windows 10

September 14th, 2017 by Admin

How can I disable Run command in GPO? Just press Win+R keys together and you can get to the Run dialog box immediately. By typing different commands in the Run box, you can access the most used Windows maintenance tools – Registry Editor, Local Group Policy Editor, etc.

When you share a PC with others, you may want to prevent inexperienced users from accessing the Run command. In this tutorial we’ll show you 2 simple ways to disable Run command in Windows 10, so others can’t access Run from the WinX menu or use WIN + R.

Method 1: Disable Run Command in Windows 10 Using Group Policy

  1. Press the WIN + R keys together, type gpedit.msc in the Run command box and then press Enter.

  2. In the Local Group Policy Editor window, navigate to User Configuration -> Administrative Templates -> Start Menu and Taskbar. Double-click on the policy “Remove Run Menu from Start Menu” appearing on the right pane.

  3. Set the policy to Enabled and then click OK.

  4. This policy setting takes effect without rebooting. When you try to access the Run command, you’ll receive the following error message:

    “This operation has been cancelled due to restrictions in effect on this computer. Please contact your system administrator.”

Method 2: Disable Run Command in Windows 10 Using Registry Editor

  1. Press the WIN + R keys together, type regedit and then press Enter.

  2. In the Registry Editor, use the left sidebar to navigate to the following key:
    HKEY_CURRENT_USER\SOFTWARE\Microsoft\Windows\CurrentVersion\Policies\Explorer

    If the Explorer key doesn’t exist, right-click on the Policies key on the left pane, then select New -> Key and name it as “Explorer“.

  3. Right-click any blank area on the right pane, and then select New -> DWORD (32-bit) Value.

  4. Name the new value as NoRun, and set its value data to 1.

  5. This registry setting does not take effect until you reboot your computer.

What to Do If You Want to Re-enable Run Command?

After disabling the Run command, the WIN + X keys doesn’t work any more and you need to use other ways to access Local Group Policy Editor or Registry Editor.

Once you get to the Local Group Policy Editor, just set the “Remove Run Menu from Start Menu” policy to “Not Configured“. Another way is going to the registry key HKEY_CURRENT_USER\SOFTWARE\Microsoft\Windows\CurrentVersion\Policies\Explorer and change the DWORD of NoRun to 0. That’s it!

How to Transfer Outlook PST Data Files to Another PC

September 13th, 2017 by Admin

How do I move an archive PST file from Outlook 2007 to Outlook 2016? Outlook stores all your data (including email messages, calendars, contacts and tasks, etc) in a Personal Folders (.PST) file. In this tutorial we’ll walk you through the steps to transfer Outlook PST data files to another computer.

Part 1: Backup Outlook PST Data Files

Follow these steps to find where your Outlook PST files are stored and backup them to external USB drive.

  1. Open the Control Panel and set the View by option to Large icons. Click the Mail option.

  2. In the Mail Setup window, click on the the Data Files button.

  3. Once there, you can see your PST files for all email accounts that were set up in the Outlook application. Choose a PST file and click on the Open Folder button.

  4. This will open the folder where your selected Outlook Data file (.pst) is saved, and you can then copy the PST file to external USB drive. If Outlook doesn’t store all your PST files in the same location, repeat the above step to locate other PST files and backup them as well.

Part 2: Restore Outlook PST Data Files to Another PC

Here’s how you can easily restore the backup PST files in a new Outlook installation or another computer:

  1. Open the Control Panel and set the View by option to Large icons. Click the Mail option.

  2. In the Mail Setup window, click on the the Data Files button.

  3. In Account Settings window, click on the Add button under the Data Files tab.

  4. When you’re asked to choose a PST format, select the Office Outlook Personal Folders File (.pst) item, and then click OK.

  5. Select your backup PST file and click OK.

  6. In the Name text box, type a descriptive name for your Personal Folders file, and click OK.

  7. Now, you’ll see the new Personal Folders on the left-pane in Outlook. Click it and you can expand to view your email messages in your backup PST files.

    That’s it!

Best Tools to Create a Bootable USB Drive on Ubuntu

September 12th, 2017 by Admin

How can I make a bootable Linux/Windows USB disk on Ubuntu? In this tutorial we’ll show you how to use the best free tools (UNetBootin and WoeUSB) to create a bootable USB drive from any CD image on Ubuntu.

Option 1: Create a Bootable USB Using UNetBootin

  1. Right-click on your desktop and select Open Terminal.
  2. Unetbootin is available under the ppa:gezakovacs/ppa repository. Use the following command to add repository:
    sudo add-apt-repository ppa:gezakovacs/ppa

  3. Run this command to check the repositories for available updates.
    sudo apt-get update

  4. To install Unetbootin, type the following command:
    sudo apt-get install unetbootin

  5. Once installed, open UNetbootin from Ubuntu Dash or Terminal.
  6. Specify the path of your live CD image, select the USB drive which you want to make as a bootable USB. Click OK to begin creating a bootable USB drive.

Option 2: Create a Bootable USB Using WoeUSB

  1. Open a Terminal window from the Dash. Run this command to add PPA repositories of Ubuntu:
    sudo add-apt-repository ppa:nilarimogard/webupd8

  2. After having added the source above, you’ll update your system. In terminal, type:
    sudo apt-get update
  3. Next, type this command to install WoeUSB on Ubuntu:
    sudo apt install woeusb

  4. Once WoeUSB is installed, insert your USB flash drive and Start WoeUSB.
  5. Choose the “From a disk image(iso)” option, browse to the ISO Image you would like WoeUSB to put on USB. Make sure the correct USB drive is selected and click Install.