Archive for the ‘Others’ category

How to Reset Installed Apps to Default in Windows 10

September 26th, 2016 by Admin

If an app crashes repeatedly, freezes or doesn’t work properly on your PC, Windows 10 allows you to reset the app to the default settings. Although you’ll lose your preferences and sign-in details from the app that causes problem, resetting it can be helpful in certain situation. In this tutorial we’ll show you to reset your installed or built-in apps to default in Windows 10.

How to Reset Installed Apps to Default in Windows 10?

  1. Open the Settings app by clicking its shortcut from the Start Menu, or pressing Windows key + I shortcut on your keyboard.

  2. Click on System.

    system

  3. On the left side of the window, click on Apps & features. You’ll see all the apps and programs you’ve installed on your computer. Find an app you want to reset, and click on it. Then click the “Advanced options” link under the app’s name.

    app-and-features

  4. Click the Reset button to reset an app’s settings.

    reset-windows-10-app

  5. You’ll have to click the Reset button to confirm you want to clear the app’s data and sign-in details. After a while you’ll be told that the app has been reset.

    confirm-app-reset

3 Ways to Remove / Disable Action Center in Windows 10

September 24th, 2016 by Admin

In Windows 10, Action Center can be accessed by clicking the square speech bubble icon located on the right-hand side of the taskbar. Action Center shows you your latest notifications, emails, updates and app messages all appear in a drawer that pulls out from the right hand side of the screen.

action-center-icon

If you hate having to clear annoying notifications all the time, or you feel like the Action Center is useless, you can get rid of it. In this tutorial we’ll show you 3 ways to remove / disable Action Center from the taskbar in Windows 10.

Method 1: Disable Windows 10 Action Center Using the Settings app

  1. Open the Settings app either by clicking its icon in the Start Menu or pressing Windows + I keyboard shortcut.

    open-settings-app

  2. Click on Personalization.

    personalization

  3. Select Taskbar from the left-hand navigation, and then click the link titled “Turn system icons on or off“.

    turn-system-icons-on-off

  4. Toggle the switch against Action Center to the Off position. This will remove & disable the Action Center icon right away.

    turn-off-action-center

If you’re running an old build of Windows 10, follow these steps:

  1. Open the Settings app.
  2. Click on System.
  3. Click the “Notifications & actions” category on the left. On the right, click the “Turn system icons on or off” link.
  4. To remove Action Center icon from taskbar, toggle Action Center to Off.

Method 2: Disable Windows 10 Action Center Using Group Policy

  1. Open the Local Group Policy Editor. Navigate to: User Configuration > Administrative Templates > Start Menu and Taskbar.
  2. On the right-hand pane, find the “Remove Notifications and Action Center” policy and double-click it.

    remove-action-center-gpo

  3. Select the Enabled radio button, and click OK to disable the Action Center.

    remove-notification-action-center

    Just restart your system to make the changes take effect.

Method 3: Disable Windows 10 Action Center Using Registry Editor

  1. Open the Registry Editor. Navigate to the following key:
    HKEY_CURRENT_USER\SOFTWARE\Policies\Microsoft\Windows\Explorer
  2. Right-click any empty space on the right pane and select New > DWORD (32-bit) Value. Name it DisableNotificationCenter. Next double-click on it and give it a value of 1.

    disable-notification-center

  3. Exit Registry Editor and restart your computer. The Action Center icon has completely disappeared from the taskbar. If you want to bring it back in future, follow the same instructions but set the DisableNotificationCenter value to 0.

How to Remove Shortcut Arrow from Desktop Icons in Windows 10 / 8 /7

September 23rd, 2016 by Admin

By default, Windows places a small arrow in the bottom left corner of the desktop shortcut icon. The arrow can help you distinguish a shortcut from an application or file. If you are not happy to see the shortcut overlay icon, you can get rid of it completely. In this tutorial we’ll show you how to hide / remove shortcut arrow from desktop icons in Windows 10/8/7.

desktop-shortcut-arrow

How to Remove Shortcut Arrow from Desktop Icons in Windows 10 / 8 /7?

  1. Open the Registry Editor. When prompted Do you want to allow this app to make changes to your PC? Choose Yes.

    regedit-via-run

  2. In the Registry Editor, navigate to the following key:
    HKEY_LOCAL_MACHINE\SOFTWARE\Microsoft\Windows\CurrentVersion\Explorer\Shell Icons

    If the Shell Icons key does not exist you’ll need to create it. To do so right-click the Explorer key in the left pane, then select New > Key and name it Shell Icons.

    create-shell-icons-key

  3. In the right pane of the Shell Icons key, right-click on any empty area, and select New > String Value. Name it 29.

    add-string-value

  4. Double-click the 29 entry to modify it. In the Value Data box, copy and paste the following:
    %windir%\System32\shell32.dll,-50

    remove-shortcut-arrow

  5. Click OK and exit Registry Editor. Reboot your computer and you should no longer see the little arrow in your desktop shortcuts. That’s it!

Problem of Black Square:

Everything worked just fine but after a second shut down, all shortcut icons have a blank square superimposed over the lower left side.

shortcut-black square

To fix this issue, just open the Registry Editor and navigate to KEY_LOCAL_MACHINE\SOFTWARE\Microsoft\Windows\CurrentVersion\Explorer\Shell Icons. Double-click the 29 entry in the right pane, leave Value Data empty and click OK.

shell-icons-shortcut

Reboot your computer and it should work now!

How to Backup and Restore Device Drivers in Windows 10 / 8 / 7

September 21st, 2016 by Admin

Every time you reinstall Windows, you have to download and install drivers again. But what to do if you don’t remember where you downloaded all your individual drivers from, or you lost the disc provided by your computer vendor? Luckily Windows comes with a built-in command line tool – DISM, which can make a backup of all installed drivers from a working PC.

In this tutorial we’ll show you how to use the DISM command to backup your device drivers and then restore them in Windows 10, 8 and 7, no need to use any third-party software.

Part 1: Backup Third Party Device Drivers

  1. Open the Command Prompt as administrator.
  2. Type the following command at the Command Prompt and press Enter.

    dism /online /export-driver /destination:C:\drivers-backup

    backup-driver-with-dism

    Replace the destination path (“C:\drivers-backup“) with the actual folder where you will store the drivers. It can be a folder on a separate partition or USB thumb drive. Make sure that folder is created before you run the above command.

  3. It begins to grab the drivers from your system drive and store them in your destination location. When it’s done, your destination folder will be filled with the driver files (.inf, .cat, .sys).

Part 2: Restore & Install Device Drivers

Once you’ve reinstalled Windows, you can manually restore and install the driver from your previous backup. Follow these steps:

  1. Open Device Manager. Due to lack of driver installation, some devices have a little yellow question mark over its icon, and they should have more descriptive names.
  2. Select a device from the device tree, right-click on it and select “Update Driver Software” from the drop-down menu.

    update-driver-software

  3. In the pop-up window, you will see two options. Click Browse my computer for driver software.

    search-for-device-driver

  4. Click on Browse to find the location of the driver files you backed up previously and click Next. Make sure the “Include subfolders” option is checked.

    browse-driver-backup

  5. After a while you’ll see the message saying “Windows has successfully updated your driver software” and now the device name should be displayed correctly.

    successfully-installed-driver

Updated: This method also works with Windows 11. However, there are other ways available for you to restore Windows device drivers from Command Prompt rather than Device Manager.

How to Take Ownership (Permission) of Protected Registry Key in Windows 10

September 20th, 2016 by Admin

Sometimes you might encounter some registry keys that are protected by Windows. When you try to edit, rename or delete a protected registry key or value, you’ll get one of the following errors:

“Cannot edit {value_name}: Error writing the value’s new contents.”

“The Registry Editor cannot rename {key_name}. Error while renaming key.”

“Unable to delete all specified values.”

“Cannot delete {key_name}: Error while deleting key.”

error-edit-registry-value

Even you’re logged in as Administrator, you might still lack permissions to edit a protected registry key. In such cases, you need to take ownership of that particular key and grant full permissions to your signed-in account. This step-by-step tutorial will guide you how to take full ownership of protected registry key in Windows 10.

How to Take Full Ownership of Protected Registry Key?

  1. To start, press the Windows logo key + R on your physical keyboard, type regedit and press Enter to open the Windows Registry.

    regedit-via-run

  2. Navigate to the protected key you want to take ownership of. For this example, we chose the following key:

    HKEY_LOCAL_MACHINE\SOFTWARE\Microsoft\Windows\CurrentVersion\SystemProtectedUserData\S-1-5-21-1176301877-597599738-4051979053-1001\AnyoneRead\Logon

  3. Right-click on the protected key, and select Permissions from the context menu that appears.

    edit-registry-permissions

  4. In the Permissions window that appears, Click Advanced.

    registry-key-permissons

  5. In the Advanced Security Settings dialog, you can see the current owner (SYSTEM or “TrustedInstaller“) of your selected key. Click on Change button.

    change-registry-owner

  6. This will open a new dialog box. Now type your user account name, and then click on “Check Names” button to convert the username to correct format. Click OK.

    select-registry-owner

  7. Now you’ll see that your user account is showing up as the owner. Check the “Replace owner on subcontainers and objects” option if you also want to take ownership of the subkeys. Click OK.

    replace-owner-on-subkeys

  8. When back to the Permissions window, select the desired user name and then check Allow checkbox under the Full Control row, and click OK.

    modify-registry-permissions

    If your user account is not shown under the Group and user names list, click on Add button.

  9. Close Registry Editor. Now you’ve taken ownership of a protected registry key and grant your account full permissions. That’s it!

8 Ways to Open Computer Management in Windows 10

September 19th, 2016 by Admin

Computer Management is a handy console included in Windows that allows you to view event logs, partition your hard drive, manage the devices and services, etc. In this article we’ll show you 8 ways to open Computer Management in Windows 10.

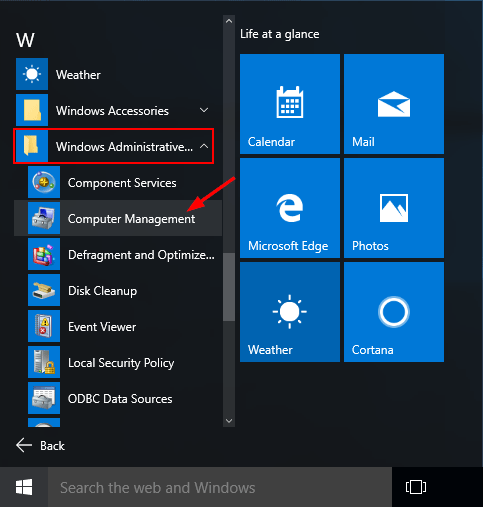
Option 1: Open Computer Management from Start Menu

Click the Start button, select All Programs -> Windows Administrative Tools, and then click on the Computer Management shortcut.

open-compmgmt-via-start-menu

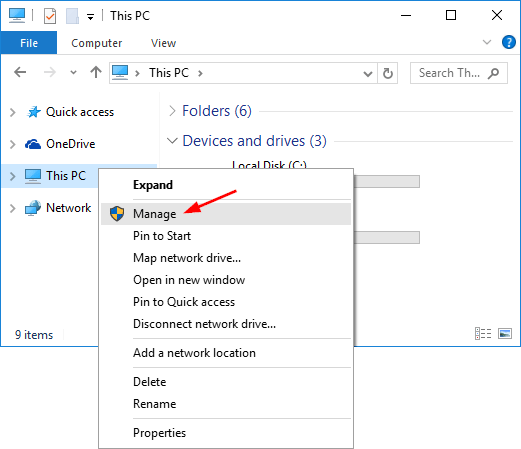
Option 2: Open Computer Management by Right-clicking My Computer

Right-click on This PC icon on your desktop (or on the left pane of File Explorer), select Manage from the context menu. This will launch Computer Management in Windows 10.

right-click-this-pc

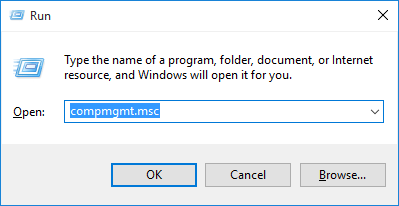
Option 3: Open Computer Management from Run

Press the Windows logo key + R to open the Run box. Type compmgmt.msc and press Enter to open the Computer Management console.

compmgmt

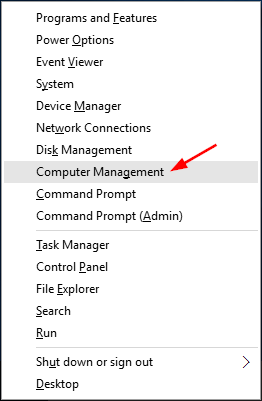
Option 4: Open Computer Management by Pressing Win + X Keys

Press the Windows logo key + X to open the power user menu. Then click the Computer Management shortcut.

power-user-menu

Option 5: Open Computer Management from Command Prompt

Open the Command Prompt in Windows 10, type compmgmt.msc and hit Enter.

open-compmgmt-via-cmd

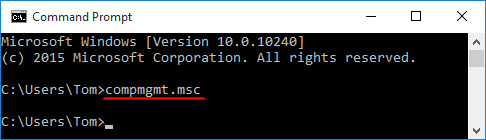
The Computer Management console will start immediately.

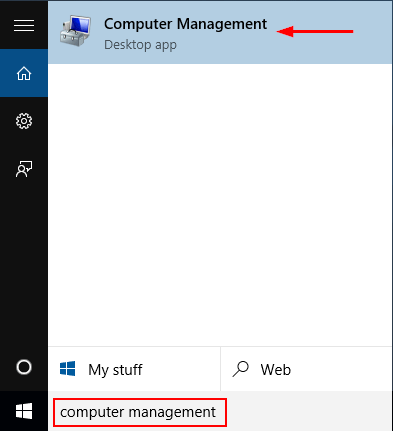
Option 6: Open Computer Management Using Cortana Search

The fastest way to open Computer Management in Windows 10 is to use the Cortana Search. Click on Cortana Search box from the taskbar, enter the words “computer management” and then click the Computer Management shortcut.

search-computer-management

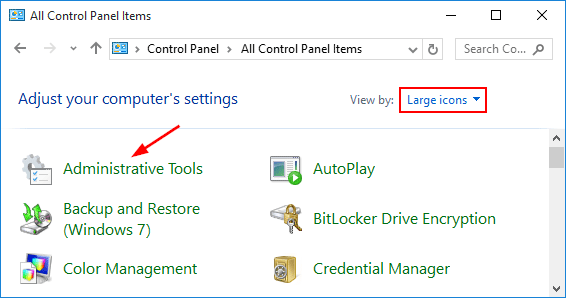
Option 7: Open Computer Management from Control Panel

Open Control Panel in Large or Small icons view. Click Administrative Tools.

administrative-tools

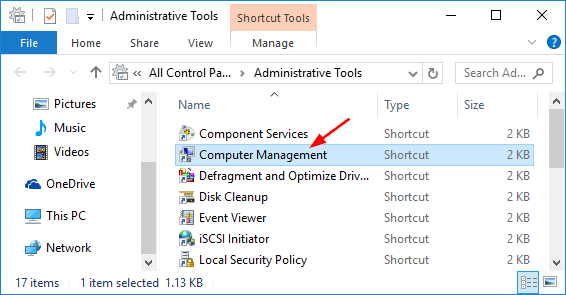
A new window will open. From there you can click on the Computer Management shortcut.

computer-management-shortcut

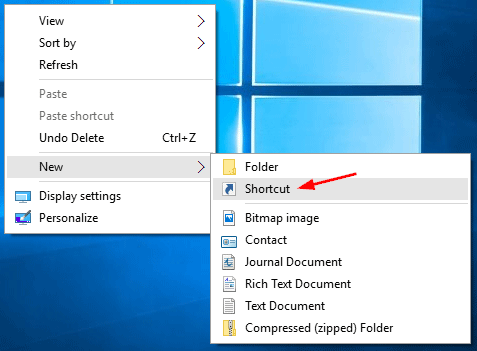
Option 8: Create a Computer Management shortcut on Your Desktop

Right-click on any empty space on your Windows 10 desktop. Select New -> Shortcut from the right-click context menu.

new-shortcut

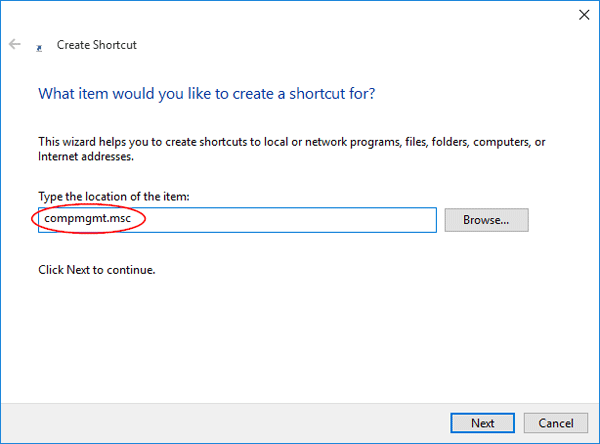
When the Create Shortcut wizard opens, type compmgmt.msc in the shortcut location box and click Next.

shotcut-location

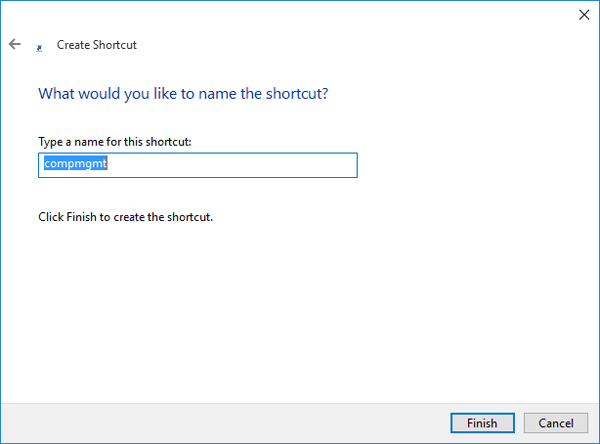
Next just type any name for your created shortcut and click Finish.

name-the-shortcut

You’ll see the Computer Management short on your desktop.

How to Manually Clear or Set Dirty Bit on Windows Volume

September 17th, 2016 by Admin

When a dirty bit is set on a volume, Windows automatically performs a disk checking the next time the computer is restarted. You can run the chkntfs command at the Command Prompt to check if a volume is dirty, but there is no way to clear the dirty bit unless you let Windows go through disk scanning at boot.

disk-dirty

In this tutorial we’ll show you how to manually clear or set the dirty bit for a NTFS & FAT32 volume in Windows 10, 8, 7, Vista and XP. The procedure requires you to use a disk editor software such as WinHex. If you want to edit the dirty bit for a system volume currently in use, you need to use a WinPE bootable CD to boot off your PC.

How to Manually Clear or Set Dirty Bit on Windows Volume?

To get started, open WinHex as administrator rights. Click the Tools menu and select Open Disk.

open-disk-with-winhex

When prompted to select a drive for editing, choose the logical volume you want to edit the dirty bit on, and then click OK.

edit-logical-volume

For FAT32 Volume:

Click on “Boot sector” at the directory browser. The dirty bit for FAT32 volume is located at offset 0x41. If this volume is dirty, the bit should be 01. Just change 01 to 00 and then save your changes back to disk, now you’ve successfully cleared the dirty bit.

fat32-dirty-bit

For NTFS Volume:

Click on $Volume at the directory browser. The offset location of the dirty bit is slightly different on every NTFS volume. To locate the dirty bit, look for a hex string of 13 bytes, beginning with 03 01, ending with 80 00 00 00 18. You should be able to find a match within the first or second sector.

ntfs-dirty-bit

The dirty bit is the 3th byte of the hex string that I’ve circled with red line. To set a dirty flag on the drive, just change it to 01. Or change it to 00 if you want to clear the dirty flag.

When it’s done, commit the change to the disk.

3 Ways to Reset Windows 10 Computer to Factory Settings

September 13th, 2016 by Admin

If your computer becomes sluggish, or freezes or hangs randomly, you might consider doing a factory reset. This will bring your Windows 10 laptop or desktop to the state when it was first turned on. In this tutorial we’ll show you 3 ways to reset Windows 10 computer to its factory default state, even if your computer is locked out or unbootable.

factory-reset-windows-10-pc

Method 1: Reset Windows 10 PC to Factory Settings After Logging in

After logging in to Windows 10, you can reset your computer to factory default settings using the Settings app. Follow these steps:

  1. To open the Settings app, you can click the Start button and then click Settings, or press Windows key + I keyboard shortcut.
  2. Click on Update & Recovery.

    update-security

  3. Select Recovery in the left-hand menu. Under Reset this PC, click on Get Started.

    get-started-pc-reset

  4. A new window will appear with two options: Keep my files or Remove everything. The former option will keep your personal documents, photos and music files intact. But both options will remove all your apps, programs and settings.

    choose-an-option

  5. if you chose “Remove everything” in the prior step, you now have the option to “Just remove my files” or “Remove files and clean the drive.” In most cases, select “Just remove my files”. If the computer is going to be recycled or given to someone else, select “Remove files and clean the drive”.

    clean-the-drive

  6. Click on Reset. Your PC will reboot automatically and begin the factory reset process. This might take an hour or more.

    reset-this-pc

Method 2: Reset Windows 10 PC to Factory Settings from The Login Screen

If you forgot Windows 10 password and couldn’t log on to your computer, you can also perform a factory reset from the login screen. Here’s how:

  1. When you’re on the login screen, hold down the SHIFT key, click the Power button in the lower-right corner and select Restart.

    shift-restart

  2. The computer will reboot and take you to the Choose an option screen. Click on Troubleshoot.

    troubleshoot

  3. On the next screen, click on Reset this PC.

    reset-this-computer

  4. You’ll be presented with two options: Keep my files or Remove everything. If you’re not concerned about your personal files, click on the latter option.

    keep-or-remove-files

  5. If you choose to remove everything, you’ll also see a new option asking if you want to clean the drive, which means it will not only delete everything, but will try to securely erase everything so that data cannot be recovered.

    fully-clean-drive

  6. Click on Reset button to start restoring Windows 10 to factory settings.

    reset-windows-10-to-factory

Method 3: Reset Windows 10 PC to Factory Settings Using Install Disc

When your computer becomes crashed or unbootable, then you’re unable to perform a factory reset using the above methods. In this case, you need to use your Windows 10 installation DVD to access the Factory Reset option.

  1. Boot your computer with Windows 10 installation DVD. You may have to change the boot sequence in your BIOS if booting from a CD/DVD is not enabled.
  2. On the Windows Setup screen, select your keyboard layout and language, and then click on Next.

    windows-setup

  3. On the next screen, click “Repair your computer“. Do NOT click “Install now“.

    repair-your-computer

  4. When the Choose an option screen appears, click on Troubleshoot.

    troubleshoot

  5. Click on Reset this PC.

    reset-this-computer

  6. Click either “Keep my files” or “Remove everything,” depending on whether you want to keep your personal files untouched.

    keep-or-remove-files

  7. You’ll then be prompted to choose the target operating system.

    choose-target-os

  8. If you want to restore only the drive on which Windows 10 is installed, you should click on “Only the drive where Windows is installed“. If you want to factory reset all the drives on your Windows 10 computer, you should click on “All drives“.

    reset-which-drive

  9. Now you’ll be presented with two options: Just remove my files and Fully clean the drive. If you choose “Fully clean the drive”, it will erase your files and data thoroughly.

    fully-clean-drive

  10. Click Reset and the factory reset process will begin.

    reset-windows-10-to-factory