Archive for the ‘Others’ category

4 Ways to Reset Domain Admin Password on Windows Server 2008

September 9th, 2016 by Admin

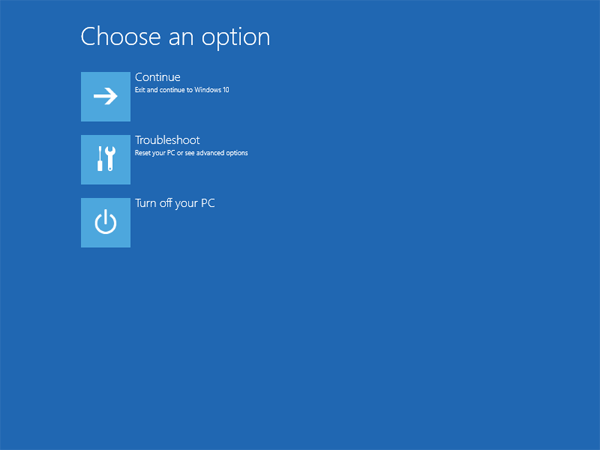
How can I change domain password from command line? Have you forgotten domain administrator password? In this tutorial we’ll show you 4 ways to reset domain admin password on Windows Server 2008 domain controller.

Method 1: Reset Domain Admin Password Using Active Directory Users and Computers snap-in

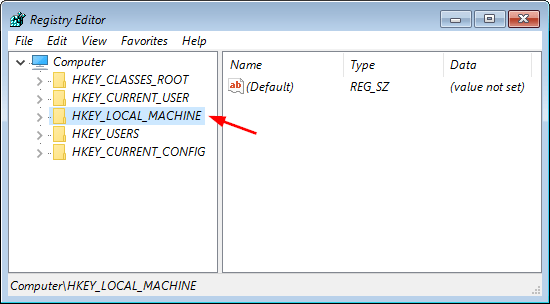
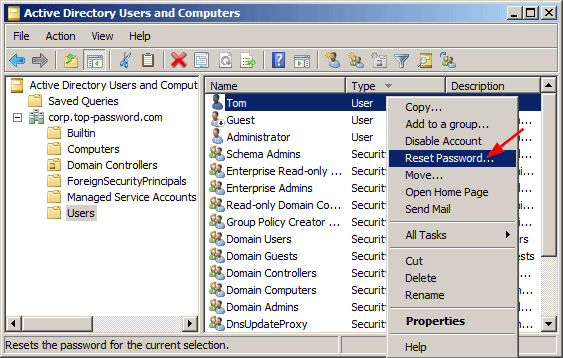
  1. Click the Start button, and then select All Programs > Administrative Tools > Active Directory Users and Computer.

    active-directory-users-and-computers

  2. When the Active Directory Users and Computers MMC snap-in opens, expand your domain and click Users in the left pane.
  3. In the right pane, right-click the name of the account, and click Reset Password.

    reset-domain-password

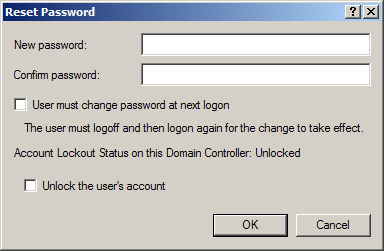
  4. Type and then confirm the new password. Click OK.

    enter-new-domain-password

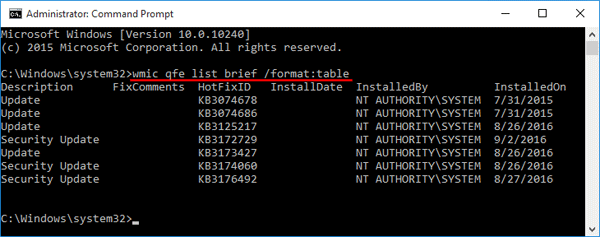
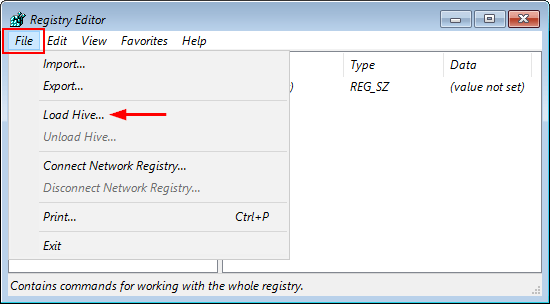
Method 2: Reset Domain Admin Password from Command Line

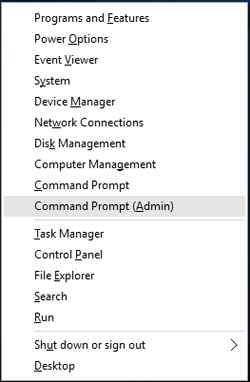
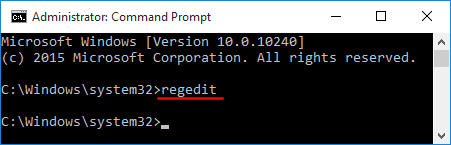
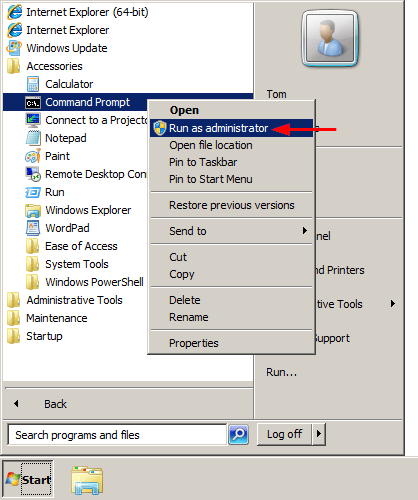
  1. To get started, you need to open an elevated Command Prompt. Click the Start button, and then select All Programs > Accessories. Right-click on Command Prompt and select Run as administrator.

    run-cmd-as-admin

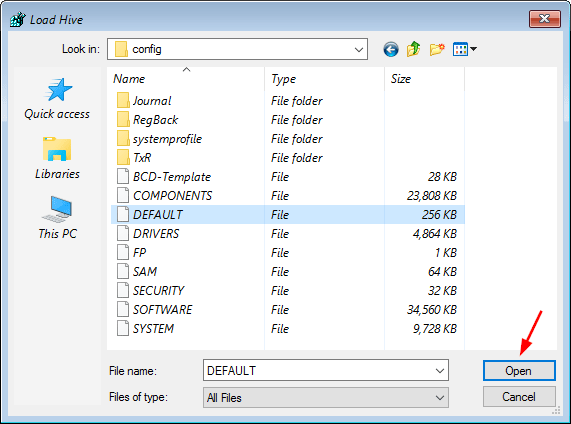
  2. At the Command Prompt, you can run the net user user_name new_password /domain command to change your domain user password. For example, if you wan to change the password of the user Tom to P@ssword123, run the below command:
    net user Tom P@ssword123 /domain

    reset-domain-password-from-command

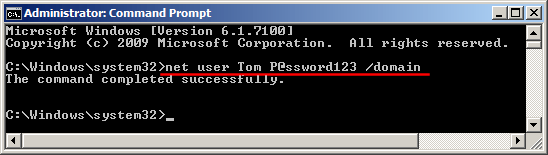
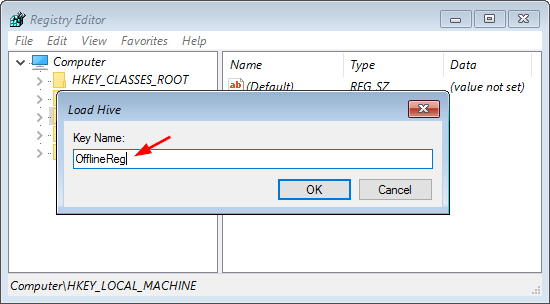
  3. Now you’ve successfully reset your domain administrator password from command line.

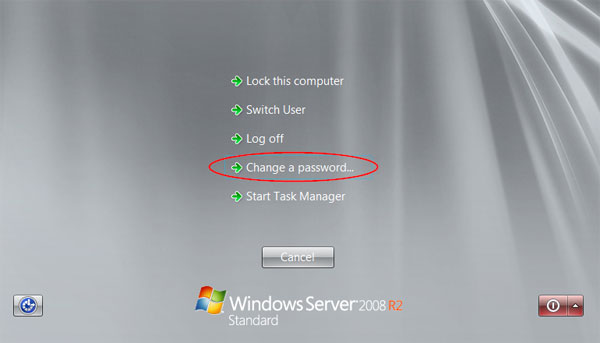
Method 3: Reset Domain Admin Password by Pressing Ctrl+Alt+Del

  1. When you’re logged into Windows Server, press the Ctrl+Alt+Del key combination, you will still see this task menu. Click Change a password.

    ctrl-alt-del-screen

  2. Type your old password followed by a new password as indicated, and then type the new password again to confirm it. Press Enter or click on the blue arrow pointing right.

    change-domain-password

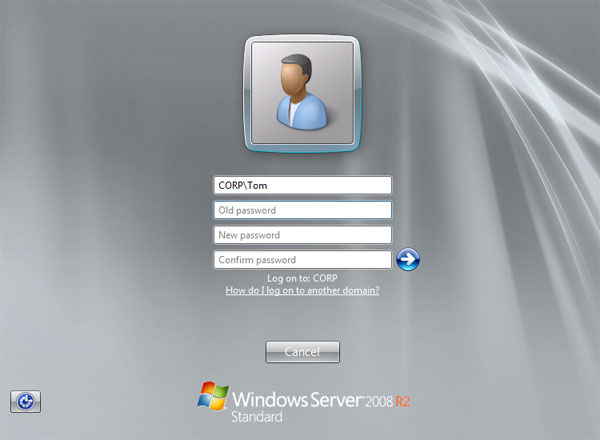
  3. You should then receive a message stating that you have successfully changed your password.

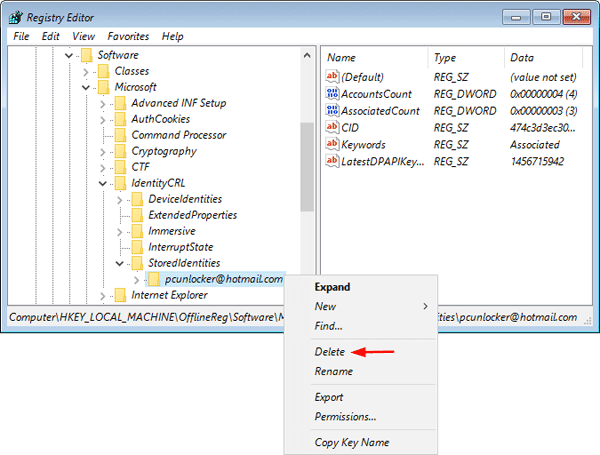
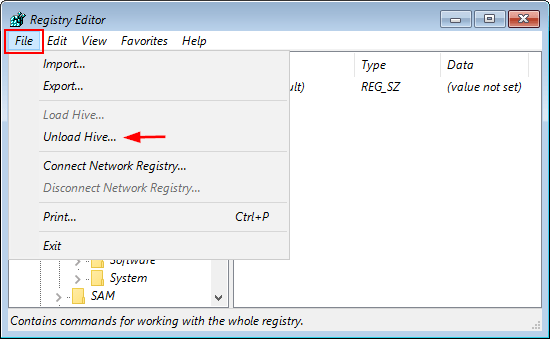
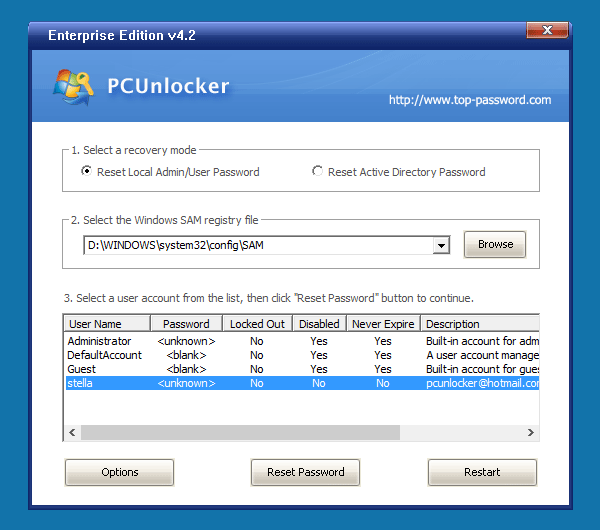
Method 4: Reset Domain Admin Password Using PCUnlocker

  1. Download PCUnlocker Enterprise (distributed as .zip format) and save it to your desktop. When the download is complete, right-click on the .zip file to extract it.
  2. After extracting, burn the PCUnlocker ISO file to your USB flash drive using ISO2Disc – an excellent utility that helps to create bootable CD/USB flash drive from ISO file.

  3. Next insert the USB flash drive into your Windows Server machine. Restart the server and enter into BIOS Setup: set the USB as first boot device. After booting from USB, it’ll take you to the PCUnlocker application.
  4. Switch the recovery mode to Reset Active Directory Password. The program will display your domain accounts stored in the Active Directory database. Choose an user and click Reset Password.

    pcunlocker

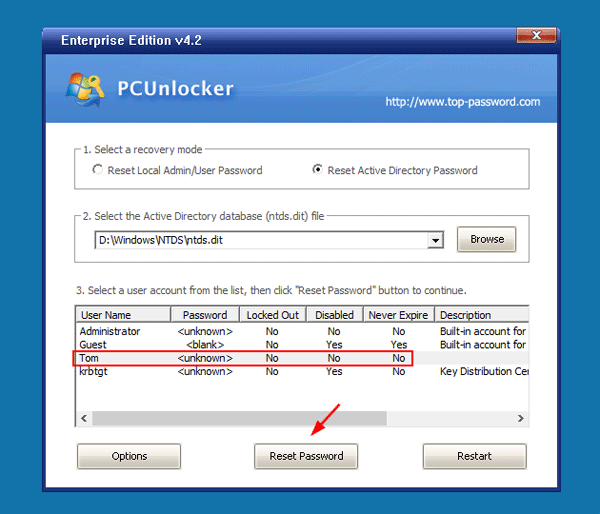
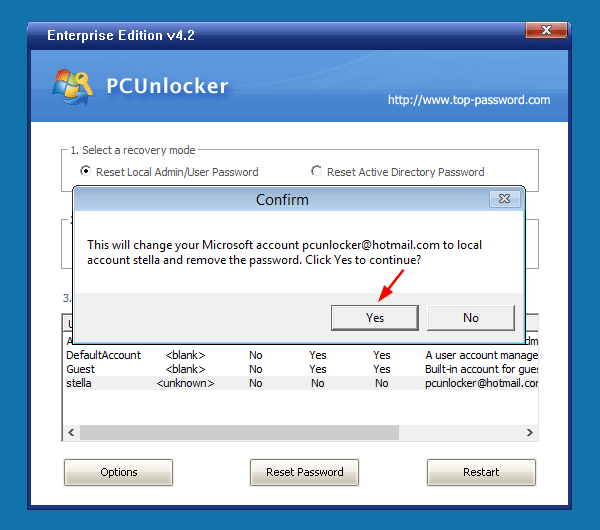
  5. Click Yes to confirm and your domain user password will be changed to Password123 immediately.

    reset-forgotten-domain-password

    Reboot the server without USB, you can then log in to Windows Server 2008 domain controller successfully. That’s it!

Recover Unbootable Windows 10 or 8 with Restore Point

September 7th, 2016 by Admin

What to do if your Windows computer has become corrupt, unusable or unstable? Most of the time, it’s very difficult to find out the exact cause of the problem and we’re suggested to roll back all recent changes to the operating system. In this tutorial we’ll show you how to recover unbootable Windows 10 or 8 system with your previously-created restore point.

How to Recover Unbootable Windows 10 or 8 with Restore Point?

When your computer is crashed, unbootable or it’s not working as you expected, you can use System Restore to restore your computer to the latest restore point. Follow these steps:

  1. Boot your computer with Windows 10/8 installation DVD. If you don’t have a install disc, you can use a working PC to download the ISO file from Microsoft and create a bootable USB drive for Windows Setup.
  2. Once booted to the Windows Setup screen, you’re prompted to select language and keyboard layout. Click Next.

    windows-setup

  3. Click Repair your computer at the bottom.

    repair-your-computer

  4. Select Troubleshoot from Choose an option screen.

    troubleshoot

  5. Click Advanced options.

    advanced-options

  6. Click System Restore.

    system-restore

  7. Click on the operating system you’re going to perform a system restore on.

    select-operating-system

  8. When the System Restore wizard opens, click Next.

    system-restore-wizard

  9. You’ll be presented with a list of previously created restore points. Select the restore point you want to restore to and click Next.

    select-restore-point

  10. Confirm the restore point and click Finish.

    review-restore-steps

  11. A dialog box will pop up to ensure you really want to perform a system restore. It can’t be undone. If you’re sure, click Yes. This starts your system restore.

    confirm-system-restore

  12. Your PC will restart and begin the system restore process. This may take a few minutes to revert back to the selected restore point.

    restoring-files

  13. After successful restoration, you’ll have a message saying system restore completed successfully.

    system-restore-completed

    Click on Restart and your computer should boot successfully into Windows. You’ll still have all of your documents, but might be missing a couple of programs that you’ll just need to reinstall again.

4 Ways to Uninstall Updates in Windows 10

September 4th, 2016 by Admin

If you installed an update that is causing severe issues with your PC, you probably want to uninstall or remove it. So here we’ll show you 4 ways to remove & uninstall updates in Windows 10.

Method 1: Uninstall Windows 10 Updates from Control Panel

  1. Open the Control Panel in Large icons view, and then click Programs and Features.

    programs-and-features

  2. Click View installed updates in the left pane.

    view-installed-updates

  3. This displays all updates installed on the system. Select the update that you want to remove, and then click Uninstall.

    uninstall-windows-updates

Method 2: Uninstall Windows 10 Updates from Settings

  1. Open Settings app by pressing the Windows key + I hotkey, or clicking Settings from the Start Menu.
  2. Click Update and security.

    update-security

  3. Click Windows Update on the left side, and click on the Advanced options link on the right side.

    advanced-update-options

  4. Click the View your update history link to see all updates installed on your Windows 10 PC.

    view-update-history

  5. Click the Uninstall updates link.

    uninstall-updates

  6. This opens the Installed Updates window of Control Panel. Locate the problematic update and click Uninstall.

    uninstall-windows-updates

Method 3: Uninstall Windows 10 Updates Using Command Prompt

  1. Open an elevated Command Prompt by pressing WIN + X keys and select “Command Prompt (Admin)” from the Quick Access menu.
  2. At the Command Prompt, type the following command to view all installed updates:
    wmic qfe list brief /format:table

    view-updates-via-cmd

  3. To uninstall an update, you can use WUSA (a built-in Windows utility for managing Windows updates). For example, to uninstall the update KB3172729, you can type this command line and press Enter.
    wusa /uninstall /kb:3172729

    uninstall-update-via-cmd

  4. When you see the Windows Update Standalone Installer dialog box, click Yes to confirm and it will uninstall your selected update.

    333

Method 4: Uninstall Windows 10 Updates Using a Batch File

If you want to uninstall multiple updates silently, you can create a batch script (.bat) to run the WUSA commands in the background, by adding /quiet and /norestart option. Change the KB number as needed.

@echo off
wusa /uninstall /kb:3172729 /quiet /norestart
wusa /uninstall /kb:3074686 /quiet /norestart
END

This will run the uninstall without any open windows, and will not prompt for a reboot. After all updates have been removed, you can restart the system manually, or set your computer to reboot automatically by adding the shutdown -r command to the end of the batch file.

Revert Windows 10 Updates by Going Back to Previous Build

September 2nd, 2016 by Admin

Windows 10 keeps freezing after installing the Anniversary Update? Just upgrade from Windows 7 to Windows 10 and the login screen doesn’t accept your original password? If you face new issues with your PC’s hardware or software, you can roll back to a previous build of Windows. This tutorial will show you how to revert Windows 10 updates and go back to previous build from Windows 10 login screen.

How to Revert Windows 10 Updates by Going Back to Previous Build?

From Windows 10 sign-in screen, click on the Power button at the bottom right. Hold down the SHIFT key and select the Restart option.

windows-10-login

When the blue Choose an option screen appears, click Troubleshoot.

troubleshoot

At the Troubleshoot screen, click Advanced options.

advanced-options

Click Go back to the previous build.

go-back-to-previous-build

Select the Administrator account that you use and know the password of.

choose-an-account

Enter the password for the selected account and then click Continue.

enter-password-for-this-account

Click on Go back to previous build.

restore-previous-build

The computer begins restoring your previous build of Windows. The roll-back process can take as short as a few minutes to about half an hour depending on the speed of your computer.

roll-back-to-previous-build

When it’s done, you can check the build number of Windows by pressing the Windows key + R and typing winver in the Run box. In my example, the build number changed from 10.0.14393 to 10.0.10240.

windows-build-number

Note that once rolled back, you might have to reinstall some apps, and some of the settings may also be lost.

Fix Operating System Not Found When Booting Windows 10 / 8

August 19th, 2016 by Admin

While booting Windows 10 or 8 computer, you might receive the following error message:

“Operating system not found. Reboot and select proper boot device.”

This issue can be caused by various reasons, such as MBR (Master Boot Record) or DBR (DOS Boot Record) is damaged, the BCD (Boot Configuration Database) is corrupt, or your system partition is not active. In this tutorial we’ll guide you how to troubleshoot the problem of operating system not found / missing in Windows 10 or 8.

Solution 1: Enable / Disable UEFI Secure Boot

Most Windows 10/8 computers come with UEFI firmware and Secure Boot enabled. The operating system installed on a GPT partition can only be booted in UEFI mode. If you configure a UEFI system to boot in Legacy mode, you’ll get the error message that saying operating system is missing or not found. If you installed Windows 10/8 on a MBR disk, it also cannot boot in UEFI mode.

When you get the error message “Operating system not found or missing” during boot, try to change the boot mode from Legacy to UEFI, or turn off UEFI and Seure Boot, it might fix your problem. To learn more about how to change the boot mode, please check these articles:

Solution 2: Fix MBR/DBR/BCD

To fix the corrupted MBR, DBR or BCD, you just need your Windows installation DVD. Follow these steps:

  1. Start your problematic PC, insert your Windows DVD and hit a key when you are asked to to boot from DVD. It is possible that you have to change the boot order in your BIOS to boot from DVD.
  2. After a few minutes, you’ll see the Windows Setup screen for specifying your keyboard and language settings, just click Next.

    windows-setup

  3. On the next screen, click “Repair your computer” in the lower left.

    repair-windows-10

  4. When the Choose an option screen appears. Click Troubleshoot.

    troubleshoot

  5. Click Advanced options.

    advanced-options

  6. Click Command Prompt in the Advanced options screen.

    command-prompt

  7. At the Command Prompt, enter the following commands one after the other and hit Enter after each:
    bootrec.exe /fixmbr
    bootrec.exe /fixboot
    bootrec.exe /rebuildbcd

    fix-os-not-found

  8. Reboot your computer. This should hopefully make your problem go away!

Solution 3: Mark Windows Partition Active

When the computer is turned on, the BIOS will look for an active partition to boot. If your system partition is not marked as active, you’ll also receive the error message “Operating system not found or missing”. Here’s how to make your Windows partition as active:

  1. Boot your computer from Windows installation DVD. Open the Command Prompt again by the above method.
  2. At the Command Prompt, type diskpart and press Enter. Then type list disk. You will see the list of disk currently attached to your computer. Now type in select disk n, where n is the disk number. In my example, I would type select disk 0.

    diskpart

  3. Now type list volume to get a list of all the partitions on your selected disk. Find the partition where your Windows is installed and type select volume n, where n is number of your Windows partition.

    list-volume

  4. To mark your selected partition as active, just type active and press Enter.

    mark-volume-active

  5. Close the Command Prompt and reboot your computer. Hopefully your problem has been resolved now!

2 Ways to Set Windows 10 PC to Never Sleep

August 12th, 2016 by Admin

It could be quite annoying if your computer goes to sleep at all the wrong times or if you have trouble coming out of sleep state. In this tutorial we’ll show you 2 ways to put your computer to never sleep & disable sleep mode in Windows 10.

Method 1: Set Windows 10 PC to Never Sleep Using Control Panel

  1. Open the Control Panel in Windows 10. Change your view to either Large icons or Small icons. Look for and click on the Power Options.

    power-options

  2. This will bring you to a place where you can choose your power plan. From the left hand side of the window, select Change when the computer sleeps.

    change-when-pc-sleep

  3. From the drop down box next to Put the computer to sleep, select the amount of time you would like Windows 10 to wait before entering sleep state. If you want to stop Windows 10 from going to sleep, select Never from the list. From there, you can also see an option for making your computer never turn off monitor display.

    put-pc-never-to-sleep

  4. When done, click the Save changes button to exit.

Method 2: Set Windows 10 PC to Never Sleep Using Settings App

  1. To get started, open the Settings app by pressing Win + I keys together, or clicking on the Start button and selecting Settings.
  2. From the Settings window, click on System.

    settings

  3. Select Power & sleep on the left pane. Under the Sleep option, select Never from the drop-down list. You can also click the Screen drop-down list and then select Never if you want your PC to never turn off screen display.

    set-pc-never-to-sleep

  4. That’s it! Your PC will never go to sleep mode again.

6 Ways to Open Registry Editor in Windows 10

August 9th, 2016 by Admin

Most PC troubleshooting tasks can be done by tweaking the registry settings. To access Windows registry, you need to open the built-in tool – Registry Editor. In this tutorial we’ll show you 6 common ways to open Registry Editor in Windows 10.

Method 1: Open Registry Editor via Run

Press the Windows key + R to open the Run box. Type regedit and press Enter.

regedit-via-run

This should be the simplest and quickest way to open Registry Editor in all versions of Windows.

Method 2: Open Registry Editor Using Command Prompt

Press Win + X keys. Choose Command Prompt (Admin) from the given options.

command-prompt-admin

Type regedit at the Command Prompt and press Enter. It will launch Registry Editor immediately.

regedit-via-cmd

Method 3: Open Registry Editor Using Cortana Search

Click inside the Cortana Search box from the taskbar, type regedit and press Enter.

regedit-via-search

Click regedit from the search result.

Method 4: Open Registry Editor Using PowerShell

Open Windows PowerShell. This can be done by pressing Win + R keys to open Run and then type powershell in the box given.

regedit-via-powershell

Type regedit and press Enter. Click Yes when the UAC confirmation box is displayed.

Method 5: Open Registry Editor via File Explorer

Open File Explorer in Windows 10. Browse to the system32 folder: C:\Windows\System32.

right-click-regedit

Locate the regedt32.exe file. Right-click on it and select Run as administrator.

Method 6: Open Registry Editor By Creating Desktop Shortcut

If you need to access Registry Editor frequently, you can create a desktop shortcut for quick access. Follow these steps:

  1. Right-click on any empty area of your desktop, select New -> Shortcut.

    create-desktop-shortcut

  2. This will open the Create Shortcut wizard. It will ask you the location of the item you want to create a shortcut for. Type %windir%\regedit.exe and click Next.

    regedit-shortcut

  3. Give your shortcut any name you prefer and click Finish.

    type-name-for-shortcut

  4. You’ll see the shortcut on the desktop. Double-click on it and you can open Registry Editor quickly.

How to Edit Offline Windows Registry from WinPE

August 7th, 2016 by Admin

When your computer no longer boots up or you’re unable to login to Windows, a registry hack might fix your problem. To access the registry for an unbootable Windows installation, you should use a WinPE bootdisk. In this tutorial we’ll walk you through the steps to load / edit offline registry hive from WinPE.

Before get started, we need to know the locations of Windows registry hives:

HKEY_LOCAL_MACHINE\SYSTEM: %windir%\system32\config\SYSTEM
HKEY_LOCAL_MACHINE\SAM: %windir%\system32\config\SAM
HKEY_LOCAL_MACHINE\SECURITY: %windir%\system32\config\SECURITY
HKEY_LOCAL_MACHINE\SOFTWARE: %windir%\system32\config\SOFTWARE
HKEY_USERS\.DEFAULT: %windir%\system32\config\DEFAULT

How to Edit Offline Windows Registry from WinPE?

  1. Boot your computer into WinPE. Open a Command Prompt and run regedit.exe to open the Registry Editor.

    command-prompt-from-winpe

  2. In the left pane of Registry Editor, highlight the HKEY_LOCAL_MACHINE hive (or HKEY_USERS).

    highlight-registry-key

  3. Click the File menu and select Load Hive.

    load-hive

  4. Browse to your Windows partition and select the registry hive which you wish to load. In my example, the registry hives are located in the directory D:\Windows\System32\Config.

    select-registry-hive

  5. Type a key name whatever you like (e.g. “OfflineReg“) and click OK. The name will be used to create a new node in the tree so one can browser the offline registry.

    enter-key-name-for-loading

  6. Now under the HKEY_LOCAL_MACHINE key, you should see a new key named after the name you typed previously.

    offline-registry

  7. Expand the new key, browse to the desired key or value for editing. In my example, I browse to OfflineReg\Software\Microsoft\IdentityCRL\StoredIdentities and delete its subkey.

    modify-offline-registry

  8. When you finish with the modifications, highlight the key you created previously (e.g. “OfflineReg“). Click the File menu and select Unload Hive.

    unload-hive

  9. This will unload the hive and all changes made will be saved to the offline registry.

How to Change Default Location for Outlook Data File (PST & OST)

August 2nd, 2016 by Admin

Is there a way to change the default location of new .pst file when create a new e-mail account in Outlook? Different versions of Outlook use different default locations to store pst files. In this tutorial we’ll show you how to change default location for Outlook .PST & .OST data file using a registry trick. It works with all versions of Outlook, including Outlook 2016 / 2013 / 2010 / 2007 / 2003.

How to Change Default Location for Outlook PST/OST File?

  1. Press the Win + R keys in a meanwhile to open the Run box. Type regedit and click OK.

    regedit

  2. When the Registry Editor launches, navigate to one of the following keys, depend on your Outlook version:

    • Outlook 2016:
      HKEY_CURRENT_USER\Software\Microsoft\Office\16.0\Outlook
    • Outlook 2013:
      HKEY_CURRENT_USER\Software\Microsoft\Office\15.0\Outlook
    • Outlook 2010:
      HKEY_CURRENT_USER\Software\Microsoft\Office\14.0\Outlook
    • Outlook 2007:
      HKEY_CURRENT_USER\Software\Microsoft\Office\12.0\Outlook
  3. At the right-side pane, right-click on any blank area and select New -> Expandable String Value.

    new-expandable-string

  4. Name the newly created value as ForcePSTPath, then double-click on it. On the Edit String dialog, enter the new default location where you wish to store the PST file for Outlook new profile, and click OK.

    ForcePSTPath

    Note: To change the default location folder of .ost files generated by exchange accounts, you can create an expandable string value and name it as ForceOSTPath.

    ForceOSTPath

  5. Close the Registry Editor and restart Microsoft Outlook application. From now on, when you set up a new email account, Outlook will automatically create a new PST file in the new default location.

This method won’t affect the location of existing .pst files. If you want to change the location of existing pst file, follow these steps:

  1. Exit the Outlook application. Locate your .pst file in Windows Explorer and move it to a new location.

    outlook-pst-location

  2. Restart Outlook. An error dialog box appears that notifies you that an Outlook Data File (.pst) could not be found. Click OK.

    pst-file-cannot-be-found

  3. It will open the Create/Open Outlook Data File dialog box. Browse to the new location, select the Outlook Data File (.pst) that you moved, and then click Open.

    open-outlook-data-file

  4. When you see a warning message, just ignore it by clicking OK. Now you’ve successfully moved your existing pst file to a new location.

    cannot-open-default-pst