Archive for the ‘Others’ category

4 Ways to Start Internet Explorer in Windows 10

June 27th, 2016 by Admin

Despite Microsoft Edge becomes the new default browser in Windows 10, Microsoft has not removed Internet Explorer from the latest operating system. But you’ll find a bit difficult to locate and run Internet Explorer. In this article we’ll show you 4 ways to start Internet Explorer in Windows 10.

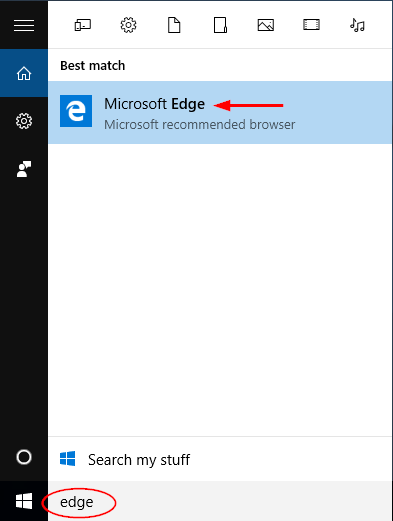
Method 1: Start Internet Explorer Using Cortana Search

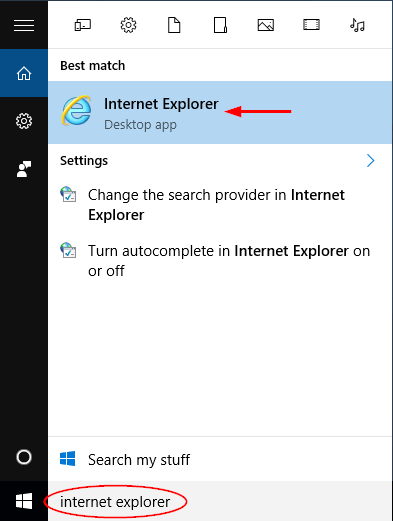
Click into the Cortana Search box on the taskbar, type internet explorer and press Enter. You can access Internet Explorer from the search result.

open-ie-via-cortana

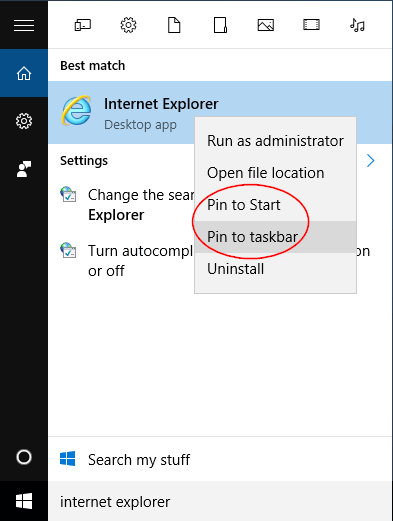
If you want to open Internet Explorer frequently, right-click on the Internet Explorer from the list and you can pin it to the taskbar or the Start screen.

pin-internet-explorer

Method 2: Start Internet Explorer from Start Menu

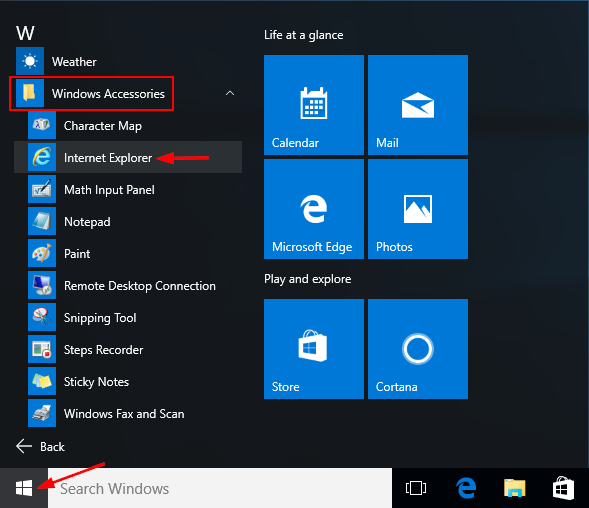
Click the Start button. When Start Menu appears, click All apps, then expand Windows Accessories and click Internet Explorer.

open-ie-via-start-menu

Method 3: Start Internet Explorer Using Run Box

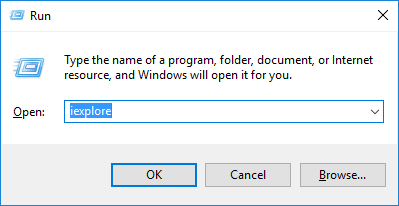
Press the Windows key + R to open the Run box. Type iexplore and press Enter. This will open Internet Explorer quickly.

iexplore

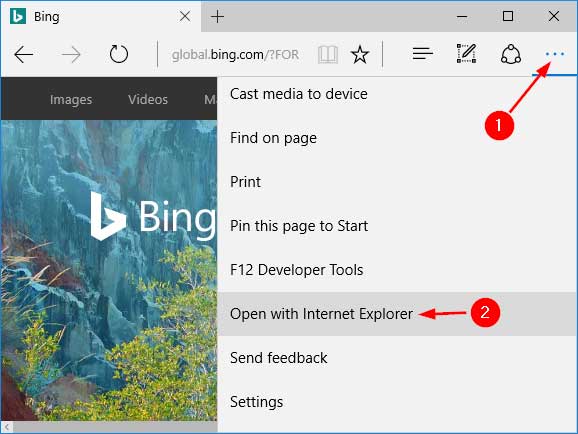
Method 4: Start Internet Explorer from Microsoft Edge

Open Microsoft Edge and navigate to the desired webpage. Click the three dots button at the top-right corner of the Microsoft Edge window, and then select Open with Internet Explorer.

open-ie-from-edge

4 Ways to Open Microsoft Edge in Windows 10

June 27th, 2016 by Admin

Microsoft Edge is the new default web browser in Windows 10. It’s clean, fast, and more intuitive than Internet Explorer. In this article we’ll show you 4 ways to open Microsoft Edge in Windows 10.

Method 1: Open Microsoft Edge from Taskbar

By default, the Microsoft Edge shortcut is pinned to Windows taskbar. Just click the Microsoft Edge icon and you can launch Edge browser immediately.

open-edge-via-taskbar

Method 2: Open Microsoft Edge from Start Menu

Click on the Start button, then click the Microsoft Edge tile shown at the right panel of the Start Menu.

open-edge

If Microsoft Edge is not shown there, click the All apps entry on the left side of Start Menu. Scroll down to select Microsoft Edge.

open-edge-via-start-menu

Method 3: Open Microsoft Edge Using Cortana Search

Click the Cortana Search box on the Windows 10 taskbar. Type edge and you can access Microsoft Edge from the search results.

open-edge-via-cortana

Method 4 Open Microsoft Edge from Run or Command Prompt

Press the Windows key + R to open the Run box. Type microsoft-edge: and press Enter. This will launch Microsoft Edge instantly.

open-edge-via-run

If you’re at the Command Prompt or PowerShell, just type start microsoft-edge: and press Enter.

If you want to open URL in Microsoft Edge from Command Prompt, type the following command and press Enter:
start microsoft-edge:http://www.top-password.com

open-edge-via-cmd

This will automatically open Edge with your desired website.

Difference Between Sleep and Hibernate in Windows 10 / 8 / 7

June 24th, 2016 by Admin

It’s a good idea to put Windows in the energy-saving mode (Sleep or Hibernate) when you’re away from your computer. However, most of users don’t know the exact differences between Sleep mode and Hibernate mode. In this article we’ll try to explain the differences in detail.

hibernate-vs-sleep

Sleep:

Sleep mode (also known as Standby mode) is useful when you’re going to be away for a short period of time. It’s similar like pausing a DVD movie, all your running programs are suspended. The computer immediately stops most system operations and your open documents and applications are put in the RAM. Power is cut from all components apart from RAM: the display, the hard drive, and ports.

However, the power must NOT be cut off while your PC is in Sleep mode, and must be continue to supply to the computer. A power outage would cause all data that aren’t saved to hard disk to be lost.

When you wake the computer up, all processes and programs resume working within seconds. This is because your computer is still on and all your data is still kept in the computer’s memory.

Hibernate:

Hibernate mode will take everything you have running on RAM (including open documents and apps) and saves it to a special file (C:\hiberfil.sys) on your hard drive, and then turn off your computer completely. That means it consumes almost no power, but it takes a bit more time to wake up than Sleep mode.

When you wake your computer from hibernation, the system will load everything saved in the hiberfil.sys file and all programs you had open will reopen in the same state you left them.

Hibernation is ideal for users who would be away from the computer for an extended period, especially when you have to cut off the power to travel but want to continue working from where you left off, without having to open your programs and documents again.

The downside of Hibernate is that it will take up a huge amount of disk space because it saves the full memory of the RAM into hard drive, you can see a gigantic hiberfil.sys file sitting in the root of your system drive.

hiberfil_sys

Conclusion

Now you should have found out the main differences between Sleep mode and Hibernate mode. It’s up to you to decide which option is best for you to save power for your computer.

Add Missing Hibernate Option to Windows 10 Start Menu

June 24th, 2016 by Admin

In Windows 10, Hibernate mode is disabled by default. When you click the Start button, only Shut down, Restart and Sleep options are shown in the Power Options menu. In this tutorial we’ll show you 2 methods to add the missing Hibernate option to the Start Menu and Power User menu in Windows 10.

hibernate-in-power-options

Before getting started, make sure you have enabled Hibernate mode in Windows 10. If Hibernate mode is disabled, the following methods still couldn’t bring the Hibernate option back to the Start Menu.

Method 1: Add Hibernate Option to Start Menu from Control Panel

  1. Open the Control Panel in Large icons view. Click Power Options.

    control-panel

  2. Select “Choose what the power buttons do” from the left side of the window.

    power-options

  3. This will open the System Settings window, where many options are greyed out. You have to click “Change settings that are currently unavailable“.

    power-system-settings

  4. Scroll to the bottom of the window, until you find the Shutdown settings section. Now check the Hibernate checkbox and click Save changes.

    add-hibernate-to-power-options

  5. Now open the Start Menu and click Power, you can see the Hibernate option in the Power menu, next to Shut down, Sleep or Restart. You can also access the Hibernate option by pressing the Windows + X (or right click on the Start button) and selecting Shut down or sign out.

Method 2: Add Hibernate Option to Start Menu Using Group Policy

  1. Press the Windows logo key + R to open the Run box. Type gpedit.msc and press Enter.

    gpedit

  2. This will open the Local Group Policy Editor. Navigate to:
    Computer Configuration -> Administrative Templates -> Windows Components -> File Explorer
  3. Double-click on the “Show hibernate in the power options menu” policy on the right panel, and set it to Enabled.

    show-hibernate-in-power-options

  4. Close Group Policy Editor and you’ll see the Hibernate option back in the Power Options menu of Windows 10 Start Menu.

2 Ways to Turn On / Off Airplane Mode in Windows 10

June 23rd, 2016 by Admin

Airplane mode (also known as flight mode) allows you to turn off all wireless communications (Wi-Fi, Bluetooth, GPS) on your PC. During a flight, you’ll be requested to turn off your computer or switch to Airplane mode to prevent any any possible interference with the airplane’s communication and navigation systems. In this tutorial we’ll show you 2 simple ways to turn on or off Airplane mode in Windows 10.

Method 1: Turn on / off Airplane mode from Action Center

Press Windows + A on your keyboard, or click on the Action Center icon (square box with three lines) from the system tray.

action-center

Expand the Quick actions section. If the Airplane mode icon is darker than the other icons, airplane mode is disabled. Click on the Airplane mode button to turn it on or off.

Method 2: Turn on / oOff Airplane mode from the Settings app

Click the Start button and select Settings, or press Windows + I on your keyboard. Once the Settings app is launched, click on Network and Internet.

network-internet

Click on Airplane mode on the left side, and you can then turn on or off Airplane mode on the right side.

airplane-mode

VMware Fix: Windows cannot find the Microsoft Software License Terms

June 20th, 2016 by Admin

Today I am trying to set up a Windows Server 2012 virtual machine in VMware Workstation 12, but keep getting the error message “Windows cannot find the Microsoft Software License Terms. Make sure the installation sources are valid and restart the installation.

cannot-find-ms-license-term

Firstly I doubt if the Windows ISO file is corrupt and download it again from Microsoft’s website, but the problem still exists. So I think the problem lies in the VMware Workstation and eventually find a solution. Here’s how:

  1. During the setup of the New Virtual Machine Wizard, select “I will install the operating system later” instead of using the Installer disc image file.

    new-vm-wizard

  2. When completing the wizard, go to VM -> Settings -> CD/DVD -> Use ISO image file, and then choose Windows installation ISO file. Boot your virtual machine and you should be able to install Windows smoothly.

    windows-setup

This problem also happens with VMware Fusion, Hyper-V, Parallels, VirtualBox. If the solution above doesn’t work for you, please try to increase the RAM for your virtual machine. Good luck!

2 Ways to Block Users from Deleting Browsing History in Internet Explorer

June 16th, 2016 by Admin

How to prevent others from deleting browsing history in your browser? There are situations where you need to share your computer with your friends or family members but you want to restrict them from deleting your saved logins and cookies. In this tutorial we’ll show you 2 simple ways to block users from deleting browsing history in Internet Explorer.

Method 1: Prevent Access to Delete Browsing History Using Group Policy

  1. Press the Windows key + R to open the Run box. Type gpedit.msc and press Enter.
  2. This should open the Local Group Policy Editor. Navigate to the following location:
    Computer Configuration\Administrative Templates\Windows Components\Internet Explorer\Delete Browsing History
  3. In the right pane, double-click on “Prevent access to Delete Browsing History” to open its settings box. Select Enabled and click Apply / OK.

    prevent-delete-browsing-history

  4. Reboot your computer. When you open the Internet Options of Internet Explorer, you’ll find the button for deleting browsing history is greyed out.

    unable-delete-ie-history

Method 2: Prevent Users from Deleting Browsing History Using Registry Editor

If Local Group Policy Editor is not accessible in your computer, you can also use the following registry trick to block users from deleting browsing history in Internet Explorer.

  1. Press the Windows key + R to open the Run box. Type regedit and press Enter.
  2. When you see the Registry Editor window, navigate to the following key:
    HKEY_LOCAL_MACHINE\Software\Policies\Microsoft\Internet Explorer\Control Panel

    If both the Internet Explorer key and the Control Panel key don’t exist, you need to create them firstly.

  3. Now in right side pane, right-click the empty space to create a new DWORD (32-bit) value named DisableDeleteBrowsingHistory and set its value to 1.

    disable-delete-browsing-history

  4. Close Registry Editor and re-open Internet Explorer. Now users will not be able to access the option for deleting browsing history in Internet Explorer. That’s it!

How to Delete File Explorer Address Bar History in Windows 11 / 10 / 8 / 7

June 15th, 2016 by Admin

While typing a path in the address bar of File Explorer, Windows will display a history of all previous locations you’ve typed. You can also view the address bar history by clicking the down arrow icon placed on the right end of the address bar.

address-bar-history

In this tutorial we’ll show you 2 ways to delete File Explorer address bar history in Windows 11, 10, 8 and 7.

Method 1: Delete Address Bar History by Right-clicking Address Bar

After opening File Explorer (or Windows Explorer), right-click on the address bar and select the “Delete history” option.

delete-address-bar-history

This will clear all address bar history from File Explorer. Now, if you click the down arrow button in the address bar, you’ll see all history has been cleared.

address-bar-history-cleared

Method 2: Delete Address Bar History from Folder Options

From File Explorer (or Windows Explorer), select the View tab and then click on Options.

file-explorer-options

Once the Folder Options window has been opened, click the Clear button to delete all the File Explorer history. This action clears the File Explorer address bar history and the recent files and folders in quick access.

folder-options

8 Ways to Open Device Manager in Windows 10

June 13th, 2016 by Admin

Device Manager is the built-in tool in Windows that allows you to view and manage hardware, update device drivers and troubleshoot any problematic devices. In this article we’ll walk you through the different methods to open Device Manager in Windows 10.

Method 1: Open Device Manager from Computer Management

Open Computer Management by right-clicking This PC (or My Computer) shortcut on the desktop, and then select Manage.

device-manager

Expand System Tools in the left pane and you can then access Device Manager.

Method 2: Open Device Manager Using Run

The easiest way to open the Device Manager on earlier versions of Windows is by pressing Windows Key + R, typing devmgmt.msc in the Run box, and pressing Enter.

devmgmt

Method 3: Open Device Manager from WinX Menu

Press the Windows key + X to bring up the WinX menu (or right-click on the Start button). Select Device Manager from the menu.

open-device-manager-via-winx

Method 4: Open Device Manager Using Cortana Search

Click the Cortana search box on Windows 10 taskbar, type device manager and press Enter. (If you’re running Windows 7, type device manager in the Start menu Search box, and then press Enter.)

open-device-manager-via-cortana

Click Device Manager from the search results.

Method 5: Open Device Manager from Control Panel

Open Control Panel. Type device manager in the top-right search box and click Device Manager in the results.

control-panel

Method 6: Open Device Manager from Settings Charm

Press the Windows key + I to open the Settings charm in Windows 10 (In Windows 8/8.1, you can access the Settings charm by swiping in from the right edge of the screen).

open-device-manager-via-settings

Type device manager in the top-right search box and press Enter, and you can then access Device Manager from the search results.

Method 7: Open Device Manager Using Command Prompt

Open Command Prompt. Type devmgmt.msc and press Enter.

open-device-manager-via-cmd

The Device Manager will launch immediately.

Method 8: Create A Shortcut to Open Device Manager

If you need to access Device Manager frequently, you can create a shortcut on your desktop for quick access. Follow these steps:

  1. Right-click in the empty space of your desktop, select New -> Shortcut.

    create-desktop-shortcut

  2. Copy and paste devmgmt.msc in the location field and click Next.

    shortcut-for-devmgmt

  3. You will be asked to name the shortcut, just type Device Manager or anything you want and click on the Finish button.

    shortcut-name

3 Ways to Disable Registry Editor in Windows 11, 10, 8 and 7

June 12th, 2016 by Admin

Making improper changes to the Registry can cause Windows to become unusable or unbootable. To prevent, restrict or block anyone from accessing Registry Editor in Windows 11, 10, 8 and 7, you can disable Registry Editor using group policy, registry trick or third-party software.

Method 1: Disable Registry Editor Using Group Policy

  1. Press the Windows key + R to bring up the Run box. Type gpedit.msc and press Enter.

    gpedit

  2. When Group Policy Editor opens, navigate to User Configuration > Administrative Templates > System. Double-click on Prevent access to registry editing tools on the right panel.

    prevent-access-to-regedit

  3. Select the radio button next to Enabled, click Apply and then OK, then close out of Group Policy Editor and reboot your computer.

    prevent-access-registry-edit

  4. When a user tries to access Registry Editor, they will get an error message saying “Registry editing has been disabled by your administrator“.

    registry-editing-disabled

This method will prevent all users from accessing Registry Editor, including yourself. To regain access to Registry Editor, you have to open Group Policy Editor again, and change the policy to Disabled or Not Configured.

Method 2: Disable Registry Editor Using Registry Trick

  1. Press the Windows key + R to bring up the Run box. Type regedit and press Enter.
  2. When Registry Editor opens, navigate to:
    HKEY_CURRENT_USER > SOFTWARE > Microsoft > Windows > CurrentVersion > Policies > System

    If the System key doesn’t exist, you need to create it.

  3. In the right pane, right-click on any empty space and select New > DWORD (32-bit) Value. Name it DisableRegistryTools and set its value to 1.

    disable-registry-tools

  4. When you try to access Registry Editor, you’ll also get the same error message “Registry editing has been disabled by your administrator“.

This method will prevent your current user from accessing Registry Editor. To regain access, you have to log on as another administrator account and delete the registry value DisableRegistryTools.

Method 3: Disable Registry Editor Using Third Party Software

Using Protect My Folders you can lock & protect Registry Editor with a password. Anyone can’t access Registry Editor without knowing your password.

  1. Download and install Protect My Folders program on your computer. The first time you launch this program it will prompt your to set a password. Don’t forgot it as you’ll need it next time you run it.
  2. When Protect My Folders starts, click on Add/Lock button.

    protect-my-folders

  3. The File/Folder selection dialog should open, choose the C:\Windows\regedit.exe file and click Add, next click OK.

    select-regedit

  4. Now you’ll see the regedit application is locked. Close Protect My Folders program.

    lock-registry-editor

  5. When you try to access Registry Editor, you’ll receive the following error message:

    cannot-find-regedit

This method will block all users from accessing Registry Editor. To regain access you have to relaunch Protect My Folders, enter your password and unlock the regedit.exe app.