Archive for the ‘Others’ category

How to Upgrade to Windows 10 without Using Windows Update

November 18th, 2015 by Admin

Windows 10 is available to public as a free upgrade to every qualified computers running a genuine copy of Windows 8.1, 8 or 7. (Enterprise editions do not qualify.) Just download the official Media Creation Tool from Microsoft and it allows you to upgrade to Windows 10 as well as create installation media such as bootable USB or DVD drive. This tutorial will show you how to upgrade your current or another computer to Windows 10 directly without using Windows Update.

How to Upgrade Your Computer to Windows 10?

Head over to Microsoft’s website to download the 32-bit or 64-bit version of Media Creation Tool. Pick the 64-bit version if you want to run Media Creation Tool on Windows 8 or 7 64-bit OS. Otherwise opt for the 32-bit version.

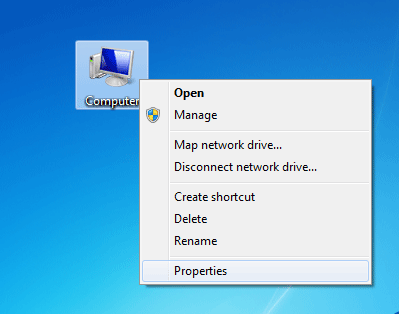
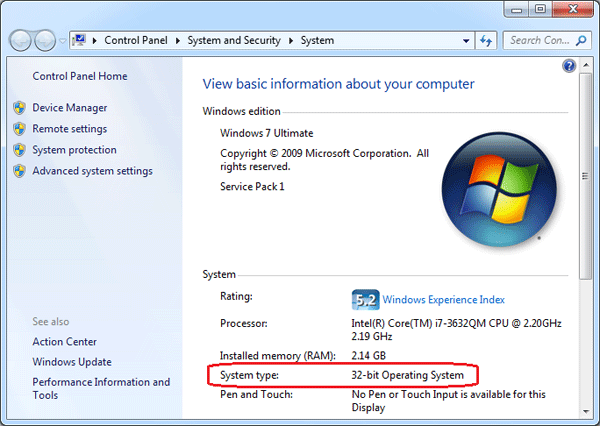
If you don’t know whether you’re running Windows 32-bit or 64-bit, right-click on “My Computer” or “This PC” icon on your desktop and select Properties, the field labeled System Type will indicate if you are using a 32-bit or 64-bit OS.

system-type

Run the Media Creation Tool and follow the steps below to upgrade your current computer or another PC to Windows 10.

Option 1: Upgrade Current Computer to Windows 10

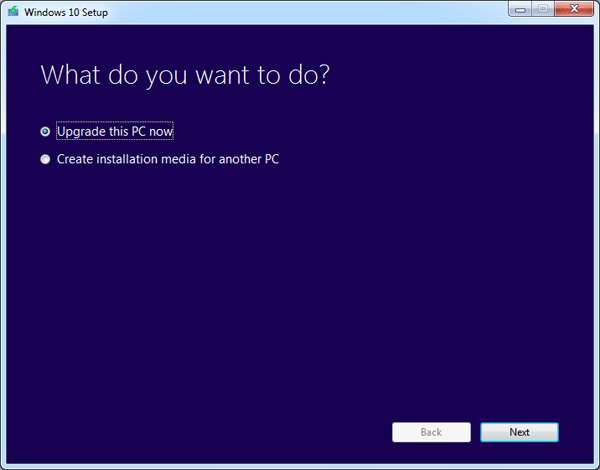
  1. Run the Media Creation Tool and then select the Upgrade this PC now option.

    upgrade-this-pc

  2. The Media Creation Tool will download Windows 10. When it’s done, accept the EULA, you’ll be presented with three options:
    • Keep personal files and apps
    • Keep personal files only
    • Nothing
  3. Select the first option to ensure your PC upgrades and you keep your files and applications. Windows 10 will start installing and after a few reboots and customization you’ll be upgraded.

Option 2: Upgrade Another Computer to Windows 10

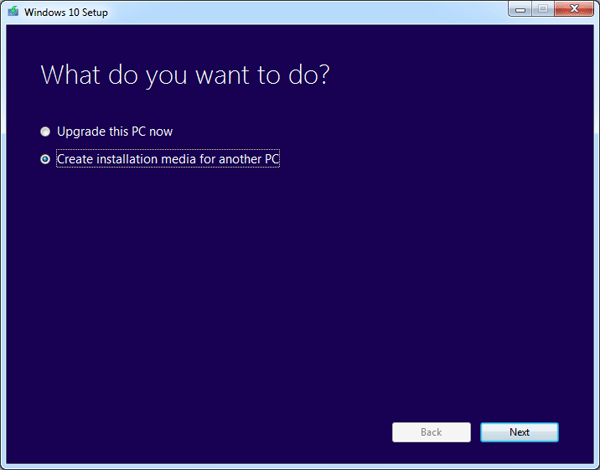
  1. Run the Media Creation Tool and then select the Create installation media for another PC option.

    create-installation-media

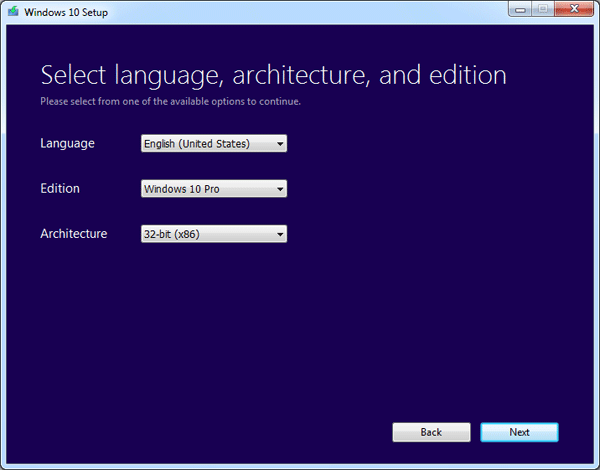
  2. Select the language, edition and architecture (32 or 64 bits) of Windows. Make sure your selections match those of the computer(s) you wish to upgrade. So, if you currently have Windows 8 Pro (32-bit), choose Windows 10 Pro 32-bit.

    select-os-edition

  3. Select USB flash drive. If you plan to burn this to DVD instead, select ISO file and, after the process is over, you’ll have to use a DVD burning program to write the ISO to disc.
  4. Click Finish when the process is complete. If you don’t plan to upgrade to Windows 10 right away, you can remove the drive and stop here.
  5. Insert the created CD or USB flash drive into the computer you want to upgrade, and then run setup.exe. Follow the on-screen instruction to complete the upgrade process. If the software asks you for a product key, you are using the wrong edition of Windows 10 to upgrade.

Auto Shutdown Windows 10 / 8 As You Expect

September 25th, 2015 by Admin

Sometimes you might want to schedule Windows to shutdown automatically after a specified amount of time. For example, let’s say you’re downloading a big file at night. You know it will take about one hour for it to be complete, but it’s too late and you must sleep now. You don’t want to leave your laptop running overnight.

Here I’ll show you 2 methods to set up auto shutdown in Windows 10 and 8, and instruct your computer to automatically shutdown after a given amount of time, or at a specified time.

Method 1: Auto Shutdown Windows 10/8 After a Certain Amount of Time

  1. Press the Windows key + X opens the Quick Access Menu. Click on Command Prompt (Admin).

    win+x-menu

  2. Using the shutdown command you can set your computer to automatically shutdown after the amount of time you specified. For example, if you want to shutdown computer exactly after 120 seconds, type the command as follow:
    shutdown /s /t 120

    auto-shutdown

  3. Once you execute the command above, the system will force close all running applications and shutdown after 2 minutes.

Method 2: Auto Shutdown Windows 10/8 At a Specified Time

But sometimes you might want to schedule your Windows computer to shutdown at a specified time. For example, if you have a habit of listening music on your laptop before bed, you might have the tendency to fall asleep but forgot to turn off your computer. To avoid this, you can configure your PC to shutdown automatically at midnight. Here’s how:

  1. You’ll need to open up Task Scheduler to create a schedule task. Press the Windows key + R and type taskschd.msc in the Run box.
  2. The Task Scheduler window will come up. Select Create Basic Task from the Actions panel on the right.

    task-scheduler

  3. Enter a meaningful name and description of the task you are going to create, and then click on Next.

    create-basic-task

  4. Select the radio button “Daily” and click on Next to continue.

    task-trigger

  5. Now enter the starting date and time. Also, make sure that you are choosing for the task to reoccur every day.

    when-to-start-task

  6. Select the radio button “Start a program” and click on Next.

    task-action

  7. Click on Browse button to locate shutdown.exe under the system folder c:\windows\system32. Enter /s as the application argument which forces your Windows computer to shut down.

    shutdown-task

  8. Go through the summary, and if everything is fine, click on Finish.

    finish-task-creating

    Now you have successfully configured the automatic shutdown at night.

Fix Boot Failure: a proper digital signature was not found

August 10th, 2015 by Admin

I have a Toshiba P850/02c with windows 8. This morning it did an automatic Windows configure update but then on restarting, I got the error message “Boot Failure: a proper digital signature was not found. One of the files on the select boot device was rejected by the Secure Boot feature.” and stuck on there. Now I am unable to boot to the desktop. How can I fix the issues?

boot-failure

This is probably due to the “Secure Boot” feature currently on all new Windows 8/8.1/10 computers. Secure Boot is a new feature that improves the security of Windows. To fix this boot failure, you have to disable the Secure Boot option in the UEFI firmware.

How to Disable Secure Boot?

To disable the Secure Boot option, you have to access to the UEFI setup.

In UEFI setup, try to find a menu labeled “Security” or “Security Settings.” Once you navigate to it, head straight down to “Secure Boot”. There’s a possibility that you might have a “Secure Boot” option immediately when you arrive at the security menu, so look out for that also. Once you see a “Secure Boot” option, disable it. Then reboot the PC to check if that fix the issue.

How to Decrypt BitLocker-Encrypted Drive from Command Line

July 30th, 2015 by Admin

If you still have admin access to your Windows computer, you can decrypt the BitLocker-encrypted drive easily from the Control Panel:

  1. After opening up the Control Panel, click the System and Security link.

  2. click on BitLocker Drive Encryption to launch the BitLocker configuration panel.

  3. Find the drive on which you want BitLocker Drive Encryption turned off, and click Turn off BitLocker.

  4. A message is displayed, informing you that the drive will be decrypted and that decryption may take some time. Click on Turn off BitLocker to begin the decryption process.

Sometimes things would get a bit tricky if your computer won’t start or you lost admin access to your Windows account. You might need to boot off your PC from a WinPE bootable disc and decrypt the hard drive through the command line utility – manage-bde. Here’s how:

  1. Open the Command Prompt as administrator.
  2. Type the following command to unlock your BitLocker drive with 48-digit recovery key:
    manage-bde -unlock D: -RecoveryPassword YOUR-BITLOCKER-RECOVERY-KEY-HERE

    If your BitLocker recovery key is stored in a file on an external drive, then use this command:
    manage-bde -unlock D: -RecoveryKey "PATH_OF_YOUR_BITLOCKER_RECOVERY_KEY_FILE"

    If you can remember your BitLocker user password, type the following command. After pressing Enter, you’ll be prompted to enter the user password.
    manage-bde -unlock D: -Password

  3. Next turn off BitLocker Encryption:
    manage-bde -off D:

  4. Now you have unlocked and disabled BitLocker.

Problem with Using Chntpw to Reset Password

July 29th, 2015 by Admin

I tried to reset the password of Windows 7 Using chntpw command in Ubuntu. The program appears to work exactly as expected, and doesn’t display any errors, and acts like it’s done everything properly when blanking or changing a password. However, when Windows is loaded, no change has been made – the password has not been blanked or changed.

Chntpw, also known as Offline NT Password & Registry Editor, is a free Linux tool that allows you to reset or edit Windows user passwords stored in the SAM database. Here are a list of problems you might experienced when using chntpw to reset a lost Windows password:

  • Chntpw boots for a short while and ends up in a kernel panic “Kernel panic – not syncing: Attempted to kill init! And then it stops booting.
  • Failed to blank or change password. Chntpw said successfully clear the password. But when you try to login from Windows it does not seem to be changed.
  • Unable to mount the hard drive that that contains the Windows registry hives. Get the mount issue “Windows is hibernated, refused to mount. NTFS: Yes, but hibernated.“, or crash with “VFS: Unable to mount root fs on unknown-block.
  • Chntpw: Unable to open/read a hive, exiting..
  • Chntpw hangs in a loop, or fail to boot even if your computer is configured with UEFI and Secure Boot.

What to do if chntpw doesn’t work on your computer? You can get around all these issues with the third-party Windows password bypass tool – PCUnlocker, or use the following methods:

2 Options to Add a User to Local Administrators Group

July 13th, 2015 by Admin

Only an administrator can perform the administration tasks such as installing a driver or an application. If you have an existing standard or limited account, you can grant it administrator privileges by adding it to the built-in Administrators group. Here are two options to add a user to the local Administrators group in Windows 10, 8, 7, Vista or XP.

Option 1: Computer Management

The easier way to add a user to the local Administrators group is to use the Computer Management app. Here’s how:

  1. To open the Computer Management, right-click on My Computer icon on your desktop and then select Manage. Another method is to press the Windows key + R to bring up the Run box, then type compmgmt.msc and hit Enter.
  2. When the Computer Management window opens, expand Local Users And Groups in the left pane, and click on Users (Please skip to the option 2 below if you don’t see Local Users and Groups.)

    local-users-and-groups

  3. Double-click your desired user account in the right hand side.
  4. In the User Properties window, click the Add button.

    account-properties

  5. In the Select Groups dialog, type the name of your administrators group. Click Check Names, and then click OK.

    select-groups

    If you don’t know the name of your administrator group, click Advanced and next click Find Now.

Option 2: Command Prompt

However, not every edition of Windows have the Local Users and Groups entry in the Computer Management (for example, Windows 8 Home and domain controller). This method will work on all editions of Windows.

  1. Open an elevated Command Prompt. In Windows 10 or 8, press the Windows key + X and then click “Command Prompt (Admin)“. In Windows 7 or Vista, go to Start > All Programs > Accessories, then right-click on Command Prompt shortcut and select “Run as Administrator“.
  2. To see a list of local groups available, just type:
    net localgroup
  3. You can add a user to the built-in Administrators group by running the following command:

    net localgroup Administrators [username] /add

    For example, add a user named test to the administrators group, we can run the below command.
    net localgroup Administrators test /add

    add-user-to-group

How to Show Hidden Files in Windows 11, 10, 8, 7 and Vista

July 1st, 2015 by Admin

One accidental deletion of a single system file can render your computer unusable. By default, Windows hides certain system files from view in Windows Explorer. This protects important files from being accidentally deleted, modified or altered.

But there are times when it’s necessary to view the hidden files and folders when coming to troubleshoot Windows problems. Here’s how to show hidden files in Windows 11, 10, 8, 7 and Vista.

How to Show Hidden Files in Windows 11, 10, 8, 7 and Vista?

  1. Open up a Windows Explorer window, choose Organize -> Folder and search options.

    win7-folder-options

    In Windows 10 or 8, click on the View tab at the top of Windows Explorer, and then click Options.

    win8-folder-options

    In Windows 11, open File Explorer and click on the See more button (three dots) on the right side of the toolbar, and then select Options.

  2. From the opened Folder Options box, go to View tab.
  3. Under the Advanced settings section, click to select “Show hidden files, folders, and drives” radio button. If you are trying to get into the Windows directories, you might want to also remove the checkbox from “Hide protected operating system files (Recommended)” as well.

    show-hiden-files

  4. When you are done, just click Apply and OK, and your changes will take effect immediately.

Fix the Error “Windows cannot complete the extraction. The destination file could not be created”

June 3rd, 2015 by Admin

Windows has built-in support for zip files. It can create, extract, browse through zip files which is a nice feature but this feature can also give you troubles in some situations.

When you try to open a .zip file you’ve downloaded using Windows Explorer, you might receive the follow error:

“Windows cannot complete the extraction. The destination file could not be created.”

error-open-zip

By default, Windows will extract the files into the temp folder when you double-click on a .zip file to open it for viewing. This error means there is a problem with the permissions of the temp folder.

Here is a workaround:

  1. Move the .zip file into one of your user profile sub-folders, like Downloads, Documents, Pictures, etc.
  2. Right-click on the .zip file and select “Extract All”. This allows you to decompress all of the files into a folder of your choice.

Actually this problem has been faced by lots of Windows users. If you open the zip file with some third-party tools such as 7-zip or WinRAR, every file could be opened without error.

How to Fix “Your connection is not private” in Chrome

May 27th, 2015 by Admin

Whenever you try to login to Yahoo Mail, Facebook or YouTube using Google Chrome, you might get the ERR_CERT_COMMON_NAME_INVALID error:

Your connection is not private
Attackers might be trying to steal your information from site (for example, passwords, messages, or credit cards).

connection-not-private

After searching the web for solutions, most of which where pointing to system time not in sync. If your computer’s date and time is not correct, you’ll face this strange problem.

If you confirm the date is up to date, then check the anti-virus software installed on your computer which might block the website’s security certificate.

  • If you’re using Avast, you need to turn off HTTPS scanning in Avast: go to Settings > Active Protection > Web Shield > Customize, uncheck the “Enable HTTPS scanning” box.
  • For Bitdefender, open the main Bitdefender interface and go to Settings (upper right corner). From there, click on Privacy Control. Select the Antiphising tab. Switch Scan SSL to OFF.

For some situations, the problem might happen as the root certs were messed up. You have to clear all certs on your computer and rebuilt new once using Microsoft fix it tool.

Hope this helps others!