When you add a password to a PST file, every time you start Outlook, a dialog box will ask you for the password. Without entering the password correctly, you will not be able to see any information in Outlook at all.
It’s a good practice to change your password regularly. In this article we’ll show you how to reset or change Outlook PST password, if you know your current password. If you can’t remember the password, see Recover forgotten PST password for instructions.
How to Reset or Change Outlook PST Password?
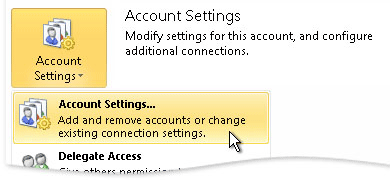
First of all, you need to open the Account Settings dialog in Outlook application. In Outlook 2007, you can access it by clicking on Tools menu and then select the Account Settings option. In Outlook 2013 or 2010, click on the File tab, and then click on Info. On the right hand side of the screen, click on the Account Settings button.
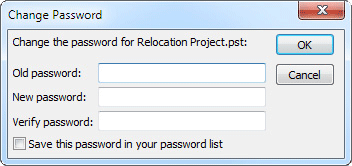
When the Account Settings dialog opens, click on the Data Files tab. It will show you a list of the PST files that are in use by MS Outlook. Make sure that you highlight the PST file that you want to change the password for and then click on Settings.
The Outlook Data File screen opens. Click Change Password. A new window will appear asking you for three pieces of information. If your PST file is not password protected, just leave the old password blank. If you already have a password for your PST file but want to remove it, enter the current password in the “Old password” field and leave the other two fields blank.
Make sure that the checkbox for “Save this password in your password list” is left unchecked. This will ensure that a password will always have to be entered when you start Outlook. Click OK and close out of the remaining open screens. You’ve now successfully reset / changed your Outlook PST password!

 UEFI (Unified Extensible Firmware Interface) is a standard firmware interface for PCs, designed to replace legacy BIOS (basic input/output system). Many new computers are shipping with UEFI firmware instead of standard BIOS. Most of UEFI-based computers come with 64-bit UEFI but there are also some Windows 8 tablets that use 32-bit UEFI, such as Dell Venue 8/11 Pro, Toshiba Encore, Acer Iconia W3/W4, Lenovo MIIX 2, Lenovo ThinkPad Tablet 2 and ASUS Transformer Book T100/T300.