Forgot Windows Server 2012 password for your Hyper-V Generation 2 VM? How to reset Hyper-V password without reinstalling your virtual machine?
Starting with Windows Server 2012, Hyper-V provides the options to create a Generation 1 or Generation 2 VM. The former is the same VM type that we have today, whereas Generation 2 VM uses UEFI firmware instead of BIOS and it is only supported by Windows 8 / 8.1 and Windows Server 2012 / 2012 R2 as the guest OS.
There are many Windows password recovery tools available on the net but most of them don’t support UEFI booting. When booting Generation 2 VM you may get the error “Boot Failed. EFI SCSI Device.” PCUnlocker is the only software that can support UEFI BIOS and works flawlessly with Hyper-V Generation 2 VM. In this tutorial we’ll walk you through the process of using PCUnlocker to reset lost Windows Server 2012 password for Hyper-V Generation 2 virtual machine.
How to Reset Windows Server 2012 Password for Hyper-V Generation 2 Virtual Machine?
PCUnlocker can run from a UEFI bootable CD or USB flash drive. However, Hyper-V Gen2 VM doesn’t provide a way to boot from a USB drive, and the virtual DVD drive only supports ISO image file. So here we’ll use the ISO image of PCUnlocker to boot a Gen2 VM and then perform the password resetting.
- After purchasing the full version of PCUnlocker Enterprise, you’ll receive the download link of PCUnlocker_UEFI_x64.zip, which is about 150 Mb. Unzip the download file and you’ll get an ISO image file called pcunlocker.iso.
- Launch Hyper-V Manager. Right-click on the Windows Server 2012 virtual machine that you want to reset lost password for, then select Settings… from the drop-down menu.

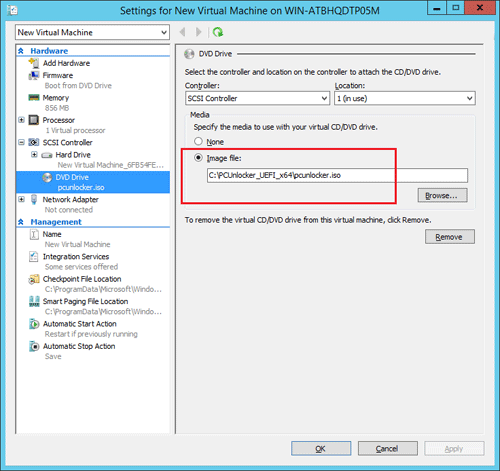
- When the Settings dialog box appears, click on the DVD Drive from the Hardware tab. Specify the DVD drive to use the ISO image file of PCUnlocker.
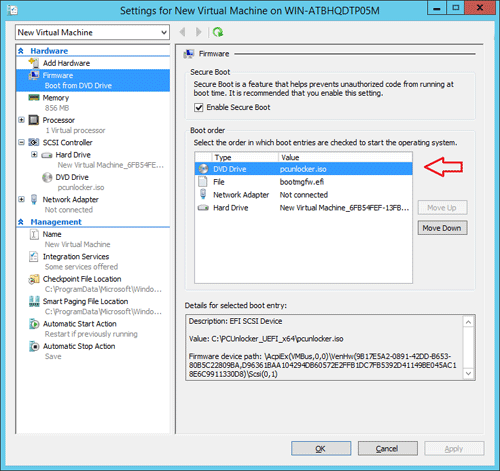
- Switch to the Firmware option under the Hardware tab. Move DVD Drive to the top of startup boot devices. Click on Apply to save your changes.
- Start the virtual machine in Hyper-V Manager. It will load the WinPE operating system from the bootable ISO image. After a while, you’ll see the PCUnlocker program.

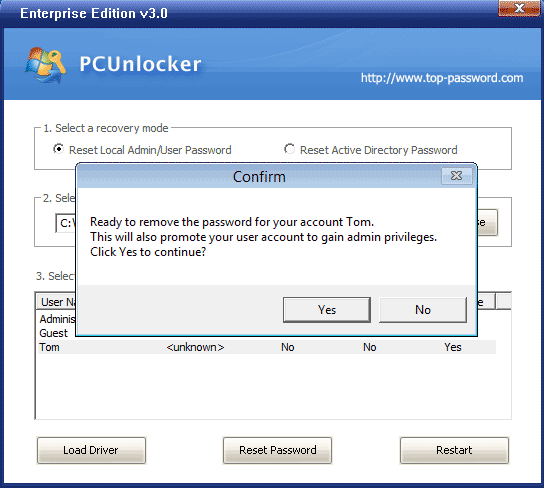
- Simply select your Windows SAM registry hive, the program will display a list of Windows user accounts. Select a user account and click the Reset Password button.
- Now you’ve successfully reset Windows Server 2012 password on Hyper-V Gen2 VM. Click the Restart button to reboot the virtual machine. Unmount the ISO file from the virtual machine’s DVD drive and you can then log back into your virtual machine without a password!
Besides resetting Hyper-V Generation 1 and Generation 2 virtual machine password, PCUnlocker can also be used to reset Windows 8/7/Vista/XP passwords for virtual machines running in VMware Workstation, Parallels, VirtualBox, Microsoft Virtual PC, etc.