Archive for the ‘Tips & Tricks’ category

How to Turn On or Off Fast Startup Missing in Windows 10

September 30th, 2015 by Admin

How to enable / disable fast startup in Windows 10? The “Turn on fast startup (recommended)” option is missing from the Power Options? Fast Startup is a new feature of Windows 10/8, that allows a computer to boot faster than before. This article will explain how the Fast Startup works and walk you through the steps to turn on / off Fast Startup missing in Windows 10.

How Fast Startup Works?

When you shutdown a PC with Fast Startup turned on, Windows saves the current system state and the contents of memory to a file called hiberfil.sys and then it shuts down the computer. Later, when you turn on the computer, rather than performing a full load of the entire system, Windows reads only the contents of the hiberfil.sys and then restores the system state and memory to the exact same condition they were in. This restoration operation can occur much faster than a computer can boot up from a complete shut down.

How to Turn On or Off Fast Startup Missing in Windows 10?

  1. Press the Windows logo key + X on your keyboard and then select Control Panel from the drop-down menu.
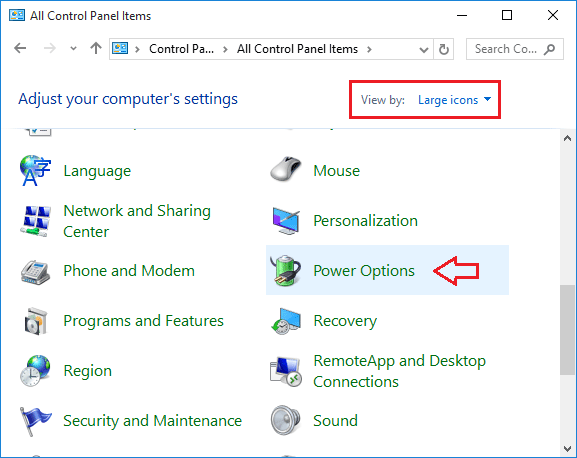
  2. When you go to the control panel it shows up as the “Category” view option by default. Switch it to “Large icons” then click Power Options.

    control-panel

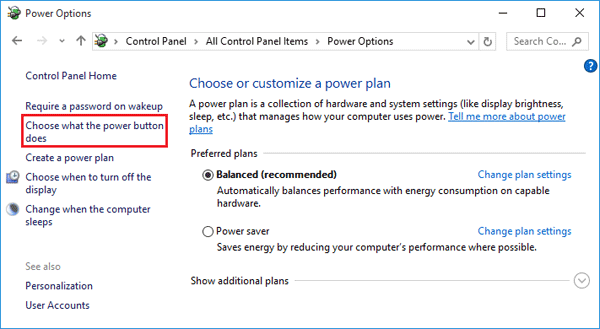
  3. Click on the “Choose what the power button does” link on the left side.

    power-options

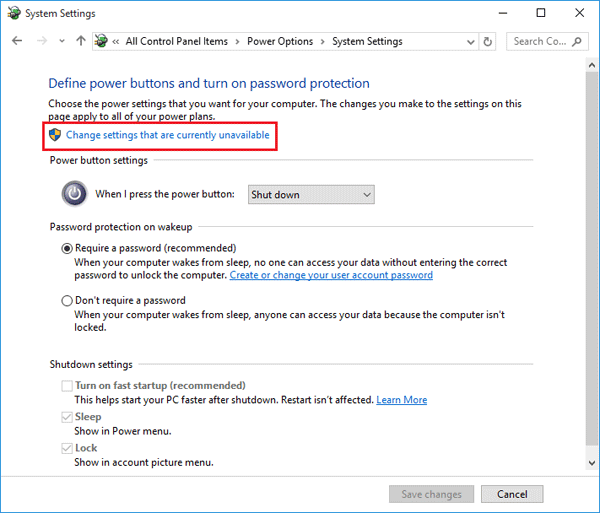
  4. By default, the Shutdown settings options are greyed out. Click on “Change settings that are currently unavailable” to unlock the greyed out options.

    system-settings

  5. Now you can check / uncheck the “Turn on fast startup option” to enable / disable the fast startup feature.

    turn-on-fast-startup

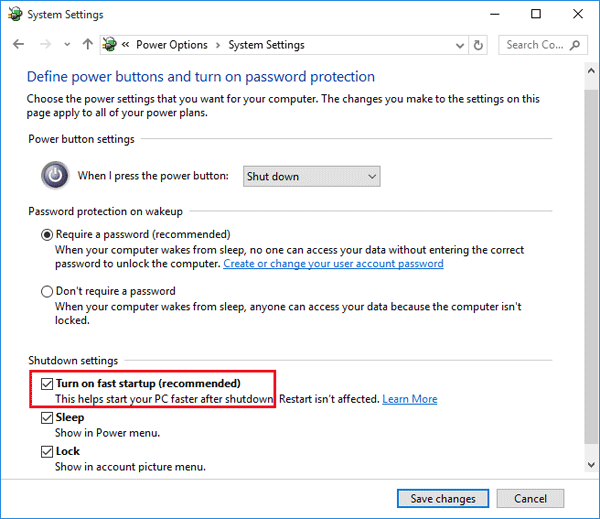
  6. Click Save changes button. Done!

Fast Startup Missing from the Power Options window?

If the “Turn on fast startup (recommended)” option is missing in the Shutdown Settings, then you have to enable Hibernation on your computer as a big part of Fast Boot builds upon the Hibernate feature. Here’s how:

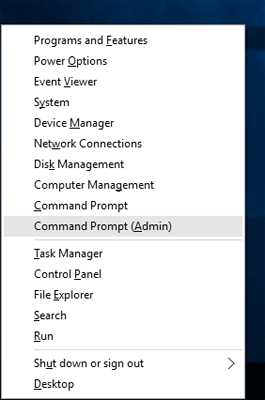
  1. Press the Windows logo key + X on your keyboard and then select “Command Prompt (Admin)“.
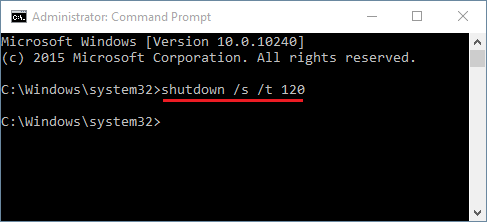
  2. At the command box type the following command and press Enter to enable hibernation:
    powercfg /hibernate on

    enable-hibernate

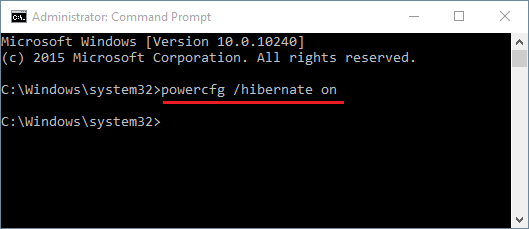
  3. Close the Command Prompt window and then re-open the Control Panel. Fast Startup should be there now.

Auto Shutdown Windows 10 / 8 As You Expect

September 25th, 2015 by Admin

Sometimes you might want to schedule Windows to shutdown automatically after a specified amount of time. For example, let’s say you’re downloading a big file at night. You know it will take about one hour for it to be complete, but it’s too late and you must sleep now. You don’t want to leave your laptop running overnight.

Here I’ll show you 2 methods to set up auto shutdown in Windows 10 and 8, and instruct your computer to automatically shutdown after a given amount of time, or at a specified time.

Method 1: Auto Shutdown Windows 10/8 After a Certain Amount of Time

  1. Press the Windows key + X opens the Quick Access Menu. Click on Command Prompt (Admin).

    win+x-menu

  2. Using the shutdown command you can set your computer to automatically shutdown after the amount of time you specified. For example, if you want to shutdown computer exactly after 120 seconds, type the command as follow:
    shutdown /s /t 120

    auto-shutdown

  3. Once you execute the command above, the system will force close all running applications and shutdown after 2 minutes.

Method 2: Auto Shutdown Windows 10/8 At a Specified Time

But sometimes you might want to schedule your Windows computer to shutdown at a specified time. For example, if you have a habit of listening music on your laptop before bed, you might have the tendency to fall asleep but forgot to turn off your computer. To avoid this, you can configure your PC to shutdown automatically at midnight. Here’s how:

  1. You’ll need to open up Task Scheduler to create a schedule task. Press the Windows key + R and type taskschd.msc in the Run box.
  2. The Task Scheduler window will come up. Select Create Basic Task from the Actions panel on the right.

    task-scheduler

  3. Enter a meaningful name and description of the task you are going to create, and then click on Next.

    create-basic-task

  4. Select the radio button “Daily” and click on Next to continue.

    task-trigger

  5. Now enter the starting date and time. Also, make sure that you are choosing for the task to reoccur every day.

    when-to-start-task

  6. Select the radio button “Start a program” and click on Next.

    task-action

  7. Click on Browse button to locate shutdown.exe under the system folder c:\windows\system32. Enter /s as the application argument which forces your Windows computer to shut down.

    shutdown-task

  8. Go through the summary, and if everything is fine, click on Finish.

    finish-task-creating

    Now you have successfully configured the automatic shutdown at night.

How to Reset or Remove Windows 10 PIN If You Forgot It

September 21st, 2015 by Admin

Have you set up a PIN login on your computer but forgot the PIN code? PIN is a convenient way for tablet users to log into Windows 10 without typing complicated password. This is really helpful especially if your tablet is not connected to a keyboard. If you’ve forgotten Windows 10 PIN, you can reset / remove it easily so long as you can log on with an alternative sign-in option – local account or Microsoft account.

Note: If you’re completely locked out of your Windows 10 PC and can’t login with any sign-in option, try to use PCUnlocker to reset your forgotten passwords of local / Microsoft account.

How to Reset or Remove Forgotten PIN in Windows 10?

  1. Click on the Windows icon in the left-hand corner of your screen, you’ll open up the Start menu. Next click on Settings.
  2. When the Settings app opens, click on Accounts.

    pc-settings

  3. Click on Sign-in options on the left pane. Under the PIN section, click on the “I forgot my PIN” link.

    forgot-my-pin

  4. The password reset procedures differ between Microsoft account and local account.

    For Local Account:

    1. If you’re using a local account, Windows will prompt you to verify your local account password. Enter your password and click OK.

      verify-local-account-password

    2. You’re now prompted to set up PIN again. Enter 4 digit number for your new PIN login and click OK. If you want to remove and disable the PIN, click Cancel.

      set-up-pin

    For Microsoft Account:

    1. If you PIN is for a Microsoft account, you’ll see this confirmation dialog. Click Continue to confirm that you really forgot your PIN.

      forgot-your-pin

    2. Microsoft will send you a security code to validate that you are the owner of the Microsoft account. Enter the recovery email address for verification and click on Next.

      verify-email-address

    3. Check your email account and look for a message from Microsoft account team. Copy the security code from the mail and paste it in the Code text box. Click on Next.

      enter-security-code

    4. Now you can either set up a new PIN or click Cancel to disable/remove the PIN login completely.

      set-up-pin

Reset Forgotten Windows 8 Password on Lenovo Yoga Tablet 2

August 30th, 2015 by Admin

Lenovo Yoga Tablet 2 was loaded with a 32-bit version of Windows 8.1, and if you’ve forgotten the login password, you can reset it with PCUnlocker. But this tablet can boot in native UEFI mode only, so you need to use 32-bit version of PCUnlocker Enterprise which supports UEFI boot. Let’s see how to create a UEFI bootable USB drive with PCUnlocker and then reset lost Windows 8 password on Lenovo Yoga Tablet 2.

Part 1: Create A PCUnlocker Live USB

As this tablet doesn’t come with a CD drive, you have to use a USB thumb drive (with at least 1GB of space) instead. Follow the steps below to create a PCUnlocker Live USB from another computer:

  1. Download the 32-bit version of PCUnlocker Enterprise and save it to your desktop. Unzip it and you’ll get a CD image: pcunlocker.iso.
  2. Download and install the free USB creator software – ISO2Disc, which allows you to make a bootable USB drive from a ISO image.
  3. Launch the ISO2Disc program. Click on Browse button and locate the pcunlocker.iso file. Next click on “Burn to USB Flash Drive” and select your attached USB thumb drive.
  4. Select “GPT (required for UEFI boot)” from the Partition Style list. Click on Start Burn to begin creating a PCUnlocker Live USB drive.

Part 2: Reset Lenovo Yoga Tablet 2 Password

As the tablet doesn’t have a full-size USB port, you have to use a micro USB on-the-go (USB OTG) adapter to connect your USB thumb drive to the micro USB port on the Lenovo Yoga Tablet 2. Once connected, you can proceed to reset your forgotten Windows 8 password:

  1. When your tablet is turned off, press and hold the volume rocker up button, and press and hold the Power button at the same time.

    lenovo-yoga-tablet

  2. This will turn on the tablet and take you to the Novo Menu. Now you can release both the volume rocker and the Power button.

    yoga-tablet-boot-menu

  3. Select the Boot Menu and hit Enter. From the next screen, choose the USB thumb drive as the boot media.
  4. Once booted to the PCUnlocker program, you’ll see a list of Windows accounts displayed on your screen. Choose a user account and click on “Reset Password” button, it will unlock & reset your forgotten Windows 8 password offline.

  5. Disconnect your USB drive and reboot the tablet. You can now login to Windows without typing a password!

Hide the Search and Task View Buttons from Windows 10 Taskbar

August 23rd, 2015 by Admin

In older preview builds of Windows 10, the Search and Task View buttons in the taskbar couldn’t be removed natively and the only way to get rid of it is using this registry trick. Luckily the official release of Windows 10 comes an option to hide the buttons. Here’s how:

Part 1: Hide the Search button from Windows 10 Taskbar

  1. Right-click on the Windows 10 Taskbar.
  2. Tap or hover to Search.
  3. You’ll see the following options:
    • Hidden – Remove Search button display on the Taskbar completely
    • Show search icon – Show a Search icon on the Taskbar that when clicked will bring up the Search bar.
    • Show search box – Display the large search box on the Taskbar which you can type directly into.

    hide-search-button

  4. Click Hidden. The Search button will disappear from the taskbar immediately

Part 2: Hide the Task View button from Windows 10 Taskbar

Right-click on the taskbar and in the context menu, uncheck the “Show Task View Button” option. The Task View button will disappear immediately.

hide-task-view-button

For tablet users though, the Task View button is pretty important. In the absence of a physical keyboard, that button is the easiest way to switch between apps. Hiding it is likely to result in a downgraded experience so tablet users are better off keeping it visible.

Password Protect A Folder in Windows 10

August 14th, 2015 by Admin

We all have sensitive files we’d like to keep secret from the world. Just like the older versions, Windows 10 also doesn’t come with a native utility specifically designed for password protecting folders. Thankfully, there is a handy folder lock program – Protect My Folders, which can hide and password protect any folders/files with ease. Here’s how to use it to password protect a folder in Windows 10.

How to Password Protect A Folder in Windows 10?

  1. Download and install Protect My Folders. The first time you launch the program, it will prompt you to set a master password. This is the only password that will be used in this tool to protect your folders, so don’t ever forget it or you will be unable to access protected folders.

    set-new-password

  2. After you enter the password and click OK, the main interface will open where you can lock or unlock folders or change the lock settings.

    protect-my-folders

  3. Open the folder which you want to lock. This folder could have files, subfolders, videos, presentations, or any sorts of data you want to protect.

    test-folder

  4. To lock the folder you wish to password protect, just drag and drop it from Windows Explorer to the Protect My Folders program. Or click on “Add/Lock” button to select your desired folder. Repeat the same process to add more folders and lock them as well.

    password-protect-folder

  5. The protected folder will be vanished immediately! If you try to access the protected folder from Windows Explorer or Command Prompt, you’ll get the error message “Access denied” or “Windows can’t find the folder“. Your protected folders will remain lock even if you’ve closed the Protect My Folders program.

    folder-access-denied

  6. To unlock a folder, launch the program and enter the master password. Just select the folder you want to unlock, and then click Unlock. Your protected folder will be back and you can open it in Windows Explorer.
  7. If you just need to lock your folder but keep it visible, click on Settings from within the Protect My Folders program. When the Settings dialog appears, uncheck the Hide option.

    lock-options

    From there you can also change the master password or uninstall the program. After it is uninstalled, all your locked folders are automatically unlocked, thus eliminating the risk of losing your data.

Fix Boot Failure: a proper digital signature was not found

August 10th, 2015 by Admin

I have a Toshiba P850/02c with windows 8. This morning it did an automatic Windows configure update but then on restarting, I got the error message “Boot Failure: a proper digital signature was not found. One of the files on the select boot device was rejected by the Secure Boot feature.” and stuck on there. Now I am unable to boot to the desktop. How can I fix the issues?

boot-failure

This is probably due to the “Secure Boot” feature currently on all new Windows 8/8.1/10 computers. Secure Boot is a new feature that improves the security of Windows. To fix this boot failure, you have to disable the Secure Boot option in the UEFI firmware.

How to Disable Secure Boot?

To disable the Secure Boot option, you have to access to the UEFI setup.

In UEFI setup, try to find a menu labeled “Security” or “Security Settings.” Once you navigate to it, head straight down to “Secure Boot”. There’s a possibility that you might have a “Secure Boot” option immediately when you arrive at the security menu, so look out for that also. Once you see a “Secure Boot” option, disable it. Then reboot the PC to check if that fix the issue.

How to Create A Windows To Go USB Drive in Windows 8 Enterprise

August 3rd, 2015 by Admin

Windows to Go is a exclusive feature available in Windows 8 Enterprise only, which lets users create a portable version of the OS that can be used directly from a USB drive. Here’s how to create a Windows To Go USB drive in Windows 8 Enterprise, without using any third-party software.

How to Create A Windows To Go USB Drive in Windows 8 Enterprise?

  1. First of all we need to open the Windows To Go Creator. Press the Windows key + W, type “Windows To Go” and then press Enter. The Windows To Go Creator Wizard opens.
  2. Select your USB drive. Although it’s recommend to use USB 3.0 external storage device, USB 2.0 should also work.

    windows-to-go-1

  3. Select Windows 8 image (.wim) file from Windows 8 installation DVD. If you’re using a Windows 8 installation ISO file, you can extract the install.wim file from it with the freeware 7-zip.

    windows-to-go-2

  4. Set up BitLocker password. By using Bitlocker, the USB drive and all data on it will be encrypted. This option is not mandatory, and you can skip it by clicking the Skip button.

    windows-to-go-3

  5. Begin to create Windows To Go USB drive. This step displays the summary of settings and prepares your storage media for Windows To Go workspace. Clicking on Create at the bottom will start the process.

    windows-to-go-4

  6. After this step, it begins to install Windows 8 on your USB drive. The whole process should take about 30 minutes, depending on the hardware from which you are running this.

    Windows-to-go-5

  7. Once a Windows To Go USB drive has been made you can choose whether to set up the host PC to boot from USB devices, or leave it as it is. You can close this wizard by selecting No, then choosing Save and Close.

    windows-to-go-boot-option

  8. Now your USB drive is ready for use.

Windows To Go Creator is only available in Enterprise edition of Windows 8. But with the freeware ISO2Disc you can create Windows To Go USB drive in any edition of Windows, so long as you have a Windows 8 ISO image.