Archive for the ‘Tips & Tricks’ category

Rate My Computer with Built-in Performance Testing Tool in Windows 8 or 7

June 28th, 2015 by Admin

Running benchmarks on a computer enables users to evaluate performance, to identify potential bottlenecks, and to choose effective system upgrades. Like Windows Vista, Windows 8 and 7 also come with a performance assessment tool, which rates your system and then gives you tips on improving it.

The following tutorial will walk you through the procedure to rate your computer with the built-in Performance Information Tools in Windows 8 or 7.

How to Rate Computer Performance in Windows 8 or 7?

  1. First of all, open up the Control Panel. In Windows 8, you can simply press the Windows key + X to bring up the Power User menu and then select “Control Panel”.
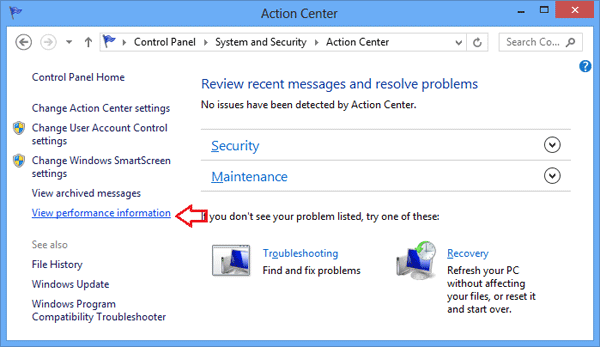
  2. Under System and Security, click Review your computer’s status.

    control-panel

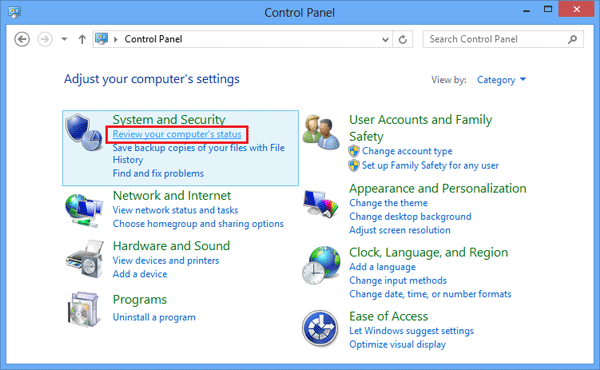
  3. In the left pane, click on View Performance Information.

    action-center

  4. When the Performance Information and Tools window appears, click on Rate This Computer to run the benchmark.

    performance-tool

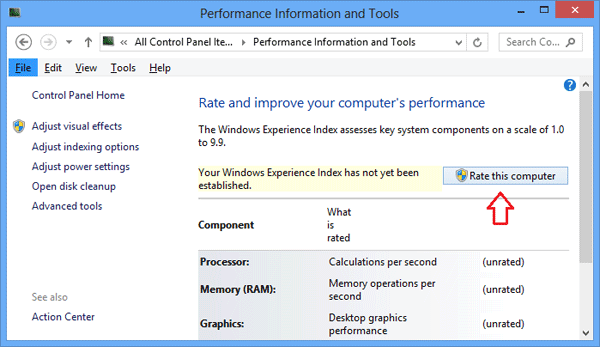
    If you have ever run an assessment for this computer before, click the Re-run the Assessment link to recalculate your performance rating.

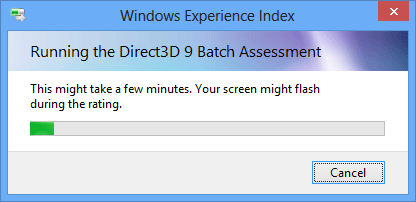
  5. The assessment may take a few minutes to complete depending on your system’s hardware and software configuration.

    rating-this-computer

  6. After the test is complete, Windows will give scores for your computer’s processor, memory, graphics, gaming graphics, and hard disk.

    performace-score

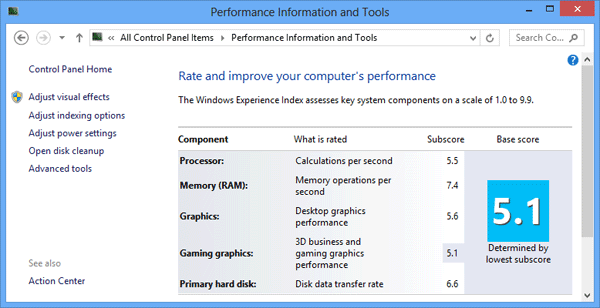
    Though it’s not known as an especially accurate measure of PC performance, particularly when comparing scores with other systems, it can be a useful tool to identify a hardware deficiency.

How to Enable or Disable Windows 10 Upgrade Notification

June 25th, 2015 by Admin

The final version of Windows 10 will release to public on July 29, 2015, and all Windows 7 and Windows 8 users can upgrade to Windows 10 for free in the first year of launch. To make the upgrade process easier, Microsoft has released a new update KB3035583 that will install a Windows 10 upgrade notification tool called “Get Windows 10”.

windows-10-upgrade-notification

If you click on the small Windows icon at the right end of the system tray, it will launch the “Get Windows 10” app and you will be able to reserve your free copy of Windows 10. However, for some reason this icon isn’t appearing on all systems, or you might want to remove the annoying upgrade notification. In this tutorial we’ll explain how to enable or disable the Windows 10 upgrade notification.

Part 1: Enable the Windows 10 Upgrade Notification

If the “Get Windows 10″ upgrade app icon is missing in taskbar, how can you get it to appear in Windows 7 or 8? The “Get Windows 10” app is delivered through an optional update and you need to have patch KB3035583 installed.

The first thing to try is make sure Windows Update is set to automatically install all updates on your PC and that your system is fully up to date. That alone might be enough to get the Windows 10 upgrade notification icon to appear.

Part 2: Remove the Windows 10 Upgrade Notification

But there are also many people who want to stick to Windows 7 or Windows 8.1, the “Get Windows 10” app and its icon present in taskbar notification area might become annoying. To remove the upgrade notification completely, you have to uninstall the update KB3035583:

  1. Open the Command Prompt with Administrator privileges. In Windows 7, right-click on the Command Prompt icon and select Run as administrator. In Windows 8, simply press the Windows + X key to bring up the Power User menu and then select “Command Prompt(Admin)”.
  2. Type the following command in the Command Prompt and hit Enter.
    WUSA /UNINSTALL /KB:3035583
  3. Follow the on-screen prompts, and when complete type exit to close Command Prompt. Restart your computer and the Windows 10 upgrade notification will go away permanently.

If you want to avoid Windows installing this update again, you will need to block the patch by opening Control Panel –> Windows Updates and checking for updates, then right-click the update KB3035583 and choose to hide it.

How to Reset Lost Windows Password on Mac OS X

June 11th, 2015 by Admin

I have a MacBook Air with Windows 7 in Bootcamp and need to recover the password. I normally use Offline NT Password & Registry Editor, but I couldn’t get it to boot from either CD or USB drive. How can I bypass the password?

Mac OS X normally uses EFI firmware that will stop you from using traditional bootable utilities to reset your Windows password. To boot a Mac from a CD or USB drive, you have to use a EFI-compatible password cracking tool such as PCUnlocker Enterprise. Here’s a walkthrough of using the PCUnlocker Live CD to reset lost Windows password on Mac OS X.

Part 1: Create A PCUnlocker Live CD from Mac OS X

Here are steps to create a PCUnlocker Live CD from within the OS X. If you’re also unable to access the OS X, you can create the disc from another Mac or Windows computer.

  1. Download the PCUnlocker Enterprise and save it to your desktop. Extract (by double-clicking) the downloaded .zip file to get a CD image named pcunlocker.iso.
  2. Open Finder and navigate to Applications -> Utilities and double-click Disk Utility.

  3. Once the Disk Utility is launched, click the Burn button at the top of Disk Utility in the toolbar.

  4. Choose the pcunlocker.iso file from the pop up window. Click on Burn and confirm your operation. The disc will be ready soon.

Part 2: Reset Lost Windows Password

  1. Power on your Mac and immediately press and hold the Option key on the keyboard. Keeping holding it, and about 10 seconds later, your Mac will prompt you to select the boot options: Windows, Macintosh HD and CD/DVD drive.
  2. Use the arrow key to select the DVD drive and press Enter. After WinPE loads, you’ll see the PCUnlocker program. It automatically searches the Windows SAM database on your Boot Camp partition, and lists all your Windows accounts.

  3. Select one of your accounts and click on “Reset Password” button. It will unlock / reset your forgotten Windows user password immediately. Eject the CD and restart your Mac. You can then log back in to your Windows without a password!

2 Options to Reset Forgotten SQL Server 2012 Password

June 10th, 2015 by Admin

Forgot the SA password for your SQL Server 2012 instance? If you have tried to access the database too many times with wrong passwords, the SA account may be locked out. In this tutorial we’ll show you two options to take control of your SQL Server 2012 by either adding a sysadmin account or resetting the SA password.

Option 1: Reset SQL Server 2012 Password in Single-user Mode

  1. Launch the SQL Server Configuration Manager utility. Look for your SQL Server 2012 instance and stop the service.

    stop-sql-server

  2. Open a Command Prompt with admin privileges, run the following command to start SQL Server 2012 in single-user mode:
    net start MSSQL$SQLEXPRESS /m"SQLCMD"

    Be sure to change MSSQL$SQLEXPRESS to the service name of your SQL Server instance. Each instance has its own SQL Server service. The service name could be found within the Windows Services panel (services.msc).

    sql-server-service

  3. Use the sqlcmd command to connect to your SQL Server 2012 database locally. If your SQL Server is installed on a remote computer, make sure you substitute the . (dot) with the host name of that server.
    sqlcmd -E -S .
  4. Type the following SQL statement to create a new account and granting it any server-level permission.
    CREATE LOGIN tom WITH PASSWORD = 'P@ssw0rd'
    GO
    ALTER SERVER ROLE sysadmin ADD MEMBER tom
    GO

    add-sql-user

  5. Type exit to quit sqlcmd. Restart your SQL Server 2012 service to get out of the single-user mode. You can then connect to the database using the new login you just created.

Option 2: Offline Reset SQL Server 2012 Password

SQL Server creates the user’s password hash, which is stored in the master database (sysxlogins). With SQL Server Password Changer you can unlock / reset SQL Server 2012 passwords for the SA and other user accounts. Here’s how:

  1. First of all, you need to stop your SQL Server 2012 instance from within the SQL Server Configuration Manager utility.
  2. Download and install the SQL Server Password Changer program.
  3. Start the SQL Server Password Changer program. Click on Open File button to browse for the master.mdf file. Usually the master.mdf file is located at C:\Program Files\Microsoft SQL Server\MSSQL11.SQLEXPRESS\MSSQL\DATA.

    open-master-mdf

  4. Once you have clicked on the Open button, the program will display a list of user accounts for your SQL Server instance. Select the SA account and click on Change Password button.

    sql-server-2012-password

  5. In the pop-up window, type a new password and click OK. The new password can be as short or simple as you want, no need to meet the password complexity requirements.
  6. After resetting the SA password, start your SQL Server instance and you can then login to the SA account successfully.

Fix the Error “Windows cannot complete the extraction. The destination file could not be created”

June 3rd, 2015 by Admin

Windows has built-in support for zip files. It can create, extract, browse through zip files which is a nice feature but this feature can also give you troubles in some situations.

When you try to open a .zip file you’ve downloaded using Windows Explorer, you might receive the follow error:

“Windows cannot complete the extraction. The destination file could not be created.”

error-open-zip

By default, Windows will extract the files into the temp folder when you double-click on a .zip file to open it for viewing. This error means there is a problem with the permissions of the temp folder.

Here is a workaround:

  1. Move the .zip file into one of your user profile sub-folders, like Downloads, Documents, Pictures, etc.
  2. Right-click on the .zip file and select “Extract All”. This allows you to decompress all of the files into a folder of your choice.

Actually this problem has been faced by lots of Windows users. If you open the zip file with some third-party tools such as 7-zip or WinRAR, every file could be opened without error.

How to Fix “Your connection is not private” in Chrome

May 27th, 2015 by Admin

Whenever you try to login to Yahoo Mail, Facebook or YouTube using Google Chrome, you might get the ERR_CERT_COMMON_NAME_INVALID error:

Your connection is not private
Attackers might be trying to steal your information from site (for example, passwords, messages, or credit cards).

connection-not-private

After searching the web for solutions, most of which where pointing to system time not in sync. If your computer’s date and time is not correct, you’ll face this strange problem.

If you confirm the date is up to date, then check the anti-virus software installed on your computer which might block the website’s security certificate.

  • If you’re using Avast, you need to turn off HTTPS scanning in Avast: go to Settings > Active Protection > Web Shield > Customize, uncheck the “Enable HTTPS scanning” box.
  • For Bitdefender, open the main Bitdefender interface and go to Settings (upper right corner). From there, click on Privacy Control. Select the Antiphising tab. Switch Scan SSL to OFF.

For some situations, the problem might happen as the root certs were messed up. You have to clear all certs on your computer and rebuilt new once using Microsoft fix it tool.

Hope this helps others!

How to Enable BitLocker Encryption without TPM Chip

May 17th, 2015 by Admin

BitLocker is a useful hard drive encryption feature in Ultimate and Enterprise versions of Windows 10/8/7/Vista, which allows you to encrypt an entire fixed drive. If you try to enable BitLocker on an old computer without TPM chip, you will receive one of the following error messages:

“A compatible Trusted Platform Module (TPM) Security Device must be present on this computer, but a TPM was not found. Please contact your system administrator to enable BitLocker.”

or

“This device can’t use a Trusted Platform Module. Your administrator must set the “Allow BitLocker without a compatible TPM” option in the “Require additional authentication at startup” policy for OS volumes.”

However, not all computers include TPM and you can’t add a TPM chip to a computer. Luckily there is a group policy that allows you to configure BitLocker to work without a TPM chip. Here’s how:

  1. Press the Windows key + R to bring up the Run box, type gpedit.msc and hit Enter to open the Group Policy Editor.
  2. Go to Local Computer Policy > Computer Configuration > Administrative Templates > Windows Components > BitLocker Drive Encryption > Operating Systems. Double-click on “Require additional authentication at startup“.

  3. In the radio buttons at the top, select Enabled. Check the box marked “Allow BitLocker without a compatible TPM“.

  4. Click OK and close out of Local Group Policy Editor.
  5. Now we will need to force the policy to take effect on your PC, to do this press the Windows + R key combination. When the Run box opens, type gpupdate /force and hit Enter.

Now you can use BitLocker to encrypt your system drive without having a TPM chip in your computer.

Parallels Desktop: Reset Lost Windows VM Password

May 16th, 2015 by Admin

If we forget the Admin password for a Windows virtual machine running on Parallels Desktop, is there an easy way to reset it? With PCUnlocker you can reset lost Windows password and regain access to your Parallels VM. This is considerably faster than destroying and rebuilding your VM.

This tutorial will take you step by step through resetting a Windows login password inside a Parallels Desktop virtual machine running on your Mac.

How to Reset Windows VM Password on Parallels Desktop?

  1. Click here to download and save the PCUnlocker self-extracting Zip file on to your Mac. Once the download is complete, double-click on the .zip file and Archive Utility should appear and automatically extract your files. Open the folder you extracted to and you can see a CD image: pcunlocker.iso.

  2. Start Parallels Desktop but do not start your virtual machine. Right-click on your Windows virtual machine and choose Configure.
  3. In the Virtual Machine Configuration dialog, choose the Hardware tab and select CD/DVD 1. Make sure that Connected option is checked. From the “Connected to:” drop-down list, select “Choose an image file” and locate the pcunlocker.iso file you downloaded in step 1.

  4. Go to Hardware tab and click Boot Order. Move CD/DVD to the first place in the Boot order.

  5. Start your Windows virtual machine and it will boot directly to the PCUnlocker program which lists all user accounts on your Windows system.
  6. Select a user whose password you would like to reset and click on “Reset Password” button to clear the user’s password. The program should now alert you that the password was cleared.

  7. You can now power off your virtual machine. Be sure to go back to the Virtual Machine Configuration and change the boot order back to hard disk. Start the VM and you should be able to log into Windows without typing a password!

Besides resetting Parallels Desktop password, you can also use PCUnlocker to bypass the passwords for Windows virtual machines running in Parallels Workstation, VMware Workstation, VirtualBox, Hyper-V, Virtual PC, ESX/ESXi, and other virtualization software.

Extend Windows 10/8/7/Vista Trial Period from 30 to 120 Days

May 14th, 2015 by Admin

During Windows installation, you can skip the product key screen to continue installing the OS for evaluation purpose. By default, you can use it for 30-day trial period. If your trial has run out before you’ve decided whether or not to purchase a license key, you can extend the trial period from 30 days to 120 days.

In this article we’ll show you how to renew the trial period once it has expired with just a simple command. This method works regardless of what edition of Windows you’re running, including Windows 10, 8, 7, Vista and Windows Server 2012, 2008.

How to Extend Windows 10/8/7/Vista Trial Period from 30 to 120 Days?

  1. Open up a Command Prompt in Administrator mode.
  2. Type slmgr.vbs –rearm at the Command Prompt, and press Enter. In Windows 10 or 8.1, use slmgr.vbs /rearm instead.
  3. After a couple of seconds it will show you the message window that the command has completed successfully.
  4. Restart your computer and you can use the trial version for another 90 days for free. If you want to enjoy exact 120 days, run above mentioned command on the last day when your Windows trial period is going to expire.
  5. You can check how many days are left in your trial period, by running slmgr.vbs -dli in the Command Prompt.