When you try to boot an existing virtual machine from a WinPE ISO image, your virtualization software VirtualBox or VMware may give you the following error, even if you’ve enabled the Virtualization Technology (VT) feature in your host PC’s BIOS.
Your PC needs to restart.
Please hold down the power button.
Error Code: 0x0000005D
Parameters:
0x000000000FABBBFF
0x0000000028100800
0x0000000000000000
0x0000000000000000
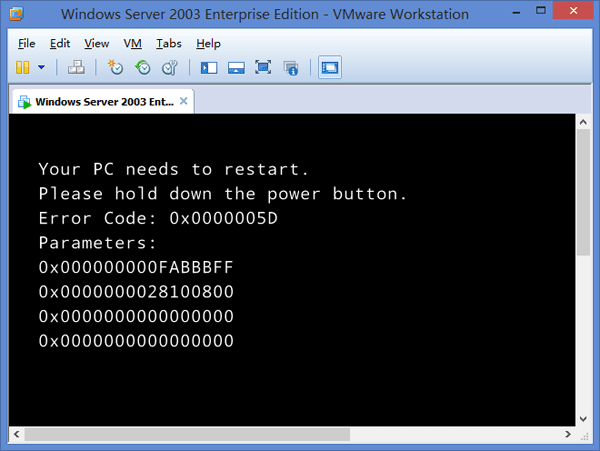
The problem does not lie in the BIOS settings but your VirtualBox or VMware settings. 64-bit WinPE image cannot execute on virtual machine defined with a 32-bit operating system within VMware or VirtualBox. To temporarily work around the issue, change the Guest operating system to a 64-bit version. Remember to change it back when finished using WinPE on the VM.
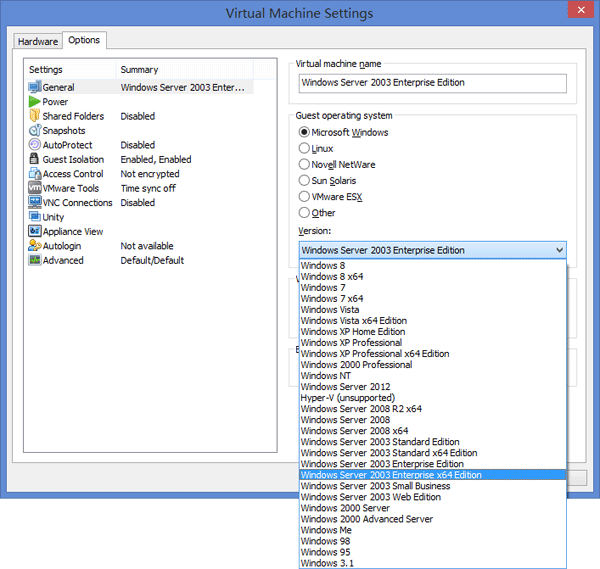
Change Windows Version in VMware Workstation
In VMware Workstation, open the virtual machine settings editor (VM > Settings). Click the Options tab and you can then change the version of Guest operating system to x64 edition. For example, if your Guest OS is Windows Server 2003 Enterprise, try to select the corresponding 64-bit version – Windows Server 2003 Enterprise x64 Edition – from the drop-down list.
Change Windows Version in VirtualBox
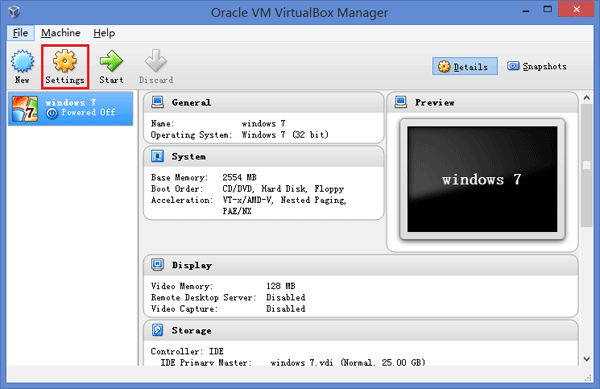
In the Oracle VM VirtualBox Manager, highlight your virtual machine and click on Settings.
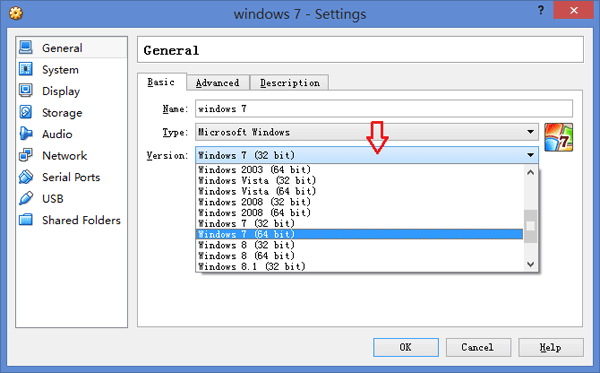
On the General tab, change the Version to 64-bit OS. In my example, I change the version of my virtual machine from Windows 7 (32-bit) to Windows 7 (64-bit).
Conclusion
This problem usually happens when you boot a 32-bit Guest OS from a Windows 8/8.1 or Windows 10 64-bit ISO image. But it’s no problem to boot a 64-bit Guest OS from 32-bit version of Windows PE.